

Upside down eggplant growing might sound like something out of a Dr. Seuss book, but trust me, it’s a real and surprisingly effective way to cultivate these delicious purple beauties! Are you tired of battling pests, dealing with sprawling plants that hog all the garden space, or just looking for a fun and unique gardening project? Then you’ve come to the right place!
For centuries, gardeners have experimented with innovative techniques to maximize yields and overcome challenges. While the exact origins of upside-down gardening are debated, the core principle – utilizing gravity to our advantage – has roots in various cultures. Think of hanging baskets overflowing with flowers; it’s the same concept, just applied to vegetables!
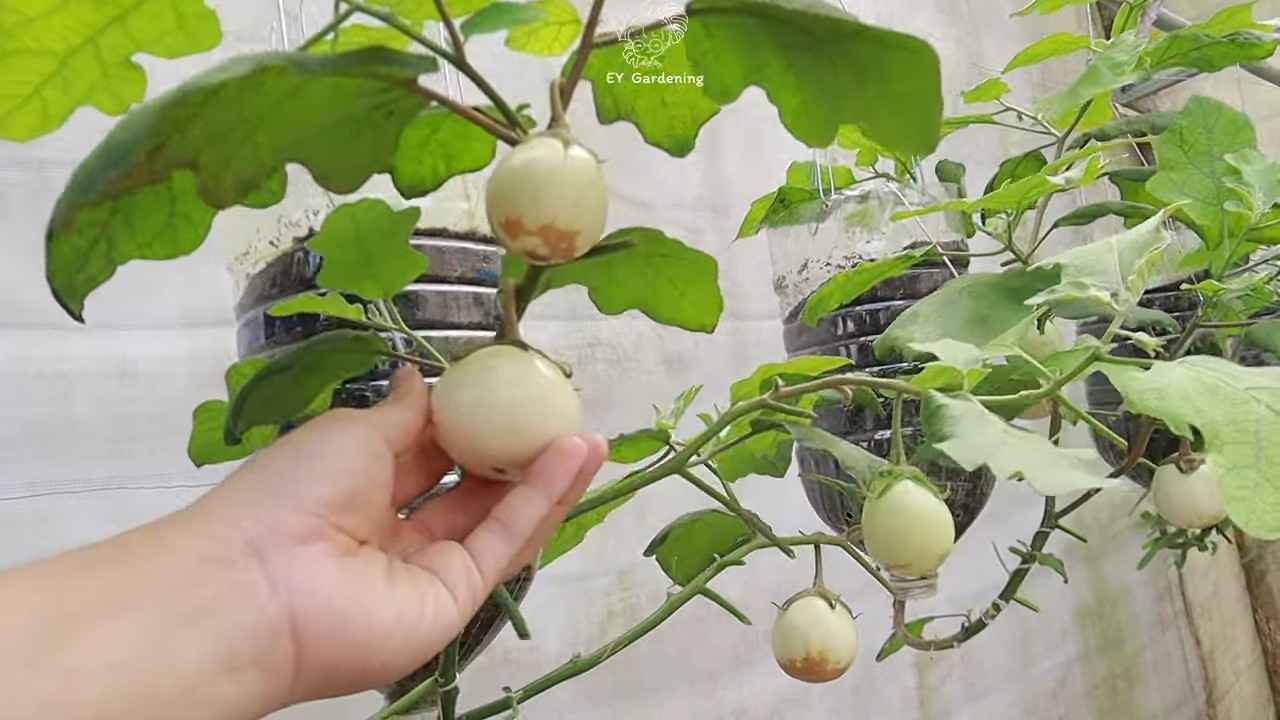
Let’s face it, traditional gardening can be tough. Eggplants, in particular, can be susceptible to soil-borne diseases and pests like flea beetles. By suspending them in the air, we create a barrier, making them less accessible to these common garden invaders. Plus, upside down eggplant growing saves valuable ground space, perfect for those of us with limited garden areas or even just a sunny balcony. I’m excited to share some simple DIY tricks and hacks that will have you harvesting a bountiful crop of eggplants in no time, all while adding a touch of whimsy to your outdoor space!
Kopfstehende Auberginen: So ziehst du deine eigenen “hängenden Gärten”
Hey Gartenfreunde! Habt ihr schon mal darüber nachgedacht, eure Auberginen kopfüber anzubauen? Klingt verrückt, oder? Aber glaubt mir, es ist nicht nur ein Hingucker, sondern kann auch richtig praktisch sein! Ich habe es selbst ausprobiert und bin total begeistert. In diesem Artikel zeige ich euch, wie ihr eure eigenen “hängenden Gärten” mit Auberginen kreiert.
Warum Auberginen kopfüber anbauen?
Bevor wir loslegen, fragt ihr euch vielleicht: Warum sollte ich das überhaupt tun? Hier sind ein paar gute Gründe:
* Platzsparend: Perfekt für kleine Gärten, Balkone oder Terrassen.
* Weniger Schädlinge: Die Auberginen hängen frei und sind weniger anfällig für Bodenschädlinge.
* Bessere Belüftung: Die Pflanzen trocknen schneller ab, was Pilzkrankheiten vorbeugen kann.
* Einfachere Ernte: Die Früchte hängen in bequemer Höhe.
* Ein echter Hingucker: Eure Nachbarn werden staunen!
Was du brauchst: Die Materialliste
Okay, genug der Theorie. Lasst uns loslegen! Hier ist, was ihr für euer Kopfstehendes Auberginen-Projekt benötigt:
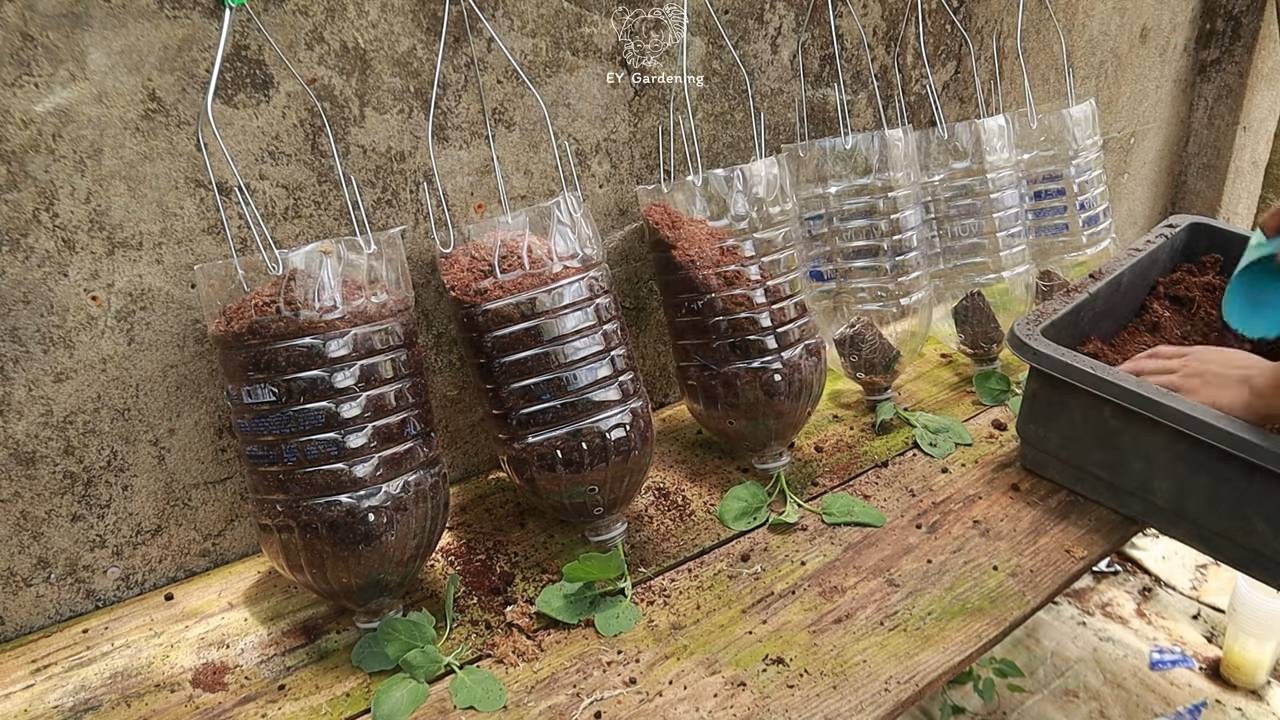
* Einen stabilen Eimer oder Topf: Am besten einen aus Kunststoff mit einem Durchmesser von mindestens 30 cm. Er sollte Löcher am Boden haben.
* Auberginen-Setzlinge: Wählt gesunde, kräftige Pflanzen.
* Hochwertige Blumenerde: Eine gut drainierende Mischung ist wichtig.
* Eine Schere oder ein Messer: Zum Schneiden des Lochs im Eimerboden.
* Eine alte Socke oder Stoffrest: Um den Setzling zu schützen.
* Wasser: Zum Gießen.
* Dünger: Für eine gute Nährstoffversorgung.
* Haken oder Kette: Zum Aufhängen des Eimers.
* Evtl. eine Bohrmaschine: Um Löcher für die Aufhängung zu bohren.
Schritt-für-Schritt-Anleitung: So geht’s!
Jetzt kommt der spannende Teil: Das Pflanzen! Folgt einfach diesen Schritten, und schon bald könnt ihr eure eigenen hängenden Auberginen bewundern.
1. Den Eimer vorbereiten:
* Reinigt den Eimer gründlich.
* Bohrt (falls nötig) Löcher in den oberen Rand des Eimers, um die Aufhängung anzubringen. Achtet darauf, dass die Löcher stabil sind.
* Schneidet ein Loch in den Boden des Eimers. Das Loch sollte groß genug sein, dass der Auberginen-Setzling hindurchpasst, aber nicht zu groß, damit die Erde nicht herausfällt. Ein Durchmesser von etwa 5-7 cm ist ideal.
2. Den Setzling vorbereiten:
* Nehmt den Auberginen-Setzling vorsichtig aus seinem Topf.
* Lockert die Wurzeln etwas auf.
* Wickelt die Wurzeln des Setzlings vorsichtig in die alte Socke oder den Stoffrest. Das schützt die Wurzeln beim Durchziehen durch das Loch.
3. Den Setzling einsetzen:
* Führt die Wurzeln des Setzlings vorsichtig von unten durch das Loch im Eimerboden. Achtet darauf, die Pflanze nicht zu beschädigen.
* Zieht den Setzling so weit durch, dass die Blätter außerhalb des Eimers sind.
* Entfernt die Socke oder den Stoffrest vorsichtig.
4. Den Eimer befüllen:
* Haltet den Setzling vorsichtig fest, während ihr den Eimer mit Blumenerde befüllt.
* Drückt die Erde leicht an, damit der Setzling stabil steht.
* Lasst oben einen kleinen Rand frei.
5. Gießen:
* Gießt die Auberginen-Pflanze gründlich, bis das Wasser aus den Löchern am Boden des Eimers austritt.
6. Aufhängen:
* Befestigt den Haken oder die Kette an den Löchern am oberen Rand des Eimers.
* Sucht einen sonnigen Standort für eure hängende Aubergine. Sie braucht mindestens 6 Stunden Sonne pro Tag.
* Hängt den Eimer auf. Achtet darauf, dass die Aufhängung stabil ist und das Gewicht des Eimers tragen kann.
Pflege deiner Kopfstehenden Auberginen
Die Arbeit ist noch nicht getan! Damit eure Auberginen prächtig gedeihen, müsst ihr sie gut pflegen. Hier sind ein paar Tipps:
* Gießen: Auberginen brauchen regelmäßig Wasser, besonders an heißen Tagen. Überprüft die Erde regelmäßig und gießt, wenn sie sich trocken anfühlt. Achtet darauf, nicht zu viel zu gießen, da Staunässe schädlich sein kann.
* Düngen: Auberginen sind Starkzehrer und brauchen ausreichend Nährstoffe. Düngt sie regelmäßig mit einem Flüssigdünger für Gemüse. Befolgt dabei die Anweisungen auf der Verpackung.
* Schädlinge und Krankheiten: Kontrolliert eure Pflanzen regelmäßig auf Schädlinge und Krankheiten. Bei Bedarf könnt ihr biologische Schädlingsbekämpfungsmittel einsetzen.
* Ausgeizen: Entfernt regelmäßig Seitentriebe, um die Bildung von Früchten zu fördern.
* Stützen: Wenn die Auberginen schwer werden, kann es notwendig sein, die Pflanze zu stützen, damit sie nicht abbricht.
Häufige Probleme und Lösungen
Auch beim kopfüber Anbau von Auberginen können Probleme auftreten. Hier sind ein paar häufige Probleme und wie ihr sie lösen könnt:
* Gelbe Blätter: Können ein Zeichen für Nährstoffmangel, Überwässerung oder Schädlingsbefall sein. Überprüft die Erde, düngt bei Bedarf und kontrolliert die Pflanze auf Schädlinge.
* Blütenfall: Kann durch Stress, zu hohe oder zu niedrige Temperaturen oder mangelnde Bestäubung verursacht werden. Sorgt für optimale Bedingungen und bestäubt die Blüten gegebenenfalls von Hand.
* Kleine Früchte: Können durch Nährstoffmangel, Wassermangel oder zu wenig Sonne verursacht werden. Düngt regelmäßig, gießt ausreichend und stellt sicher, dass die Pflanze genügend Sonne bekommt.
* Schädlinge: Blattläuse, Spinnmilben und andere Schädlinge können Auberginen befallen. Bekämpft sie mit biologischen Schädlingsbekämpfungsmitteln.
Erntezeit!
Nach etwa 60-80 Tagen könnt ihr eure ersten Auberginen ernten. Die Früchte sind reif, wenn sie eine glänzende Farbe haben und sich leicht eindrücken lassen. Schneidet die Auberginen mit einem scharfen Messer ab.
Zusätzliche Tipps und Tricks
Hier sind noch ein paar zusätzliche Tipps, die euch beim kopfüber Anbau von Auberginen helfen können:
* Wählt die richtige Sorte: Nicht alle Auberginen-Sorten eignen sich für den kopfüber Anbau. Wählt Sorten, die kompakt wachsen und nicht zu groß werden.
* Verwendet eine Rankhilfe: Wenn eure Auberginen-Pflanze zu groß wird, könnt ihr eine Rankhilfe verwenden, um sie zu stützen.
* Experimentiert mit verschiedenen Eimern: Ihr könnt verschiedene Eimer oder Töpfe ausprobieren, um herauszufinden, welche am besten für eure Bedürfnisse geeignet sind.
* Habt Geduld: Der kopfüber Anbau von Auberginen kann etwas Übung erfordern. Gebt nicht auf, wenn es beim ersten Mal nicht klappt.
Ich hoffe, diese Anleitung hat euch geholfen, eure eigenen hängenden Auberginen zu ziehen. Es ist ein tolles Projekt, das nicht nur Spaß macht, sondern auch leckere Früchte liefert. Viel Erfolg und happy gardening!
Conclusion
So, there you have it! Growing eggplants upside down isn’t just a quirky gardening trend; it’s a genuinely effective method for boosting your yield, combating pests, and maximizing space, especially if you’re working with a smaller garden or balcony. The benefits are undeniable: improved air circulation, reduced soilborne diseases, and easier harvesting. Plus, let’s be honest, an eggplant plant suspended in mid-air is a conversation starter!
This method isn’t just about aesthetics; it’s about creating a healthier and more productive environment for your eggplants. By keeping the fruit off the ground, you’re minimizing the risk of rot and pest infestations. The improved air circulation helps to prevent fungal diseases, which can be a common problem for eggplant growers. And the best part? You don’t need a ton of fancy equipment to get started. A sturdy bucket, some well-draining potting mix, and a healthy eggplant seedling are all you need to embark on this exciting gardening adventure.
Don’t be afraid to experiment with different varieties of eggplants. While smaller, more compact varieties like ‘Fairy Tale’ or ‘Hansel’ are particularly well-suited for upside-down growing, you can certainly try larger varieties as well. Just be sure to provide adequate support as the plant grows and the fruits develop. Consider using a trellis or additional ties to prevent the plant from becoming too heavy and potentially breaking.
For a fun variation, try companion planting in the top of the bucket. Herbs like basil or thyme not only add a fragrant touch but also help to deter pests. Marigolds are another excellent choice, known for their pest-repelling properties. This adds another layer of protection and maximizes the use of your growing space.
We understand that trying a new gardening technique can be a little daunting, but we promise you, the rewards are well worth the effort. The satisfaction of harvesting your own homegrown eggplants, especially when grown in such an unconventional way, is truly unparalleled.
So, are you ready to give it a try? We wholeheartedly encourage you to embrace the upside-down eggplant growing method and experience the difference for yourself. We’re confident that you’ll be amazed by the results.
And most importantly, we want to hear about your experience! Share your photos, tips, and challenges in the comments below. Let’s create a community of upside-down eggplant enthusiasts and learn from each other. Your insights could be invaluable to other gardeners who are just starting out. Let us know what varieties you tried, what challenges you faced, and what successes you celebrated. Together, we can unlock the full potential of this innovative gardening technique and enjoy a bountiful harvest of delicious, homegrown eggplants. Remember, gardening is all about experimentation and learning, so don’t be afraid to get your hands dirty and have some fun! Your journey to successful upside-down eggplant growing starts now!
Frequently Asked Questions (FAQ)
What type of eggplant is best for upside-down growing?
While you can technically grow any type of eggplant upside down, smaller, more compact varieties tend to perform best. These varieties are less likely to become too heavy and unwieldy, making them easier to manage in a hanging container. Some excellent choices include ‘Fairy Tale,’ ‘Hansel,’ ‘Patio Baby,’ and ‘Little Fingers.’ These varieties produce smaller fruits that are well-suited for container gardening and won’t put as much strain on the plant. However, if you’re feeling adventurous, you can certainly try larger varieties like ‘Black Beauty’ or ‘Ichiban,’ just be sure to provide adequate support as the plant grows.
What kind of container should I use for upside-down eggplant growing?
A five-gallon bucket is a good starting point. The container needs to be sturdy enough to support the weight of the plant, soil, and developing fruits. Plastic buckets are a popular choice because they are lightweight, durable, and readily available. You can also use hanging baskets or even repurposed containers like old tires or laundry baskets, as long as they have adequate drainage. Make sure the container has a hole in the bottom (or top, since it will be upside down) large enough to accommodate the eggplant seedling. The hole should be about 2-3 inches in diameter.
What type of soil should I use?
Use a high-quality potting mix that is well-draining and rich in nutrients. Avoid using garden soil, as it can be too heavy and compact, which can restrict root growth. A good potting mix will provide adequate aeration and drainage, which are essential for healthy eggplant growth. You can also amend the potting mix with compost or other organic matter to further improve its fertility.
How often should I water my upside-down eggplant?
Water your upside-down eggplant regularly, especially during hot, dry weather. The frequency of watering will depend on the weather conditions, the size of the container, and the type of potting mix you’re using. As a general rule, water when the top inch of soil feels dry to the touch. Be careful not to overwater, as this can lead to root rot. Ensure that the container has adequate drainage to prevent water from accumulating at the bottom.
How much sunlight does an upside-down eggplant need?
Eggplants need at least 6-8 hours of direct sunlight per day to thrive. Choose a location that receives plenty of sunlight throughout the day. If you’re growing your eggplant indoors, you may need to supplement with artificial lighting, such as grow lights.
How do I fertilize my upside-down eggplant?
Fertilize your upside-down eggplant regularly with a balanced fertilizer. You can use a liquid fertilizer or a slow-release granular fertilizer. Follow the instructions on the fertilizer package for application rates. Fertilize every 2-3 weeks during the growing season to provide the plant with the nutrients it needs to produce healthy fruits.
How do I protect my upside-down eggplant from pests and diseases?
Monitor your eggplant regularly for pests and diseases. Common pests that can affect eggplants include aphids, flea beetles, and spider mites. You can control these pests with insecticidal soap, neem oil, or other organic pest control methods. Common diseases that can affect eggplants include fungal diseases like early blight and verticillium wilt. Prevent these diseases by providing good air circulation, avoiding overwatering, and using disease-resistant varieties.
How do I harvest my eggplants?
Harvest your eggplants when they are firm, glossy, and have reached their mature size. Use a sharp knife or pruning shears to cut the fruit from the plant. Be careful not to damage the plant when harvesting. The size and color of the eggplant will vary depending on the variety.
Can I grow other vegetables upside down?
Yes, you can grow other vegetables upside down, such as tomatoes, peppers, and herbs. The same principles apply to growing these vegetables upside down as to growing eggplants upside down. Choose varieties that are well-suited for container gardening and provide adequate support as the plants grow.
What if the eggplant falls out of the hole?
This is a common concern, especially when the plant is young. To prevent this, gently wrap the root ball with burlap or cheesecloth before inserting it into the hole. This will help to hold the soil in place and prevent the plant from falling out. As the plant grows, the roots will eventually fill the container and hold the soil in place. You can also use a piece of cardboard or plastic to create a collar around the base of the plant to provide additional support.

Leave a Comment