

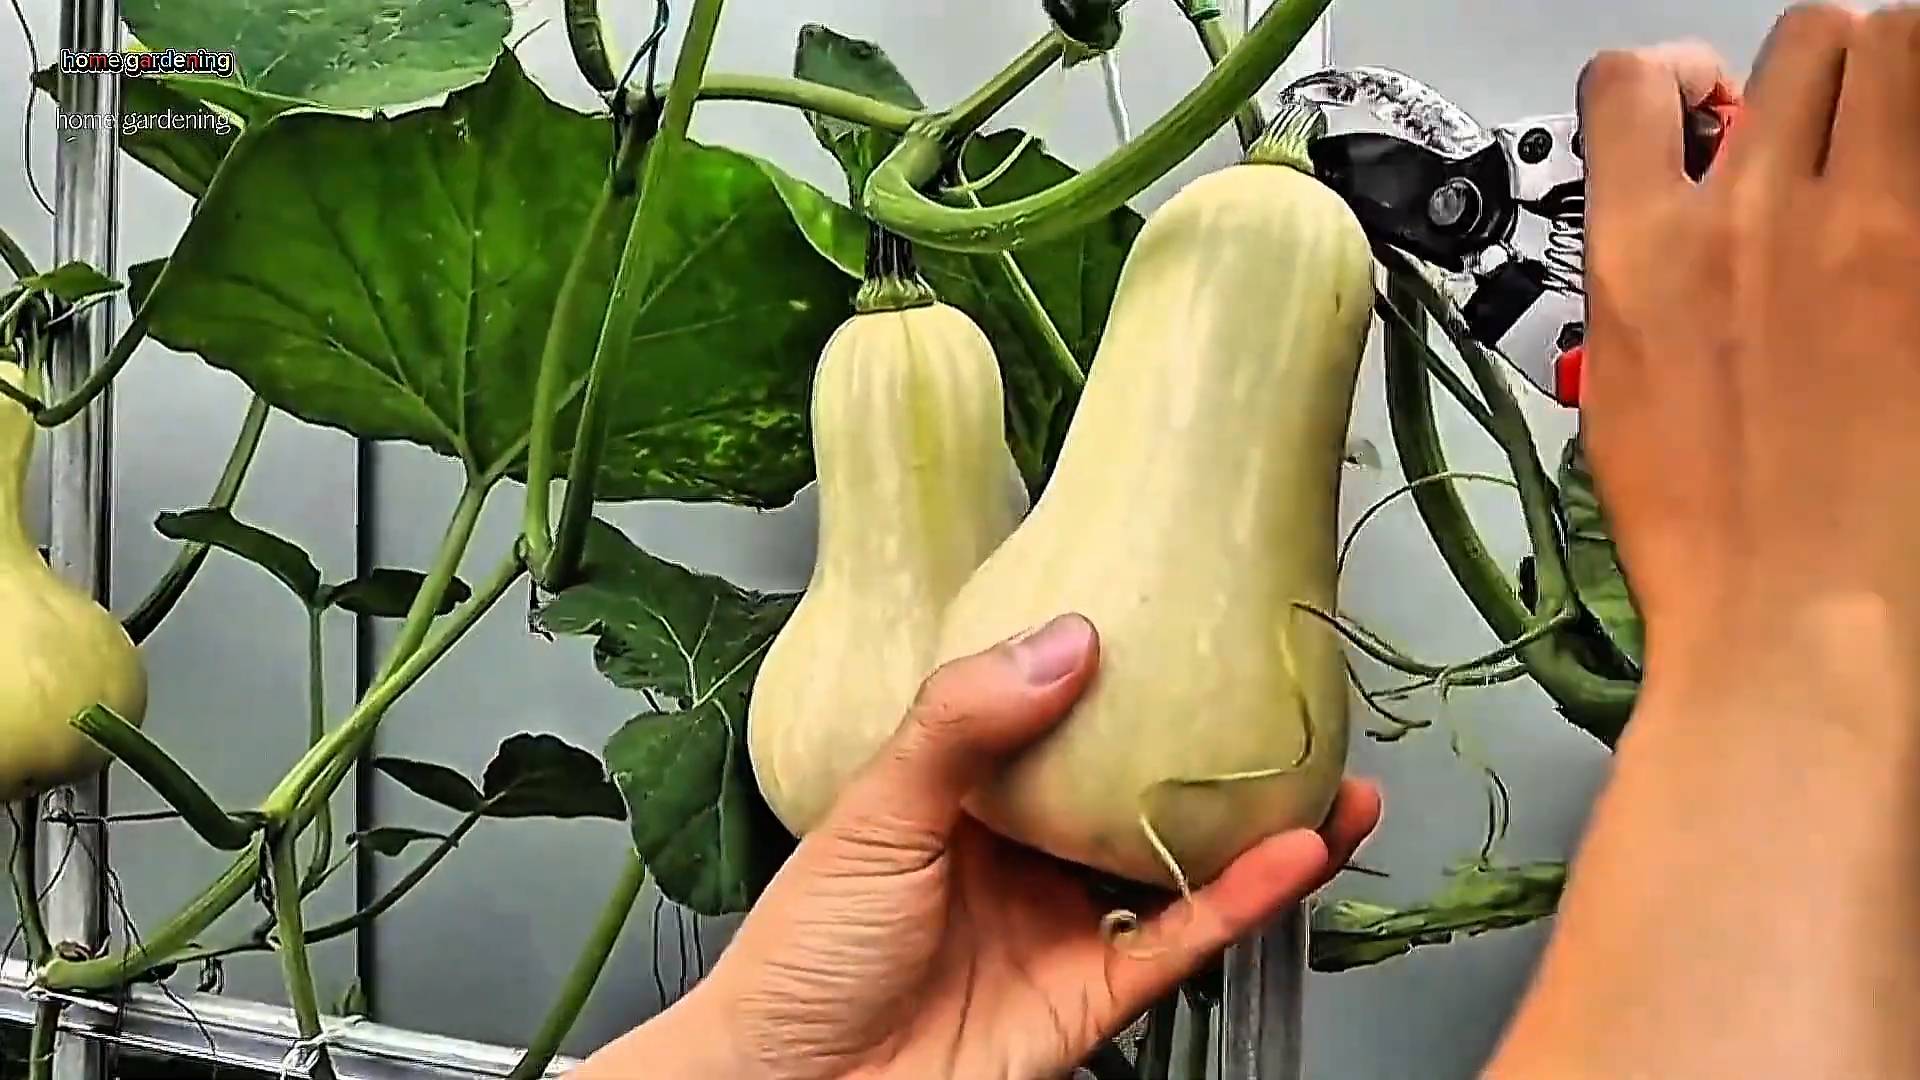
Styrofoam Squash Garden DIY: Ever dream of a bountiful squash harvest but lack the space or ideal soil? I’ve got you covered! Forget back-breaking labor and endless weeding; we’re diving into a clever and surprisingly effective method that will have you harvesting delicious squash in no time. This isn’t your grandma’s garden – unless your grandma is a total gardening genius!
The concept of container gardening, a precursor to our Styrofoam Squash Garden DIY, has been around for centuries. From the Hanging Gardens of Babylon to the rooftop gardens of ancient Rome, people have always found innovative ways to cultivate plants in limited spaces. While we might not be building architectural wonders, we *are* tapping into that same spirit of ingenuity and resourcefulness.
Why is this DIY trick so essential? Well, let’s face it, not everyone has access to a sprawling backyard with perfect soil. Many of us are dealing with small patios, balconies, or less-than-ideal growing conditions. This method allows you to bypass those limitations and create a controlled environment where your squash can thrive. Plus, it’s a fantastic way to recycle those pesky styrofoam containers that seem to accumulate! So, get ready to transform your gardening game with this simple, budget-friendly, and incredibly rewarding project. Let’s get growing!
DIY Styrofoam Squash Garden: From Trash to Treasure!
Hey there, fellow garden enthusiasts! Are you looking for a fun, budget-friendly way to add some autumnal charm to your porch or garden? Well, look no further! Today, I’m going to show you how to transform discarded styrofoam into adorable, realistic-looking squash. This project is perfect for using up those packing peanuts and styrofoam scraps that seem to accumulate endlessly. Plus, it’s a fantastic way to get creative and add a personal touch to your fall decor. Let’s get started!
Materials You’ll Need:
* Styrofoam: Gather various sizes and shapes of styrofoam. Packing peanuts, large blocks, even styrofoam cups can be used! The more variety, the better.
* Craft Knife or Serrated Knife: For shaping the styrofoam. Be careful and always cut away from yourself.
* Acrylic Paints: Orange, yellow, green, brown, and cream are great starting points. Feel free to experiment with different shades to achieve a realistic look.
* Paintbrushes: A variety of sizes will be helpful for base coating, detailing, and dry brushing.
* Hot Glue Gun and Glue Sticks: For attaching stems and other embellishments.
* Twigs or Real Squash Stems: For the squash stems. You can find these in your yard or at a craft store.
* Sandpaper (Optional): For smoothing out rough edges.
* Clear Acrylic Sealer (Optional): To protect your painted squash from the elements if you plan to display them outdoors.
* Newspaper or Drop Cloth: To protect your work surface.
* Pencil or Marker: For sketching guidelines (optional).
* Gloves (Optional): To protect your hands from paint.
Shaping Your Styrofoam
This is where the magic begins! We’re going to take those plain pieces of styrofoam and give them the characteristic shapes of different types of squash.
1. Prepare Your Workspace: Lay down newspaper or a drop cloth to protect your work surface from paint and styrofoam debris.
2. Choose Your Styrofoam: Select a piece of styrofoam that you want to transform into a squash. Consider its size and shape. A rounder piece might be perfect for a pumpkin, while a more elongated piece could become a butternut squash.
3. Sketch Guidelines (Optional): If you’re feeling unsure, use a pencil or marker to lightly sketch the desired shape onto the styrofoam. This will give you a visual guide as you cut.
4. Start Cutting: Using your craft knife or serrated knife, carefully begin to shape the styrofoam. Remember to always cut away from yourself to avoid accidents. Take your time and make small, controlled cuts.
* For Round Squash (Pumpkins, Gourds): Round off the edges of the styrofoam block. You can create indentations to mimic the segments of a pumpkin by making shallow cuts along the sides.
* For Elongated Squash (Butternut, Acorn): Taper the styrofoam block towards one or both ends. You can create the characteristic ridges of an acorn squash by making shallow cuts along the sides.
* For Irregular Shapes (Gourds): Don’t be afraid to get creative! Use the knife to create bumps, curves, and other interesting features.
5. Sand Down Rough Edges (Optional): If you want a smoother finish, use sandpaper to gently sand down any rough edges or uneven surfaces. This step is especially helpful if you’re using styrofoam that has been previously used.
6. Repeat: Continue shaping different pieces of styrofoam until you have a variety of squash shapes.
Painting Your Styrofoam Squash
Now comes the fun part – adding color and bringing your squash to life!
1. Base Coat: Choose a base color for each squash. Orange is a classic choice for pumpkins, while yellow or cream works well for butternut squash. Use a large paintbrush to apply an even coat of paint to the entire surface of the styrofoam. Let the paint dry completely. This might take a couple of hours, depending on the type of paint you’re using.
2. Add Details: Once the base coat is dry, it’s time to add details to make your squash look more realistic.
* For Pumpkins: Use a darker shade of orange or brown to create shadows in the indentations. You can also add highlights with a lighter shade of orange or yellow.
* For Butternut Squash: Use a light brown or tan to add subtle variations in color. You can also add some green around the stem area.
* For Acorn Squash: Use a dark green or brown as the base coat, and then add highlights with a lighter green or yellow.
* For Gourds: Get creative with different colors and patterns! You can use stripes, spots, or swirls to create unique and interesting gourds.
3. Dry Brushing: Dry brushing is a technique that involves using a dry brush with a small amount of paint to create a textured effect. Dip a dry brush into a small amount of paint (a contrasting color works well), and then wipe off most of the paint onto a paper towel. Lightly brush the surface of the squash to add subtle highlights and shadows. This technique is especially effective for creating a weathered or rustic look.
4. Layering Colors: Don’t be afraid to layer different colors to create depth and dimension. Apply thin layers of paint and let them dry between coats. This will help you achieve a more realistic and nuanced look.
5. Let it Dry: Allow the paint to dry completely before moving on to the next step.
Adding Stems and Embellishments
The final touch that will really make your styrofoam squash look authentic is adding stems and other embellishments.
1. Gather Stems: Collect twigs from your yard or purchase real squash stems from a craft store. You can also use dried grape vines or other natural materials.
2. Prepare Stems: If you’re using twigs, break them into smaller pieces that are appropriate for the size of your squash. If you’re using real squash stems, you may need to trim them to fit.
3. Attach Stems: Using a hot glue gun, carefully attach the stems to the top of each squash. Hold the stem in place until the glue has cooled and hardened.
4. Add Embellishments (Optional): If you want to add even more detail, you can embellish your squash with other materials.
* Leaves: Attach artificial leaves around the base of the stem.
* Vines: Wrap thin vines around the squash.
* Raffia: Tie raffia around the stem for a rustic touch.
* Seeds: Glue small seeds (like pumpkin seeds or sunflower seeds) to the surface of the squash.
5. Seal (Optional): If you plan to display your styrofoam squash outdoors, it’s a good idea to seal them with a clear acrylic sealer. This will protect the paint from the elements and help them last longer. Follow the instructions on the sealer can. Usually, you’ll spray a light, even coat over the entire surface of the squash and let it dry completely. You might need to apply several coats for maximum protection.
Displaying Your Styrofoam Squash Garden
Now that you’ve created your beautiful styrofoam squash, it’s time to show them off!
* Porch Display: Arrange your squash on your porch steps, along with pumpkins, gourds, and other fall decorations.
* Table Centerpiece: Create a stunning table centerpiece by arranging your squash in a basket or bowl.
* Garden Decor: Scatter your squash throughout your garden to add a touch of autumnal charm.
* Window Display: Place your squash in your windows to create a festive display.
Tips and Tricks for Success
* Don’t be afraid to experiment! The beauty of this project is that there are no rules. Get creative with colors, shapes, and embellishments.
* Use a variety of styrofoam sizes and shapes. This will add visual interest to your squash garden.
* Take your time. Rushing through the process can lead to mistakes.
* Protect your work surface. Styrofoam can be messy, so be sure to cover your work surface with newspaper or a drop cloth.
* Be careful when using a craft knife. Always cut away from yourself to avoid accidents.
* Have fun! This project is a great way to relax and get creative.
I hope you enjoyed this tutorial! I can’t wait to see what you create. Happy crafting!

Conclusion
So, there you have it! Transforming ordinary styrofoam into a thriving squash garden is not just a fun project; it’s a game-changer for gardeners of all levels. Whether you’re battling limited space, poor soil conditions, or simply seeking a creative and cost-effective gardening solution, this styrofoam squash garden DIY method offers a pathway to bountiful harvests.
Why is this a must-try? Because it addresses several common gardening challenges head-on. The styrofoam provides excellent insulation, protecting your squash roots from extreme temperature fluctuations. Its lightweight nature makes it incredibly portable, allowing you to chase the sun or move your garden indoors during unexpected frosts. And let’s not forget the drainage benefits – the styrofoam structure prevents waterlogging, a common culprit behind root rot and other squash ailments.
But the beauty of this DIY project lies in its adaptability. Feel free to experiment with different squash varieties. Zucchini, yellow squash, butternut squash, and even smaller pumpkin varieties thrive in these styrofoam containers. Consider adding companion plants like marigolds or nasturtiums to deter pests and attract pollinators. You can also customize the size and shape of your styrofoam containers to fit your specific space and aesthetic preferences. Think vertical gardening by stacking styrofoam boxes or creating a tiered garden for a visually stunning display.
Don’t be afraid to get creative with your soil mix. While a standard potting mix works well, you can enrich it with compost, worm castings, or other organic amendments to boost nutrient levels and promote healthy growth. Remember to monitor your plants regularly for signs of pests or diseases and take appropriate action promptly.
This styrofoam squash garden DIY project is more than just a gardening technique; it’s an invitation to connect with nature, unleash your creativity, and enjoy the satisfaction of growing your own food. It’s a sustainable and resourceful way to maximize your gardening potential, regardless of your experience level.
We wholeheartedly encourage you to give this DIY project a try. It’s a rewarding experience that will not only provide you with delicious, homegrown squash but also enhance your gardening skills and inspire you to explore new possibilities. Once you’ve created your own styrofoam squash garden, we’d love to hear about your experience! Share your photos, tips, and challenges in the comments below. Let’s build a community of styrofoam squash gardeners and inspire others to embrace this innovative and sustainable gardening method. Your insights could be invaluable to fellow gardeners embarking on this exciting journey. Happy gardening!
Frequently Asked Questions (FAQ)
What type of styrofoam is best to use for a styrofoam squash garden DIY?
Ideally, you should use recycled styrofoam containers or blocks. Look for clean, food-grade styrofoam if possible. Avoid using styrofoam that has been treated with chemicals or pesticides. If you’re purchasing new styrofoam, opt for expanded polystyrene (EPS) as it’s lightweight and provides good insulation. Make sure to thoroughly clean any recycled styrofoam before using it to remove any dirt or debris.
How do I ensure proper drainage in my styrofoam squash garden?
Drainage is crucial for preventing root rot. Before adding soil, drill several drainage holes in the bottom of your styrofoam containers. The size and number of holes will depend on the size of your container, but aim for at least four to five holes that are about half an inch in diameter. You can also add a layer of gravel or small stones at the bottom of the container to further improve drainage. Monitor the soil moisture regularly and adjust your watering schedule accordingly.
What type of soil should I use for growing squash in styrofoam containers?
A well-draining potting mix is essential. Avoid using garden soil, as it can be too heavy and compact, hindering drainage. A good potting mix will typically contain a blend of peat moss, perlite, and vermiculite. You can also amend the potting mix with compost, worm castings, or other organic matter to provide additional nutrients. Consider adding a slow-release fertilizer to ensure a steady supply of nutrients throughout the growing season.
How often should I water my styrofoam squash garden?
Watering frequency will depend on several factors, including the weather, the size of your containers, and the type of squash you’re growing. Generally, you should water your squash plants when the top inch of soil feels dry to the touch. Avoid overwatering, as this can lead to root rot. Water deeply and thoroughly, ensuring that the water drains out of the drainage holes. During hot, dry weather, you may need to water more frequently.
How much sunlight do squash plants need in a styrofoam garden?
Squash plants require at least six to eight hours of direct sunlight per day to thrive. Choose a location for your styrofoam squash garden that receives ample sunlight. If you live in a particularly hot climate, you may need to provide some afternoon shade to prevent the plants from overheating. You can also use shade cloth or other materials to protect your plants from intense sunlight.
How do I fertilize my squash plants in styrofoam containers?
Squash plants are heavy feeders and require regular fertilization. You can use a balanced fertilizer, such as a 10-10-10 or 20-20-20, or a fertilizer specifically formulated for vegetables. Follow the instructions on the fertilizer package carefully. You can also use organic fertilizers, such as compost tea or fish emulsion. Fertilize your squash plants every two to three weeks during the growing season.
How do I protect my styrofoam squash garden from pests and diseases?
Regularly inspect your plants for signs of pests or diseases. Common squash pests include squash bugs, squash vine borers, and aphids. You can use insecticidal soap, neem oil, or other organic pesticides to control these pests. To prevent diseases, ensure good air circulation around your plants and avoid overwatering. You can also use a fungicide if necessary. Companion planting with marigolds or nasturtiums can also help deter pests.
Can I grow other vegetables in styrofoam containers besides squash?
Yes, styrofoam containers are suitable for growing a wide variety of vegetables, including tomatoes, peppers, cucumbers, eggplant, and herbs. The key is to choose vegetables that are appropriate for the size of your containers and provide them with the proper growing conditions. Consider the mature size of the plant when selecting your container.
How long will my styrofoam squash garden last?
The lifespan of your styrofoam squash garden will depend on the quality of the styrofoam and the care you provide. With proper care, your styrofoam containers can last for several years. To extend their lifespan, avoid exposing them to extreme temperatures or direct sunlight for extended periods. You can also reinforce the containers with duct tape or other materials to prevent them from cracking or breaking.
What do I do with the styrofoam containers at the end of the growing season?
At the end of the growing season, you can clean out the styrofoam containers and store them for future use. Alternatively, you can recycle the styrofoam if your local recycling program accepts it. If you’re unable to recycle the styrofoam, you can dispose of it properly in your trash. Consider reusing the soil in your compost pile or garden.
Leave a Comment