

Soap based home hacks are about to revolutionize the way you think about cleaning and gardening! Forget those expensive, chemical-laden products – we’re diving headfirst into the world of simple, effective, and surprisingly versatile soap solutions.
For generations, our grandmothers relied on the power of soap for everything from laundry to pest control. It’s a tradition rooted in resourcefulness and a deep understanding of natural ingredients. Think about it: before the age of mass-produced chemicals, soap was the go-to for keeping homes clean and gardens thriving. Now, we’re bringing those time-tested techniques back into the spotlight, but with a modern twist!
Why should you care about soap based home hacks? Because they’re incredibly budget-friendly, environmentally conscious, and surprisingly effective. Imagine tackling common garden pests without harming beneficial insects or whipping up a gentle cleaning solution that’s safe for your family and pets. I know I’m always looking for ways to simplify my life and reduce my reliance on harsh chemicals, and these hacks do just that. Plus, it’s incredibly satisfying to create something useful from simple ingredients. So, get ready to unlock the hidden potential of your soap and transform your home and garden with these easy DIY tricks!
DIY Soap Hacks to Simplify Your Life
Hey there, fellow DIY enthusiasts! I’m always on the lookout for clever ways to use everyday items in unexpected ways. And guess what? Humble soap is a powerhouse of potential beyond just washing your hands! I’ve compiled some of my favorite soap-based hacks that are not only easy but also incredibly effective. Get ready to be amazed by the versatility of this cleaning staple!
Unsticking a Stubborn Zipper
Is there anything more frustrating than a stuck zipper? Before you resort to brute force (and potentially break it!), try this simple soap trick.
* The Problem: A zipper that refuses to budge.
* The Solution: Soap as a lubricant.
* Materials Needed: A bar of dry soap (preferably unscented), or a soap crayon.
Step-by-Step Instructions:
1. Identify the Stuck Point: Carefully examine the zipper to pinpoint exactly where it’s jammed. This will help you focus your efforts.
2. Apply the Soap: Gently rub the bar of soap (or soap crayon) along the zipper teeth, both above and below the stuck point. Make sure you’re applying it directly to the teeth, not just the fabric.
3. Wiggle and Jiggle: After applying the soap, gently wiggle the zipper pull back and forth. Don’t force it! The soap should help lubricate the teeth and allow the zipper to move more freely.
4. Repeat if Necessary: If the zipper is still stuck, repeat steps 2 and 3. You might need to apply a little more soap and be patient with the wiggling.
5. Clean Up: Once the zipper is unstuck, wipe away any excess soap residue with a damp cloth. This will prevent the soap from attracting dirt or dust.
Creating a DIY Laundry Detergent
Store-bought laundry detergent can be expensive and often contains harsh chemicals. Why not make your own? It’s surprisingly easy and cost-effective!
* The Problem: Expensive and chemical-laden laundry detergent.
* The Solution: A homemade, natural alternative.
* Materials Needed:
* 1 bar of Fels-Naptha laundry soap (or Zote soap)
* 1 cup of washing soda (sodium carbonate)
* 1/2 cup of borax (sodium borate)
* Large pot
* Grater
* Storage container (bucket or jar)
Step-by-Step Instructions:
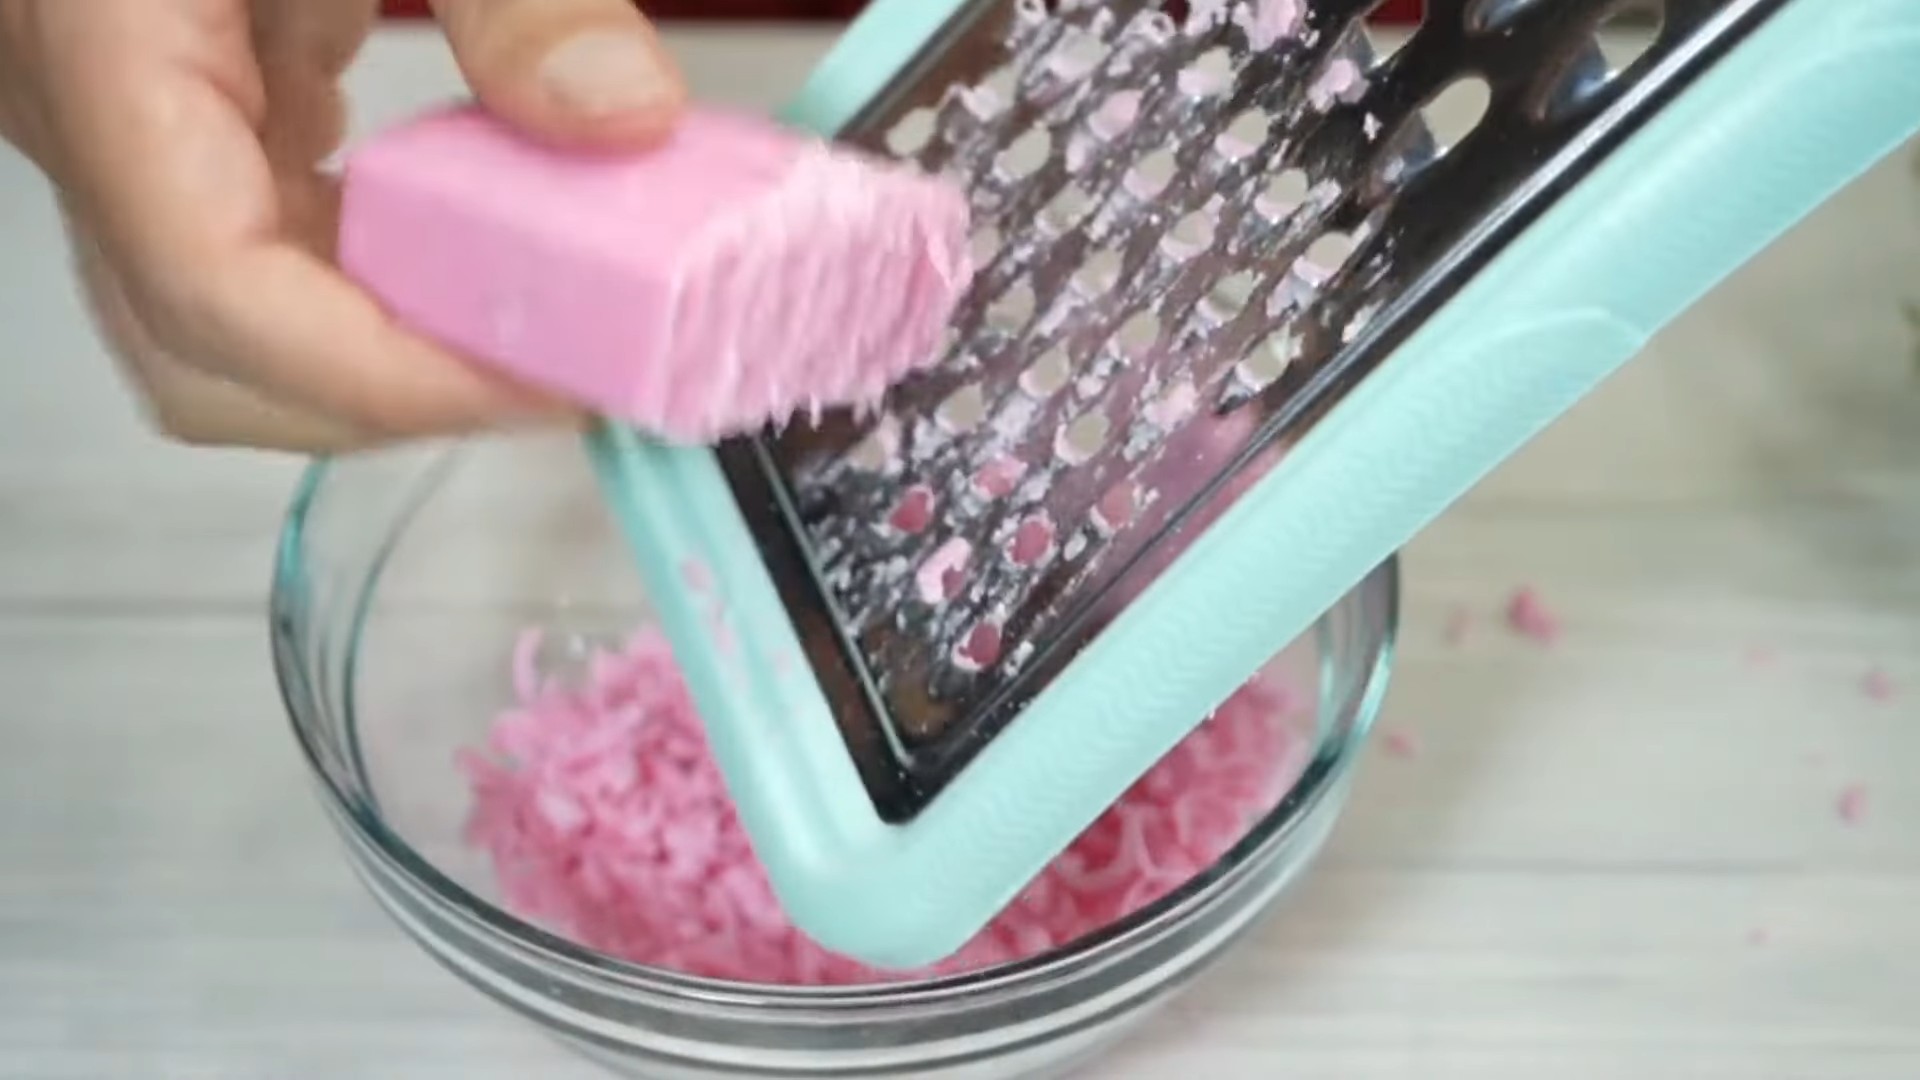
1. Grate the Soap: Using a grater, finely grate the entire bar of Fels-Naptha (or Zote) soap. The finer the grate, the easier it will dissolve.
2. Dissolve the Soap: In a large pot, combine the grated soap with about 6 cups of water. Heat the mixture over medium heat, stirring constantly, until the soap is completely dissolved. This might take a few minutes, so be patient.
3. Add Washing Soda and Borax: Once the soap is dissolved, remove the pot from the heat and stir in the washing soda and borax. Continue stirring until everything is fully dissolved.
4. Add More Water: Add enough water to the pot to make a total of 1 gallon. Stir well to combine.
5. Let it Sit: Allow the mixture to sit for at least 12 hours, or preferably overnight. It will thicken into a gel-like consistency.
6. Mix it Up: After it has sat, the mixture will likely be lumpy. Use an immersion blender to blend it until smooth. If you don’t have an immersion blender, you can carefully transfer the mixture to a regular blender in batches.
7. Store and Use: Pour the finished laundry detergent into your storage container. Use about 1/4 cup per load of laundry.
Preventing Foggy Mirrors in the Bathroom
Tired of wiping down your bathroom mirror after every shower? Soap can help!
* The Problem: Foggy bathroom mirrors.
* The Solution: A soap-based anti-fog treatment.
* Materials Needed: A bar of dry soap (again, unscented is best), a clean, dry cloth.
Step-by-Step Instructions:
1. Apply the Soap: Rub the dry bar of soap directly onto the dry mirror. Cover the entire surface with a thin layer of soap.
2. Buff it Out: Using a clean, dry cloth, buff the soap into the mirror until it’s almost invisible. You don’t want to leave any streaks or clumps of soap. The goal is to create a thin, protective layer.
3. Enjoy a Fog-Free Mirror: The soap will create a barrier that prevents condensation from forming on the mirror. This should last for several days, depending on how often you shower.
4. Reapply as Needed: When you start to notice the mirror fogging up again, simply reapply the soap and buff it out.
Lubricating Sticky Drawers and Doors
A sticking drawer or door can be a real nuisance. Soap to the rescue!
* The Problem: Drawers or doors that are difficult to open or close.
* The Solution: Soap as a lubricant for the tracks or edges.
* Materials Needed: A bar of dry soap.
Step-by-Step Instructions for Drawers:
1. Identify the Problem Area: Determine where the drawer is sticking. Is it rubbing against the sides of the frame, or is the track not moving smoothly?
2. Apply Soap to the Tracks: Remove the drawer completely. Rub the bar of soap along the drawer tracks, both on the drawer itself and inside the frame.
3. Reinsert and Test: Reinsert the drawer and test its movement. If it’s still sticking, apply more soap to the problem areas.
4. Repeat as Necessary: Continue applying soap and testing until the drawer slides smoothly.
Step-by-Step Instructions for Doors:
1. Identify the Problem Area: Determine where the door is sticking. Is it rubbing against the frame at the top, bottom, or sides?
2. Apply Soap to the Edge: Rub the bar of soap along the edge of the door where it’s sticking.
3. Open and Close: Open and close the door several times to distribute the soap.
4. Repeat as Necessary: Continue applying soap and opening and closing the door until it moves freely.
Protecting Plants from Pests
Did you know that soap can be used to create a natural insecticide? It’s a gentle and effective way to protect your plants from unwanted pests.
* The Problem: Pests damaging your plants.
* The Solution: A homemade insecticidal soap spray.
* Materials Needed:
* 1 tablespoon of mild liquid soap (dish soap, castile soap, or insecticidal soap)
* 1 quart of water
* Spray bottle
Step-by-Step Instructions:
1. Mix the Solution: In a spray bottle, combine the liquid soap and water. Make sure the soap is fully dissolved. Important: Avoid using dish soaps that contain degreasers, bleach, or other harsh chemicals, as these can damage your plants.
2. Test on a Small Area: Before spraying the entire plant, test the solution on a small, inconspicuous area to make sure it doesn’t cause any adverse reactions. Wait 24 hours to observe the results.
3. Spray the Affected Areas: If the test area looks good, spray the affected areas of the plant thoroughly, including the undersides of the leaves where pests often hide.
4. Repeat as Needed: Repeat the treatment every few days, or as needed, until the pests are gone.
5. Rinse if Necessary: If you notice any signs of soap buildup on the leaves, rinse them off with clean water.
Making Bubbles for Kids
Forget buying expensive bubble solution! You can easily make your own with soap and a few other household ingredients.
* The Problem: Running out of bubble solution.
* The Solution: A homemade bubble recipe.
* Materials Needed:
* 1/2 cup dish soap (Dawn works well)
* 5 cups water
* 2 tablespoons glycerin (optional, but it makes the bubbles stronger)
* Bubble wand
Step-by-Step Instructions:
1. Combine Ingredients: In a large container, combine the dish soap, water, and glycerin (if using).
2. Stir Gently: Stir the mixture gently to avoid creating too many bubbles.
3. Let it Sit: Allow the mixture to sit for at least 30 minutes, or preferably longer. This will help the bubbles form better.
4. Blow Bubbles
Conclusion
So, there you have it! Transforming ordinary soap into a powerhouse of cleaning and household solutions is not just a clever trick; it’s a game-changer for your home and your wallet. We’ve explored how to create everything from gentle laundry detergents to effective stain removers, all starting with a simple bar of soap. The beauty of these DIY soap-based hacks lies in their simplicity, affordability, and eco-friendliness. You’re not just cleaning; you’re reducing your reliance on harsh chemicals and contributing to a more sustainable lifestyle.
But why is this a must-try? Because it works! Store-bought cleaners often contain a cocktail of ingredients, many of which are unnecessary and potentially harmful. By crafting your own solutions, you have complete control over what goes into them. You can tailor the ingredients to your specific needs and preferences, ensuring a safe and effective clean every time. Plus, the satisfaction of creating something useful from scratch is incredibly rewarding.
Consider these variations to further personalize your soap-based creations:
* **Scent Customization:** Experiment with different essential oils to create your signature scent. Lavender for a calming laundry detergent, lemon for a zesty all-purpose cleaner, or tea tree for its antibacterial properties – the possibilities are endless.
* **Soap Type:** While we’ve focused on basic bar soap, feel free to explore other options. Castile soap is a popular choice for its gentle and versatile nature. You can also use leftover soap scraps to create a new bar or liquid cleaner, minimizing waste.
* **Adding Boosters:** For extra cleaning power, consider adding natural boosters like baking soda, washing soda, or vinegar to your soap-based solutions. These ingredients can help tackle tough stains, deodorize, and brighten surfaces.
* **Specific Needs:** Adapt the recipes to address specific cleaning challenges. For example, add borax to your laundry detergent for extra whitening power or use a stronger concentration of soap for tackling greasy messes.
We’re confident that once you try these DIY soap-based hacks, you’ll be amazed by their effectiveness and versatility. They’re not just a trend; they’re a practical and sustainable way to keep your home clean and healthy.
Now, it’s your turn! We encourage you to dive in, experiment with the recipes, and discover the magic of soap. Don’t be afraid to get creative and adapt the formulas to suit your unique needs and preferences. And most importantly, share your experiences with us! We’d love to hear about your successes, your challenges, and any variations you’ve discovered. Let’s build a community of DIY enthusiasts who are passionate about creating a cleaner, healthier, and more sustainable world, one soap-based hack at a time. Embrace the power of **soap based home hacks** and unlock a world of cleaning possibilities!
Frequently Asked Questions (FAQ)
What kind of soap should I use for these DIY hacks?
The best type of soap to use is a basic, unscented bar soap. Look for soaps that are free of dyes, perfumes, and other additives, as these can sometimes interfere with the effectiveness of the cleaning solutions or leave behind unwanted residues. Castile soap is an excellent choice due to its gentle and versatile nature. Avoid using moisturizing soaps, as they may contain oils that can leave a greasy film.
Are these DIY soap-based cleaners safe for all surfaces?
While most of these cleaners are gentle and safe for a wide range of surfaces, it’s always a good idea to test them in an inconspicuous area first, especially on delicate or sensitive materials like wood, marble, or painted surfaces. Avoid using abrasive scrubbers or excessive force, as this can damage the surface. For surfaces that are known to be sensitive to certain ingredients (like vinegar on marble), adjust the recipe accordingly or choose a different cleaning solution.
How long will these DIY soap-based cleaners last?
The shelf life of these cleaners depends on the ingredients used and how they are stored. Generally, liquid cleaners made with water should be used within a few weeks to prevent bacterial growth. Adding a natural preservative like vitamin E oil can help extend the shelf life. Solid cleaners, like soap bars or powders, can last much longer if stored in a cool, dry place. Always label your DIY cleaners with the date they were made to keep track of their freshness.
Can I use essential oils in these recipes, and if so, which ones are best?
Yes, you can definitely use essential oils to add fragrance and enhance the cleaning properties of your DIY soap-based cleaners. Some popular choices include:
* **Lavender:** For its calming scent and antibacterial properties.
* **Lemon:** For its refreshing scent and degreasing power.
* **Tea Tree:** For its antibacterial and antifungal properties.
* **Eucalyptus:** For its invigorating scent and antiseptic properties.
* **Peppermint:** For its refreshing scent and insect-repelling properties.
When using essential oils, be sure to use pure, therapeutic-grade oils and follow recommended dilution rates. A few drops are usually sufficient to scent a batch of cleaner.
What if my DIY soap-based cleaner is too thick or too thin?
If your cleaner is too thick, simply add more water until you reach the desired consistency. If it’s too thin, you can add more grated soap or a thickening agent like cornstarch (for powder cleaners). Be sure to mix well after adding any ingredients to ensure a uniform consistency.
Can I use these DIY soap-based cleaners in my washing machine?
Yes, you can use DIY soap-based laundry detergents in your washing machine. However, it’s important to use the correct amount to avoid oversudsing. Start with a small amount (about 1-2 tablespoons) and adjust as needed based on the size of your load and the hardness of your water. Avoid using too much soap, as this can leave residue on your clothes and in your washing machine.
Are these DIY soap-based cleaners safe for pets and children?
While these cleaners are generally safer than conventional cleaners, it’s still important to keep them out of reach of pets and children. Some essential oils can be toxic to pets, so be sure to research the safety of any essential oils you use before using them around animals. Always store your DIY cleaners in labeled containers and instruct children not to handle them without supervision.
What can I do with leftover soap scraps?
Don’t throw away those soap scraps! You can use them to make a new bar of soap by melting them down and pouring them into a mold. You can also grate them and add them to your DIY cleaning solutions. Another option is to place them in a small mesh bag and use them as a scrub in the shower or bath.
How can I make my DIY soap-based cleaner more effective for tough stains?
For tough stains, you can add natural boosters like baking soda, washing soda, or vinegar to your soap-based cleaner. Baking soda is a mild abrasive that can help scrub away stains, while washing soda is a stronger cleaner that can help remove grease and grime. Vinegar is a natural acid that can help dissolve mineral deposits and brighten surfaces. When using these boosters, be sure to test them in an inconspicuous area first to ensure they don’t damage the surface.
Where can I find the ingredients for these DIY soap-based hacks?
Most of the ingredients for these DIY soap-based hacks can be found at your local grocery store, hardware store, or online retailer. Look for basic, unscented bar soap, washing soda, baking soda, vinegar, and essential oils. You may also need containers to store your DIY cleaners.
Leave a Comment