

Rosemary Container Gardening: A Fragrant Journey
Rosemary Container Gardening – it sounds sophisticated, maybe even a little daunting, right? But I’m here to tell you it’s surprisingly simple and incredibly rewarding! Forget the image of sprawling rosemary bushes only found in sun-drenched Mediterranean landscapes; with a few clever tricks and a little DIY know-how, you can cultivate this aromatic herb right on your patio, balcony, or even your kitchen windowsill. I’ve been growing rosemary in containers for years, and it’s become one of my favorite gardening projects.
The history of rosemary is rich and fascinating, steeped in folklore and tradition. For centuries, it’s been valued not only for its culinary uses but also for its symbolic meaning – representing remembrance and loyalty. Growing your own rosemary connects you to this ancient heritage, allowing you to enjoy the plant’s beauty and fragrance in a personal and meaningful way.
Why Choose Rosemary Container Gardening?
Let’s face it: fresh rosemary is expensive! And nothing beats the taste and aroma of homegrown herbs. Rosemary Container Gardening offers a fantastic solution. It’s perfect for those with limited space, allowing you to enjoy the benefits of this versatile herb without needing a large garden. Plus, container gardening gives you greater control over your rosemary’s environment, ensuring optimal growing conditions and a bountiful harvest. Whether you’re a seasoned gardener or a complete beginner, this guide will equip you with the knowledge and techniques to successfully cultivate your own rosemary, transforming your outdoor space into a fragrant haven.
In this article, we’ll explore various aspects of Rosemary Container Gardening, from selecting the perfect pot and soil to mastering watering techniques and dealing with common pests. Get ready to embark on this fragrant journey and discover the joy of growing your own rosemary!
Unlocking the Power of Lime: My Favorite Cleaning Hacks
Limes aren’t just for margaritas! I’ve discovered they’re a surprisingly effective cleaning agent, and I’m excited to share my favorite lime-based cleaning hacks with you. Get ready to ditch harsh chemicals and embrace the natural power of this citrus fruit!
Gathering Your Supplies
- Fresh limes (the juicier, the better!)
- A small bowl
- A spray bottle
- Soft cloths or sponges
- Optional: Baking soda (for extra scrubbing power)
- Optional: White vinegar (for extra cleaning power)
Phase 1: Making Your Lime Cleaning Solutions
- Juice Extraction: Roll the limes firmly on a countertop to soften them and release more juice. Cut them in half and juice them into your small bowl. I usually get about 1/4 cup of juice from two average-sized limes. You can adjust the amount of lime juice depending on the size of the area you’re cleaning.
- Basic Lime Spray: For a simple all-purpose cleaner, simply fill your spray bottle with water and add the lime juice. Give it a good shake to combine. This solution is great for wiping down countertops, sinks, and other surfaces.
- Enhanced Lime Spray (with Vinegar): For tougher grime, I like to boost the cleaning power by adding white vinegar. Mix equal parts lime juice and white vinegar in your spray bottle, then top it off with water. This combination is fantastic for cutting through grease and soap scum.
- Lime and Baking Soda Paste: For stubborn stains or burnt-on food, create a paste by mixing lime juice with baking soda. Start with a small amount of baking soda and add more as needed to achieve a paste-like consistency. This paste is excellent for scrubbing pots, pans, and even the inside of your microwave.
Phase 2: Applying Your Lime Cleaning Solutions
- Test in an inconspicuous area: Before applying any cleaning solution to a large surface, always test it on a small, hidden area first. This helps ensure that the solution won’t damage or discolor the surface. This is especially important for delicate materials like wood or certain types of stone.
- Spray and Wipe: For the spray solutions, generously spray the surface you’re cleaning and let it sit for a few minutes to allow the lime juice to work its magic. Then, wipe the surface clean with a soft cloth or sponge. For really grimy areas, you might need to scrub a bit.
- Scrubbing with the Paste: For the lime and baking soda paste, apply it directly to the stained area. Use a soft sponge or brush to gently scrub the surface. The baking soda acts as a mild abrasive, helping to lift away stubborn stains. Rinse thoroughly with water once you’re finished scrubbing.
- Microwave Cleaning: For cleaning the microwave, place a bowl of water with a few tablespoons of lime juice inside. Microwave on high for a few minutes until the water is steaming. The steam, combined with the lime juice, will loosen up food splatters and make them much easier to wipe away. Let it sit for a few minutes before wiping clean.
- Cutting Boards: Lime juice is great for disinfecting cutting boards. Simply spray your cutting board with the lime solution, let it sit for a few minutes, and then scrub with a brush. Rinse thoroughly with water and let it air dry.
Phase 3: Advanced Lime Cleaning Hacks
- Removing Hard Water Stains: Hard water stains on faucets and showerheads can be a real pain. Apply the lime and baking soda paste to the affected areas, let it sit for 15-20 minutes, then scrub gently with a brush. Rinse thoroughly with water. For stubborn stains, you may need to repeat the process.
- Cleaning Stainless Steel: Lime juice can help remove fingerprints and smudges from stainless steel appliances. Simply spray the surface with the basic lime solution, wipe clean, and then buff with a soft cloth for a streak-free shine. Avoid using abrasive cleaners on stainless steel, as they can scratch the surface.
- Freshening Garbage Disposals: To freshen up your garbage disposal, cut a lime in half and run it through the disposal. The lime juice will help to eliminate odors and clean the blades. Follow this with running cold water for about 30 seconds.
- Cleaning Copper: For tarnished copper, make a paste of lime juice and salt. Apply the paste to the copper, let it sit for a few minutes, then rub gently with a soft cloth. Rinse thoroughly and dry immediately to prevent further tarnishing. Always test this on a small, inconspicuous area first.
- Removing Rust: For minor rust stains, apply the lime juice directly to the affected area and let it sit for several hours, or even overnight. Then, scrub gently with a brush and rinse thoroughly. For more significant rust stains, you may need to use a stronger rust remover.
Phase 4: Important Considerations
- Always test on a small area first: Before applying any lime cleaning solution to a large surface, always test it on a small, inconspicuous area to ensure it won’t damage or discolor the material.
- Rinse thoroughly: After cleaning with lime juice, always rinse the surface thoroughly with water to remove any residue.
- Avoid using on delicate surfaces: Lime juice is generally safe for most surfaces, but it’s best to avoid using it on delicate materials like polished wood or certain types of stone. Always check the manufacturer’s recommendations before cleaning.
- Store properly: Store your lime cleaning solutions in a cool, dark place. They should last for a week or two in the refrigerator.
Conclusion
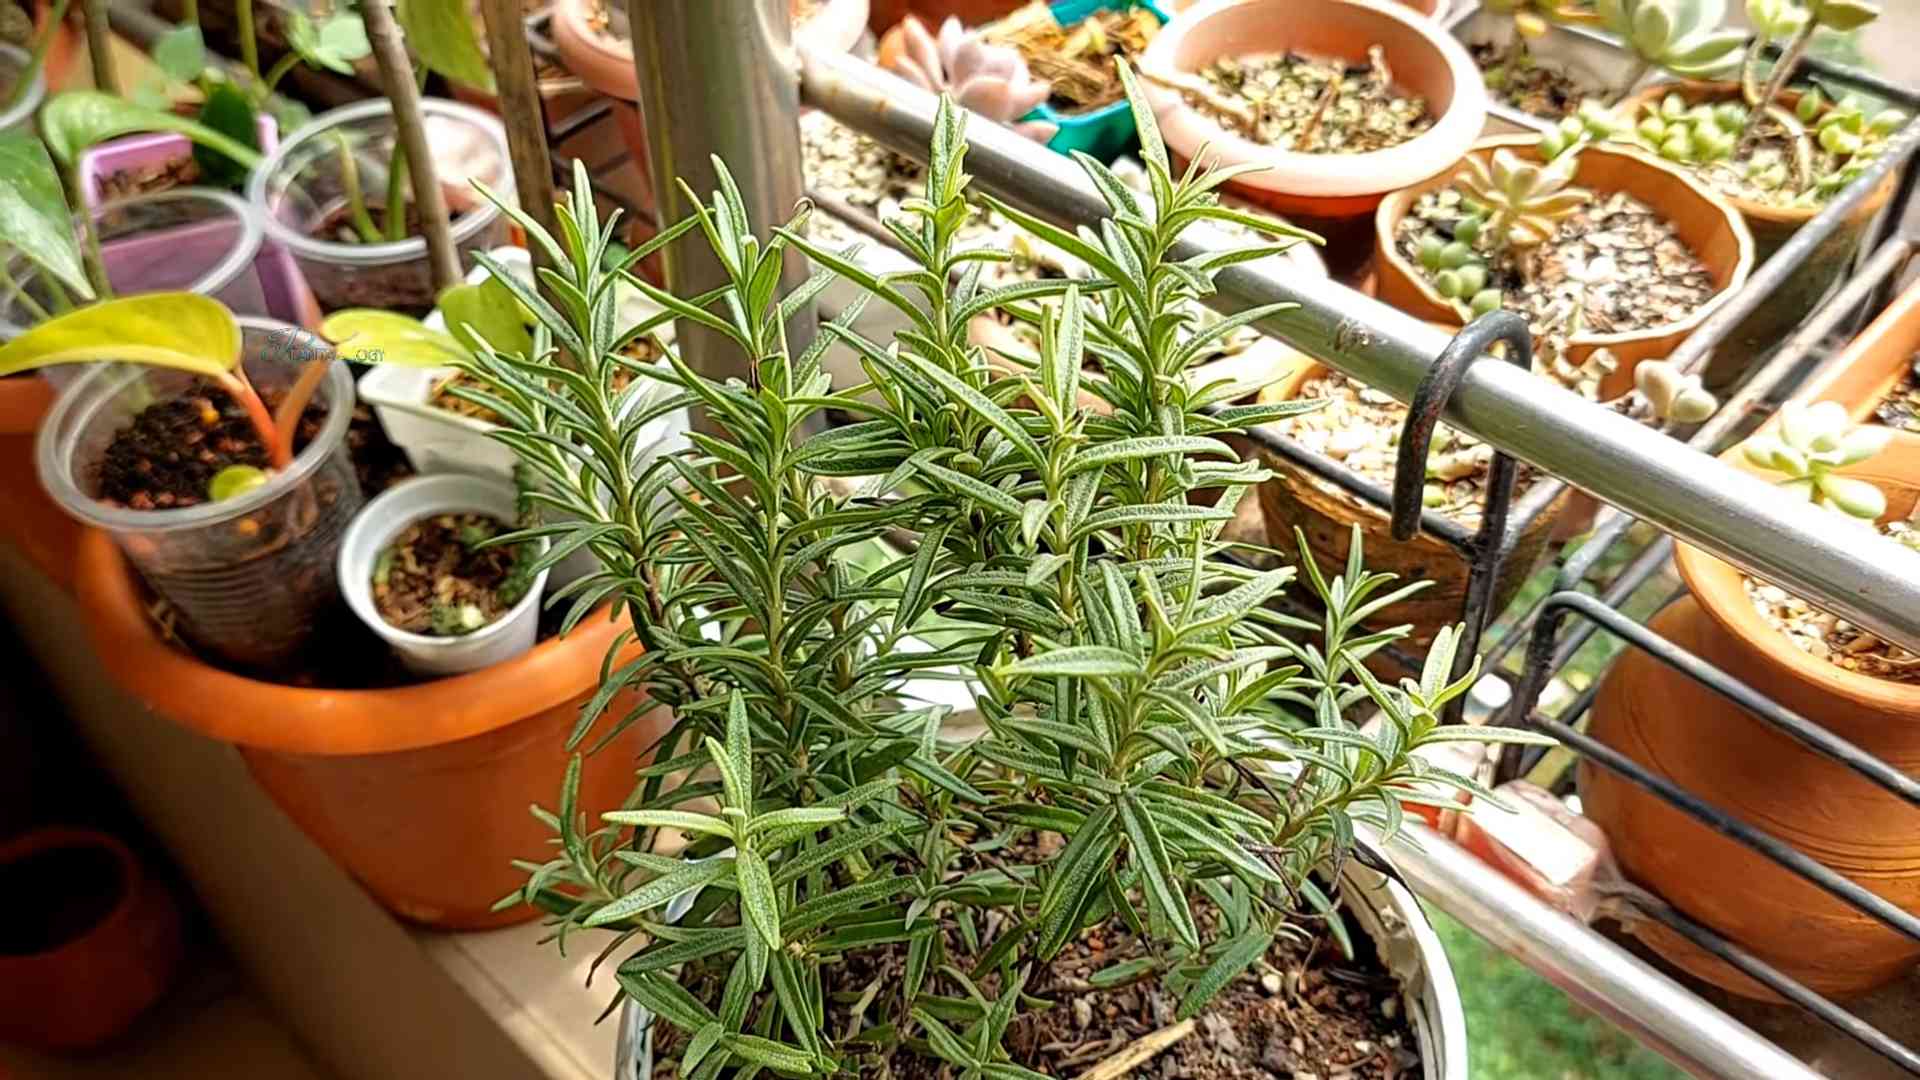
So, there you have it! Our guide to mastering the art of rosemary container gardening. This isn’t just about growing rosemary; it’s about unlocking a world of culinary and aromatic possibilities right at your fingertips. By following these simple steps, you’ll be well on your way to enjoying fresh, fragrant rosemary year-round, regardless of your gardening space. This DIY rosemary container gardening trick is a must-try because it’s incredibly rewarding, surprisingly easy, and allows you to enjoy the benefits of homegrown herbs without needing a sprawling garden. The satisfaction of snipping a sprig of your own homegrown rosemary to add to your favorite dish is unparalleled.
Beyond the basic method, the possibilities are endless! Experiment with different container sizes and shapes to find what best suits your aesthetic and space. Consider adding other herbs to your container garden for a beautiful and fragrant medley. Basil, thyme, and oregano are excellent companions for rosemary. You can also explore different types of rosemary, each with its unique flavor profile. There are upright varieties, prostrate varieties that spill over the edges of containers, and even those with variegated leaves. The choice is yours!
Don’t be afraid to get creative with your container choices. Anything from terracotta pots to repurposed buckets can work wonderfully. Just ensure your container has adequate drainage holes to prevent root rot. Remember, the key to success is providing your rosemary with well-draining soil, plenty of sunlight, and consistent watering. With a little care and attention, your rosemary will thrive and reward you with an abundance of fragrant leaves.
We encourage you to try this Rosemary Container Gardening technique and share your experiences with us! Show us your thriving rosemary plants on social media using #RosemaryContainerGardening. We’d love to see your beautiful creations and hear about your successes (and even your learning curves – we all have them!). Join our growing community of rosemary enthusiasts and let’s inspire each other to cultivate our green thumbs and enjoy the delicious rewards of homegrown herbs.
Happy gardening!
Frequently Asked Questions
What type of soil is best for rosemary in containers?
Rosemary prefers well-draining soil that’s slightly alkaline. A good potting mix specifically designed for herbs or a blend of regular potting soil with perlite or coarse sand will work well. Avoid heavy clay soils that retain too much moisture, as this can lead to root rot.
How much sunlight does rosemary need?
Rosemary thrives in full sun, meaning at least 6-8 hours of direct sunlight per day. A south-facing location is ideal in the Northern Hemisphere. If you live in a particularly hot climate, a little afternoon shade might be beneficial to prevent scorching.
How often should I water my rosemary in a container?
Water your rosemary thoroughly when the top inch or two of soil feels dry to the touch. Avoid overwatering, as this can lead to root rot. The frequency of watering will depend on factors like the size of your container, the type of soil, and the weather conditions. During hot, dry spells, you may need to water more frequently.
When is the best time to prune my rosemary?
Pruning is essential for maintaining the shape and health of your rosemary plant. The best time to prune is after the plant has finished flowering, typically in late spring or early summer. You can also lightly prune throughout the growing season to encourage bushier growth and prevent it from becoming leggy.
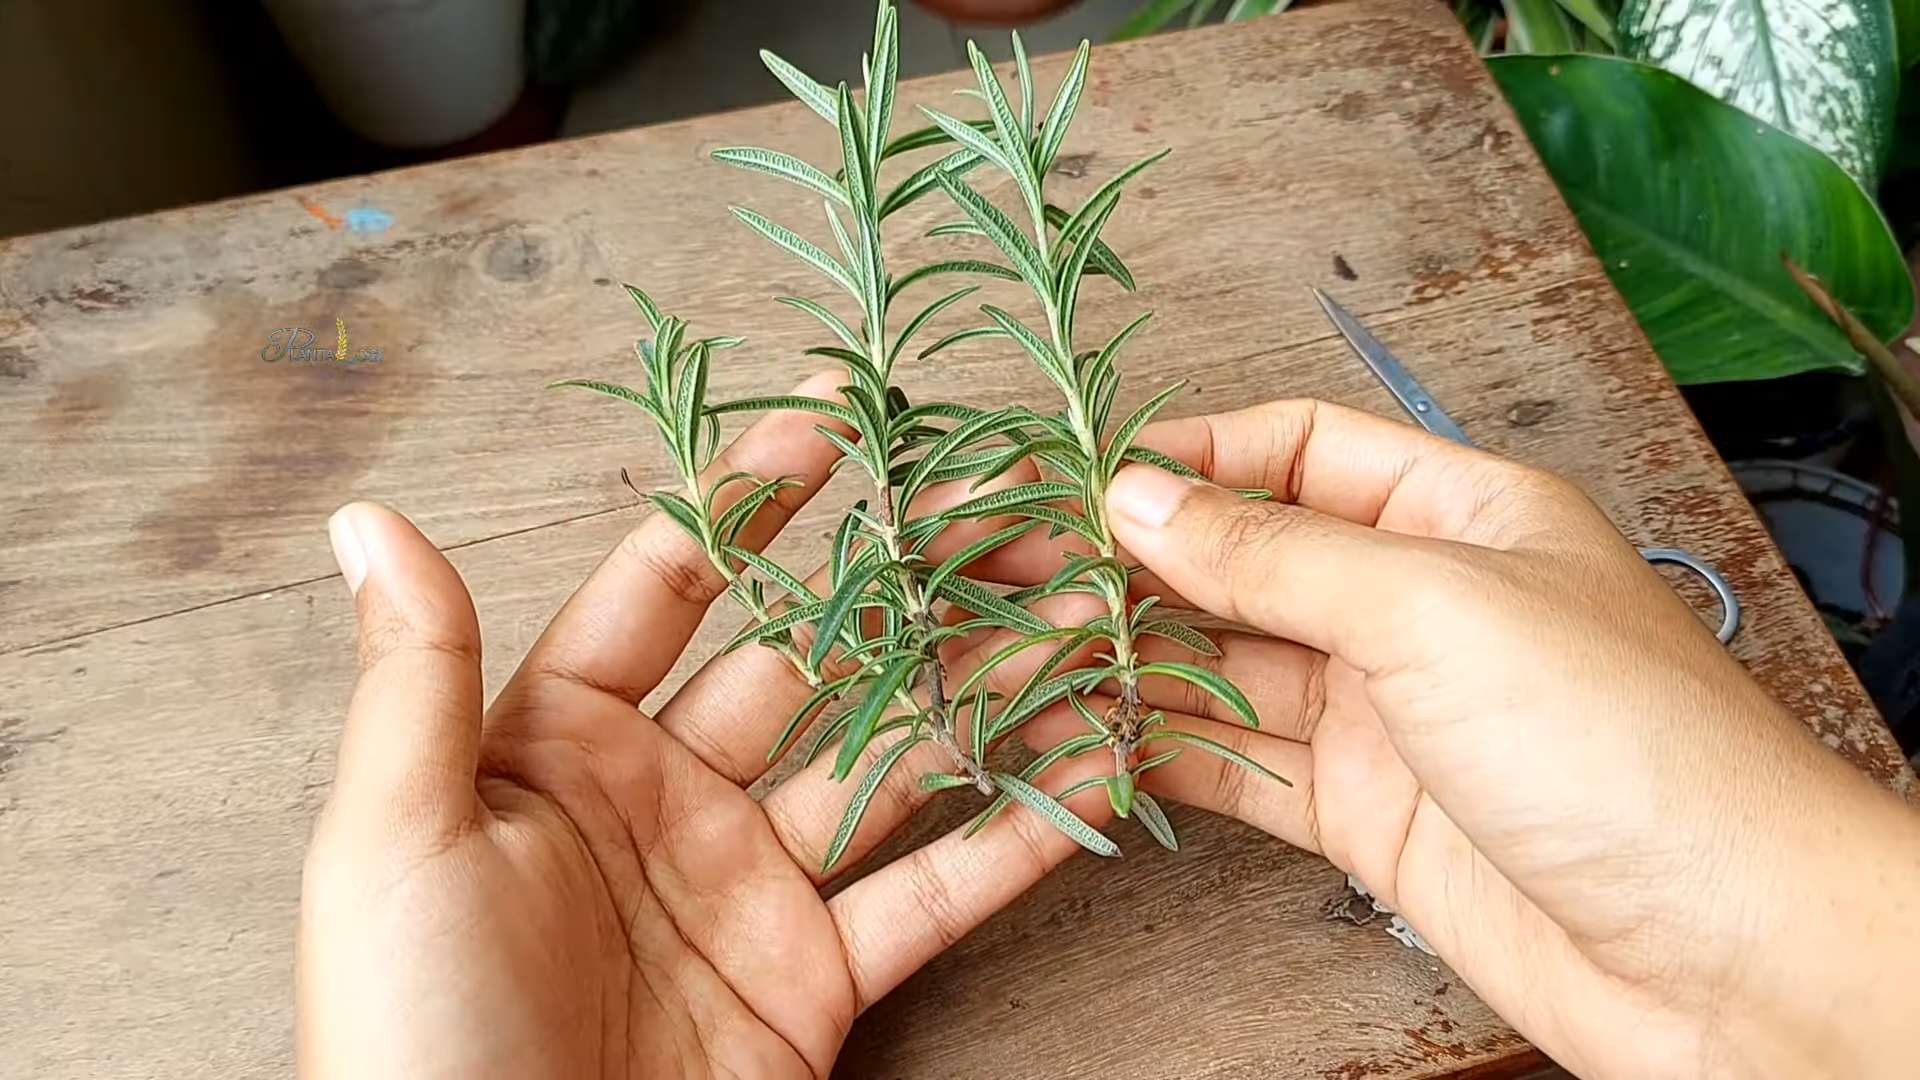
Can I propagate rosemary from cuttings?
Yes, rosemary is relatively easy to propagate from stem cuttings. Take 4-6 inch cuttings from healthy stems, remove the lower leaves, and dip the cut ends in rooting hormone before planting them in moist potting mix. Keep the cuttings moist and in a warm location until roots develop.
What are some common problems with growing rosemary in containers?
Common problems include root rot (due to overwatering), nutrient deficiencies (indicated by yellowing leaves), and pest infestations (such as spider mites or aphids). Ensure proper drainage, use a balanced fertilizer, and monitor your plant regularly for signs of pests or diseases.
How do I overwinter my rosemary container?
If you live in a climate with freezing temperatures, you’ll need to protect your rosemary plant during the winter. You can bring the container indoors to a sunny location, or provide extra insulation by wrapping the pot with burlap or placing it in a sheltered area. Reduce watering during the winter months.
What are the benefits of growing rosemary in containers?
Container gardening offers several advantages, including portability (you can move your rosemary to a sunnier spot or bring it indoors during winter), space-saving (perfect for small gardens or patios), and better control over soil conditions and watering. It also allows for easier harvesting and makes it simple to move your rosemary around your outdoor space.
Can I use any type of container for rosemary?
While many containers work, terracotta pots are a popular choice because they allow for good drainage and aeration. However, you can use other materials such as plastic, metal, or even repurposed containers. Just ensure there are adequate drainage holes to prevent waterlogging.
What should I do if my rosemary plant starts to look leggy?
Leggy rosemary indicates a lack of sunlight or insufficient pruning. Move the plant to a sunnier location and prune it back to encourage bushier growth. Regular pinching of the growing tips will also help to keep it compact and full.


Leave a Comment