

Recycled Bottle Pepper Gardening: Imagine biting into a juicy, homegrown pepper, bursting with flavor, knowing you nurtured it from a tiny seed using… a recycled plastic bottle! Sounds amazing, right? Well, it’s not just a dream; it’s a surprisingly simple and rewarding DIY project that anyone can tackle, regardless of their gardening experience.
For centuries, humans have cultivated peppers, tracing back to ancient civilizations in South America. These vibrant fruits weren’t just a food source; they held cultural and medicinal significance. Now, we’re taking that tradition and giving it a modern, eco-friendly twist.
Let’s face it, gardening can sometimes feel intimidating. Space constraints, expensive equipment, and the fear of failure often deter aspiring green thumbs. But what if I told you that you could bypass all those hurdles with a readily available resource – the humble plastic bottle? This DIY guide will show you how recycled bottle pepper gardening can transform your balcony, patio, or even a sunny windowsill into a thriving pepper patch. Not only is it a fantastic way to reduce waste, but it also provides a cost-effective and incredibly satisfying way to grow your own delicious peppers. So, grab those empty bottles, and let’s get started!
DIY Recycled Bottle Pepper Garden: From Trash to Table!
Hey there, fellow gardening enthusiasts! I’m so excited to share this super easy and eco-friendly project with you: turning old plastic bottles into adorable and productive pepper planters! Not only is this a fantastic way to recycle, but it also allows you to grow fresh, delicious peppers right on your windowsill, balcony, or patio, even if you don’t have a lot of space. Let’s dive in!
What You’ll Need:
* Empty plastic bottles (2-liter soda bottles or similar work great!)
* Scissors or a utility knife
* Potting soil
* Pepper seeds or seedlings (your choice of variety!)
* Drill or nail (for drainage holes)
* Watering can or spray bottle
* Optional: Spray paint (for decorating your planters)
* Optional: Twine or rope (for hanging planters)
* Optional: Small pebbles or gravel (for drainage layer)
Preparing Your Bottles: The Foundation of Your Pepper Paradise
This is where the magic begins! We’re going to transform those discarded bottles into mini-gardens.
1. Clean Your Bottles: First things first, give your bottles a good wash with soap and water to remove any residue. Rinse them thoroughly and let them dry completely. This is crucial for preventing mold and ensuring a healthy environment for your pepper plants.
2. Cut the Bottles: Now, decide how you want to orient your planters. There are two main ways to cut the bottles:
* Horizontal Planters: This method is great for maximizing surface area and creating a trough-like planter. Cut the bottle horizontally, about halfway down. You’ll be using the bottom half as the planter. The top half can be discarded or used for another project (like a mini-greenhouse cover!).
* Vertical Planters: This method is perfect for hanging planters or saving space. Cut the bottle about a third of the way down from the top. Invert the top portion and nest it inside the bottom portion. This creates a self-watering system (more on that later!).
Important Safety Tip: When using scissors or a utility knife, always be careful and cut away from yourself. A sharp blade is safer than a dull one, as you won’t need to apply as much force.
3. Create Drainage Holes: This is absolutely essential! Pepper plants need well-draining soil to thrive. Use a drill or a nail (heated with a lighter for easier piercing) to create several drainage holes in the bottom of the bottle. I usually make about 4-6 holes, depending on the size of the bottle. If you’re using the vertical planter method, make sure to drill holes in both the top and bottom sections.
4. Optional: Decorate Your Planters: This is where you can get creative! If you want to add some personality to your pepper garden, now’s the time to spray paint your bottles. Choose colors that complement your decor or go wild with fun patterns. Let the paint dry completely before moving on to the next step. You can also use markers, stickers, or even wrap the bottles in twine for a rustic look.
Planting Your Peppers: Nurturing Your Green Babies
Now for the fun part: bringing your pepper plants to life!
1. Add a Drainage Layer (Optional): If you’re using the horizontal planter method, consider adding a layer of small pebbles or gravel to the bottom of the bottle. This will further improve drainage and prevent the roots from sitting in soggy soil.
2. Fill with Potting Soil: Use a good quality potting soil that’s specifically formulated for vegetables. Avoid using garden soil, as it can be too heavy and compact, hindering root growth. Fill the bottle with soil, leaving about an inch of space at the top.
3. Plant Your Seeds or Seedlings:
* From Seeds: If you’re starting from seeds, sow them according to the instructions on the seed packet. Generally, you’ll want to plant them about ¼ inch deep. Gently water the soil after planting.
* From Seedlings: If you’re using seedlings, carefully remove them from their containers and gently loosen the roots. Dig a small hole in the soil and place the seedling in the hole, making sure the top of the root ball is level with the soil surface. Gently backfill the hole with soil and water thoroughly.
4. Water Thoroughly: After planting, give your pepper plants a good watering. Make sure the water drains out of the drainage holes.
Setting Up Your Self-Watering Vertical Planter (If Applicable):
If you opted for the vertical planter method, here’s how to set up the self-watering system:
1. Insert the Top Section: Carefully insert the top section of the bottle (the one with the cap removed) into the bottom section. The neck of the bottle should be submerged in the water reservoir in the bottom section.
2. Add Water to the Reservoir: Fill the bottom section with water, making sure the water level doesn’t reach the soil in the top section. The soil will draw water up from the reservoir as needed, keeping your pepper plants consistently moist.
3. Monitor the Water Level: Check the water level in the reservoir regularly and refill as needed.
Caring for Your Pepper Plants: Keeping Them Happy and Healthy
Now that your pepper plants are planted, it’s important to provide them with the right care to ensure they thrive.
1. Sunlight: Pepper plants need at least 6-8 hours of sunlight per day. Place your planters in a sunny location, such as a windowsill, balcony, or patio. If you don’t have enough natural light, you can supplement with a grow light.
2. Watering: Water your pepper plants regularly, but avoid overwatering. The soil should be moist but not soggy. Check the soil moisture by sticking your finger into the soil. If the top inch of soil feels dry, it’s time to water. If you’re using the self-watering vertical planter, simply refill the water reservoir as needed.
3. Fertilizing: Pepper plants are heavy feeders, so they need regular fertilization. Use a balanced fertilizer that’s specifically formulated for vegetables. Follow the instructions on the fertilizer package. I like to use a liquid fertilizer diluted in water every couple of weeks.
4. Pruning: Pruning can help to encourage bushier growth and more pepper production. Pinch off any suckers (small shoots that grow between the main stem and the branches) to direct the plant’s energy towards fruit production.
5. Pest Control: Keep an eye out for pests, such as aphids, spider mites, and whiteflies. If you spot any pests, treat them with an organic insecticide, such as neem oil or insecticidal soap.
6. Support: As your pepper plants grow, they may need some support to prevent them from toppling over. You can use stakes, trellises, or even just tie the plants to a nearby object.
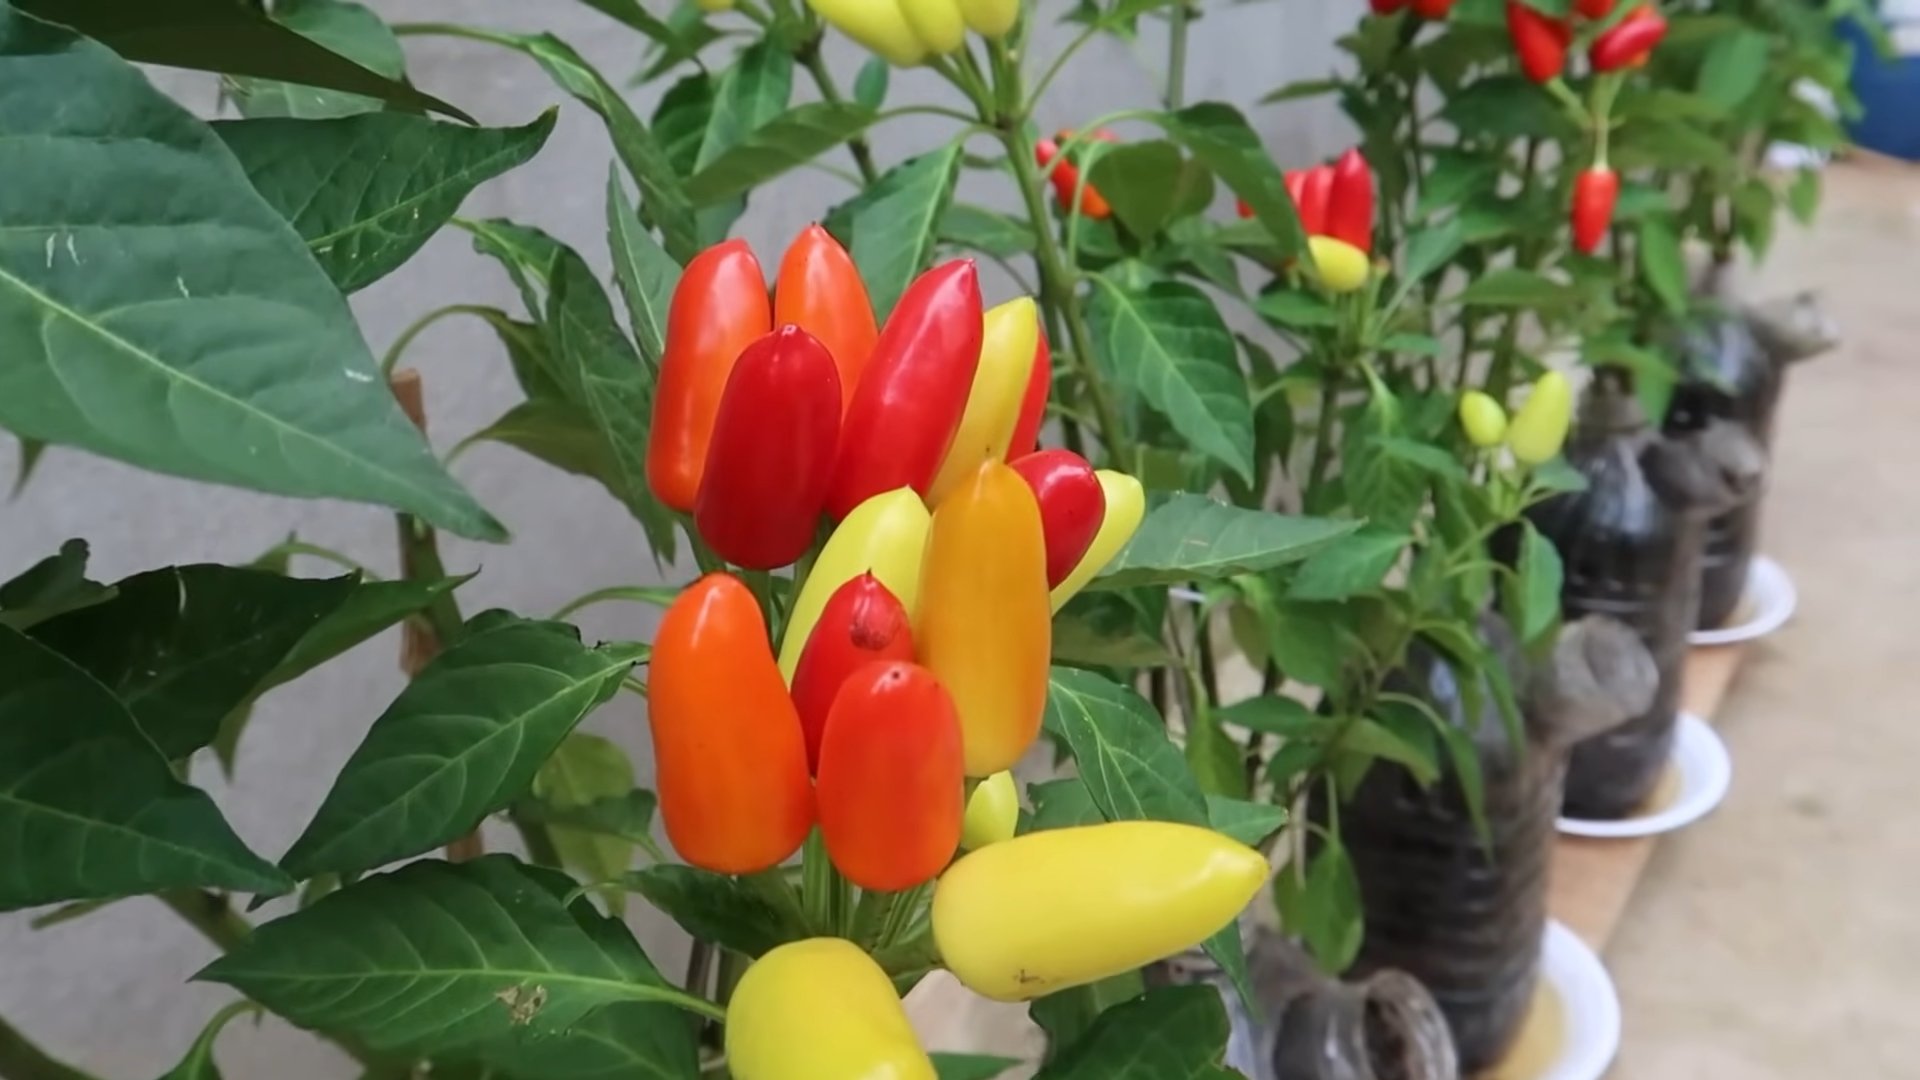
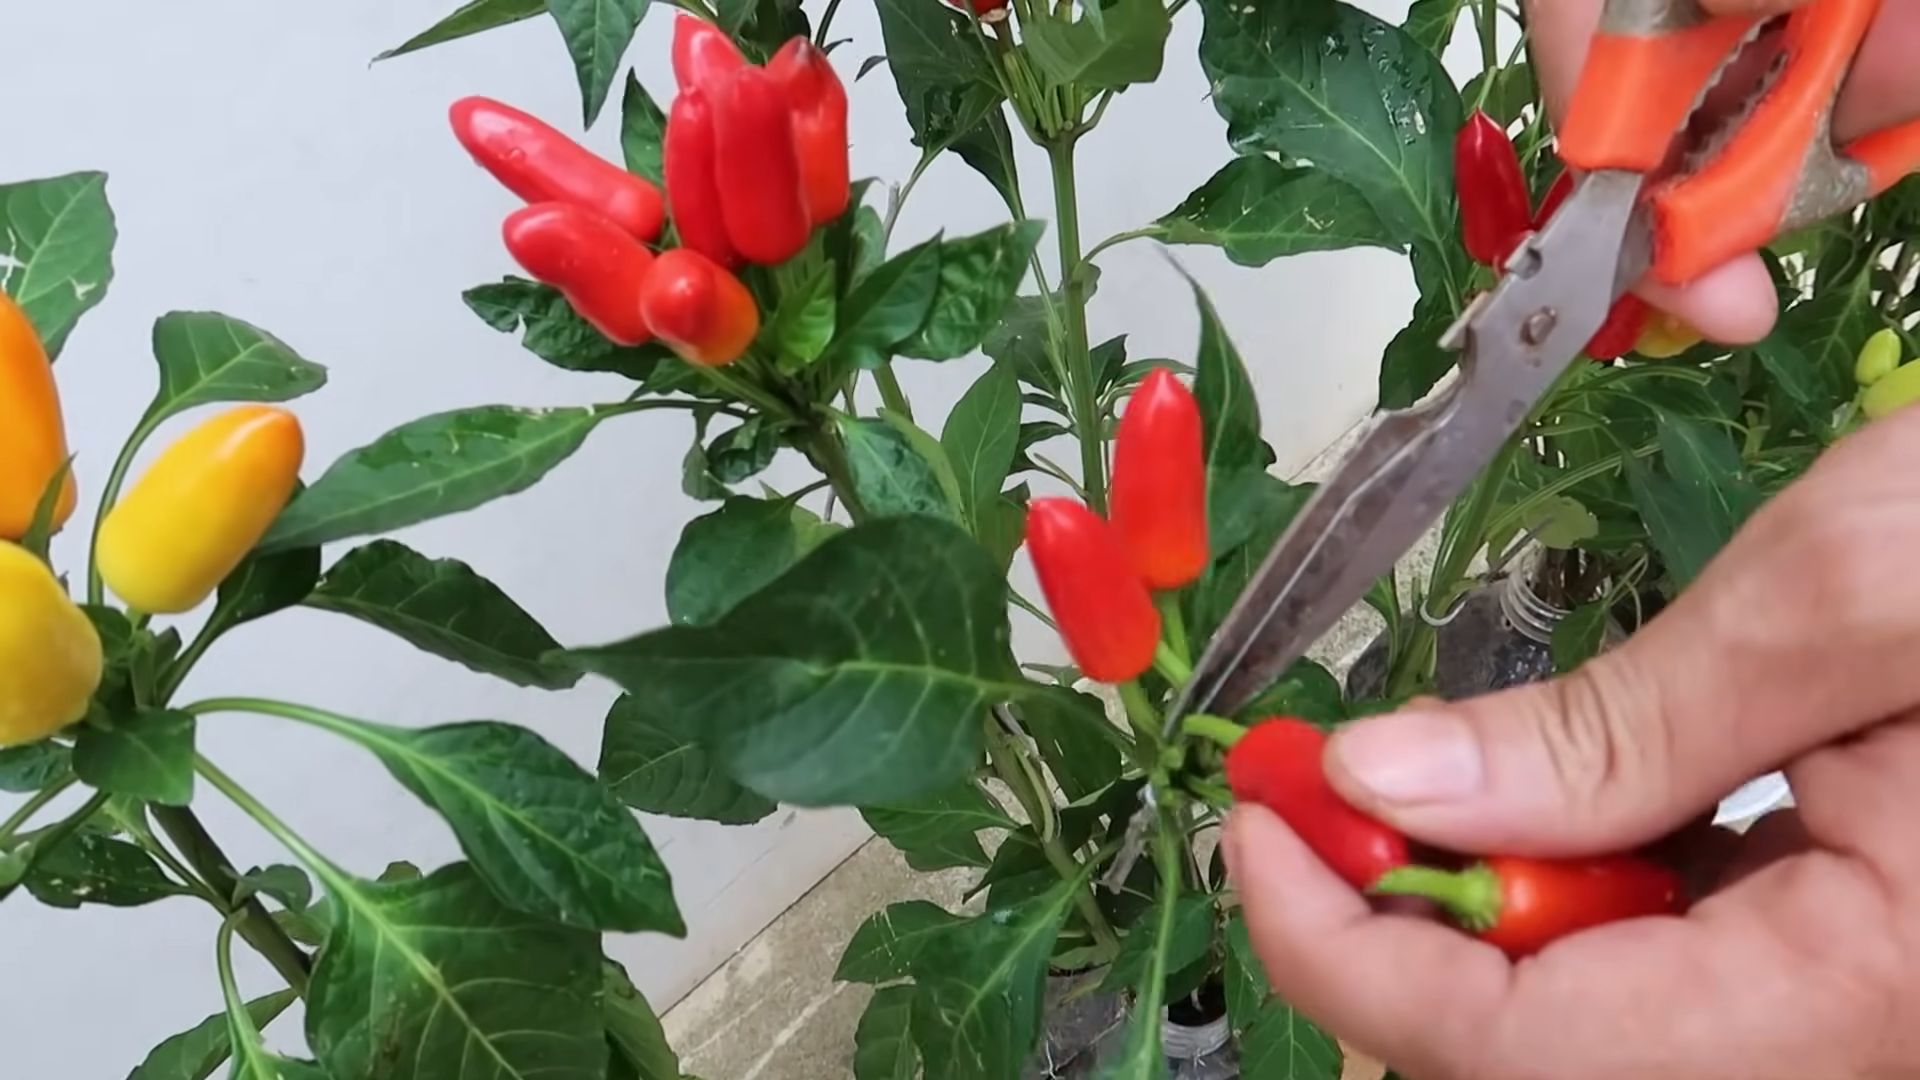
Harvesting Your Peppers: The Sweet Reward of Your Labor
After a few months of care, your pepper plants will start producing delicious peppers!
1. Harvest When Ripe: Peppers are typically ready to harvest when they’ve reached their mature color and size. The exact time will depend on the variety of pepper you’re growing.
2. Use Scissors or Pruning Shears: To harvest your peppers, use scissors or pruning shears to cut the stem just above the pepper. Avoid pulling the peppers off the plant, as this can damage the plant.
3. Enjoy Your Harvest! Now you can enjoy the fruits (or rather, vegetables!) of your labor. Use your fresh peppers in your favorite recipes, or simply enjoy them raw as a healthy snack.
Troubleshooting: Addressing Common Issues
Even with the best care, you might encounter some challenges along the way. Here are a few common issues and how to address them:
* Yellowing Leaves: This can be caused by overwatering, underwatering, nutrient deficiencies, or pests. Check the soil moisture and adjust your watering accordingly. Fertilize your plants regularly. Inspect your plants for pests and treat them as needed.
* Blossom End Rot: This is a condition where the bottom of the pepper turns black and rotten. It’s caused by a calcium deficiency. Add calcium to the soil by using bone meal or eggshells.
* Lack of Fruit Production: This can be caused by insufficient sunlight, lack of pollination, or nutrient deficiencies. Make sure your plants are getting enough sunlight. Hand-pollinate your plants by gently shaking the flowers. Fertilize your plants regularly.
Final Thoughts: A Sustainable and Rewarding Project
I hope you enjoyed this DIY recycled bottle pepper garden project! It’s a fun, easy, and sustainable way to grow your own fresh peppers. Plus, it’s a great conversation starter and a fantastic way to teach kids about gardening and recycling. So, gather your bottles, grab your seeds, and get ready to enjoy a bountiful harvest! Happy gardening!
Conclusion
So, there you have it! Transforming a simple recycled bottle into a thriving pepper garden is not just a fun project; it’s a sustainable, space-saving, and incredibly rewarding way to grow your own fresh produce. We’ve walked you through the process, highlighting the ease and accessibility of this DIY trick. But why is this method a must-try?
Firstly, it’s environmentally conscious. By repurposing plastic bottles, you’re actively reducing waste and giving these materials a new lease on life. In a world increasingly aware of its environmental footprint, every little bit helps, and this project is a tangible way to contribute to a more sustainable lifestyle.
Secondly, it’s incredibly space-efficient. Whether you have a sprawling backyard or a tiny balcony, this method allows you to cultivate peppers even in the most limited spaces. The vertical nature of the bottle garden maximizes your growing potential, making it perfect for urban dwellers or anyone with limited gardening space.
Thirdly, it’s cost-effective. Starting a garden can often involve significant upfront costs for pots, soil, and other materials. This DIY approach minimizes those expenses, allowing you to grow your own peppers on a budget. The only real investment is your time and a little bit of love.
But the benefits don’t stop there. Growing your own peppers allows you to control the quality of your produce. You know exactly what goes into your plants, ensuring that you’re consuming healthy, pesticide-free peppers. Plus, there’s nothing quite like the satisfaction of harvesting your own homegrown vegetables.
Ready to take your pepper gardening to the next level? Consider these variations:
* Herb Garden Hybrid: Combine your pepper plants with complementary herbs like basil or oregano in the same bottle. This companion planting can enhance the flavor of your peppers and deter pests.
* Tiered Bottle Tower: Create a multi-tiered structure by stacking several bottle gardens on top of each other. This maximizes vertical space and creates a visually stunning display.
* Hydroponic Adaptation: Experiment with a hydroponic setup by using nutrient-rich water instead of soil. This can accelerate growth and reduce the risk of soilborne diseases.
* Variety is the Spice of Life: Don’t limit yourself to just one type of pepper. Grow a variety of peppers with different colors, shapes, and heat levels to add visual interest and culinary diversity to your garden.
We’re confident that you’ll find this DIY recycled bottle pepper gardening project to be both enjoyable and rewarding. It’s a fantastic way to connect with nature, reduce waste, and enjoy fresh, homegrown peppers.
So, grab a recycled bottle, some soil, and your favorite pepper seeds, and get started today! We can’t wait to see your creations. Don’t forget to share your experiences, photos, and tips with us in the comments below. Let’s build a community of bottle garden enthusiasts and inspire others to embrace sustainable gardening practices. Happy gardening!
Frequently Asked Questions (FAQ)
What type of plastic bottle is best for this project?
Ideally, you should use PET (polyethylene terephthalate) bottles, which are commonly used for soda and water. These bottles are durable, lightweight, and recyclable. Avoid using bottles made from PVC (polyvinyl chloride), as they can leach harmful chemicals into the soil. Make sure the bottle is clean and free of any residue before you start.
How often should I water my bottle pepper garden?
The watering frequency will depend on the climate, the type of soil you’re using, and the size of the bottle. As a general rule, check the soil moisture level daily. If the top inch of soil feels dry to the touch, it’s time to water. Water thoroughly until excess water drains out of the drainage holes. Avoid overwatering, as this can lead to root rot. During hot and dry weather, you may need to water more frequently.
What type of soil should I use for my pepper plants?
Use a well-draining potting mix that is specifically formulated for vegetables. Avoid using garden soil, as it can be too heavy and compact, which can hinder root growth. You can also amend your potting mix with compost or other organic matter to improve its fertility and drainage.
How much sunlight do pepper plants need?
Pepper plants need at least 6-8 hours of direct sunlight per day to thrive. Choose a location for your bottle garden that receives plenty of sunlight. If you’re growing your peppers indoors, you may need to supplement with artificial lighting, such as grow lights.
What kind of fertilizer should I use for my pepper plants?
Use a balanced fertilizer that is specifically formulated for vegetables. Look for a fertilizer with an NPK ratio (nitrogen, phosphorus, potassium) of around 10-10-10 or 14-14-14. Follow the instructions on the fertilizer package for application rates. You can also use organic fertilizers, such as compost tea or fish emulsion.
How do I protect my pepper plants from pests and diseases?
Regularly inspect your plants for signs of pests or diseases. Common pests that affect pepper plants include aphids, spider mites, and whiteflies. You can control these pests with insecticidal soap or neem oil. Diseases that can affect pepper plants include fungal diseases like powdery mildew and blossom end rot. Prevent these diseases by providing good air circulation, avoiding overwatering, and using disease-resistant varieties.
Can I grow other vegetables in recycled bottles?
Yes, you can grow a variety of other vegetables in recycled bottles, including herbs, lettuce, spinach, and tomatoes. Choose vegetables that have shallow root systems and don’t require a lot of space.
How do I transplant my pepper seedlings into the bottle?
Gently remove the pepper seedling from its original container. Carefully loosen the roots and place the seedling in the bottle, making sure the roots are covered with soil. Water thoroughly after transplanting.
What do I do if my pepper plant gets too big for the bottle?
If your pepper plant outgrows the bottle, you can transplant it into a larger container or directly into the ground. Choose a location that receives plenty of sunlight and has well-draining soil.
How long does it take for pepper plants to produce peppers?
It typically takes 60-90 days for pepper plants to produce peppers, depending on the variety and growing conditions. Be patient and continue to provide your plants with proper care, and you’ll be rewarded with a bountiful harvest.
Is this method suitable for all climates?
This method is adaptable to various climates. In colder climates, you can bring the bottle gardens indoors during the winter months. In hotter climates, provide shade during the hottest part of the day to prevent the plants from overheating.
How do I ensure proper drainage in the bottle?
Drill several drainage holes in the bottom of the bottle before planting. You can also add a layer of gravel or pebbles to the bottom of the bottle to improve drainage.
Can I use this method for organic pepper gardening?
Absolutely! Use organic potting mix, organic fertilizers, and organic pest control methods to create a completely organic pepper garden.
What are the benefits of growing peppers in recycled bottles compared to traditional gardening methods?
Recycled bottle gardening is space-saving, cost-effective, and environmentally friendly. It also allows for better control over soil conditions and reduces the risk of soilborne diseases.
How do I harvest my peppers?
Harvest your peppers when they have reached their mature size and color. Use a sharp knife or scissors to cut the peppers from the plant, leaving a small stem attached.
Leave a Comment