

Purple Bush Beans Gardening: Ever dreamt of strolling through your backyard, plucking vibrant, deep purple beans straight from the vine for a fresh, colorful salad? I know I have! There’s something incredibly satisfying about growing your own food, and purple bush beans offer a unique twist on a classic garden staple. But let’s be honest, sometimes gardening feels more like a battle against pests, unpredictable weather, and confusing instructions than a relaxing hobby.
For centuries, beans have been a vital food source across cultures, from ancient civilizations in the Americas to bustling European markets. While the common green bean is a familiar sight, purple bush beans bring a touch of whimsy and added nutritional value to your garden. Their striking color, thanks to anthocyanins (the same antioxidants found in blueberries!), not only makes them visually appealing but also packs a healthy punch.
That’s where these DIY tricks and hacks come in! I’m going to share some simple, effective techniques to help you successfully cultivate a thriving purple bush beans garden, even if you’re a complete beginner. Forget complicated gardening jargon and expensive equipment. We’ll focus on practical tips to maximize your yield, protect your plants from common problems, and enjoy a bountiful harvest of delicious, eye-catching purple bush beans. So, grab your gardening gloves, and let’s get started on your journey to becoming a purple bean pro!
“`html
Growing Gorgeous Purple Bush Beans: A DIY Guide
Alright, bean enthusiasts! Get ready to add a splash of color and deliciousness to your garden with purple bush beans. I’m going to walk you through everything you need to know, from prepping the soil to harvesting those vibrant veggies. Trust me, it’s easier than you think, and the reward is totally worth it!
Choosing Your Purple Bush Bean Variety
First things first, let’s talk varieties. There are a few different types of purple bush beans out there, each with its own unique characteristics. Here are a couple of my favorites:
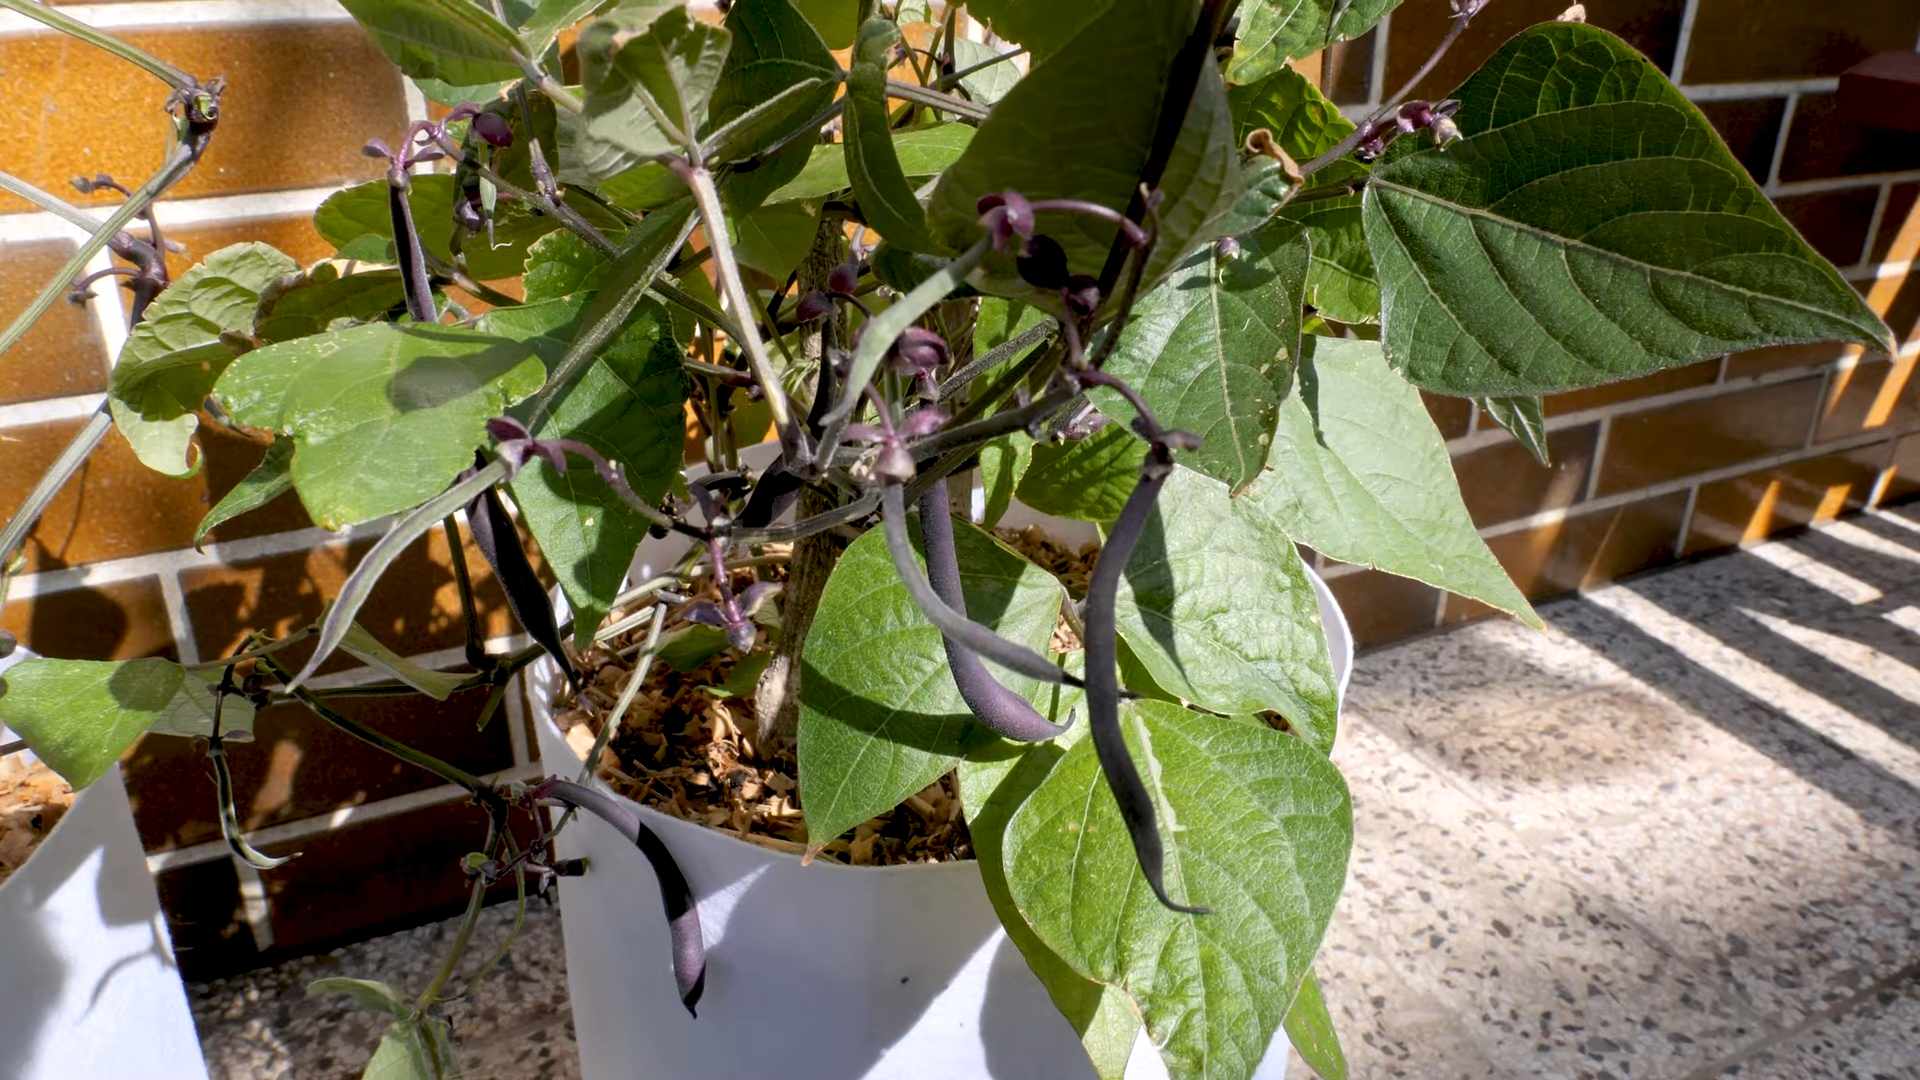
* Royal Burgundy: These are probably the most popular purple bush beans. They’re known for their deep purple color, excellent flavor, and high yields. Plus, they turn green when cooked, which is kind of a fun surprise!
* Purple Queen: As the name suggests, these beans are regal! They’re slightly longer than Royal Burgundy and have a slightly sweeter flavor. They also hold their purple color a bit better when cooked.
Preparing Your Garden Bed
Okay, now that you’ve chosen your variety, let’s get down to the nitty-gritty of preparing your garden bed. Beans are pretty forgiving, but they’ll thrive in well-drained soil that’s rich in organic matter.
* Sunlight: Purple bush beans need at least 6-8 hours of sunlight per day. So, choose a spot in your garden that gets plenty of sunshine.
* Soil: As I mentioned, well-drained soil is key. If your soil is heavy clay, you’ll want to amend it with compost or other organic matter to improve drainage.
* pH: Beans prefer a soil pH between 6.0 and 7.0. You can test your soil pH with a simple soil testing kit from your local garden center. If your soil is too acidic (pH below 6.0), you can add lime to raise the pH. If it’s too alkaline (pH above 7.0), you can add sulfur to lower the pH.
Planting Your Purple Bush Beans
Alright, time to get those beans in the ground! Here’s how I do it:
1. Timing is Everything: Plant your purple bush beans after the last frost in your area. Beans are sensitive to frost, so you don’t want to risk planting them too early. You can check your local frost dates online or with your local extension office.
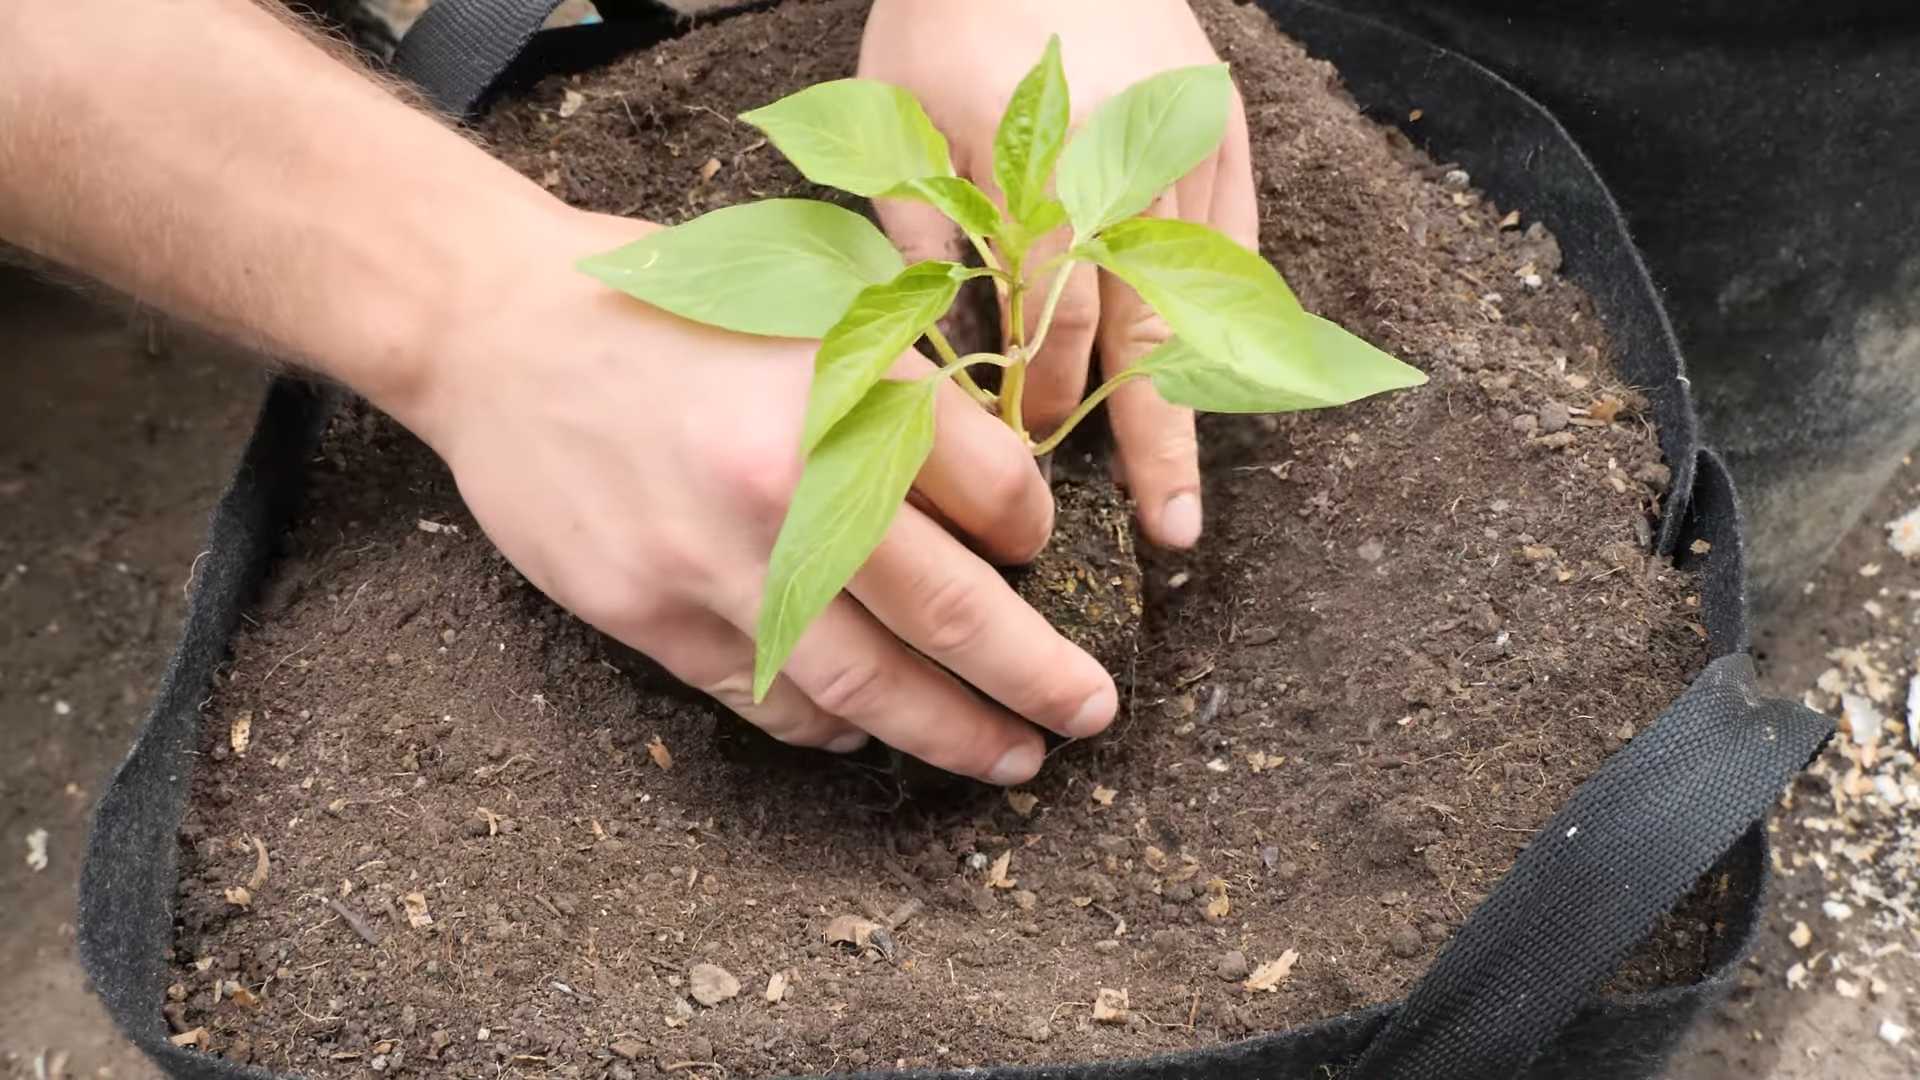
2. Direct Sowing: Beans are best direct-sown, meaning you plant the seeds directly into the garden bed. They don’t transplant well, so starting them indoors is generally not recommended.
3. Spacing: Sow the seeds about 1 inch deep and 2-3 inches apart in rows that are 18-24 inches apart.
4. Watering: After planting, water the soil gently but thoroughly. Keep the soil consistently moist until the seeds germinate.
5. Germination: You should see seedlings emerge in about 7-14 days, depending on the soil temperature and moisture levels.
Caring for Your Purple Bush Beans
Once your seedlings have emerged, it’s time to start caring for them. Here’s what you need to do:
* Watering: Water your bean plants regularly, especially during dry spells. Aim to keep the soil consistently moist, but not waterlogged. Water deeply and less frequently, rather than shallowly and more often.
* Weeding: Keep your garden bed free of weeds, as weeds can compete with your bean plants for nutrients and water. Hand-pull weeds carefully to avoid disturbing the bean plants’ roots.
* Fertilizing: Beans are legumes, which means they can fix nitrogen from the air into the soil. This means they don’t need a lot of fertilizer. However, you can give them a boost with a side dressing of compost or a balanced fertilizer a few weeks after they emerge. I like to use a fertilizer that’s specifically formulated for beans and other legumes.
* Pest Control: Keep an eye out for pests like aphids, bean beetles, and slugs. You can control these pests with insecticidal soap, neem oil, or by hand-picking them off the plants. I prefer using organic pest control methods whenever possible.
* Support: Bush beans don’t typically need support, but if your plants are getting tall and leggy, you can provide them with some support by staking them or using a small trellis.
Harvesting Your Purple Bush Beans
Now for the fun part – harvesting! Here’s how to know when your purple bush beans are ready to pick:
* Timing: Purple bush beans are typically ready to harvest about 50-60 days after planting.
* Appearance: The beans should be firm, plump, and brightly colored. They should also snap easily when bent.
* Size: The beans should be about 4-6 inches long, depending on the variety.
* Harvesting Technique: To harvest your beans, gently snap them off the plant. Be careful not to damage the plant.
* Frequency: Harvest your beans regularly, about every 2-3 days. This will encourage the plant to produce more beans.
Dealing with Common Problems
Even with the best care, you might encounter some problems when growing purple bush beans. Here are a few common problems and how to deal with them:
* Bean Beetles: These pesky beetles can skeletonize the leaves of your bean plants. You can control them with insecticidal soap, neem oil, or by hand-picking them off the plants.
* Aphids: These tiny insects can suck the sap from your bean plants, causing them to weaken and yellow. You can control them with insecticidal soap or by spraying them with a strong stream of water.
* Slugs: Slugs can munch on the leaves of your bean plants, especially when they’re young. You can control them with slug bait or by hand-picking them off the plants at night.
* Powdery Mildew: This fungal disease can cause a white, powdery coating on the leaves of your bean plants. You can prevent powdery mildew by providing good air circulation and avoiding overhead watering. If your plants do get powdery mildew, you can treat them with a fungicide.
* Bean Mosaic Virus: This virus can cause mottled leaves and stunted growth. There is no cure for bean mosaic virus, so it’s important to prevent it by using disease-resistant varieties and controlling aphids, which can spread the virus.
Saving Seeds (Optional)
If you want to save seeds from your purple bush beans for next year, here’s how to do it:
1. Choose Healthy Plants: Select healthy, vigorous plants that produce high-quality beans.
2. Allow Beans to Mature: Allow some of the beans to mature fully on the plant. They should become dry and brown.
3. Harvest the Dry Beans: Harvest the dry beans and remove them from the pods.
4. Dry the Seeds: Spread the seeds out on a tray and allow them to dry completely in a cool, dry place for several weeks.
5. Store the Seeds: Store the dried seeds in an airtight container in a cool, dry place. They should be viable for several years.
Enjoying Your Harvest
Finally, the best part – enjoying your harvest! Purple bush beans are delicious steamed, sautéed, or added to salads. They’re also a great source of vitamins, minerals, and fiber. Remember they turn green when cooked!
Here are a few of my favorite ways to enjoy purple bush beans:
* Steamed with a little butter and salt. Simple, but delicious!
* Sautéed with garlic and olive oil. A classic combination.
* Added to a salad with feta cheese and a lemon vinaigrette. A refreshing and flavorful salad.
* Pickled. A great way to preserve your harvest.
So there you have it! Everything you need to know to grow gorgeous purple bush beans in your own garden. With a little bit of care and attention, you’ll be enjoying a bountiful harvest in no time. Happy gardening!
“`
Conclusion
So, there you have it! Mastering the art of growing your own purple bush beans is not only achievable but also incredibly rewarding. We’ve walked you through the entire process, from selecting the right seeds to harvesting your vibrant, delicious crop. But why should you bother with this particular variety? The answer lies in the unique combination of beauty, flavor, and nutritional benefits that purple bush beans offer.
Think about it: imagine strolling through your garden, the deep purple hues of these beans adding a splash of color to your landscape. Beyond aesthetics, these beans boast a slightly sweeter, more delicate flavor than their green counterparts, making them a delightful addition to salads, stir-fries, or simply steamed as a side dish. And let’s not forget the nutritional punch they pack! Rich in antioxidants, vitamins, and fiber, purple bush beans are a healthy and delicious choice for you and your family.
This DIY trick – because that’s truly what it is, a simple yet effective method for cultivating a garden staple – is a must-try for several reasons. First, it empowers you to control the quality of your food, ensuring that you’re consuming produce free from harmful pesticides and chemicals. Second, it connects you to the natural world, fostering a sense of accomplishment and appreciation for the growing process. And third, it’s a cost-effective way to enjoy fresh, flavorful vegetables right from your backyard.
But the journey doesn’t end here! Feel free to experiment with different varieties of purple bush beans, such as ‘Royal Burgundy’ or ‘Purple Queen,’ to discover your personal favorite. Try companion planting with herbs like basil or rosemary to deter pests and enhance the flavor of your beans. And don’t be afraid to get creative in the kitchen, incorporating your homegrown purple bush beans into new and exciting recipes. Consider pickling them for a tangy treat, adding them to soups for a burst of color and nutrients, or even grilling them for a smoky, charred flavor.
We’re confident that once you experience the joy of growing your own purple bush beans, you’ll be hooked. It’s a simple, satisfying, and sustainable way to enjoy fresh, healthy food. So, grab your seeds, get your hands dirty, and embark on this exciting gardening adventure.
We encourage you to try this DIY trick and share your experiences with us! Let us know what varieties you’ve grown, what challenges you’ve faced, and what delicious dishes you’ve created. Share your photos and stories on social media using #PurpleBushBeansGardening and inspire others to join the fun. Together, we can cultivate a community of passionate gardeners who appreciate the beauty and bounty of nature. Happy gardening!
Frequently Asked Questions (FAQ)
What are the benefits of growing purple bush beans compared to green beans?
Purple bush beans offer several advantages over traditional green beans. Firstly, their vibrant color adds visual appeal to your garden and your plate. Secondly, they often have a slightly sweeter and more delicate flavor. Most importantly, the purple color indicates a higher concentration of anthocyanins, powerful antioxidants that offer various health benefits, including reducing inflammation and protecting against chronic diseases. Growing your own allows you to control pesticide use and enjoy fresher, more nutritious beans.
How much space do I need to grow purple bush beans?
One of the great things about bush beans is that they don’t require a lot of space. They are ideal for small gardens, raised beds, or even containers. A general guideline is to allow about 4-6 inches between plants and 18-24 inches between rows. If you’re growing in containers, choose pots that are at least 12 inches in diameter and depth to provide adequate room for the roots to develop. Remember to provide support if the plants start to lean.
What kind of soil is best for growing purple bush beans?
Purple bush beans thrive in well-drained soil that is rich in organic matter. Before planting, amend your soil with compost or aged manure to improve its fertility and drainage. The ideal soil pH for beans is between 6.0 and 7.0. You can test your soil pH using a home testing kit or by sending a sample to your local agricultural extension office. If your soil is too acidic, you can add lime to raise the pH.
How often should I water my purple bush beans?
Consistent watering is crucial for healthy bean growth. Water your plants deeply and regularly, especially during dry periods. Aim to keep the soil consistently moist but not waterlogged. A good rule of thumb is to water when the top inch of soil feels dry to the touch. Mulching around the plants can help retain moisture and suppress weeds. Avoid overhead watering, as this can increase the risk of fungal diseases. Drip irrigation or soaker hoses are excellent options for delivering water directly to the roots.
When is the best time to harvest purple bush beans?
Harvest time depends on the variety of purple bush beans you’re growing, but generally, they are ready to harvest about 50-60 days after planting. The beans should be firm, plump, and easily snap off the plant. Avoid letting the beans become too large or tough, as this can affect their flavor and texture. Harvest regularly to encourage continued production.
What are some common pests and diseases that affect purple bush beans, and how can I prevent them?
Common pests that can affect purple bush beans include aphids, bean beetles, and slugs. Diseases include bean rust, powdery mildew, and anthracnose. To prevent these problems, practice good garden hygiene by removing plant debris and weeds. Rotate your crops each year to prevent soilborne diseases from building up. Use organic pest control methods, such as insecticidal soap or neem oil, to control pests. Ensure good air circulation around your plants to prevent fungal diseases. Choose disease-resistant varieties of purple bush beans whenever possible.
Can I grow purple bush beans in containers?
Yes, purple bush beans are well-suited for container gardening. Choose a container that is at least 12 inches in diameter and depth. Use a high-quality potting mix that drains well. Provide adequate sunlight (at least 6-8 hours per day) and water regularly. You may need to fertilize your container-grown beans more frequently than those grown in the ground, as nutrients can leach out of the soil more quickly.
How do I store purple bush beans after harvesting?
Freshly harvested purple bush beans can be stored in the refrigerator for up to a week. Place them in a plastic bag or container to prevent them from drying out. For longer storage, you can blanch and freeze the beans. To blanch, boil the beans for 2-3 minutes, then immediately plunge them into ice water to stop the cooking process. Drain the beans thoroughly and freeze them in freezer-safe bags or containers. You can also pickle or can purple bush beans for long-term storage.
Are there any companion plants that are beneficial for purple bush beans?
Yes, several companion plants can benefit purple bush beans. Marigolds deter bean beetles and other pests. Basil repels aphids and other insects. Rosemary also helps to deter pests. Carrots and cucumbers are also good companion plants for beans. Avoid planting beans near onions or garlic, as these can inhibit their growth.
How can I save seeds from my purple bush beans for next year?
Saving seeds from your purple bush beans is a great way to ensure a continuous supply of seeds for future plantings. Allow some of the bean pods to dry completely on the plant. Once the pods are dry and brittle, remove the seeds and store them in an airtight container in a cool, dry place. Label the container with the variety and date. It’s important to note that if you’re growing multiple varieties of beans, there’s a chance of cross-pollination, which could result in seeds that don’t produce true-to-type plants. To prevent cross-pollination, you can isolate different varieties of beans by a significant distance or hand-pollinate them.

Leave a Comment