

Growing Tomatoes at Home can feel like a daunting task, but trust me, it’s more rewarding than you might think! Imagine biting into a juicy, sun-ripened tomato, bursting with flavor, that you nurtured from a tiny seed right in your own backyard. Forget those bland, store-bought imposters – we’re talking about the real deal here! This article is your ultimate guide to unlocking the secrets of successful home tomato cultivation, even if you’ve never gardened a day in your life.
The history of tomato cultivation is fascinating, dating back to the Aztecs and Incas who first domesticated these vibrant fruits. Over centuries, tomatoes have journeyed across continents, evolving into the diverse varieties we enjoy today. But let’s be honest, in our modern world, many of us have lost touch with the simple pleasure of growing our own food. That’s where this DIY guide comes in.
Why should you bother with growing tomatoes at home? Because it’s not just about the taste (though that’s a huge perk!). It’s about connecting with nature, reducing your carbon footprint, and knowing exactly what goes into your food. Plus, let’s face it, with rising grocery prices and concerns about food security, having a reliable source of fresh produce right outside your door is more important than ever. I’m here to share easy-to-follow tricks and hacks that will transform your garden into a tomato-growing paradise, regardless of your space or experience level. Get ready to roll up your sleeves and get your hands dirty – delicious, homegrown tomatoes await!
DIY Home Garden: Transforming Plastic Waste into a Blooming Oasis
Hey there, fellow garden enthusiasts! I’m so excited to share this project with you. We’re going to turn something that often ends up in landfills – plastic waste – into a thriving home garden. Not only is this a fantastic way to reduce your environmental footprint, but it’s also a super budget-friendly way to grow your own herbs, vegetables, or flowers. Get ready to get your hands dirty (in a good way!) and create something beautiful and sustainable.
Materials You’ll Need
Before we dive in, let’s gather our supplies. Don’t worry, most of these are probably already lying around your house!
- Plastic Bottles and Containers: Think soda bottles, water bottles, milk jugs, yogurt containers, margarine tubs – the more variety, the better! Make sure they’re clean and dry.
- Scissors or a Utility Knife: For cutting the plastic. Be careful!
- Potting Soil: Choose a good quality potting mix that suits the plants you want to grow.
- Seeds or Seedlings: Your choice of herbs, vegetables, or flowers.
- Drill or Nail and Hammer: For creating drainage holes.
- Watering Can or Hose: To keep your plants hydrated.
- Gloves (Optional): To protect your hands.
- Measuring Tape or Ruler: For precise cuts (optional, but helpful).
- Permanent Markers: For labeling your containers.
- Gravel or Small Stones: For drainage (optional).
- Spray Paint (Optional): To decorate your containers.
Preparing Your Plastic Containers
This is where the transformation begins! We’re going to take those discarded plastic items and give them a new purpose.
- Cleaning: First things first, give all your plastic containers a good wash with soap and water. Remove any labels or sticky residue. This will help prevent any contamination of your soil.
- Cutting (if necessary): Depending on the size and shape of your containers, you might need to cut them. For example, you can cut a large soda bottle in half to create two smaller planters. Use your scissors or utility knife carefully. If you’re using a utility knife, always cut away from yourself and use a cutting board.
- Horizontal Cuts: For creating shorter planters, cut the bottle horizontally. You can cut it in half, or even into thirds, depending on the desired height.
- Vertical Cuts: For creating hanging planters, you can cut a bottle vertically, leaving a small section intact at the bottom to form a “pocket.”
- Creative Cuts: Feel free to get creative! You can cut out shapes or patterns to add some flair to your planters.
- Creating Drainage Holes: This is crucial for healthy plant growth. Water needs to be able to drain out of the container to prevent root rot. Use your drill or nail and hammer to create several drainage holes in the bottom of each container.
- Drill Method: If you’re using a drill, use a small drill bit (around 1/4 inch) and drill several holes evenly spaced across the bottom of the container.
- Nail and Hammer Method: If you’re using a nail and hammer, place the container on a sturdy surface and carefully hammer the nail through the bottom to create the holes. Be careful not to crack the plastic.
- Adding Gravel (Optional): For extra drainage, you can add a layer of gravel or small stones to the bottom of each container before adding the soil. This will help prevent the drainage holes from getting clogged.
- Decorating (Optional): This is where you can really let your personality shine! You can use spray paint to decorate your containers. Choose colors that complement your garden or create a fun and whimsical design.
- Preparation: Before painting, make sure the containers are clean and dry. You can also lightly sand the surface to help the paint adhere better.
- Painting: Apply several thin coats of spray paint, allowing each coat to dry completely before applying the next. This will prevent drips and ensure a smooth finish.
- Stencils and Designs: You can use stencils to create intricate designs or simply freehand your own artwork.
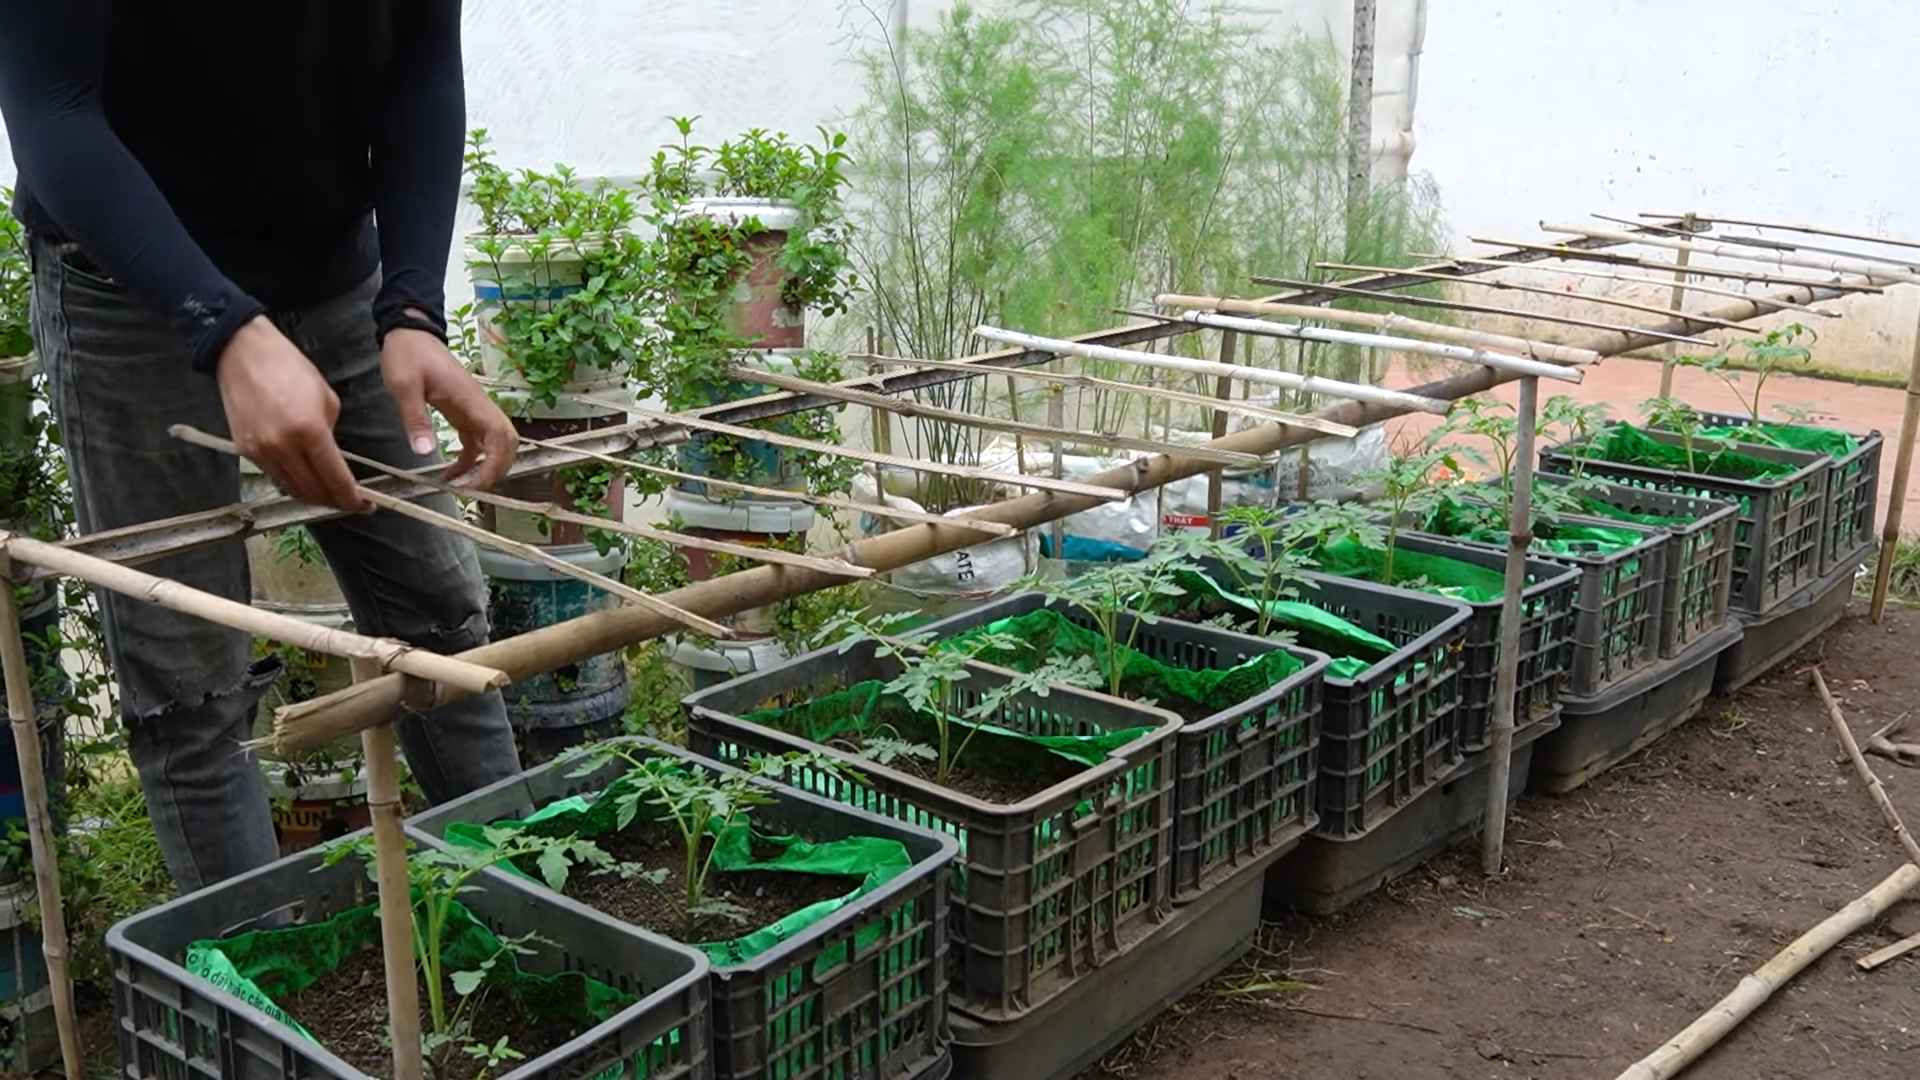
Planting Your Garden
Now for the fun part – planting your seeds or seedlings!
- Filling with Soil: Fill each container with potting soil, leaving about an inch of space at the top. Gently pat down the soil to remove any air pockets.
- Planting Seeds: If you’re planting seeds, follow the instructions on the seed packet for spacing and depth. Generally, you’ll want to create a small hole in the soil, drop in the seed, and cover it with a thin layer of soil.
- Planting Seedlings: If you’re planting seedlings, gently remove them from their original containers. Loosen the roots slightly and place the seedling in the center of the container. Fill in around the seedling with potting soil and gently pat it down.
- Watering: After planting, water your seeds or seedlings thoroughly. Make sure the water drains out of the drainage holes.
- Labeling: Use your permanent markers to label each container with the name of the plant. This will help you keep track of what you’ve planted.
Caring for Your Plastic Bottle Garden
Just like any garden, your plastic bottle garden will need regular care to thrive.
- Watering: Water your plants regularly, but don’t overwater. The frequency of watering will depend on the type of plant, the weather, and the drainage of your containers. Check the soil moisture by sticking your finger into the soil. If the soil feels dry, it’s time to water.
- Sunlight: Most plants need at least six hours of sunlight per day. Place your plastic bottle garden in a sunny location, such as a windowsill, balcony, or patio.
- Fertilizing: To keep your plants healthy and productive, fertilize them regularly with a balanced fertilizer. Follow the instructions on the fertilizer package.
- Pruning: Prune your plants regularly to encourage growth and prevent them from becoming leggy. Remove any dead or yellowing leaves.
- Pest Control: Keep an eye out for pests, such as aphids, spider mites, and whiteflies. If you find any pests, treat them with an appropriate insecticide or organic pest control method.
- Repotting: As your plants grow, they may outgrow their containers. When this happens, you’ll need to repot them into larger containers. Choose a container that is at least two inches larger in diameter than the original container.
Creative Ideas for Your Plastic Bottle Garden
The possibilities are endless when it comes to creating a plastic bottle garden! Here are a few ideas to get you started:
- Vertical Garden: Create a vertical garden by hanging your plastic bottle planters on a wall or fence. You can use rope, wire, or even old clothes hangers to hang the planters.
- Hanging Baskets: Create hanging baskets by cutting the bottoms off of plastic bottles and attaching them to wire hangers.
- Herb Spiral: Build an herb spiral using plastic bottles filled with soil. This is a great way to grow a variety of herbs in a small space.
- Seed Starting: Use small plastic containers, like yogurt cups, to start seeds indoors before transplanting them into your garden.
- Composting: Use large plastic containers to create a compost bin. This is a great way to recycle food scraps and create nutrient-rich soil for your garden.
Troubleshooting Tips
Even with the best planning, you might encounter a few challenges along the way. Here are some common issues and how to address them:
- Yellowing Leaves: This could be a sign of overwatering, underwatering, or nutrient deficiency. Adjust your watering schedule and fertilize your plants regularly.
- Leggy Growth: This is usually caused by insufficient sunlight. Move your plants to a sunnier location.
- Root Rot: This is caused by overwatering and poor drainage. Make sure your containers have adequate drainage holes and avoid overwatering.
- Pest Infestation: Treat pests with an appropriate insecticide or organic pest control method.
Choosing the Right Plants
Not all plants are created equal when it comes to growing in plastic containers. Here are some great options that thrive in this type of environment:
- Herbs: Basil, mint, oregano, thyme, rosemary, chives, parsley. Herbs are generally low-maintenance
Conclusion
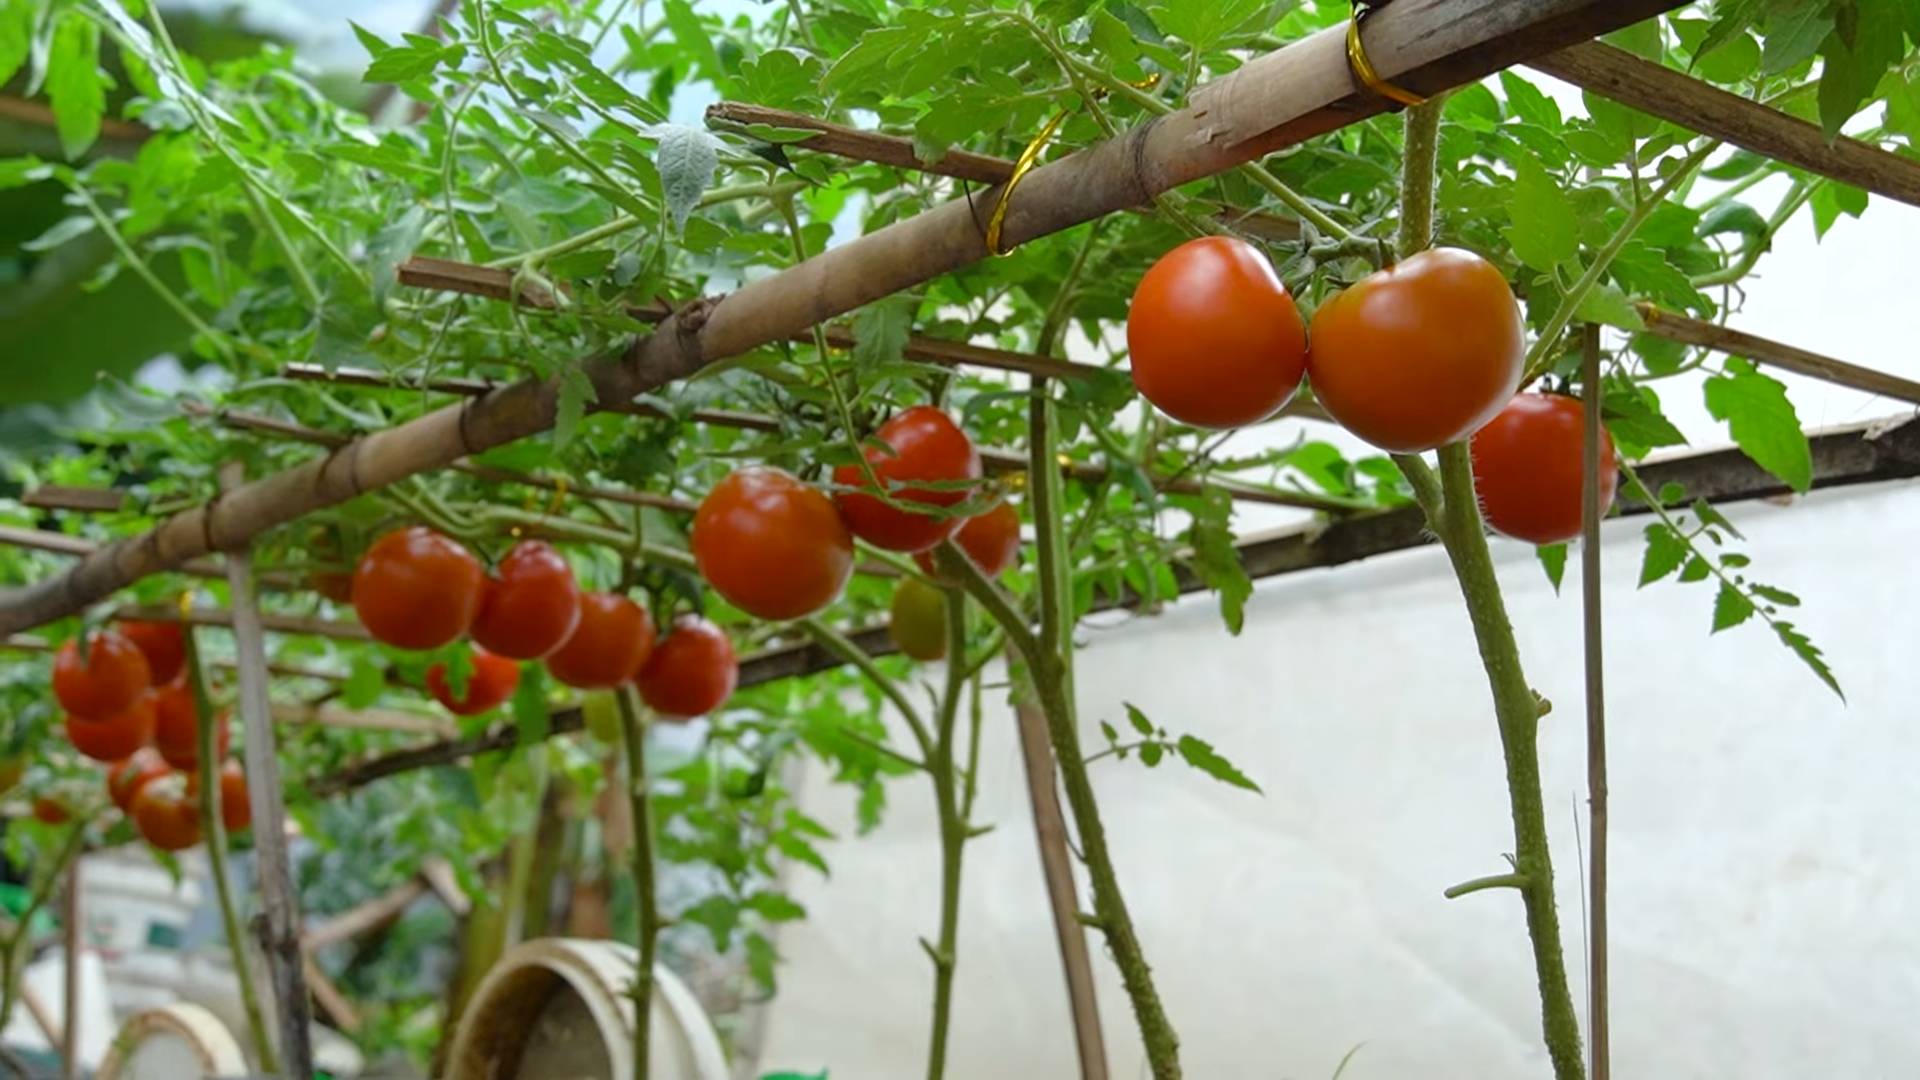
So, there you have it! Growing tomatoes at home, while it might seem daunting at first, is an incredibly rewarding experience that brings the vibrant flavors of summer right to your table. We’ve explored the essential steps, from selecting the perfect tomato variety for your climate and space to nurturing your seedlings and providing them with the support they need to thrive. We’ve also delved into troubleshooting common issues and harvesting your bountiful crop at its peak of ripeness.
But why is this DIY approach a must-try? Simply put, the taste of a homegrown tomato, bursting with sunshine and vine-ripened goodness, is incomparable to anything you can find in a store. You control the entire process, ensuring that your tomatoes are free from harmful pesticides and herbicides. Plus, you get the immense satisfaction of knowing you nurtured these delicious fruits from seed to table.
Beyond the basic techniques, there are countless ways to personalize your tomato-growing journey. Experiment with different varieties – from the tiny, sweet cherry tomatoes perfect for snacking to the large, meaty beefsteak tomatoes ideal for sandwiches. Consider growing heirloom varieties for unique flavors and colors. You can also explore different growing methods, such as container gardening on a balcony or raised beds in your backyard. Companion planting, like basil near your tomatoes, can enhance flavor and deter pests.
For those with limited space, try growing tomatoes in hanging baskets or upside-down planters. These methods are not only space-saving but also visually appealing. You can also explore hydroponic tomato growing for a soilless, controlled environment.
Don’t be afraid to experiment with different fertilizers and soil amendments to find what works best for your tomatoes. Some gardeners swear by adding eggshells to the soil for extra calcium, while others prefer using compost tea for a nutrient boost.
The key to successful tomato growing is observation. Pay close attention to your plants, noting any changes in their leaves, stems, or fruit. Early detection of problems allows you to take corrective action before they become serious.
We wholeheartedly encourage you to embark on this tomato-growing adventure. It’s a fantastic way to connect with nature, learn new skills, and enjoy the freshest, most flavorful tomatoes imaginable. And remember, even if you encounter a few challenges along the way, don’t give up! Every season is a learning opportunity.
Once you’ve harvested your first batch of homegrown tomatoes, we’d love to hear about your experience! Share your tips, tricks, and triumphs in the comments below. Let’s create a community of tomato enthusiasts who can learn from each other and celebrate the joys of growing our own food. Did you try a specific variety? Did you encounter any unexpected challenges? What were your favorite ways to use your homegrown tomatoes? Your insights can help other gardeners succeed.
So, grab your seeds, prepare your soil, and get ready to experience the unparalleled satisfaction of growing your own delicious, sun-ripened tomatoes. Happy gardening!
Frequently Asked Questions (FAQ)
What are the best tomato varieties to grow for beginners?
For beginners, determinate tomato varieties like Roma, Celebrity, and Better Bush are excellent choices. Determinate varieties grow to a specific size and produce most of their fruit at once, making them easier to manage. They also require less pruning than indeterminate varieties. Cherry tomatoes, such as Sweet 100 or Sun Gold, are also relatively easy to grow and provide a continuous harvest of sweet, bite-sized fruits. Consider your local climate when selecting varieties; your local garden center can provide recommendations for tomatoes that thrive in your area.
How much sunlight do tomatoes need?
Tomatoes need at least 6-8 hours of direct sunlight per day to thrive. Without sufficient sunlight, they will produce fewer fruits and may be more susceptible to diseases. Choose a planting location that receives full sun throughout the day. If you are growing tomatoes in containers, make sure to position them in a sunny spot and rotate them occasionally to ensure even sun exposure. If you live in a particularly hot climate, providing some afternoon shade can prevent sunscald on the fruits.
What kind of soil is best for growing tomatoes?
Tomatoes prefer well-draining soil that is rich in organic matter. A slightly acidic soil pH of 6.0 to 6.8 is ideal. Before planting, amend your soil with compost, aged manure, or other organic materials to improve its fertility and drainage. If your soil is heavy clay, consider adding sand or perlite to improve drainage. You can also purchase a soil testing kit to determine the pH and nutrient levels of your soil and make necessary adjustments.
How often should I water my tomato plants?
Water tomato plants deeply and regularly, especially during hot, dry weather. Aim to water at the base of the plant to avoid wetting the foliage, which can increase the risk of fungal diseases. The frequency of watering will depend on the weather, soil type, and size of the plant. Check the soil moisture regularly by sticking your finger about an inch into the soil. If the soil feels dry, it’s time to water. Avoid overwatering, as this can lead to root rot. Mulching around the base of the plants can help retain moisture and suppress weeds.
When and how should I fertilize my tomato plants?
Fertilize tomato plants regularly throughout the growing season. Start with a balanced fertilizer at planting time, and then switch to a fertilizer that is higher in phosphorus and potassium once the plants begin to flower and set fruit. Follow the instructions on the fertilizer package carefully to avoid over-fertilizing. You can also use organic fertilizers, such as compost tea or fish emulsion. Apply fertilizer every 2-3 weeks, or as needed, based on the plant’s growth and appearance.
How do I prevent common tomato diseases and pests?
Preventing tomato diseases and pests requires a combination of good cultural practices and, if necessary, appropriate treatments. Choose disease-resistant tomato varieties whenever possible. Practice crop rotation to avoid building up disease organisms in the soil. Provide good air circulation around the plants by spacing them properly and pruning them regularly. Water at the base of the plants to avoid wetting the foliage. Monitor your plants regularly for signs of pests or diseases, and take action promptly if you spot any problems. Organic pest control methods, such as insecticidal soap or neem oil, can be effective for controlling many common tomato pests. For fungal diseases, copper-based fungicides can be used as a preventative measure.
How do I prune tomato plants?
Pruning tomato plants can improve air circulation, reduce the risk of disease, and encourage fruit production. Determinate tomato varieties require minimal pruning, while indeterminate varieties benefit from regular pruning. Remove suckers (the small shoots that grow between the main stem and the branches) from indeterminate varieties to encourage the plant to focus its energy on fruit production. You can also remove yellowing or diseased leaves to improve air circulation. Use clean, sharp pruning shears to avoid spreading diseases.
When is the best time to harvest tomatoes?
Tomatoes are ready to harvest when they are fully colored, slightly soft to the touch, and easily detach from the vine. The exact color will depend on the variety. Gently twist or cut the tomato from the vine, leaving a small piece of the stem attached. Avoid squeezing the tomato, as this can bruise it. Store harvested tomatoes at room temperature, away from direct sunlight, to preserve their flavor and texture. Do not refrigerate tomatoes, as this can make them mealy.
Can I grow tomatoes in containers?
Yes, tomatoes can be successfully grown in containers. Choose a large container (at least 10 gallons) with drainage holes. Use a high-quality potting mix that is specifically formulated for vegetables. Select determinate or dwarf tomato varieties for container growing, as they are more compact and manageable. Provide adequate support for the plants, such as a stake or cage. Water and fertilize regularly, as container-grown tomatoes tend to dry out and deplete nutrients more quickly than those grown in the ground.
What do I do with green tomatoes at the end of the season?
If you have green tomatoes at the end of the season, don’t despair! There are several ways to use them. You can ripen them indoors by placing them in a paper bag with a ripe apple or banana. The ethylene gas released by the ripe fruit will help the tomatoes ripen. You can also use green tomatoes to make fried green tomatoes, green tomato relish, or green tomato chutney. These are delicious ways to enjoy the last of your tomato harvest.
Leave a Comment