

Onions in Bottles DIY Hack: Ever dream of having a constant supply of fresh onions right at your fingertips, without the hassle of a sprawling garden? I know I have! For centuries, onions have been a culinary cornerstone, adding depth and flavor to dishes across cultures. From ancient Egypt, where they were revered and even used as currency, to modern-day kitchens worldwide, onions are indispensable. But let’s face it, growing them can sometimes feel like a chore, especially if you’re short on space or time.
That’s where this ingenious DIY trick comes in! Imagine transforming ordinary plastic bottles into mini onion-growing powerhouses. This isn’t just about saving money; it’s about embracing a sustainable and space-saving approach to gardening. We’ll show you how to create a vertical onion garden that’s both practical and visually appealing. Forget about battling weeds and pests in a traditional garden bed. With this onions in bottles DIY hack, you’ll be enjoying fresh, homegrown onions in no time, even if you only have a small balcony or patio. So, grab your empty bottles, and let’s get started on this exciting gardening adventure!
Never Buy Onions Again: The Ultimate Onion-in-a-Bottle Growing Guide!
Hey there, fellow gardeners and food-saving enthusiasts! I’m so excited to share this amazing DIY hack with you: growing onions in bottles! Yes, you read that right. Forget buying onions from the store every week. With this method, you can have a continuous supply of fresh, green onions right at your fingertips. It’s surprisingly easy, space-saving, and incredibly rewarding. Let’s dive in!
What You’ll Need
Before we get started, let’s gather our supplies. This is a pretty low-cost project, which is always a win!
* Plastic Bottles: I prefer using 2-liter soda bottles, but any clear plastic bottle will work. Just make sure they’re clean and have had the labels removed. You’ll need one bottle per onion you want to grow.
* Onions: You can use store-bought onions that have started to sprout, or you can buy onion sets (small, immature onions). I’ve had success with both! If you’re using store-bought onions, look for ones with healthy green shoots already emerging.
* Potting Soil: A good quality potting mix is essential for healthy growth. Avoid using garden soil, as it can be too dense and may contain pests or diseases.
* Water: Tap water is fine, but rainwater or filtered water is even better.
* Scissors or a Utility Knife: For cutting the bottles. Be careful!
* Optional: Rooting Hormone: This can help speed up root development, but it’s not strictly necessary.
* Optional: Fertilizer: A balanced liquid fertilizer can give your onions a boost, especially after they’ve been growing for a few weeks.
Preparing the Bottles
This is where we transform those empty plastic bottles into mini-onion greenhouses!
1. Clean the Bottles: Make sure your bottles are thoroughly cleaned with soap and water. Rinse them well to remove any soap residue. This is important to prevent any contamination that could harm your onions.
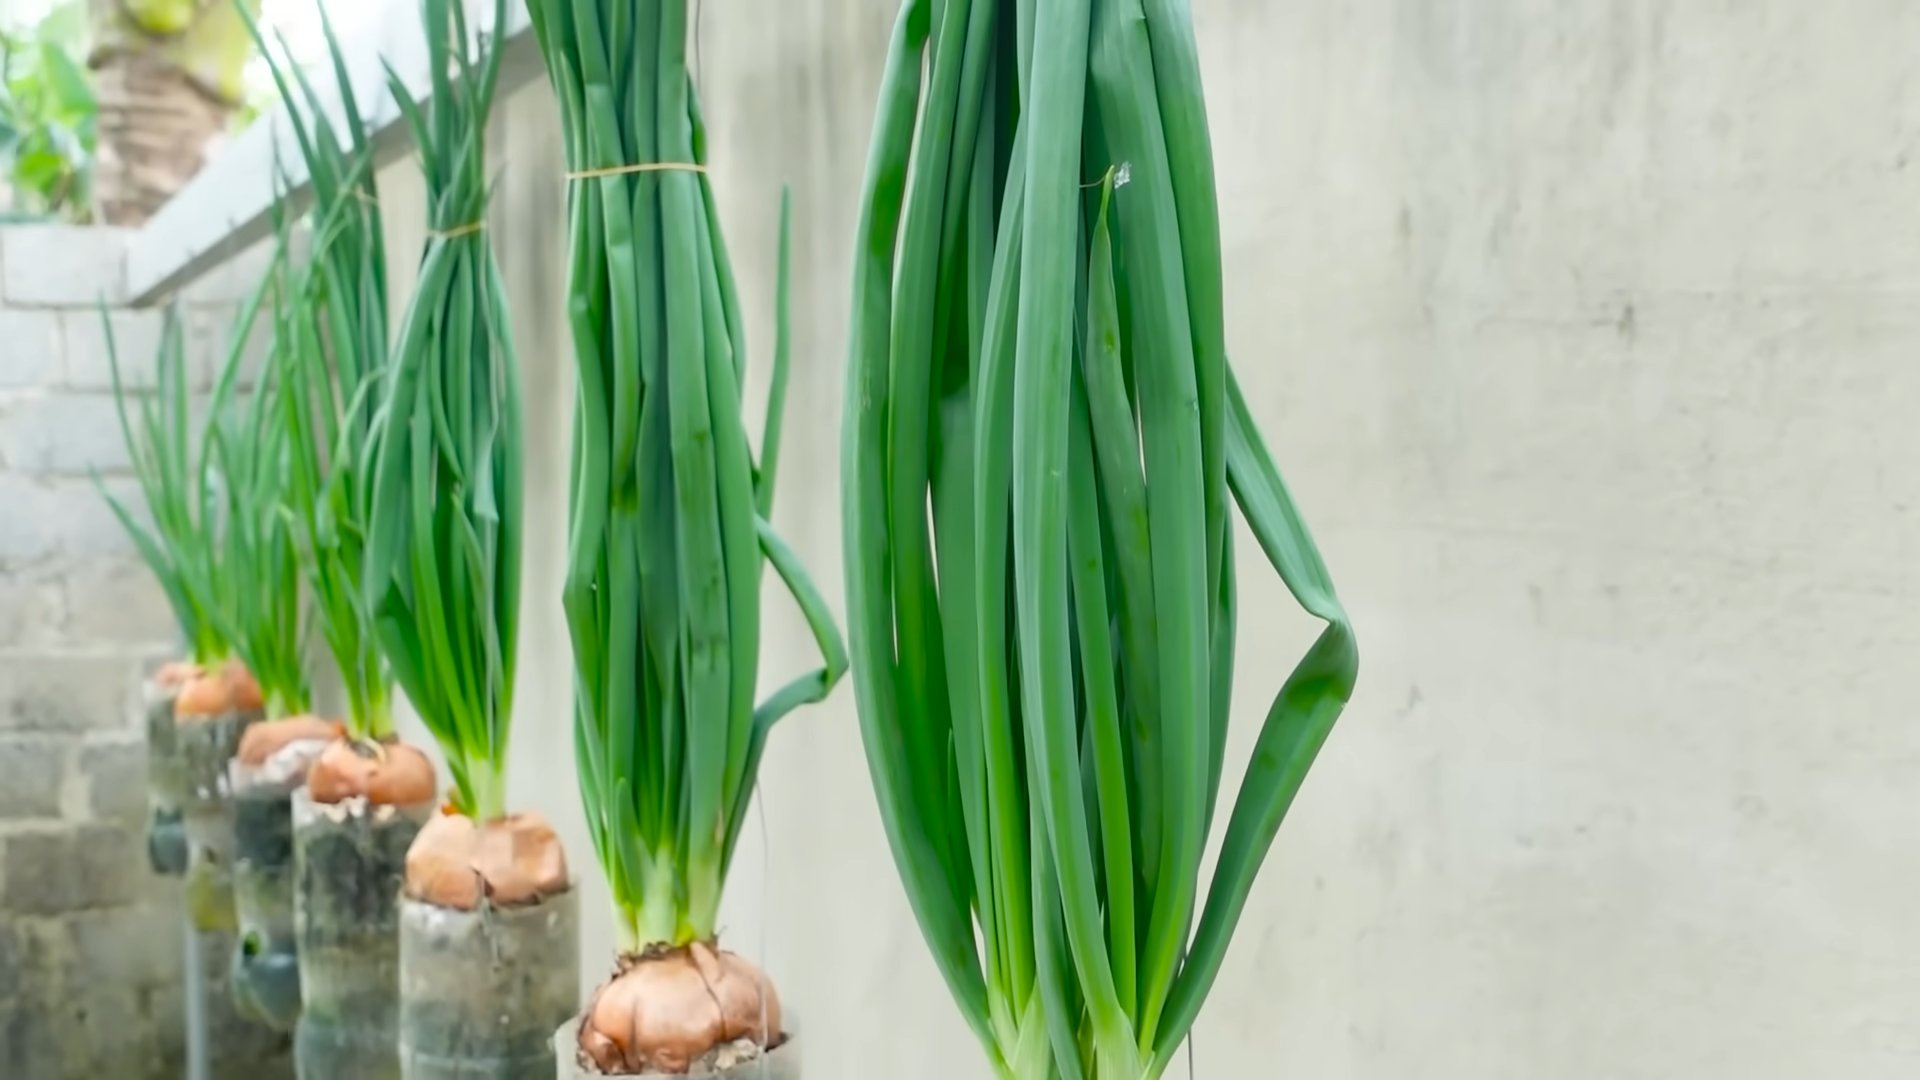
2. Cut the Bottles: Using your scissors or utility knife, carefully cut the bottle in half horizontally. You want to cut it so that the top half (the part with the bottle neck) can be inverted and placed inside the bottom half. I usually cut mine about two-thirds of the way up the bottle.
3. Drill Drainage Holes (Optional but Recommended): This step is crucial for preventing waterlogging. If you have a drill, use a small drill bit to create several drainage holes in the bottom of the bottle. If you don’t have a drill, you can carefully poke holes with a nail or a heated skewer. Just be careful not to burn yourself!
4. Prepare the Bottle Top: If you want to make watering easier, you can cut off the bottle cap. This will allow you to water from the top without having to remove the top half of the bottle. I find this particularly helpful when the onion greens get tall.
Planting the Onions
Now for the fun part – getting those onions planted!
1. Fill the Bottom Half with Soil: Fill the bottom half of the bottle with potting soil, leaving about an inch of space at the top. Gently pat the soil down to remove any air pockets.
2. Prepare the Onion: If you’re using a store-bought onion, you can simply plant it as is. If you’re using an onion set, you can soak it in water for a few hours before planting to help it rehydrate. This isn’t essential, but it can give it a little head start.
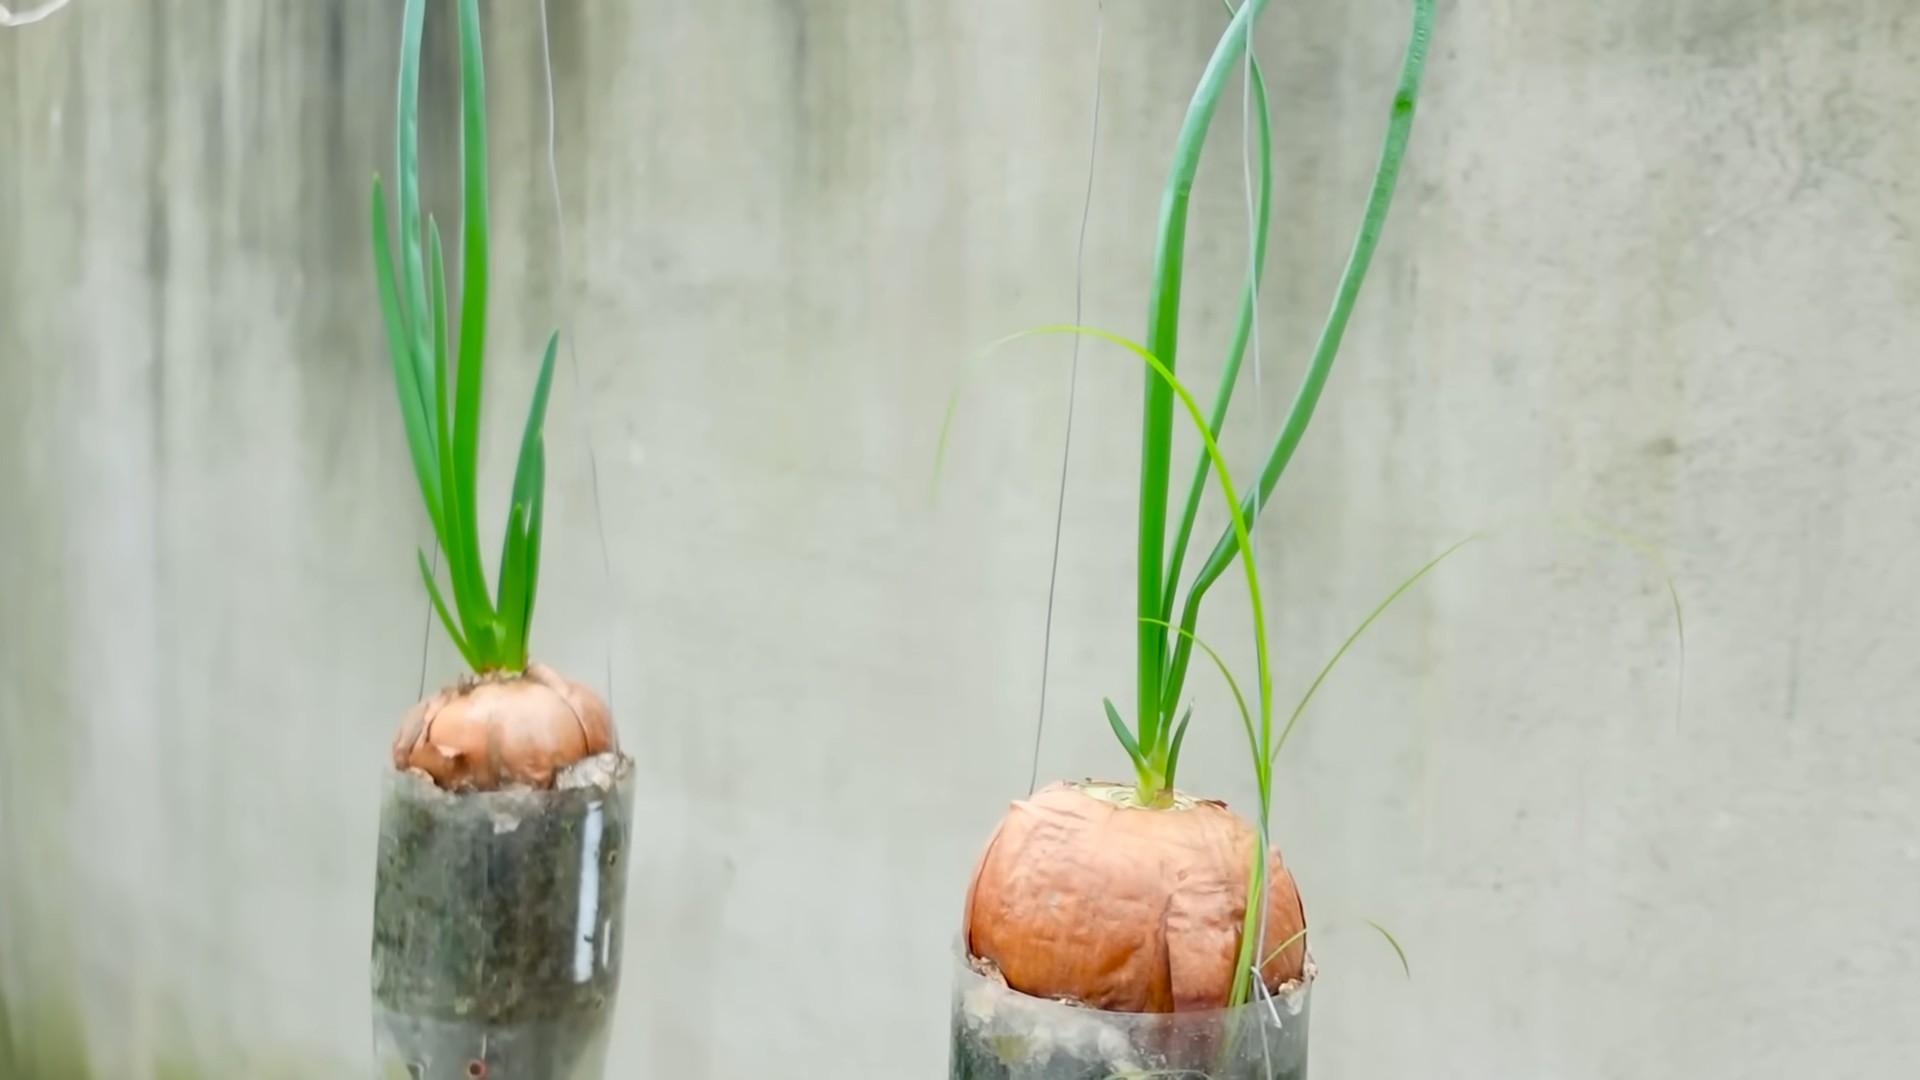
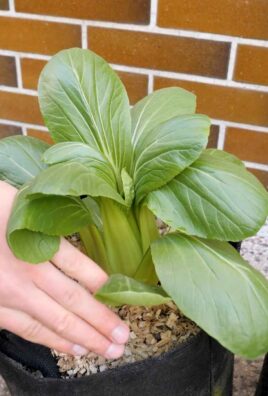
3. Plant the Onion: Make a small hole in the center of the soil, deep enough to accommodate the onion bulb. Place the onion in the hole, with the roots facing down and the green shoots facing up. Cover the bulb with soil, leaving the top of the bulb and the green shoots exposed.
4. Water Thoroughly: Water the soil thoroughly until water drains out of the drainage holes (if you made them). This will help settle the soil around the onion and encourage root growth.
5. Invert the Top Half: Carefully invert the top half of the bottle and place it inside the bottom half, creating a mini-greenhouse effect. This will help retain moisture and warmth, which is especially beneficial in cooler climates.
Caring for Your Onion Plants
Once your onions are planted, it’s important to provide them with the right care to ensure they thrive.
1. Location: Place your onion bottles in a sunny location that receives at least 6-8 hours of direct sunlight per day. A south-facing window or a sunny balcony is ideal.
2. Watering: Water your onions regularly, keeping the soil consistently moist but not waterlogged. Check the soil moisture by sticking your finger into the soil. If it feels dry to the touch, it’s time to water.
3. Fertilizing: After a few weeks, you can start fertilizing your onions with a balanced liquid fertilizer. Follow the instructions on the fertilizer label. I usually fertilize mine every two weeks.
4. Ventilation: To prevent mold and mildew, it’s important to provide adequate ventilation. You can do this by removing the top half of the bottle for a few hours each day, especially on warm days.
5. Harvesting: You can start harvesting the green onion tops as soon as they’re large enough to use. Simply snip off the tops with scissors, leaving about an inch of growth. The onions will continue to grow, providing you with a continuous supply of fresh greens.
6. Repotting (Optional): If your onions outgrow their bottles, you can repot them into larger containers. This will give them more room to grow and produce larger bulbs.
Troubleshooting
Even with the best care, you might encounter some problems along the way. Here are a few common issues and how to address them:
* Yellowing Leaves: This could be a sign of overwatering, underwatering, or nutrient deficiency. Check the soil moisture and adjust your watering accordingly. If the soil is consistently moist, you may be overwatering. If the soil is dry, you may be underwatering. If the leaves are yellowing despite proper watering, try fertilizing your onions.
* Slow Growth: This could be due to insufficient sunlight, poor soil, or lack of nutrients. Make sure your onions are getting enough sunlight and that you’re using a good quality potting mix. Fertilizing your onions can also help boost their growth.
* Pests: Onions are generally pest-resistant, but they can occasionally be attacked by aphids or other small insects. If you notice any pests, you can try spraying your onions with insecticidal soap.
* Mold or Mildew: This is usually caused by poor ventilation. Make sure to remove the top half of the bottle regularly to allow for air circulation. You can also try spraying your onions with a fungicide.
Why This Method Rocks!
I’m telling you, this onion-in-a-bottle method is a game-changer. Here’s why I love it so much:
* Space-Saving: Perfect for small apartments, balconies, or anyone with limited garden space.
* Continuous Harvest: You can harvest the green tops as needed, and they’ll keep growing back.
* Reduces Food Waste: Use those sprouting onions instead of throwing them away!
* Cost-Effective: Save money on groceries by growing your own onions.
* Fun and Educational: A great project for kids and adults alike. It’s so rewarding to watch your onions grow!
* Environmentally Friendly: Reusing plastic bottles is a great way to reduce waste.
Experiment and Have Fun!
Don’t be afraid to experiment with different types of onions, different soil mixes, and different watering schedules. The key is to find what works best for you and your growing environment. And most importantly, have fun! Gardening should be a relaxing and enjoyable experience.
I hope you found this guide helpful. Happy growing, and may your bottles be overflowing with delicious green onions! Let me know in the comments how your onion-in-a-bottle adventures are going! I’d love to hear your tips and tricks too!
Conclusion
So, there you have it! The Onions in Bottles DIY Hack – a simple yet revolutionary way to extend the life of your precious onions and minimize food waste. We’ve walked you through the process, highlighting the ease and efficiency of this method. But why is this DIY trick a must-try? It’s more than just a clever storage solution; it’s about reclaiming control over your kitchen, reducing your grocery bills, and contributing to a more sustainable lifestyle.
Think about it: how many times have you tossed out half an onion because it’s gone soft or sprouted? This hack eliminates that frustration. By creating a dry, dark environment within the bottle, you significantly slow down the sprouting and rotting process, keeping your onions fresh and ready to use for weeks, even months, longer than traditional storage methods.
Beyond the basic method, there’s room for experimentation. Consider adding a small silica gel packet to the bottom of the bottle to absorb any excess moisture. This is particularly useful in humid climates. You can also use different types of bottles – glass or plastic, as long as they are clean and dry. For smaller onions, try using smaller bottles like those from juice or condiments.
This is more than just a storage tip; it’s a game-changer for onion lovers!
But the real magic happens when you personalize this hack to fit your own needs. Do you prefer to chop your onions in advance? You can store pre-chopped onions in a bottle in the refrigerator, ensuring they stay fresh and ready for quick meal preparation. Just be sure to use them within a few days.
We understand that trying something new can be daunting, but trust us, this is one DIY project that’s worth the effort. The minimal time investment yields significant returns in terms of freshness, savings, and reduced waste.
We wholeheartedly encourage you to give the Onions in Bottles DIY Hack a try. It’s a simple, effective, and sustainable solution that will transform the way you store onions. And once you’ve experienced the benefits firsthand, we want to hear about it! Share your experiences, tips, and variations in the comments below. Let’s build a community of onion-saving enthusiasts and collectively reduce food waste, one bottle at a time. Let us know what kind of onions you stored, how long they lasted, and any modifications you made to the process. Your feedback will help others discover the power of this simple yet effective DIY trick.
Frequently Asked Questions (FAQs)
1. What types of onions work best with the Onions in Bottles DIY Hack?
The Onions in Bottles DIY Hack works well with most types of onions, including yellow onions, white onions, red onions, and even shallots. However, the key is to ensure that the onions are in good condition when you store them. Avoid using onions that are already bruised, soft, or showing signs of sprouting. For best results, choose firm, dry onions with intact skins. Sweet onions, due to their higher moisture content, might not last as long as other varieties, so keep a closer eye on them.
2. How long will onions last in a bottle compared to traditional storage methods?
This is where the Onions in Bottles DIY Hack truly shines. When stored properly in a bottle, onions can last for several weeks, even months, longer than when stored in a traditional onion bin or in the refrigerator. In a cool, dark, and dry environment, onions stored in a bottle can easily last for 2-3 months, and sometimes even longer. Traditional storage methods, such as leaving onions in a bag or basket, typically result in a shelf life of only a few weeks. The bottle provides a protective barrier against moisture and light, which are the primary culprits behind onion spoilage.
3. What kind of bottles are best for storing onions?
The best bottles for storing onions are clean, dry, and airtight. Both glass and plastic bottles can be used effectively. Glass bottles are generally preferred because they are non-reactive and don’t absorb odors. However, plastic bottles are lighter and less likely to break. The size of the bottle will depend on the size and quantity of onions you want to store. For larger onions, use larger bottles, such as those from juice or soda. For smaller onions or shallots, smaller bottles, such as those from condiments or water, will suffice. Ensure the bottle has a tight-fitting lid or cap to prevent moisture from entering.
4. How do I prepare the onions before putting them in the bottle?
Before placing onions in the bottle, it’s crucial to ensure they are clean and dry. Gently wipe off any dirt or debris with a dry cloth. Avoid washing the onions, as moisture can promote spoilage. If the outer skin of the onion is loose or damaged, carefully remove it. Make sure the onions are completely dry before placing them in the bottle. You can even let them air dry for a few hours to ensure all surface moisture is gone.
5. Is it necessary to store the bottles in a dark place?
Yes, storing the bottles in a dark place is highly recommended. Light can accelerate the sprouting process and degrade the quality of the onions. A cool, dark, and dry environment is ideal for long-term onion storage. A pantry, basement, or even a dark corner of your kitchen can work well. If you don’t have a naturally dark storage area, you can cover the bottles with a cloth or place them in a closed cabinet.
6. Can I store cut or chopped onions in a bottle?
Yes, you can store cut or chopped onions in a bottle, but the storage time will be significantly shorter. Cut onions are more susceptible to spoilage and bacterial growth. To store cut onions in a bottle, place them in an airtight container or bag inside the bottle. Store the bottle in the refrigerator and use the onions within 2-3 days. For optimal freshness, it’s best to store whole, uncut onions in the bottle.
7. How do I know if the onions in the bottle are still good to use?
Regularly check the onions in the bottle for signs of spoilage. Look for soft spots, mold, or an unpleasant odor. If the onions are sprouting, they are still safe to eat, but the flavor may be slightly altered. If the onions are slimy or have a strong, pungent odor, discard them immediately. When in doubt, it’s always best to err on the side of caution and throw away any onions that appear questionable.
8. Can I reuse the bottles for storing onions again?
Yes, you can reuse the bottles for storing onions multiple times. However, it’s essential to thoroughly clean and dry the bottles between uses. Wash the bottles with hot, soapy water and rinse them well. Ensure the bottles are completely dry before storing more onions. This will help prevent the growth of mold and bacteria.
9. What if I live in a humid climate? Will this hack still work?
Living in a humid climate can present a challenge for onion storage, but the Onions in Bottles DIY Hack can still be effective with a few modifications. Consider adding a small silica gel packet to the bottom of the bottle to absorb any excess moisture. You can also place the bottles in a cool, dry location, such as an air-conditioned room or a dehumidified pantry. Regularly check the onions for signs of moisture or spoilage and remove any that are affected.
10. Are there any other food storage hacks that work well with this method?
Yes, there are several other food storage hacks that complement the Onions in Bottles DIY Hack. For example, you can use a similar method to store garlic cloves in a bottle. You can also store potatoes in a cool, dark place in a burlap sack or cardboard box. Proper ventilation is key for storing potatoes. By combining these storage techniques, you can significantly reduce food waste and save money on groceries.
Leave a Comment