

Mushroom Growing DIY: Unlock the Secrets to Your Own Fungal Farm!
Have you ever dreamed of strolling into your backyard and harvesting a bounty of fresh, flavorful mushrooms? Imagine the delicious meals you could create, the money you could save, and the sheer satisfaction of nurturing your own edible fungi. Well, dream no longer! This article is your ultimate guide to Mushroom Growing DIY, packed with easy-to-follow instructions and insider tips to get you started.
Mushrooms have been revered for centuries, not just for their culinary uses but also for their medicinal properties and even spiritual significance in some cultures. From ancient Chinese emperors seeking the “elixir of life” in rare mushrooms to modern-day gourmets savoring the earthy flavors of truffles, these fascinating fungi have captivated humanity for generations.
But why should you embark on a Mushroom Growing DIY adventure? In today’s world, where concerns about food security and sustainability are growing, cultivating your own mushrooms is a fantastic way to take control of your food source. Plus, store-bought mushrooms can be expensive and lack the freshness and flavor of homegrown varieties. With our simple DIY techniques, you can bypass the grocery store and enjoy a constant supply of delicious, organic mushrooms right from your own home. So, let’s dive in and discover the magic of mushroom cultivation!

DIY Mushroom Growing: A Beginner’s Guide to Cultivating Your Own Fungi
Hey there, fellow fungi enthusiasts! Ever dreamt of harvesting your own delicious mushrooms right from your home? Well, dream no more! Growing mushrooms at home is surprisingly achievable, even for beginners. This guide will walk you through a simple and effective method for cultivating your own tasty treats. I’ll be focusing on growing oyster mushrooms, as they are relatively easy to cultivate and quite forgiving, making them perfect for your first foray into the world of mycology.
What You’ll Need: Gathering Your Supplies
Before we dive in, let’s gather everything you’ll need. This is crucial for a smooth and successful growing experience.
* Oyster Mushroom Spawn: This is essentially the “seed” of your mushrooms. You can purchase it online or from a local mushroom supplier. Make sure to get a reputable source to ensure healthy spawn.
* Substrate: This is the material the mushrooms will grow on. Straw is an excellent choice for oyster mushrooms. You can also use coffee grounds, but for this guide, we’ll stick with straw.
* Large Container: A bucket, tub, or even a large bag will work. Just make sure it’s clean and can hold the straw and spawn. A 5-gallon bucket is a good starting point.
* Large Pot or Kettle: For pasteurizing the straw.
* Thermometer: To monitor the temperature of the water during pasteurization.
* Spray Bottle: For misting the mushrooms as they grow.
* Gloves: To keep things sterile and prevent contamination.
* Drill with a Large Drill Bit (Optional): For creating drainage holes in your container.
* Bleach or Disinfectant: For cleaning your container.
Preparing the Substrate: Pasteurization is Key
Pasteurization is a crucial step to eliminate competing organisms that could hinder mushroom growth. We’re not sterilizing, just reducing the competition.
1. Chop the Straw: Cut the straw into smaller pieces, about 2-3 inches long. This will make it easier for the mushroom mycelium to colonize. I like to use garden shears for this.
2. Soak the Straw: Place the chopped straw in your large pot or kettle. Fill it with water until the straw is completely submerged.
3. Heat the Water: Heat the water to a temperature of 160-180°F (71-82°C). Use your thermometer to monitor the temperature. Maintain this temperature for about 60-90 minutes. This process kills off unwanted bacteria and fungi that could compete with your oyster mushrooms.
4. Drain the Straw: Carefully drain the hot water from the straw. Be careful, as the straw will be very hot! I usually use a colander or a large strainer.
5. Cool the Straw: Allow the straw to cool down to room temperature. This is important because the hot straw can kill the mushroom spawn. You want the straw to be damp, but not soaking wet. Squeeze out any excess water. The ideal moisture content is when you can squeeze a handful of straw and only a few drops of water come out.
Inoculating the Substrate: Mixing Spawn and Straw
Now comes the fun part – introducing the mushroom spawn to the prepared straw!
1. Clean Your Container: Thoroughly clean your chosen container with bleach or disinfectant and rinse it well. This helps prevent contamination.
2. Create Drainage Holes (Optional): If you’re using a bucket or tub, drill a few drainage holes in the bottom to prevent water from pooling.
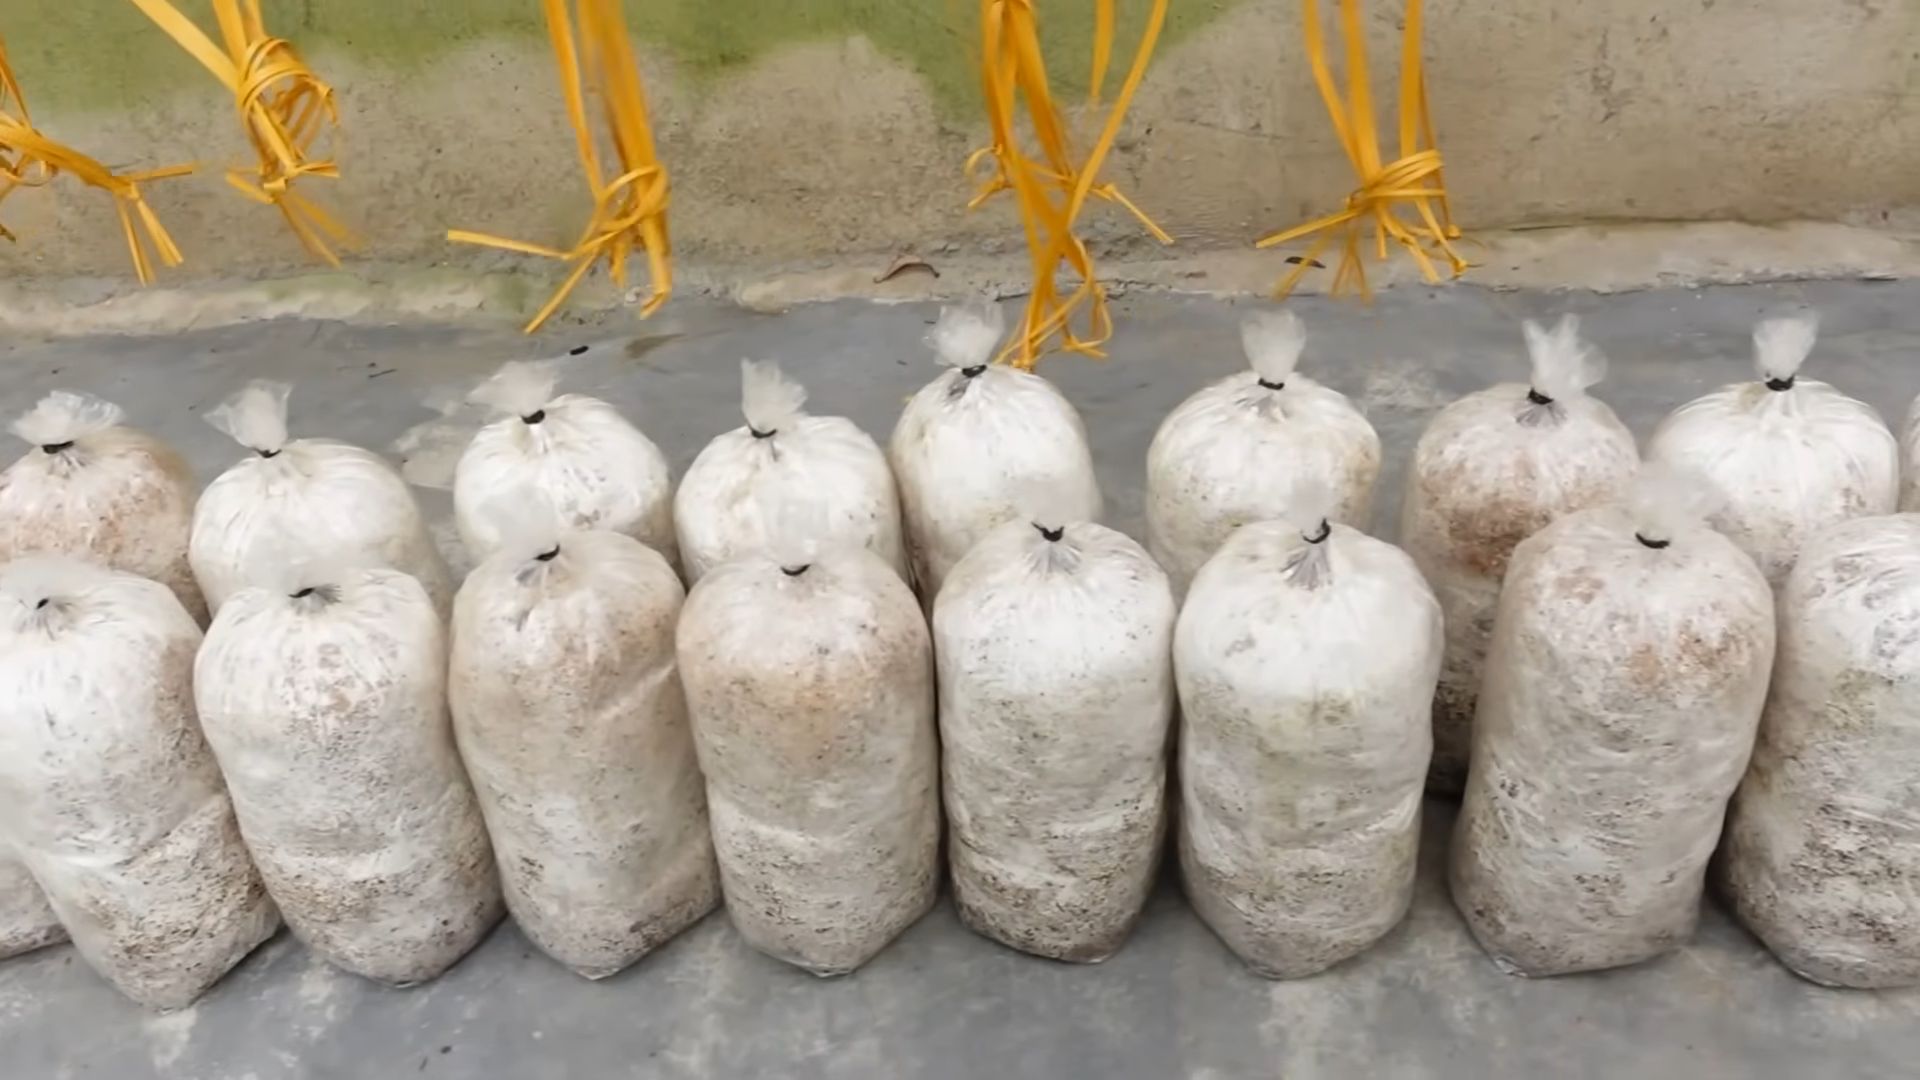
3. Layer the Straw and Spawn: In your container, create alternating layers of straw and mushroom spawn. Start with a layer of straw, then sprinkle a layer of spawn on top. Repeat this process until you’ve used all the straw and spawn. The final layer should be straw. A good ratio is about 1 part spawn to 10 parts straw.
4. Mix Thoroughly (Optional): While layering is generally sufficient, you can gently mix the spawn and straw together to ensure even distribution. Be careful not to compact the mixture too much.
5. Press Down Gently: Lightly press down on the straw mixture to compact it slightly. This helps create good contact between the spawn and the straw.
Incubation: Waiting for the Magic to Happen
This is the waiting game. The mycelium needs time to colonize the straw.
1. Find a Suitable Location: Place your container in a dark, humid, and well-ventilated location. A basement, closet, or spare room works well. The ideal temperature for oyster mushroom colonization is between 65-75°F (18-24°C).
2. Maintain Humidity: Keep the humidity high by misting the inside of the container with water regularly. You want the straw to stay damp, but not soaking wet. You can also cover the container with a plastic bag to help retain moisture, but make sure to leave some ventilation.
3. Monitor Colonization: Over the next few weeks, you’ll notice white, fuzzy growth spreading throughout the straw. This is the mushroom mycelium, and it’s a sign that the colonization process is underway.
4. Be Patient: Colonization can take anywhere from 2-4 weeks, depending on the temperature and humidity. Don’t disturb the container too much during this time.
Fruiting: Time to Harvest Your Mushrooms!
Once the straw is fully colonized (covered in white mycelium), it’s time to initiate fruiting.
1. Introduce Light: Move your container to a location with indirect light. Oyster mushrooms need light to trigger fruiting. A windowsill or a room with a bright light source will work.
2. Increase Ventilation: Increase the ventilation by removing the plastic bag (if you were using one) or opening the container. Fresh air is essential for fruiting.
3. Maintain Humidity: Continue to mist the mushrooms regularly to maintain high humidity. You can also use a humidity tent or humidifier if needed.
4. Wait for Pins: After a few days, you’ll start to see small mushroom “pins” forming on the surface of the straw. These are the baby mushrooms!
5. Watch Them Grow: The pins will grow rapidly over the next few days. Keep the humidity high and the ventilation good.
6. Harvest Your Mushrooms: Harvest the mushrooms when the caps are fully formed but before they start to release spores. The edges of the caps will start to curl upwards slightly when they’re ready to harvest. To harvest, simply twist or cut the mushrooms off the straw.
Troubleshooting: Common Issues and Solutions
Even with the best preparation, you might encounter some issues. Here are a few common problems and how to address them:
* Contamination: If you see green, black, or other colored molds growing on the straw, it’s likely contaminated. Unfortunately, there’s not much you can do at this point except discard the contaminated substrate. To prevent contamination in the future, make sure to pasteurize the straw properly and keep everything clean.
* Slow Colonization: If the mycelium is growing slowly, it could be due to low temperature, low humidity, or poor spawn quality. Make sure the temperature is within the ideal range (65-75°F), increase the humidity by misting more frequently, and ensure you’re using fresh, high-quality spawn.
* No Fruiting: If the straw is fully colonized but no mushrooms are forming, it could be due to lack of light, lack of ventilation, or low humidity. Move the container to a location with indirect light, increase the ventilation, and maintain high humidity.
* Small Mushrooms: If the mushrooms are small and stunted, it could be due to lack of humidity or nutrients. Make sure to mist the mushrooms regularly and consider adding a small amount of nutrient-rich material to the substrate, such as coffee grounds.
Harvesting and Enjoying Your Homegrown Mushrooms
Once you’ve harvested your mushrooms, you can store them in the refrigerator for up to a week. They’re delicious sautéed, grilled, or added to soups and stews. Growing your own mushrooms is a rewarding experience, and I hope this guide has helped you get started. Happy growing!
Getting a Second Flush: Extending Your Harvest
After your initial harvest, don’t throw away the substrate just yet! You can often get a second (or even third) flush of mushrooms.
1. Soak the Substrate: After harvesting, soak the substrate in cold water for 12-24 hours. This rehydrates the mycelium and encourages further fruiting.
2. Drain the Water: Drain the water from the substrate and return it to its original location.
3. Repeat Fruiting Conditions: Repeat the fruiting conditions as described above (introduce light, increase ventilation, and maintain humidity).
4. Wait for More Mushrooms: With a little luck, you’ll
Conclusion
So, there you have it! Transforming your kitchen into a mini mushroom farm might sound intimidating, but with this simple DIY trick, it’s surprisingly accessible and rewarding. Forget expensive kits and complicated setups. This method allows you to cultivate fresh, delicious mushrooms right in the comfort of your own home, using readily available materials and a little bit of patience.
Why is this Mushroom Growing DIY a must-try? Because it offers a unique blend of sustainability, cost-effectiveness, and culinary delight. You’re reducing your reliance on commercially grown mushrooms, minimizing your carbon footprint, and gaining access to a constant supply of organic, flavorful fungi. Imagine the satisfaction of harvesting your own mushrooms and incorporating them into your favorite dishes – from creamy mushroom soups and savory stir-fries to gourmet pizzas and hearty pasta sauces. The possibilities are endless!
But the benefits extend beyond the kitchen. This DIY project is also a fantastic learning experience, offering insights into the fascinating world of mycology. You’ll gain a deeper appreciation for the intricate processes involved in mushroom cultivation and develop a newfound respect for these incredible organisms. It’s a hands-on science lesson that’s both educational and engaging.
Looking for variations? Experiment with different types of mushrooms! Oyster mushrooms are a great starting point due to their resilience and rapid growth. Once you’ve mastered the basics, you can explore other varieties like shiitake, lion’s mane, or even more exotic species. Consider adjusting the substrate to suit the specific needs of each mushroom type. Some prefer straw, while others thrive on hardwood sawdust or coffee grounds.
Another exciting variation is to incorporate your mushroom growing into a larger permaculture system. Use the spent substrate as a nutrient-rich amendment for your garden, creating a closed-loop system that minimizes waste and maximizes resource utilization. You can also integrate your mushroom farm into an aquaponics setup, using the nutrient-rich water from your fish tank to irrigate your mushrooms.
Don’t be afraid to get creative and personalize your Mushroom Growing DIY project. Add your own unique touches, experiment with different techniques, and adapt the process to suit your specific environment and resources. The key is to have fun and embrace the learning process.
We wholeheartedly encourage you to give this DIY trick a try. It’s a rewarding experience that will transform the way you think about food and sustainability. And most importantly, we want to hear about your experiences! Share your successes, your challenges, and your creative variations with us. Post photos of your mushroom harvests, share your favorite mushroom recipes, and let us know what you’ve learned along the way. Together, we can create a thriving community of mushroom enthusiasts and inspire others to embark on their own mushroom growing adventures. So, grab your supplies, roll up your sleeves, and get ready to cultivate some culinary magic!
Frequently Asked Questions (FAQ)
What are the easiest mushrooms to grow for beginners?
Oyster mushrooms are generally considered the easiest mushrooms to grow for beginners. They are relatively fast-growing, tolerant of a wide range of conditions, and can be cultivated on a variety of substrates, including straw, coffee grounds, and cardboard. They are also readily available in spawn form, making them a convenient choice for first-time growers. Shiitake mushrooms are another popular option, but they require a bit more patience as they take longer to fruit.
What is the best substrate for growing mushrooms?
The best substrate depends on the type of mushroom you are growing. Oyster mushrooms thrive on straw, coffee grounds, and cardboard. Shiitake mushrooms prefer hardwood sawdust or logs. Lion’s mane mushrooms can be grown on a variety of substrates, including sawdust, straw, and supplemented hardwood. It’s important to research the specific needs of the mushroom you are growing and choose a substrate that provides the necessary nutrients and moisture.
How long does it take to grow mushrooms?
The time it takes to grow mushrooms varies depending on the species and the growing conditions. Oyster mushrooms can typically be harvested within a few weeks of inoculation. Shiitake mushrooms can take several months to fruit, especially when grown on logs. Factors such as temperature, humidity, and light can also affect the growth rate.
What are the ideal temperature and humidity for growing mushrooms?
The ideal temperature and humidity also depend on the type of mushroom you are growing. Oyster mushrooms generally prefer temperatures between 60-75°F (15-24°C) and high humidity (80-90%). Shiitake mushrooms prefer cooler temperatures (50-60°F or 10-15°C) and moderate humidity (70-80%). Maintaining the proper temperature and humidity is crucial for successful mushroom cultivation.
How do I prevent contamination in my mushroom grow?
Contamination is a common challenge in mushroom growing, but it can be minimized by following proper sanitation practices. Sterilize your substrate before inoculation to kill any competing organisms. Use sterile tools and gloves when handling the spawn and substrate. Maintain a clean growing environment and avoid introducing contaminants such as dust, mold, or bacteria. Proper ventilation can also help prevent the buildup of moisture, which can promote the growth of contaminants.
What do I do with the spent mushroom substrate?
Spent mushroom substrate is a valuable resource that can be used as a soil amendment in your garden. It is rich in nutrients and organic matter, which can improve soil fertility and water retention. You can add it directly to your garden beds or compost it for later use. It’s a great way to recycle the substrate and reduce waste.
Can I grow mushrooms indoors without any special equipment?
Yes, you can grow mushrooms indoors without any special equipment. This Mushroom Growing DIY method focuses on using readily available materials such as plastic bags, buckets, or containers. You can create a simple fruiting chamber by placing your inoculated substrate in a humid environment, such as a bathroom or a closet. Misting the substrate regularly will help maintain the necessary humidity.
How often should I water my mushrooms?
You should mist your mushrooms regularly to maintain high humidity. The frequency of watering will depend on the humidity of your growing environment. In dry climates, you may need to mist several times a day. In humid climates, you may only need to mist once a day or every other day. The goal is to keep the substrate moist but not waterlogged.
What if my mushrooms don’t grow?
If your mushrooms don’t grow, there could be several reasons. The most common causes are contamination, improper temperature or humidity, or insufficient light. Check your substrate for signs of contamination, such as mold or discoloration. Ensure that the temperature and humidity are within the optimal range for the mushroom species you are growing. Provide adequate light, but avoid direct sunlight. If you’ve ruled out these factors, the spawn may be old or of poor quality.
Are there any mushrooms I should avoid growing at home?
Yes, it’s crucial to only grow mushrooms that you can positively identify as edible. Never consume wild mushrooms unless you are an experienced mycologist. Some mushrooms are poisonous and can cause serious illness or even death. Stick to commercially available spawn of known edible varieties to ensure your safety.

Leave a Comment