

Mushroom gardening beginners home, are you ready to unlock a world of delicious, homegrown goodness right in your own backyard (or even indoors!)? Forget those expensive grocery store prices and questionable origins – I’m here to guide you through the surprisingly simple process of cultivating your own mushrooms. For centuries, mushrooms have been revered in various cultures, not just as a food source, but also for their medicinal properties and even spiritual significance. From ancient Chinese emperors seeking the “elixir of life” in rare fungi to modern-day chefs celebrating their earthy flavors, mushrooms have always held a special place in our hearts (and stomachs!).
But let’s be honest, the idea of growing mushrooms can seem a little intimidating, right? That’s where this DIY guide comes in! I’m going to break down the process into easy-to-follow steps, perfect for even the most novice gardener. Imagine the satisfaction of harvesting your own plump, juicy mushrooms, knowing exactly where they came from and how they were grown. Plus, mushroom gardening beginners home can be a fantastic way to recycle organic waste, reduce your carbon footprint, and add a unique and rewarding element to your gardening routine. So, grab your gloves, and let’s get started on this exciting fungal adventure!
Growing Mushrooms at Home: A Beginner’s Guide
Hey there, fellow fungi fanatics! Ever dreamt of harvesting your own delicious mushrooms right in your kitchen? Well, dream no more! Growing mushrooms at home is surprisingly achievable, even for complete beginners. I’m going to walk you through a simple method using readily available materials. We’ll focus on growing oyster mushrooms, as they are relatively easy to cultivate and quite forgiving.
What You’ll Need: The Mushroom Growing Shopping List
Before we dive in, let’s gather our supplies. This is crucial for a smooth and successful mushroom-growing adventure.
* Oyster Mushroom Spawn: This is the “seed” of your mushrooms. You can find it online or at some garden centers. Make sure it’s fresh!
* Straw: This will be our substrate, the food source for the mushrooms. Wheat straw is ideal, but other types can work too.
* Large Plastic Bag: A heavy-duty garbage bag will do the trick.
* Lime (Hydrated Lime or Agricultural Lime): This helps pasteurize the straw and prevent contamination.
* Large Pot or Tub: For pasteurizing the straw.
* Drill or Knife: To create ventilation holes in the bag.
* Spray Bottle: For misting the mushrooms.
* Gloves: To keep things sanitary.
* Thermometer: To monitor the temperature of the pasteurization process.
Phase 1: Preparing the Substrate (Straw)
The key to successful mushroom growing is a properly prepared substrate. We need to pasteurize the straw to kill off any competing organisms that might steal the nutrients from our oyster mushrooms.
1. Chop the Straw: Using scissors or a knife, chop the straw into smaller pieces, about 2-4 inches long. This makes it easier for the mushroom mycelium (the root-like structure) to colonize.
2. Lime Bath: Fill your large pot or tub with water. Add the lime according to the package instructions. Usually, it’s about 1-2 tablespoons per gallon of water. The goal is to raise the pH of the water to around 12, which will help kill off unwanted bacteria and fungi.
3. Soak the Straw: Submerge the chopped straw in the lime water. Make sure all the straw is completely covered. Weigh it down with a brick or a heavy object if needed.
4. Soaking Time: Let the straw soak in the lime water for 12-24 hours. This allows the lime to do its job and properly pasteurize the straw.
5. Drain the Straw: After soaking, drain the straw thoroughly. You want it to be damp, not soaking wet. Squeeze out any excess water. The straw should feel like a wrung-out sponge.
Phase 2: Inoculating the Straw (Adding the Spawn)
Now comes the exciting part – introducing the oyster mushroom spawn to the prepared straw! This is where the magic begins.
1. Cleanliness is Key: Before handling the spawn, wash your hands thoroughly with soap and water. Wear gloves to minimize contamination.
2. Layering Time: In your large plastic bag, create alternating layers of straw and spawn. Start with a layer of straw, then sprinkle a generous amount of spawn over it. Repeat this process until you’ve used up all the straw and spawn. The final layer should be straw.
3. Mixing (Optional): Gently mix the spawn and straw together as you layer. This helps distribute the spawn evenly throughout the substrate.
4. Seal the Bag: Tie the bag closed, leaving some air inside. Don’t pack the straw too tightly.
5. Ventilation: Using a drill or knife, create several small holes (about ¼ inch in diameter) all over the bag. These holes will allow for air exchange, which is essential for mushroom growth. Space the holes about 4-6 inches apart.
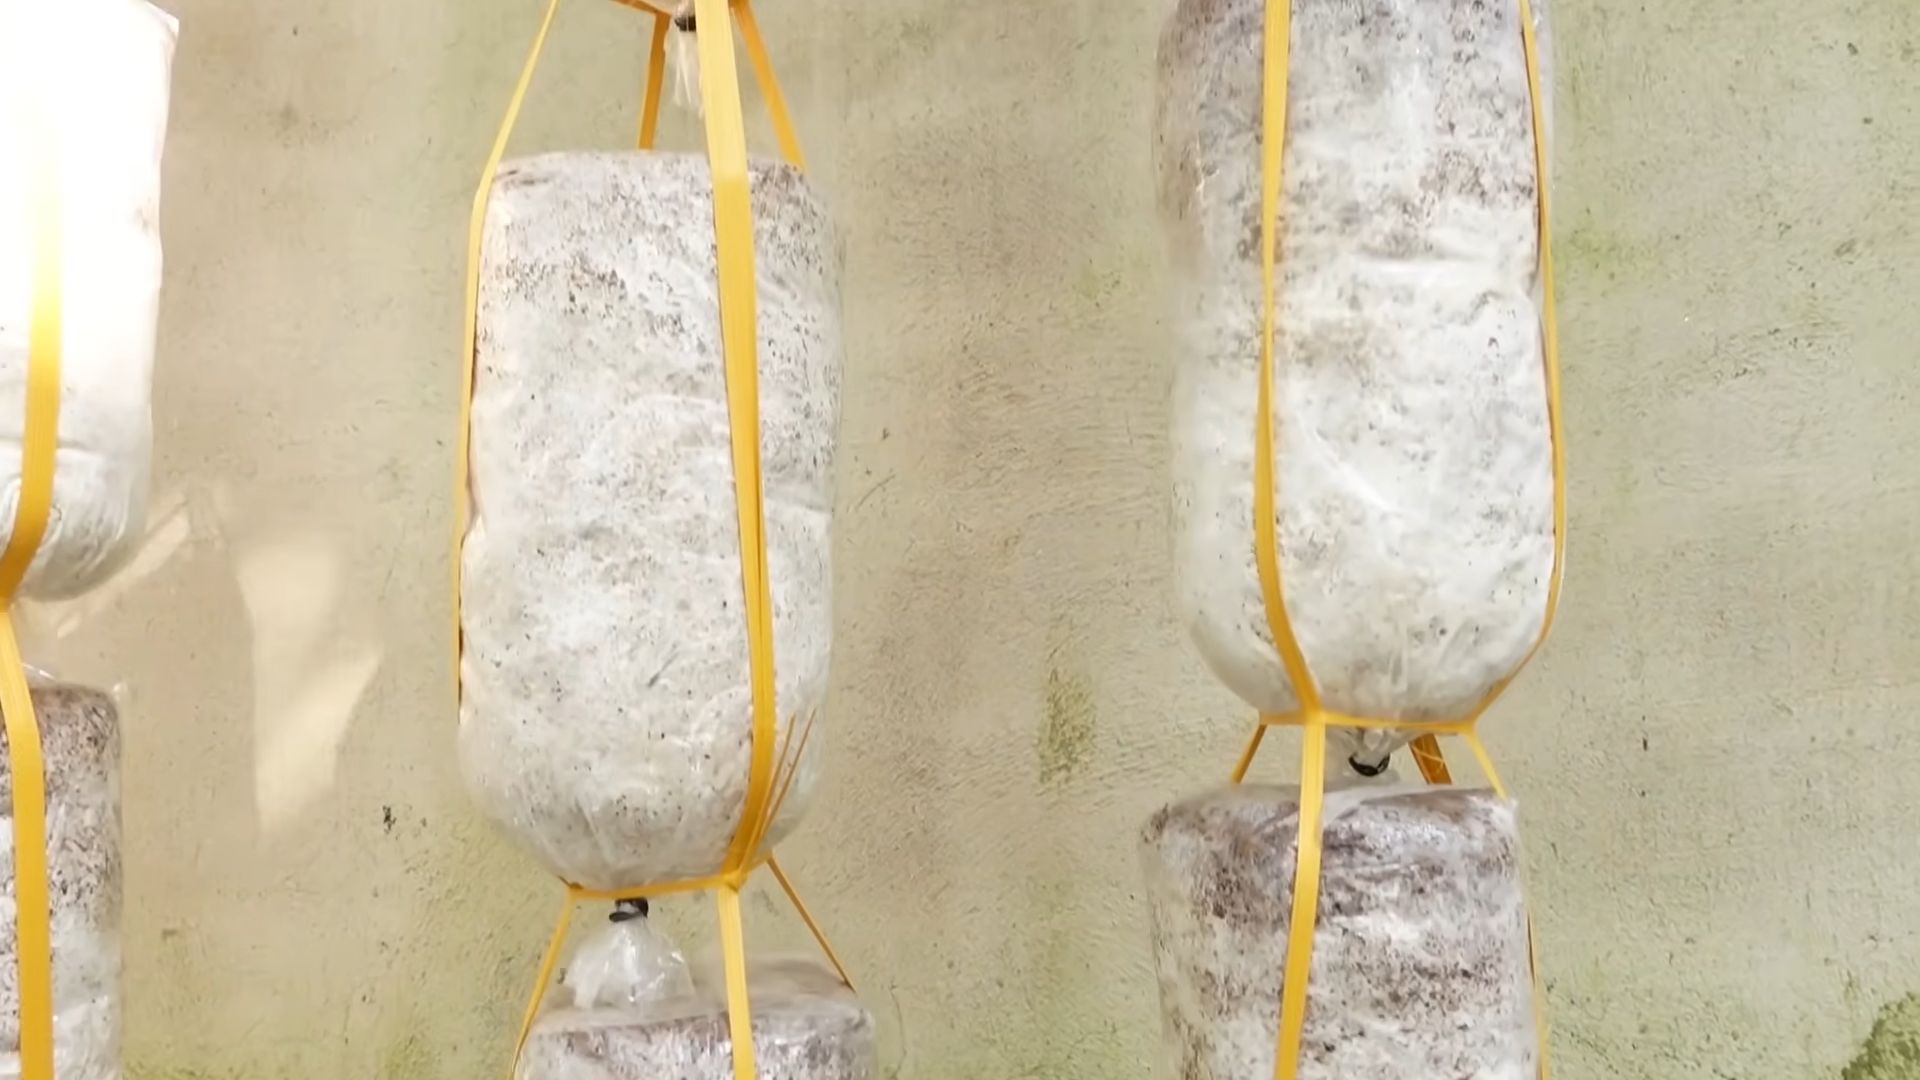
Phase 3: Incubation (The Waiting Game)
This is where patience comes in. The mycelium needs time to colonize the straw.
1. Finding the Right Spot: Place the bag in a dark, warm location with good air circulation. A temperature between 65-75°F (18-24°C) is ideal. A closet, basement, or spare room can work well.
2. Monitoring: Check the bag every few days. You should start to see white, fuzzy growth (the mycelium) spreading throughout the straw.
3. Patience is a Virtue: This process can take anywhere from 2-4 weeks, depending on the temperature and the amount of spawn used. Don’t be discouraged if it takes longer.
4. Contamination Check: Keep an eye out for any signs of contamination, such as green, black, or other unusual colors. If you see contamination, it’s best to discard the bag to prevent it from spreading.
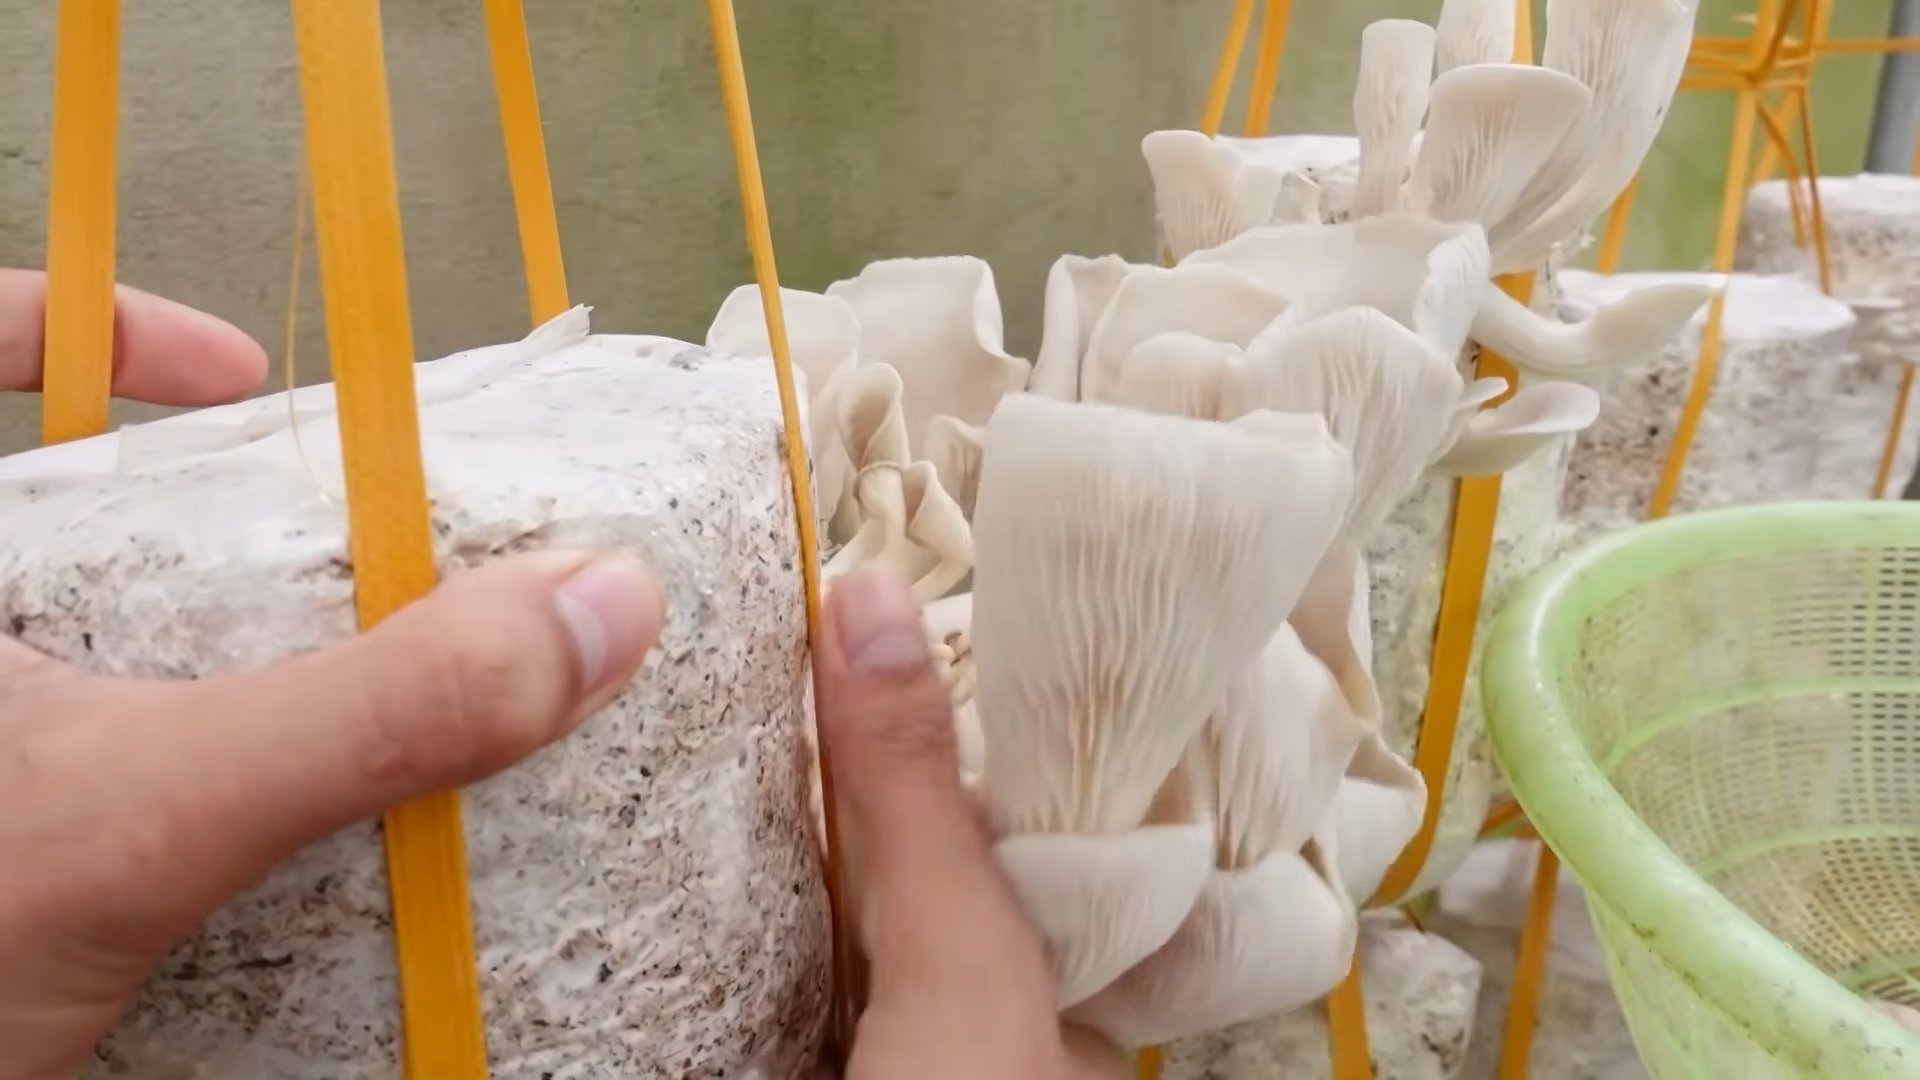
Phase 4: Fruiting (Mushroom Time!)
Once the straw is fully colonized (covered in white mycelium), it’s time to trigger fruiting, which is when the mushrooms start to grow.
1. Light Exposure: Move the bag to a location with indirect light. Oyster mushrooms need some light to fruit properly.
2. Humidity is Key: Oyster mushrooms need high humidity to fruit. Mist the bag with water several times a day to keep the straw moist. You can also place a humidity dome or plastic wrap over the bag to help retain moisture. Just make sure there’s still adequate ventilation.
3. Air Circulation: Ensure good air circulation around the bag. This helps prevent mold and encourages healthy mushroom growth.
4. Observe and Wait: Within a week or two, you should start to see small mushroom “pins” forming on the surface of the straw. These pins will rapidly grow into mature mushrooms.
5. Harvest Time: Harvest the mushrooms when the caps are fully formed but before they start to drop spores (you’ll see a powdery substance). Simply twist or cut the mushrooms off the straw.
Phase 5: Subsequent Flushes (More Mushrooms!)
After harvesting your first flush of mushrooms, you can often get several more flushes from the same bag.
1. Soaking: After harvesting, soak the straw in water for 12-24 hours. This rehydrates the substrate and encourages new mushroom growth.
2. Repeat: Repeat the fruiting process (light, humidity, air circulation) as described above.
3. Declining Yields: Each subsequent flush will likely produce fewer mushrooms than the previous one. Eventually, the substrate will be depleted of nutrients, and it’s time to start a new bag.
Troubleshooting: Common Issues and Solutions
Even with the best preparation, you might encounter some challenges. Here are a few common issues and how to address them:
* No Growth: If you don’t see any mycelium growth after a few weeks, the spawn might be old or the temperature might be too low. Try using fresh spawn and ensuring a warmer environment.
* Contamination: If you see mold or other contaminants, it’s likely due to poor pasteurization or handling. Make sure to properly pasteurize the straw and maintain good hygiene.
* Small Mushrooms: If the mushrooms are small and stunted, it could be due to lack of humidity or air circulation. Increase the humidity and ensure good ventilation.
* Yellowing Straw: Yellowing of the straw can indicate that it’s drying out. Increase the humidity and mist the bag more frequently.
Tips for Success: My Secret Mushroom Growing Weapons
* Start Small: Don’t try to grow too much at once. Start with a small bag and gradually increase the size as you gain experience.
* Keep Records: Keep track of your progress, including dates, temperatures, and observations. This will help you learn from your mistakes and improve your results.
* Experiment: Don’t be afraid to experiment with different techniques and substrates. There’s no one-size-fits-all approach to mushroom growing.
* Join a Community: Connect with other mushroom growers online or in your local area. You can learn a lot from their experiences and get valuable advice.
* Be Patient: Mushroom growing takes time and patience. Don’t get discouraged if you don’t see results immediately. Just keep learning and experimenting, and you’ll eventually be rewarded with delicious, homegrown mushrooms!
Growing mushrooms at home is a rewarding and fascinating experience. With a little effort and patience, you can enjoy fresh, delicious mushrooms right from your own kitchen. Happy growing!
Conclusion
So, there you have it! Cultivating your own mushrooms at home, even as a complete beginner, is not only achievable but incredibly rewarding. This simple, DIY trick for mushroom gardening beginners home opens up a world of fresh, flavorful fungi right at your fingertips. Forget those expensive, often bland, supermarket mushrooms – imagine the satisfaction of harvesting your own organic, delicious crop, knowing exactly where it came from and how it was grown.
This method is a must-try because it’s accessible, affordable, and doesn’t require a green thumb or extensive gardening knowledge. It’s a fantastic way to connect with nature, learn about the fascinating world of fungi, and enjoy the unparalleled taste of homegrown mushrooms. Plus, it’s a sustainable practice that reduces your reliance on commercially grown produce.
But the fun doesn’t stop there! Once you’ve mastered the basics, you can experiment with different types of mushrooms. Oyster mushrooms are a great starting point, but you could also try growing shiitake, lion’s mane, or even wine cap mushrooms, each offering a unique flavor profile and culinary experience. Consider varying the substrate you use – coffee grounds, straw, and hardwood sawdust all offer different nutrient profiles that can impact the growth and flavor of your mushrooms.
Don’t be afraid to experiment with the environment too. While a dark, humid space is generally ideal, slight variations in temperature and humidity can influence the fruiting process. Keep detailed notes of your experiments, documenting what works and what doesn’t. This will help you refine your technique and become a true mushroom-growing expert.
We encourage you to take the plunge and try this DIY mushroom gardening trick at home. It’s a fun, educational, and delicious experience that you won’t regret. And most importantly, share your experiences with us! We’d love to hear about your successes, challenges, and any variations you’ve tried. Post pictures of your mushroom harvests, share your tips and tricks, and let’s build a community of home mushroom growers. Together, we can unlock the secrets of the fungal kingdom and enjoy the bounty of our own homegrown mushrooms. This DIY trick for mushroom gardening beginners home is a game changer.
Frequently Asked Questions (FAQ)
What exactly do I need to get started with this DIY mushroom gardening trick?
You’ll need a few basic supplies: mushroom spawn (available online or at garden centers), a suitable substrate (like straw, coffee grounds, or hardwood sawdust), a container (a bucket, tub, or even a plastic bag will work), and a spray bottle for misting. A dark, humid space is also essential.
How long does it take to grow mushrooms using this method?
The time it takes to harvest your first mushrooms can vary depending on the type of mushroom, the substrate used, and the environmental conditions. Generally, you can expect to see mushrooms within a few weeks to a couple of months. Oyster mushrooms tend to be faster growers than shiitake mushrooms, for example.
What’s the best substrate to use for growing mushrooms at home?
The best substrate depends on the type of mushroom you’re growing. Oyster mushrooms thrive on straw, coffee grounds, and even cardboard. Shiitake mushrooms prefer hardwood sawdust. Research the specific needs of the mushroom variety you’re interested in growing to determine the most suitable substrate.
How do I maintain the humidity levels needed for mushroom growth?
Maintaining adequate humidity is crucial for successful mushroom cultivation. You can mist the substrate regularly with a spray bottle to keep it moist. Covering the container with a plastic bag or lid can also help trap moisture. A humidity sensor can be helpful to monitor the humidity levels and adjust your watering schedule accordingly. Aim for a humidity level of around 80-90%.
What if I don’t have a dark space to grow my mushrooms?
While mushrooms prefer darkness, they don’t need complete darkness. A dimly lit space, such as a basement, closet, or even a shaded corner of a room, will usually suffice. Avoid direct sunlight, as it can dry out the substrate and inhibit mushroom growth.
How do I know when my mushrooms are ready to harvest?
Mushrooms are typically ready to harvest when the caps have fully opened but before they start to flatten out or drop spores. The exact timing will vary depending on the type of mushroom. For oyster mushrooms, harvest when the caps are still slightly curled downwards. For shiitake mushrooms, harvest when the caps have fully expanded and the edges are slightly upturned.
Can I reuse the substrate after harvesting mushrooms?
Yes, you can often get multiple flushes (harvests) from the same substrate. After harvesting the first flush, rehydrate the substrate by soaking it in water for a few hours. Then, drain the excess water and return the substrate to its growing environment. You may get smaller harvests in subsequent flushes. Eventually, the substrate will become depleted of nutrients and will need to be replaced.
What if my mushrooms start to look moldy or discolored?
Mold can be a problem in mushroom cultivation. If you notice mold, try to remove it carefully without disturbing the surrounding substrate. Improve ventilation to reduce humidity levels. If the mold is widespread, it may be necessary to discard the affected substrate. Discoloration can also be a sign of contamination or improper growing conditions.
Are there any common mistakes that beginners should avoid?
Yes, some common mistakes include using contaminated spawn, not maintaining adequate humidity, overwatering the substrate, and exposing the mushrooms to direct sunlight. Researching the specific needs of the mushroom variety you’re growing and paying close attention to environmental conditions can help you avoid these mistakes.
Where can I find reliable information about mushroom gardening?
There are many resources available online and in libraries. Look for books and articles written by experienced mushroom growers. Online forums and communities dedicated to mushroom cultivation can also be valuable sources of information and support. Always verify the information you find with multiple sources to ensure its accuracy.
Is this DIY trick for mushroom gardening beginners home safe?
Yes, as long as you are using edible mushroom spawn and following proper hygiene practices. Always wash your hands before handling the spawn and substrate. Ensure that the growing environment is clean to prevent contamination. Only consume mushrooms that you have positively identified as edible. If you are unsure about the identity of a mushroom, do not eat it.
Leave a Comment