

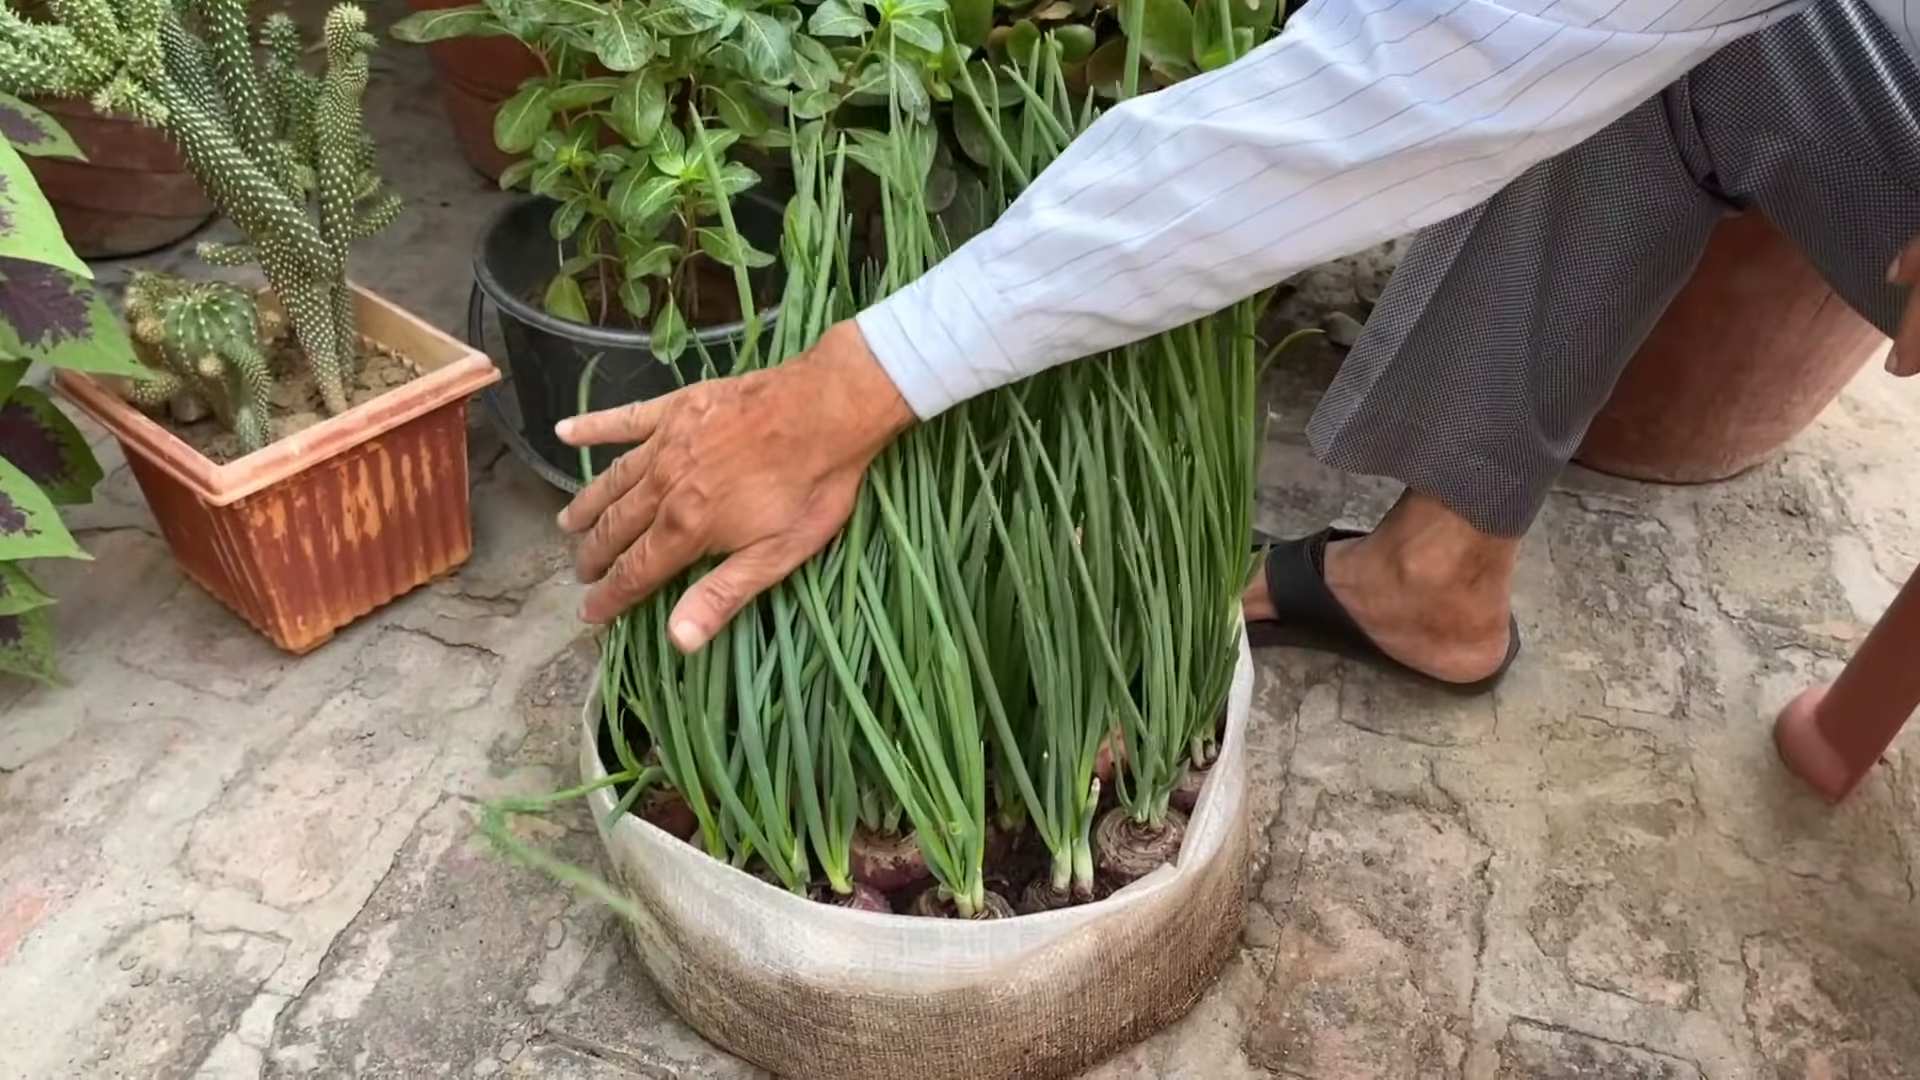
Innovative onion growing methods are revolutionizing the way we approach home gardening, and I’m so excited to share some incredible DIY tricks with you! Forget everything you thought you knew about planting onions because we’re diving deep into techniques that will maximize your yield and minimize your effort.
Onions have been a staple in cuisines around the world for centuries, dating back to ancient civilizations in Egypt and beyond. Their pungent flavor and versatility have made them a culinary cornerstone. But let’s be honest, growing them can sometimes feel like a chore. That’s where these DIY hacks come in!
Are you tired of small, lackluster onions? Do you dream of harvesting a bountiful crop without spending hours toiling in the garden? Well, you’re in the right place! These innovative onion growing methods are designed to help you achieve just that. We’ll explore everything from vertical gardening techniques to companion planting strategies, ensuring you get the most out of your garden space. I’m going to show you how to transform your onion-growing game, making it easier, more efficient, and ultimately, more rewarding. Get ready to impress your friends and family with your homegrown onion bounty!
DIY Home Security System: Turning Old Smartphones into Security Cameras
Hey everyone! Ever feel like you could use a little extra peace of mind when it comes to home security? You don’t necessarily need to shell out hundreds of dollars for a fancy system. I’m going to show you how to create your own DIY home security system using something you probably already have lying around: old smartphones! It’s a fantastic way to repurpose those devices and boost your security without breaking the bank.
What You’ll Need
Before we dive in, let’s gather our supplies. This is a pretty low-cost project, which is always a win!
* **Old Smartphones (Android or iOS):** The more, the merrier! Just make sure they’re in working condition, meaning they can power on, connect to Wi-Fi, and have a functioning camera.
* **Smartphone Chargers:** You’ll need to keep those cameras powered on 24/7.
* **Wi-Fi Connection:** A stable Wi-Fi network is crucial for transmitting the video feed.
* **Mounting Options:** Think about how you want to position your cameras. Options include:
* **Small Tripods:** These are great for placing cameras on shelves or tables.
* **Suction Cup Mounts:** Perfect for windows.
* **Wall Mounts:** For a more permanent and secure installation.
* **Command Strips:** A less permanent option for walls.
* **Security Camera App:** We’ll need an app to turn our phones into security cameras. I recommend “AlfredCamera” or “Manything,” but there are plenty of others to choose from. I’ll be using AlfredCamera for this tutorial.
* **A Google Account:** You’ll need this to log into AlfredCamera.
* **Optional: Power Banks:** For temporary placement in areas without easy access to outlets.
Setting Up Your Smartphones as Security Cameras
This is where the magic happens! We’ll be transforming those old phones into vigilant guardians of your home.
1. **Download and Install AlfredCamera (or your chosen app):**
* On *all* of your smartphones (both the old ones you’ll use as cameras and your current phone), head to the Google Play Store (Android) or the App Store (iOS).
* Search for “AlfredCamera” and download the app.
* Once downloaded, install the app on each device.
2. **Sign In with Your Google Account:**
* Open AlfredCamera on *all* devices.
* Tap the “Sign in with Google” button.
* Use the *same* Google account on *every* device. This is how the app knows which devices are connected to your security system.
3. **Designate Camera and Viewer Devices:**
* On your *old* smartphones (the ones you’ll be using as cameras):
* After signing in, the app will ask you to choose a role. Select “Camera.”
* Grant the app the necessary permissions, including access to the camera, microphone, and storage. The app needs these permissions to function properly as a security camera.
* You might be prompted to disable battery optimization for AlfredCamera. This is important because battery optimization can sometimes interfere with the app’s ability to run in the background and record continuously. Follow the on-screen instructions to disable it.
* On your *current* smartphone (the one you’ll use to view the camera feeds):
* After signing in, select “Viewer.”
* You don’t need to grant camera or microphone permissions to this device.
4. **Configure Camera Settings:**
* On each of your camera devices, tap the gear icon (settings) within the AlfredCamera app.
* Here are some settings you might want to adjust:
* **Resolution:** Choose the video quality. Higher resolution means a clearer image but also uses more data. I usually go with “High” or “Standard.”
* **Motion Detection:** Make sure this is enabled. This is what triggers the app to record when it detects movement.
* **Motion Detection Sensitivity:** Adjust how sensitive the motion detection is. If you’re getting too many false alarms (e.g., from a pet walking by), lower the sensitivity. If it’s not detecting movement when it should, increase the sensitivity.
* **Continuous Focus:** Enable this to keep the image sharp.
* **Night Vision:** If you plan to use the cameras in low-light conditions, enable night vision. Keep in mind that night vision can drain the battery faster.
* **Sound Detection:** Enable this if you want the app to alert you when it hears sounds.
* **Two-Way Talk:** This allows you to speak through the camera device from your viewer device. It can be useful for scaring off intruders or communicating with family members.
* **Camera Name:** Give each camera a descriptive name (e.g., “Front Door,” “Living Room”) so you can easily identify them in the viewer app.
5. **Position and Mount Your Cameras:**
* Now comes the fun part: finding the best spots for your cameras!
* Consider these factors when choosing locations:
* **Field of View:** Make sure the camera has a clear view of the area you want to monitor.
* **Lighting:** Avoid placing cameras directly facing bright light sources, as this can cause glare and make it difficult to see.
* **Power Source:** Ensure the camera is close to a power outlet so you can keep it plugged in.
* **Security:** Place the camera in a location where it’s not easily accessible to potential intruders.
* Use your chosen mounting options (tripods, suction cups, wall mounts, etc.) to securely position the cameras.
* I like to use a combination of methods. For example, I have one camera mounted on a window using a suction cup mount, and another on a bookshelf using a small tripod.
6. **Connect to Power:**
* Plug each camera into a power outlet using its charger.
* Make sure the charging cable is securely connected to both the phone and the outlet.
* If you’re using a power bank, fully charge it before connecting it to the camera.
Using the Viewer App
Now that your cameras are set up, let’s take a look at how to use the viewer app to monitor your home.
1. **Open AlfredCamera on Your Viewer Device:**
* Launch the AlfredCamera app on your current smartphone.
* You should see a list of your camera devices.
2. **View Live Feeds:**
* Tap on the name of a camera to view its live feed.
* You can switch between cameras by tapping the back button and selecting a different camera from the list.
3. **Use the Controls:**
* While viewing a live feed, you’ll see several controls at the bottom of the screen:
* **Record:** Manually start and stop recording.
* **Snapshot:** Take a still image of the current view.
* **Two-Way Talk:** Speak through the camera device.
* **Flashlight:** Turn on the camera’s flashlight (if available).
* **Zoom:** Zoom in and out on the image.
4. **Review Motion Detection Events:**
* When the app detects motion, it will record a short video clip and send you a notification.
* To review these events, tap the “Events” tab in the app.
* You’ll see a list of all motion detection events, with the most recent events at the top.
* Tap on an event to view the video clip.
* You can download the video clip to your phone or delete it.
5. **Adjust Viewer Settings:**
* Tap the menu icon (usually three lines or dots) in the app to access the settings.
* Here are some settings you might want to adjust:
* **Notifications:** Customize the types of notifications you receive (e.g., motion detection, low battery).
* **Resolution:** Choose the video quality for viewing live feeds.
* **Storage:** Manage your cloud storage space.
* **Security:** Enable two-factor authentication for added security.
Tips and Tricks for a Better DIY Security System
Here are a few extra tips to help you get the most out of your DIY home security system:
* **Experiment with Camera Placement:** Don’t be afraid to move your cameras around to find the best angles and coverage.
* **Use External Power Banks:** If you need to place a camera in an area without easy access to a power outlet, use a portable power bank.
* **Consider a Paid Subscription:** AlfredCamera and Manything offer paid subscriptions that unlock additional features, such as higher resolution recording, longer recording times, and more cloud storage.
* **Test Your System Regularly:** Make sure your cameras are working properly
Conclusion
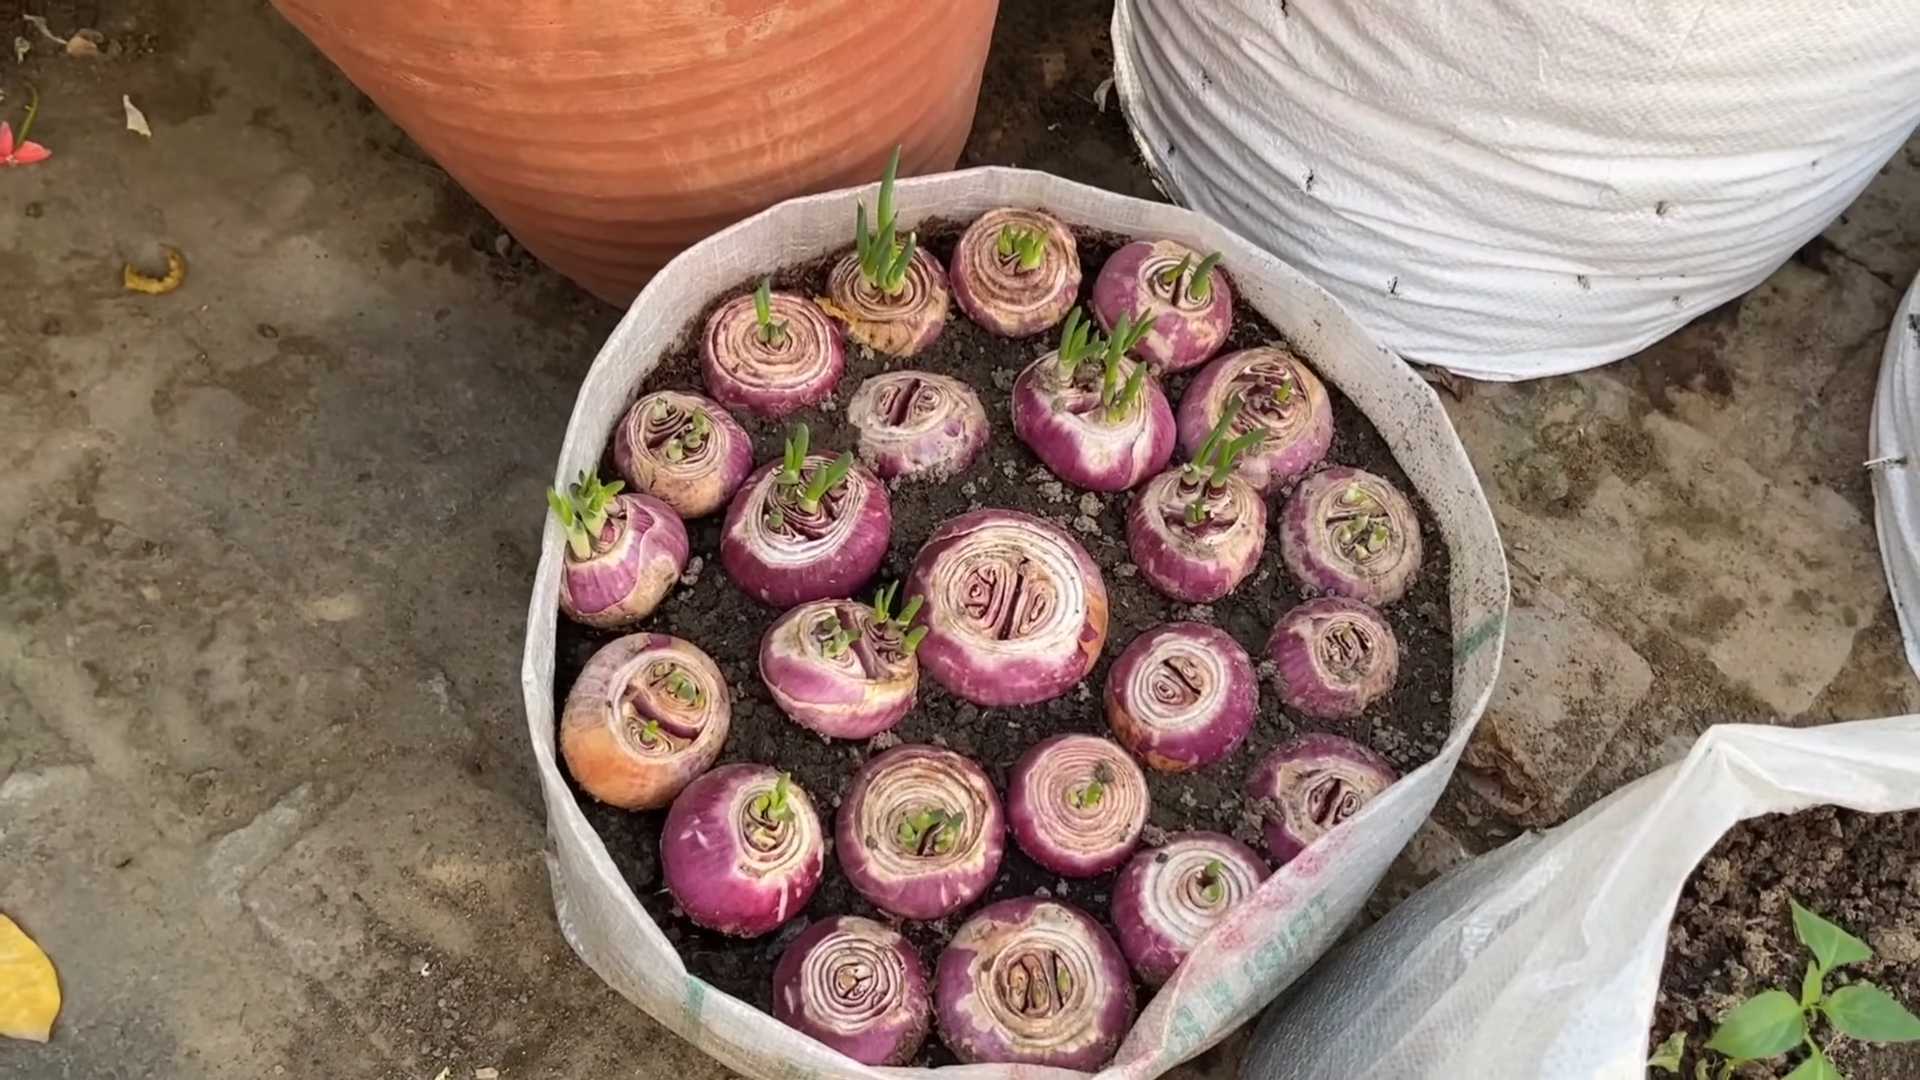
So, there you have it! This innovative onion growing method isn’t just a quirky experiment; it’s a game-changer for anyone looking to maximize their yield, minimize their space, and enjoy the freshest, most flavorful onions imaginable. We’ve explored how to transform ordinary household items and readily available materials into a thriving onion patch, right in your own backyard, balcony, or even windowsill.
Why is this a must-try? Because it empowers you to take control of your food source, reduce your reliance on store-bought produce (often laden with pesticides and shipped from afar), and experience the unparalleled satisfaction of nurturing your own food from seed to table. Imagine the pride you’ll feel serving a dish featuring onions you personally cultivated! Beyond the practical benefits, this method fosters a deeper connection with nature and a greater appreciation for the simple miracle of growth.
But the beauty of this innovative onion growing method lies in its adaptability. Feel free to experiment with different varieties of onions – from sweet Vidalias to pungent red onions – to discover your personal favorites. Consider adding companion plants like carrots or chamomile to your onion containers to deter pests and enhance growth. You can also adjust the size and shape of your containers to suit your available space and aesthetic preferences. Perhaps you’ll even discover a new and improved variation that you can share with the world!
We’ve covered the basics, but the real magic happens when you put these techniques into practice. Don’t be afraid to get your hands dirty, embrace the learning process, and adapt the method to your unique environment and resources. The rewards – a bountiful harvest of delicious, homegrown onions – are well worth the effort.
We are confident that this innovative onion growing method will revolutionize your gardening experience. It’s a simple, sustainable, and incredibly rewarding way to grow your own food.
Now, it’s your turn! We wholeheartedly encourage you to try this innovative onion growing method and witness the incredible results for yourself. Document your journey, share your successes (and even your challenges!), and inspire others to join the movement. Post photos of your thriving onion patches on social media using #InnovativeOnionGrowing and tag us so we can celebrate your green thumb achievements. Let’s build a community of passionate gardeners who are committed to growing their own food and sharing their knowledge with the world. Your experiences and insights will undoubtedly help others refine their techniques and achieve even greater success. Happy growing!
Frequently Asked Questions (FAQ)
What type of onions are best suited for this innovative growing method?
While this method is quite versatile, some onion varieties tend to thrive more than others. Generally, smaller to medium-sized onions, such as shallots, green onions (scallions), and smaller bulb onions, are excellent choices. These varieties tend to mature faster and require less space, making them ideal for container gardening. However, don’t be afraid to experiment with larger varieties like Vidalia or Walla Walla onions. Just be sure to provide them with adequate space and support as they grow. Consider starting with onion sets (small, immature bulbs) for faster results, or you can start from seed for a wider selection of varieties. Remember to choose varieties that are well-suited to your local climate and growing conditions.
How often should I water my onions grown using this method?
Watering frequency is crucial for successful onion growth. Onions need consistent moisture, but they don’t like to sit in soggy soil. A good rule of thumb is to water deeply whenever the top inch of soil feels dry to the touch. This might mean watering every day or two during hot, dry weather, or less frequently during cooler, wetter periods. Be sure to check the soil moisture regularly and adjust your watering schedule accordingly. Overwatering can lead to root rot, while underwatering can stunt growth. Using well-draining soil is essential to prevent waterlogging. Consider using a moisture meter to accurately gauge the soil moisture levels.
What kind of soil is best for growing onions using this method?
Onions thrive in well-draining, fertile soil that is rich in organic matter. A good potting mix specifically formulated for vegetables is an excellent choice. You can also create your own mix by combining equal parts of compost, peat moss (or coconut coir), and perlite or vermiculite. The compost provides essential nutrients, the peat moss or coconut coir helps retain moisture, and the perlite or vermiculite improves drainage. Avoid using heavy clay soil, as it can become waterlogged and hinder root growth. Before planting, amend the soil with a slow-release fertilizer to provide a steady supply of nutrients throughout the growing season. A slightly acidic to neutral soil pH (around 6.0 to 7.0) is ideal for onion growth.
How much sunlight do onions need when grown using this method?
Onions are sun-loving plants and require at least 6-8 hours of direct sunlight per day to thrive. Choose a location that receives plenty of sunlight throughout the day. If you are growing onions indoors, place them near a sunny window or supplement with grow lights. Insufficient sunlight can result in weak, leggy growth and smaller bulbs. Rotate your onion containers regularly to ensure that all sides of the plants receive adequate sunlight. If you live in a particularly hot climate, you may need to provide some afternoon shade to prevent the onions from scorching.
How do I fertilize my onions grown using this method?
Onions are heavy feeders and require regular fertilization to produce large, healthy bulbs. Start by incorporating a slow-release fertilizer into the soil at planting time. Then, supplement with a liquid fertilizer every 2-3 weeks throughout the growing season. Choose a fertilizer that is high in phosphorus and potassium, as these nutrients are essential for bulb development. Avoid using fertilizers that are too high in nitrogen, as this can promote excessive leaf growth at the expense of bulb formation. You can also use organic fertilizers such as compost tea or fish emulsion. Be sure to follow the instructions on the fertilizer label carefully to avoid over-fertilizing, which can damage the plants.
How do I protect my onions from pests and diseases when using this method?
While this method can minimize some pest and disease issues, it’s still important to take precautions. Regularly inspect your onion plants for signs of pests such as onion maggots, thrips, and aphids. If you spot any pests, treat them promptly with an appropriate insecticide or insecticidal soap. You can also use companion planting to deter pests. For example, planting carrots near onions can help repel onion flies. To prevent fungal diseases, ensure good air circulation around your plants and avoid overwatering. If you notice any signs of disease, such as yellowing leaves or lesions, treat them with a fungicide. Consider using organic pest control methods whenever possible to minimize the impact on the environment.
When do I harvest my onions grown using this method?
The timing of harvest depends on the variety of onion you are growing and your desired use. Green onions (scallions) can be harvested at any time once they reach a suitable size. Bulb onions are typically ready to harvest when the tops begin to fall over and turn brown. At this point, stop watering the onions and allow the soil to dry out slightly. Gently pull the onions from the soil and allow them to cure in a warm, dry place for several days. Curing helps to harden the outer layers of the bulbs and prevent them from rotting during storage. Once the onions are cured, you can store them in a cool, dry, and well-ventilated place for several months.
Leave a Comment