

Indoor Spinach Growing: Imagine fresh, vibrant spinach gracing your plate, harvested just moments before from your very own indoor garden! Forget those limp, pre-packaged greens from the grocery store. This isn’t just a dream; it’s an achievable reality with a few simple tricks and a dash of DIY spirit.
For centuries, cultivating greens has been a cornerstone of healthy living. Spinach, in particular, boasts a rich history, believed to have originated in ancient Persia. From its humble beginnings, it has journeyed across continents, becoming a staple in diverse cuisines. But in today’s fast-paced world, accessing truly fresh, nutrient-rich spinach can be a challenge. That’s where the magic of indoor gardening comes in!
I know what you’re thinking: “Indoor gardening? Sounds complicated!” But trust me, it doesn’t have to be. This article is your ultimate guide to successful indoor spinach growing, even if you’re a complete beginner. We’ll unlock the secrets to creating the perfect environment, from lighting and soil to watering and harvesting. Why settle for store-bought when you can enjoy the unparalleled taste and satisfaction of growing your own delicious, healthy spinach right in your home? Let’s get started!
Grow Your Own Spinach Indoors: A Beginner’s Guide
Hey there, fellow plant enthusiasts! Ever dreamt of having fresh, vibrant spinach readily available, even when the weather outside is frightful? Well, dream no more! I’m going to walk you through the surprisingly simple process of growing spinach indoors. Trust me, even if you think you have a “black thumb,” you can totally do this. Let’s get started!
What You’ll Need
Before we dive into the nitty-gritty, let’s gather our supplies. Having everything on hand will make the whole process smoother and more enjoyable.
* Spinach Seeds: Opt for varieties specifically bred for indoor growing, such as ‘Bloomsdale Long Standing’ or ‘Baby’s Leaf Hybrid’. These tend to be more compact and productive in containers.
* Containers: Choose containers that are at least 6 inches deep and have drainage holes. I personally love using rectangular planters, as they maximize space. You can also use individual pots, about 6 inches in diameter.
* Potting Mix: Use a high-quality, well-draining potting mix. Avoid using garden soil, as it can compact and hinder drainage. I recommend a mix specifically formulated for vegetables.
* Grow Lights: Spinach needs plenty of light to thrive. If you don’t have a sunny windowsill, invest in a grow light. LED grow lights are energy-efficient and work wonders.
* Watering Can or Spray Bottle: For gentle watering.
* Optional: Seed starting tray, heat mat (for faster germination), liquid fertilizer.
Getting Started: Sowing Your Spinach Seeds
This is where the magic begins! We’re going to plant those tiny seeds and watch them sprout into delicious spinach.
1. Prepare Your Containers: Fill your chosen containers with potting mix, leaving about an inch of space at the top. Gently pat down the soil to create a firm, even surface.
2. Sow the Seeds: Sprinkle the spinach seeds evenly over the surface of the soil. Aim for about 1 inch spacing between seeds. You can also sow them in rows, about 2 inches apart.
3. Cover the Seeds: Lightly cover the seeds with about 1/4 inch of potting mix.
4. Water Gently: Use a watering can or spray bottle to gently moisten the soil. Be careful not to overwater, as this can cause the seeds to rot. The soil should be damp, but not soggy.
5. Create a Humid Environment (Optional): To speed up germination, you can cover the containers with a clear plastic lid or plastic wrap. This will help to create a humid environment. If you use a lid or plastic wrap, make sure to remove it once the seedlings emerge to prevent fungal diseases.
6. Provide Warmth (Optional): Spinach seeds germinate best in temperatures between 60-70°F (15-21°C). If your home is cooler than this, you can use a heat mat to warm the soil.
7. Place in a Well-Lit Area: Place the containers in a location that receives plenty of bright, indirect light. If you’re using grow lights, position them about 6-12 inches above the soil surface.
Nurturing Your Spinach: Light, Water, and Nutrients
Now that your spinach seeds are sown, it’s time to provide them with the care they need to flourish.
1. Light: Spinach needs at least 6 hours of light per day. If you’re using a sunny windowsill, rotate the containers regularly to ensure that all sides of the plants receive equal light. If you’re using grow lights, keep them on for 12-14 hours per day.
2. Watering: Keep the soil consistently moist, but not soggy. Water when the top inch of soil feels dry to the touch. Avoid overwatering, as this can lead to root rot. I usually check the soil moisture every day or two.
3. Fertilizing: Spinach is a heavy feeder, so it needs regular fertilization. Start fertilizing about 2-3 weeks after the seedlings emerge. Use a liquid fertilizer specifically formulated for leafy greens, diluted to half strength. Fertilize every 2-3 weeks. I personally like using fish emulsion or seaweed extract.
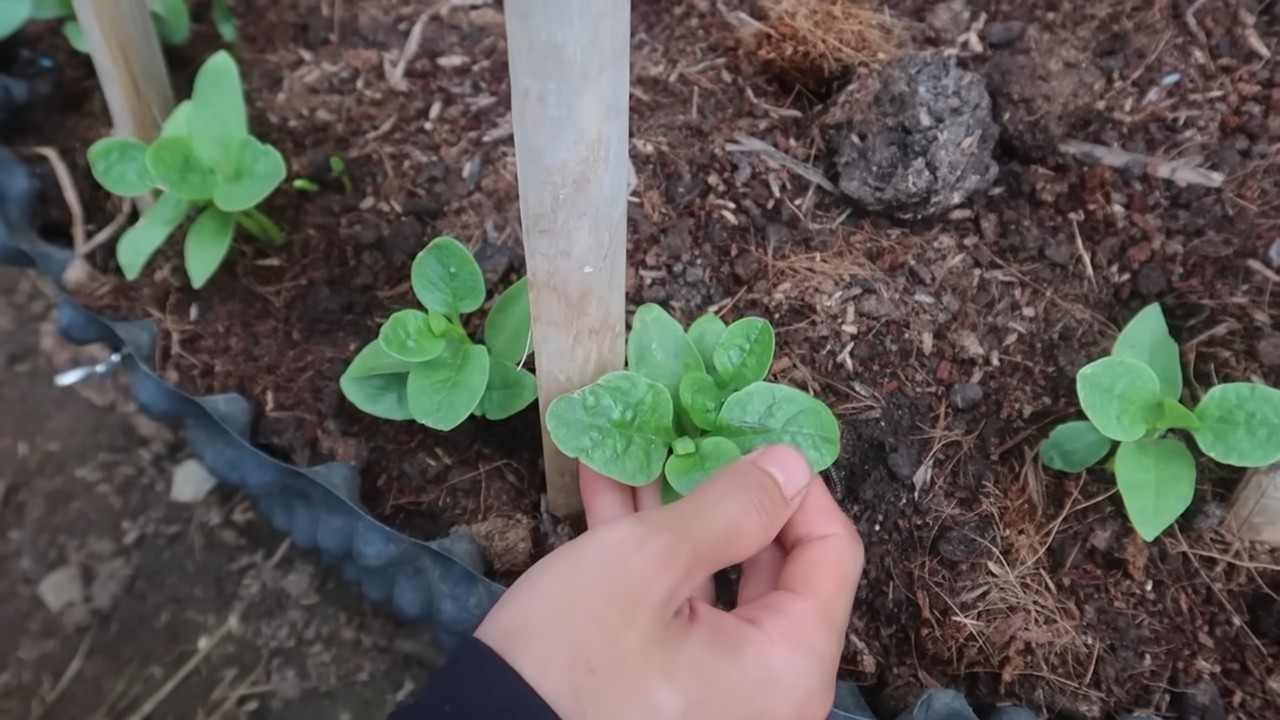
4. Thinning: Once the seedlings have developed a few sets of true leaves, thin them out so that they are about 2-3 inches apart. This will give them enough space to grow and prevent overcrowding. You can eat the thinned seedlings as microgreens!
5. Air Circulation: Good air circulation is important for preventing fungal diseases. Make sure that your spinach plants have plenty of space around them and that the air is circulating freely. You can also use a small fan to improve air circulation.
Harvesting Your Bounty: Enjoying Your Homegrown Spinach
The moment you’ve been waiting for! Harvesting your own spinach is incredibly rewarding.
1. When to Harvest: You can start harvesting spinach leaves when they are about 4-6 inches long.
2. How to Harvest: Use scissors or a sharp knife to cut the outer leaves, leaving the inner leaves to continue growing. This is known as “cut and come again” harvesting, and it allows you to harvest spinach from the same plants for several weeks.
3. Harvesting Baby Spinach: If you prefer baby spinach, you can harvest the entire plant when it is about 2-3 inches tall.
4. Storage: Store harvested spinach in the refrigerator in a plastic bag or container. It will keep for about a week.
5. Enjoy! Use your homegrown spinach in salads, smoothies, soups, or any other dish that calls for spinach.
Troubleshooting: Common Issues and Solutions
Even with the best care, you might encounter some challenges along the way. Here are some common issues and how to address them:
* Yellowing Leaves: This can be caused by overwatering, underwatering, nutrient deficiencies, or lack of light. Check the soil moisture, fertilize regularly, and make sure your plants are getting enough light.
* Leggy Growth: This is usually caused by insufficient light. Move your plants to a brighter location or use grow lights.
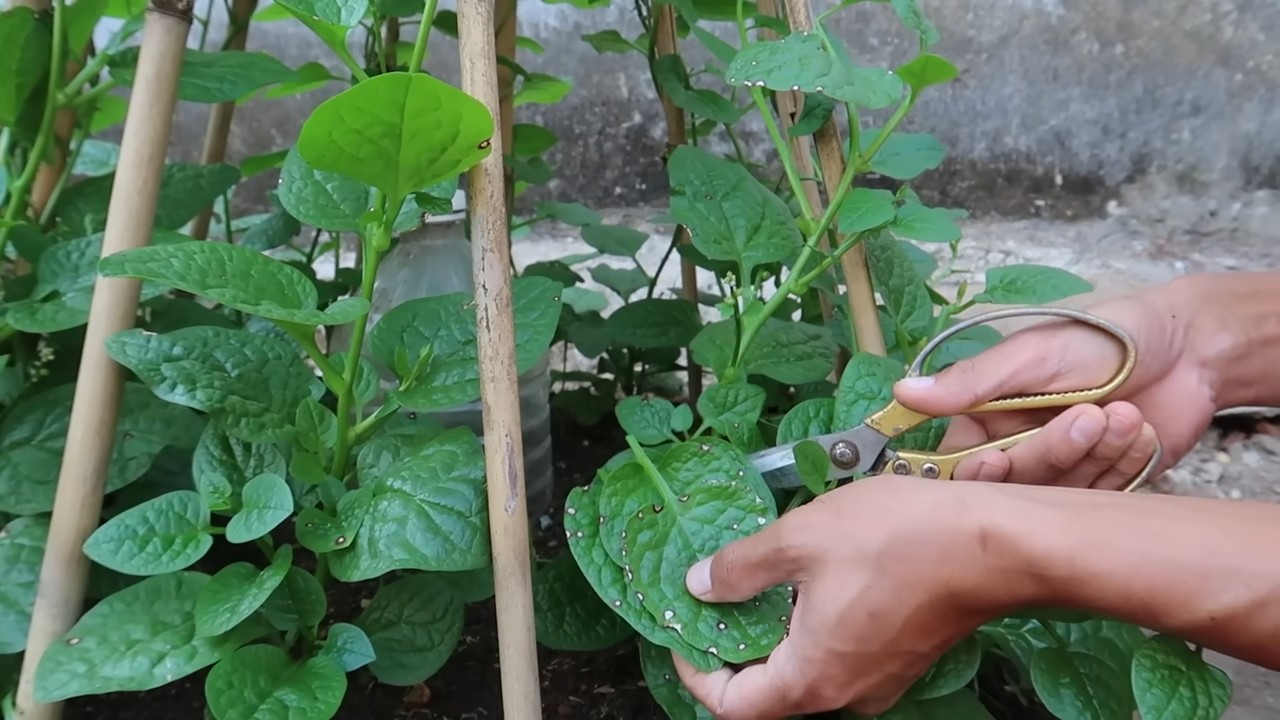
* Pests: Aphids and spider mites are common pests that can attack spinach. Inspect your plants regularly and treat any infestations with insecticidal soap or neem oil.
* Fungal Diseases: Overwatering and poor air circulation can lead to fungal diseases. Make sure to water properly and provide good air circulation. If you notice any signs of fungal disease, such as powdery mildew, treat your plants with a fungicide.
Choosing the Right Spinach Variety
Selecting the right spinach variety is crucial for successful indoor growing. Here are a few of my favorites:
* Bloomsdale Long Standing: This is a classic spinach variety that is known for its heat tolerance and disease resistance. It produces large, crinkled leaves that are perfect for salads and cooking.
* Baby’s Leaf Hybrid: This variety is specifically bred for baby spinach production. It produces small, tender leaves that are ready to harvest in just a few weeks.
* Tyee: This is a fast-growing spinach variety that is resistant to bolting (going to seed). It produces smooth, dark green leaves that are perfect for salads and smoothies.
* Space: This is a semi-savoy variety with dark green leaves. It’s known for its disease resistance and good flavor.
Optimizing Your Indoor Spinach Garden
Want to take your indoor spinach growing to the next level? Here are some tips for optimizing your garden:
* Succession Planting: Sow new seeds every 2-3 weeks to ensure a continuous harvest of spinach.
* Companion Planting: Plant spinach alongside other vegetables, such as radishes, lettuce, and carrots. These plants can help to deter pests and improve soil health.
* Soil Testing: Test your soil regularly to ensure that it has the proper pH and nutrient levels.
* Vertical Gardening: If you’re short on space, consider growing spinach in a vertical garden. This can help to maximize your growing area and improve air circulation.
* Hydroponics: For a more advanced approach, you can grow spinach hydroponically. This involves growing plants in water without soil.
Why Grow Spinach Indoors?
You might be wondering, “Why bother growing spinach indoors when I can just buy it at the store?” Well, there are several compelling reasons:
* Freshness: Homegrown spinach is incredibly fresh and flavorful. It hasn’t been sitting on a truck or in a warehouse for days.
* Cost Savings: Over time, growing your own spinach can save you money on groceries.
* Organic: You can grow organic spinach without the use of harmful pesticides or herbicides.
* Convenience: Having fresh spinach readily available in your home is incredibly convenient.
* Therapeutic: Gardening is a relaxing and rewarding hobby that can reduce stress and improve your overall
Conclusion
So, there you have it! Mastering the art of indoor spinach growing is not only achievable but also incredibly rewarding. We’ve walked you through the essential steps, from selecting the right seeds and containers to providing optimal lighting and watering. But why should you embark on this leafy adventure?
First and foremost, growing your own spinach guarantees a constant supply of fresh, nutritious greens right at your fingertips. Imagine adding vibrant, homegrown spinach to your morning smoothie, a quick lunch salad, or a hearty dinner dish, all without a trip to the grocery store. The taste difference alone is a compelling reason to give it a try. Store-bought spinach often pales in comparison to the crisp, slightly sweet flavor of freshly harvested leaves.
Beyond the taste, consider the health benefits. Spinach is a nutritional powerhouse, packed with vitamins, minerals, and antioxidants. By growing your own, you have complete control over the growing process, ensuring that your spinach is free from harmful pesticides and herbicides. You’re essentially investing in your health and well-being with every seed you sow.
But the benefits extend beyond the purely practical. There’s a certain satisfaction that comes from nurturing a plant from seed to harvest. It’s a connection to nature, a reminder of the simple joys of life, and a welcome respite from the stresses of the modern world. Indoor gardening, especially indoor spinach growing, can be a therapeutic and fulfilling hobby.
Don’t be afraid to experiment with different varieties of spinach. Some, like ‘Baby’s Leaf Hybrid,’ are specifically bred for indoor growing and offer a milder flavor. Others, like ‘Tyee,’ are known for their disease resistance. You can also try growing spinach in different types of containers, from traditional pots to vertical planters, to maximize your space and create a visually appealing indoor garden.
Consider companion planting as well. Basil, for example, is said to deter pests and improve the flavor of spinach. Chives can also help repel aphids. Experiment with different combinations to find what works best for you.
And remember, success in indoor spinach growing is often a matter of trial and error. Don’t be discouraged if your first attempt isn’t perfect. Learn from your mistakes, adjust your approach, and keep trying. With a little patience and persistence, you’ll be harvesting your own delicious spinach in no time.
We encourage you to take the plunge and start your own indoor spinach garden today. Share your experiences with us! We’d love to hear about your successes, your challenges, and any tips or tricks you’ve discovered along the way. Post photos of your spinach plants, share your favorite spinach recipes, and connect with other indoor gardeners in the comments section below. Let’s create a community of spinach enthusiasts and inspire others to embrace the joys of growing their own food. Happy gardening!
Frequently Asked Questions (FAQ)
Q: What is the best type of spinach to grow indoors?
A: While many spinach varieties can be grown indoors, some are better suited than others. Look for varieties that are specifically bred for indoor or container gardening. ‘Baby’s Leaf Hybrid’ is a popular choice due to its compact size, fast growth, and mild flavor. ‘Space’ spinach is another excellent option, known for its disease resistance and adaptability. ‘Tyee’ is also a good choice if you are looking for something that is resistant to bolting. Ultimately, the best variety for you will depend on your personal preferences and growing conditions. Experiment with a few different types to see which ones thrive in your indoor environment.
Q: How much light does indoor spinach need?
A: Spinach requires a significant amount of light to grow properly. Ideally, it needs at least 6-8 hours of direct sunlight per day. If you don’t have a sunny windowsill, you’ll need to supplement with artificial lighting. Grow lights are an excellent option, providing the necessary spectrum of light for healthy growth. LED grow lights are energy-efficient and long-lasting. Fluorescent grow lights are also a viable option, but they may need to be replaced more frequently. Position your grow lights about 6-12 inches above the spinach plants and adjust as needed to prevent burning.
Q: What is the best soil for growing spinach indoors?
A: Spinach prefers well-draining soil that is rich in organic matter. A good potting mix specifically designed for vegetables is ideal. You can also create your own potting mix by combining equal parts of compost, peat moss (or coconut coir), and perlite or vermiculite. Compost provides essential nutrients, peat moss (or coconut coir) helps retain moisture, and perlite or vermiculite improves drainage. Avoid using garden soil, as it can be too heavy and may contain pests or diseases.
Q: How often should I water my indoor spinach plants?
A: Spinach needs consistent moisture to thrive, but it doesn’t like to be waterlogged. Water your plants when the top inch of soil feels dry to the touch. Water thoroughly, until water drains out of the bottom of the pot. Be sure to empty the saucer underneath the pot to prevent root rot. Overwatering can be just as detrimental as underwatering, so it’s important to find the right balance. Check the soil moisture regularly and adjust your watering schedule as needed, depending on the temperature and humidity of your indoor environment.
Q: How do I harvest my indoor spinach?
A: You can begin harvesting spinach leaves when they are about 4-6 inches long. Simply snip off the outer leaves with scissors or a knife, leaving the inner leaves to continue growing. This cut-and-come-again method allows you to harvest spinach multiple times from the same plant. Avoid harvesting more than one-third of the plant at a time, as this can stress the plant and slow down growth. Harvest in the morning, when the leaves are crisp and fresh.
Q: What are some common problems with indoor spinach growing and how can I fix them?
A: Some common problems include aphids, spider mites, and fungal diseases. Aphids and spider mites can be controlled with insecticidal soap or neem oil. Fungal diseases can be prevented by ensuring good air circulation and avoiding overwatering. If you notice any signs of disease, remove the affected leaves immediately. Another common issue is bolting, which is when the spinach plant prematurely goes to seed. This can be caused by high temperatures or long days. To prevent bolting, keep your spinach plants cool and provide them with adequate shade during the hottest part of the day.
Q: Can I grow spinach indoors year-round?
A: Yes, you can grow spinach indoors year-round, provided you can provide the necessary light, temperature, and moisture. During the winter months, you may need to rely more heavily on artificial lighting. Keep the temperature between 60-70°F (15-21°C) for optimal growth. With proper care, you can enjoy fresh, homegrown spinach all year long.
Q: How do I fertilize my indoor spinach plants?
A: Spinach benefits from regular fertilization. Use a balanced liquid fertilizer, such as a 10-10-10 or 20-20-20, diluted to half strength. Fertilize every 2-3 weeks, following the instructions on the fertilizer label. Avoid over-fertilizing, as this can burn the roots and damage the plants. You can also amend the soil with compost or worm castings to provide a slow-release source of nutrients.
Q: Can I grow spinach in a hydroponic system indoors?
A: Yes, spinach can be successfully grown in a hydroponic system indoors. Hydroponics offers several advantages, including faster growth, higher yields, and reduced risk of soilborne diseases. There are many different types of hydroponic systems you can use, such as deep water culture, nutrient film technique (NFT), and ebb and flow. Choose a system that is appropriate for your space and budget. Be sure to use a nutrient solution specifically formulated for leafy greens.


Leave a Comment