

Indoor Potato Gardening: Imagine harvesting fresh, homegrown potatoes right from your kitchen! Sounds like a dream, right? Well, it doesn’t have to be! For centuries, cultures around the world have cherished the humble potato, not just as a staple food, but as a symbol of sustenance and resilience. From the Andean highlands where they originated to the bustling cities of today, potatoes have nourished generations.
But what if you don’t have a sprawling backyard? That’s where the magic of indoor potato gardening comes in! I’m here to show you how to cultivate your own spuds, no matter how limited your space. In today’s world, where access to fresh, healthy produce can be a challenge, growing your own food is more important than ever. Plus, it’s incredibly rewarding to nurture a plant from start to finish and then enjoy the fruits (or rather, tubers!) of your labor.
This DIY guide is packed with simple, effective tricks and hacks that will transform your home into a mini potato farm. Whether you’re a seasoned gardener or a complete beginner, I’ll walk you through every step, from choosing the right potatoes to troubleshooting common problems. Get ready to dig in and discover the joy of indoor potato gardening – it’s easier than you think!
Grow Your Own Potatoes Indoors: A Spud-tacular DIY Guide!
Hey there, fellow gardening enthusiasts! Ever thought about growing potatoes indoors? It’s easier than you think, and it’s a fantastic way to enjoy fresh, homegrown potatoes even if you don’t have a sprawling outdoor garden. I’m going to walk you through the entire process, step-by-step, so you can have your own little potato patch right in your home. Let’s get digging!
What You’ll Need
Before we get our hands dirty, let’s gather all the necessary supplies. This will make the whole process smoother and more enjoyable.
* Seed Potatoes: These are not seeds, but rather small potatoes specifically grown for planting. You can find them at your local garden center or online. Look for certified disease-free varieties. I personally love Yukon Gold for their creamy texture and delicious flavor, but feel free to experiment!
* Large Container: You’ll need a container that’s at least 10 gallons in size. A plastic storage bin, a large bucket, or even a repurposed trash can (cleaned thoroughly, of course!) will work. The key is depth – potatoes need room to grow upwards as you “hill” them.
* Potting Mix: Don’t use garden soil! It’s too dense and won’t drain well. A good quality potting mix is essential for healthy potato growth. I recommend a mix that’s light and airy, with good drainage.
* Water: Obvious, but crucial! You’ll need to water your potatoes regularly.
* Sunlight: Potatoes need at least 6-8 hours of sunlight per day. If you don’t have a sunny spot indoors, you’ll need to supplement with grow lights.
* Optional: Fertilizer: A balanced, slow-release fertilizer can give your potatoes a boost.
* Optional: Drainage Holes: If your container doesn’t have drainage holes, you’ll need to drill some. This is super important to prevent root rot.
Preparing Your Seed Potatoes
This step is crucial for getting your potatoes off to a good start. We’re going to “chit” the potatoes, which encourages them to sprout before planting.
1. Inspect Your Seed Potatoes: Look for potatoes that are firm and healthy. Avoid any that are soft, mushy, or have signs of disease.
2. Chitting (Sprouting): Place the seed potatoes in a cool, bright location for about 1-2 weeks. You can use an egg carton or a shallow tray. The goal is to encourage them to develop “eyes” or sprouts.
3. Cutting (Optional): If your seed potatoes are large (bigger than an egg), you can cut them into smaller pieces, ensuring that each piece has at least 2-3 eyes. Let the cut pieces dry for a day or two to prevent rotting. I usually skip this step if my seed potatoes are small enough.
Planting Your Potatoes
Now for the fun part! Let’s get those potatoes in the ground (or, rather, in the container).
1. Prepare the Container: If your container doesn’t have drainage holes, drill several in the bottom. This is essential to prevent waterlogging.
2. Add Potting Mix: Fill the container with about 4-6 inches of potting mix.
3. Plant the Seed Potatoes: Place the seed potatoes on top of the potting mix, with the sprouts (eyes) facing upwards. Space them evenly if you’re planting multiple potatoes in the same container. I usually plant about 2-3 seed potatoes in a 10-gallon container.
4. Cover with Potting Mix: Cover the seed potatoes with another 2-3 inches of potting mix.
5. Water Thoroughly: Water the soil until it’s moist but not soggy.
Hilling Your Potatoes
This is a key technique for maximizing your potato yield. As the potato plants grow, you’ll gradually add more soil to encourage the formation of more potatoes along the stem.
1. Wait for Growth: Once the potato plants have grown about 6-8 inches tall, it’s time to start hilling.
2. Add More Potting Mix: Add more potting mix to the container, covering the stems of the plants, leaving only the top few leaves exposed.
3. Repeat: Continue this process every few weeks as the plants grow, until the container is almost full. This encourages the plant to produce more potatoes along the buried stem. I usually hill about 3-4 times during the growing season.
Caring for Your Potato Plants
Proper care is essential for healthy potato growth and a bountiful harvest.
1. Watering: Water your potato plants regularly, keeping the soil consistently moist but not soggy. Check the soil moisture by sticking your finger into the soil. If it feels dry an inch or two below the surface, it’s time to water.
2. Sunlight: Ensure your potato plants receive at least 6-8 hours of sunlight per day. If you don’t have enough natural light, supplement with grow lights.
3. Fertilizing (Optional): If you choose to fertilize, use a balanced, slow-release fertilizer according to the package directions. I usually fertilize every few weeks during the growing season.
4. Pest Control: Keep an eye out for pests like aphids or potato beetles. If you spot any, you can try hand-picking them off or using an organic insecticide.
5. Rotation: Rotate the pot every few days to ensure even light exposure on all sides of the plant.
Harvesting Your Potatoes
The moment we’ve all been waiting for! Harvesting your homegrown potatoes is incredibly rewarding.
1. Timing: Potatoes are typically ready to harvest about 70-90 days after planting, depending on the variety. The foliage will start to turn yellow and die back.
2. Stop Watering: About two weeks before harvest, stop watering the plants. This will help the potatoes to cure and develop a thicker skin.
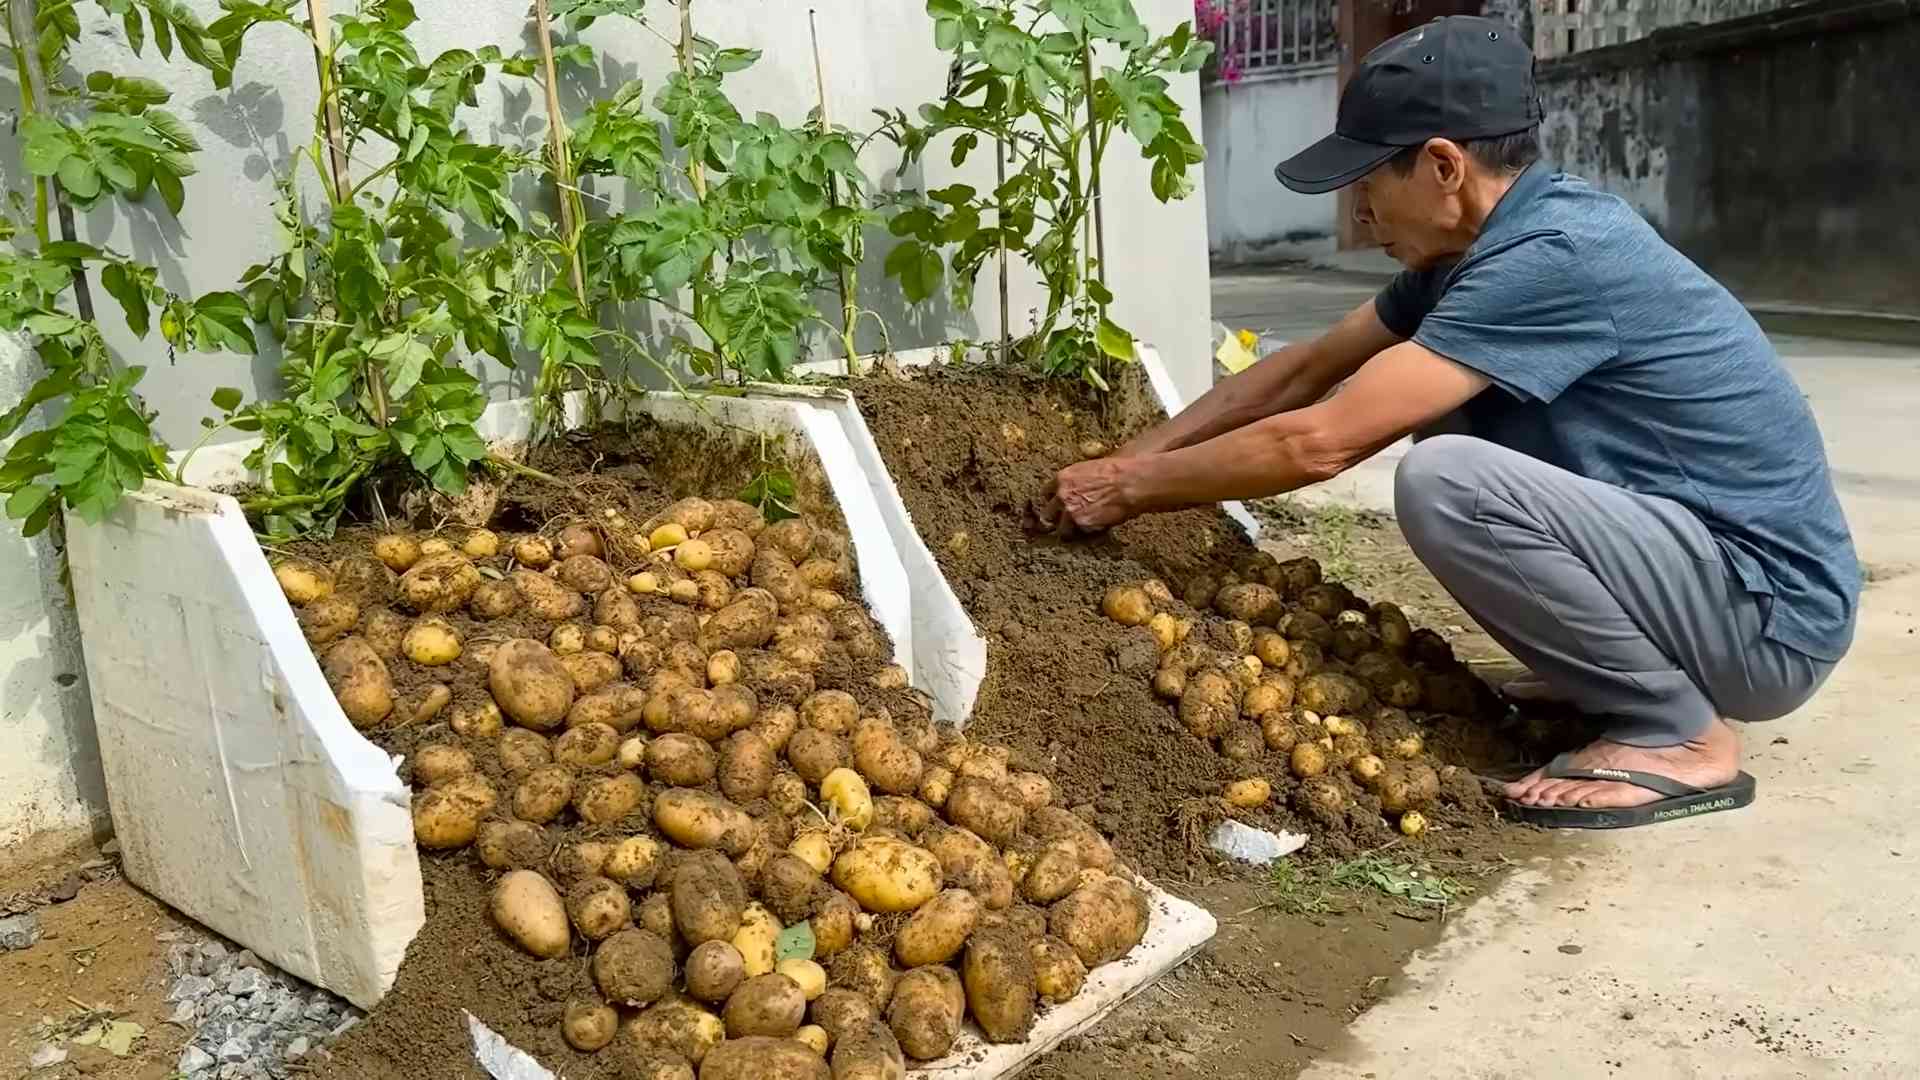
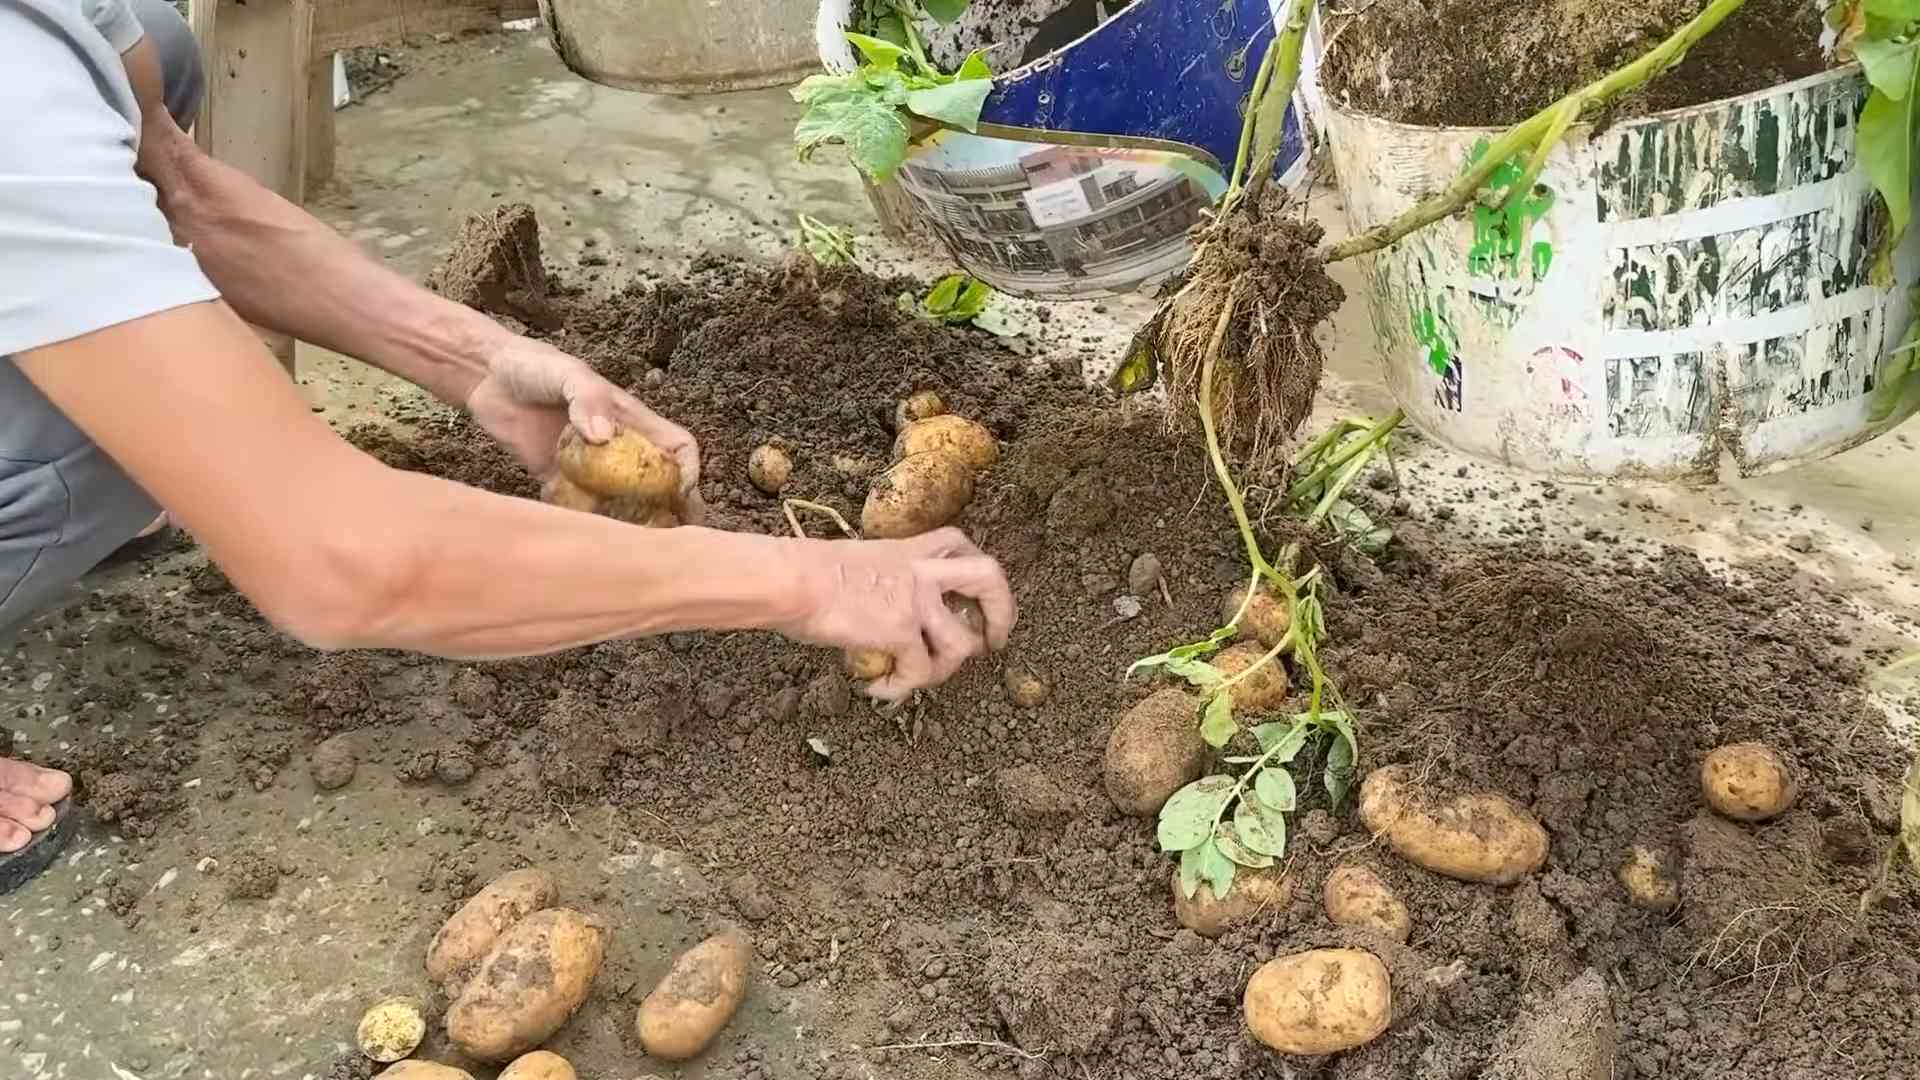
3. Harvesting: Gently dig around the base of the plants and carefully remove the potatoes. Be careful not to damage them. I like to use my hands to gently loosen the soil and then lift the potatoes out.
4. Curing: After harvesting, let the potatoes cure in a cool, dark, and well-ventilated place for about a week. This will help them to develop a thicker skin and improve their storage life.
5. Storage: Store your cured potatoes in a cool, dark, and dry place. They should last for several months.
Troubleshooting
Even with the best care, you might encounter some challenges along the way. Here are a few common problems and how to address them:
* Yellowing Leaves: This could be a sign of overwatering, underwatering, or nutrient deficiency. Adjust your watering schedule and consider fertilizing.
* Leggy Growth: This usually indicates insufficient sunlight. Move your plants to a sunnier location or supplement with grow lights.
* Small Potatoes: This could be due to insufficient hilling, overcrowding, or poor soil. Make sure you’re hilling regularly and that you’re not planting too many potatoes in the same container.
* Rotting Potatoes: This is usually caused by overwatering or poor drainage. Ensure your container has adequate drainage holes and avoid overwatering.
Choosing the Right Potato Variety
The type of potato you choose to grow indoors can impact your success and enjoyment. Here are a few popular and well-suited varieties:
* Yukon Gold: As I mentioned before, these are a personal favorite. They are known for their creamy texture and buttery flavor. They are also relatively early maturing, making them a good choice for indoor growing.
* Red Pontiac: These potatoes have a beautiful red skin and a firm, waxy texture. They are great for boiling, roasting, or making potato salad.
* Fingerling Potatoes: These long, slender potatoes come in a variety of colors and flavors. They are a gourmet option that can add a unique touch to your meals.
* Irish Cobbler: This is an early-season variety that is known for its excellent flavor and texture. It’s a good choice for those who want to harvest their potatoes quickly.
Optimizing Your Indoor Potato Garden
Want to take your indoor potato gardening to the next level? Here are a few tips to help you maximize your yield and enjoyment:
* Use a Self-Watering Container: This can help to ensure that your potatoes receive consistent moisture, which is especially important if you’re prone to forgetting to water.
* Add Compost to Your Potting Mix: Compost is a great way to improve the fertility of your soil and provide your potatoes with essential nutrients.
* Monitor Soil pH: Potatoes prefer a slightly acidic soil pH (around 6.0-6.5). You can test your soil pH with a soil testing kit and adjust it
Conclusion
So, there you have it! Transforming your humble spuds into a thriving indoor potato garden is not only surprisingly simple, but also incredibly rewarding. Forget those expensive, chemically treated potatoes from the grocery store. With this easy DIY trick, you can cultivate your own fresh, organic potatoes right in the comfort of your home, regardless of the season.
Why is this a must-try? Because it’s more than just growing food; it’s about connecting with nature, understanding the life cycle of plants, and enjoying the unparalleled taste of homegrown produce. Imagine the satisfaction of harvesting your own potatoes, knowing exactly where they came from and how they were grown. Plus, it’s a fantastic educational project for kids, teaching them about sustainability and the importance of food production.
But the beauty of this indoor potato gardening method lies in its adaptability. Feel free to experiment with different potato varieties. Russets, Yukon Golds, or even fingerling potatoes can all thrive indoors. Consider using different containers, too. While buckets and grow bags are excellent choices, you can also repurpose old laundry baskets or even large storage bins, ensuring they have adequate drainage, of course.
For an extra boost, try adding a small amount of organic fertilizer to the soil every few weeks. This will provide your potato plants with the nutrients they need to produce a bountiful harvest. You can also experiment with different lighting conditions. While a sunny windowsill is ideal, you can supplement with grow lights if natural light is limited.
And don’t forget the power of companion planting! Consider adding herbs like basil or rosemary to your potato containers. These herbs can help deter pests and improve the overall health of your plants.
Ultimately, this DIY indoor potato gardening trick is about embracing a more sustainable and self-sufficient lifestyle. It’s about taking control of your food source and enjoying the simple pleasures of growing your own food.
We wholeheartedly encourage you to give this a try. It’s a fun, educational, and ultimately delicious project that anyone can undertake. And once you’ve harvested your first crop of homegrown potatoes, we’d love to hear about your experience! Share your photos, tips, and stories in the comments below. Let’s build a community of indoor potato gardeners and inspire others to embrace the joys of homegrown food. Happy gardening!
Frequently Asked Questions (FAQs)
What kind of potatoes are best for indoor gardening?
While you can technically grow any type of potato indoors, some varieties tend to perform better than others. Smaller, earlier-maturing varieties like Yukon Gold, fingerling potatoes, and even red potatoes are generally good choices. These varieties tend to produce a decent yield in a shorter amount of time, which is ideal for indoor growing conditions. Avoid larger, late-maturing varieties like Russets, as they may require more space and a longer growing season than is practical indoors. Seed potatoes are recommended for best results.
How much light do indoor potato plants need?
Potatoes need a significant amount of light to thrive. Ideally, they should receive at least 6-8 hours of direct sunlight per day. A south-facing window is usually the best option. If you don’t have access to enough natural light, you can supplement with grow lights. Fluorescent or LED grow lights are both effective. Position the lights a few inches above the plants and keep them on for 12-14 hours per day. Insufficient light can lead to leggy growth and reduced potato production.
What kind of soil should I use for indoor potato gardening?
The ideal soil for indoor potato gardening is a well-draining, nutrient-rich potting mix. Avoid using garden soil, as it can be too heavy and may contain pests or diseases. A good potting mix will provide adequate drainage and aeration, which are essential for healthy potato growth. You can also amend the potting mix with compost or other organic matter to improve its fertility. A slightly acidic to neutral pH (around 6.0-7.0) is ideal.
How often should I water my indoor potato plants?
Water your potato plants regularly, keeping the soil consistently moist but not waterlogged. Overwatering can lead to root rot, while underwatering can stunt growth. Check the soil moisture by sticking your finger about an inch into the soil. If it feels dry, it’s time to water. Water deeply, allowing the excess water to drain out of the bottom of the container. Reduce watering frequency as the plants mature and the potatoes begin to form.
How do I “hill” my potato plants indoors?
“Hilling” is the process of adding more soil around the stems of the potato plants as they grow. This encourages the plants to produce more potatoes along the buried stems. As your potato plants grow, gradually add more soil to the container, burying the lower portion of the stems. Leave only the top few sets of leaves exposed. Repeat this process every few weeks until the container is nearly full.
When can I harvest my indoor potatoes?
The time it takes to harvest your potatoes will depend on the variety you’re growing. Generally, you can expect to harvest your potatoes about 70-90 days after planting. A good indication that your potatoes are ready to harvest is when the foliage starts to turn yellow and die back. You can also gently dig around in the soil to check the size of the potatoes. If they’re large enough for your liking, you can harvest them.
Are there any common pests or diseases that affect indoor potato plants?
While indoor potato plants are generally less susceptible to pests and diseases than outdoor plants, they can still be affected. Common pests include aphids, spider mites, and whiteflies. These pests can be controlled with insecticidal soap or neem oil. Diseases such as early blight and late blight can also affect potato plants. To prevent these diseases, ensure good air circulation and avoid overwatering. If you notice any signs of pests or diseases, treat them promptly to prevent them from spreading.
Can I grow potatoes indoors year-round?
Yes, you can grow potatoes indoors year-round, provided you have adequate light and temperature control. Indoor potato gardening allows you to bypass the limitations of outdoor growing seasons and enjoy fresh, homegrown potatoes any time of year.
What size container should I use for indoor potato gardening?
A container that is at least 10-12 inches in diameter and 12 inches deep is recommended for growing potatoes indoors. Larger containers are generally better, as they provide more room for the roots to grow and the potatoes to develop. Ensure the container has drainage holes to prevent waterlogging.
Can I reuse the soil from my indoor potato garden?
While you can technically reuse the soil, it’s generally not recommended. Potato plants deplete the soil of nutrients, and the soil may also contain pests or diseases. It’s best to start with fresh potting mix each time you plant potatoes. If you do choose to reuse the soil, amend it with compost or other organic matter to replenish its nutrients.
Leave a Comment