

High Yield Radish Garden: Dreaming of crisp, peppery radishes bursting with flavor, straight from your backyard? I know I am! There’s something incredibly satisfying about growing your own food, and radishes are the perfect gateway vegetable for even the most novice gardener. But let’s be honest, sometimes our gardening efforts don’t quite live up to our expectations. We end up with sparse rows and tiny, underwhelming radishes.
Radishes have been cultivated for centuries, with evidence suggesting they were enjoyed by the ancient Egyptians and Greeks. They were prized not only for their taste but also for their medicinal properties. Today, we still appreciate their quick growth and nutritional benefits, but we want more bang for our buck, right? That’s where these DIY tricks come in!
This article is your ultimate guide to unlocking the secrets of a truly high yield radish garden. I’m going to share simple, yet effective DIY hacks that will transform your radish growing experience. Forget disappointing harvests! With these tips, you’ll be enjoying a bounty of delicious radishes in no time. Whether you’re a seasoned gardener or just starting out, these easy-to-implement techniques will help you maximize your radish production and impress your friends and family with your gardening prowess. Let’s get digging!
Grow Radishes Like a Pro: My Secret to a Bumper Crop!
Hey there, fellow gardening enthusiasts! I’m so excited to share my tried-and-true method for growing radishes that are not only delicious but also incredibly abundant. Forget those tiny, sparse harvests – I’m talking about a radish explosion! This guide is packed with all the tips and tricks I’ve learned over the years to maximize my radish yield. Let’s get our hands dirty!
Choosing the Right Radish Variety
Before we even think about planting, selecting the right radish variety is crucial. Not all radishes are created equal! Some are better suited for specific climates or growing seasons. Here are a few of my favorites:
* Cherry Belle: A classic, fast-growing variety that’s perfect for beginners. They mature quickly and have a mild, slightly sweet flavor.
* French Breakfast: These elongated radishes have a mild, peppery taste and are great for salads or snacking.
* Easter Egg: A colorful mix of red, white, pink, and purple radishes. They add a fun touch to your garden and are just as easy to grow as other varieties.
* Black Spanish: For those who like a bit of a kick, these radishes have a strong, pungent flavor. They also store well, making them a good choice for fall planting.
* Watermelon Radish: A beautiful radish with a green exterior and a vibrant pink interior. They have a mild, slightly sweet flavor and are great for adding color to salads.
Pro Tip: Consider your local climate and growing season when choosing your radish variety. Check seed packets for information on days to maturity and recommended planting times.
Preparing Your Radish Bed: The Foundation for Success
Radishes are relatively easy to grow, but they do appreciate well-prepared soil. Here’s how I get my radish bed ready for planting:
* Sunlight: Radishes need at least 6 hours of sunlight per day. Choose a location in your garden that receives plenty of sunshine.
* Soil: Radishes prefer loose, well-drained soil that’s rich in organic matter. Avoid heavy clay soils, as they can hinder root development.
* Amendments: Before planting, amend your soil with compost or well-rotted manure. This will improve drainage, add nutrients, and help retain moisture.
* pH: Radishes prefer a soil pH between 6.0 and 7.0. You can test your soil pH with a soil testing kit and amend it accordingly.
* Remove Rocks and Debris: Clear the planting area of any rocks, sticks, or other debris that could interfere with root growth.
Step-by-Step Soil Preparation:
1. Clear the area: Remove any existing weeds, grass, or debris from the planting area.
2. Loosen the soil: Use a garden fork or tiller to loosen the soil to a depth of at least 6 inches.
3. Amend the soil: Spread a 2-3 inch layer of compost or well-rotted manure over the soil surface.
4. Incorporate the amendments: Use a garden fork or tiller to mix the compost or manure into the soil.
5. Rake the soil: Rake the soil smooth and level, removing any clumps or rocks.
Planting Your Radish Seeds: Timing is Everything!
Radishes are cool-season crops, which means they thrive in cooler temperatures. The ideal time to plant radishes is in early spring or late summer/early fall.
* Spring Planting: Plant radishes as soon as the soil can be worked in the spring, usually 2-4 weeks before the last expected frost.
* Fall Planting: Plant radishes in late summer or early fall, about 4-6 weeks before the first expected frost.
* Succession Planting: To ensure a continuous harvest, plant radishes in succession every 1-2 weeks. This will provide you with a steady supply of fresh radishes throughout the growing season.
Step-by-Step Planting Instructions:
1. Create Furrows: Use a hoe or your finger to create shallow furrows in the soil, about 1/2 inch deep and 1 inch apart.
2. Sow the Seeds: Sprinkle the radish seeds evenly into the furrows, spacing them about 1 inch apart.
3. Cover the Seeds: Gently cover the seeds with soil and lightly pat down the soil surface.
4. Water Thoroughly: Water the planting area thoroughly with a gentle spray to avoid disturbing the seeds.
5. Mark the Rows: Label the rows with the radish variety and planting date.
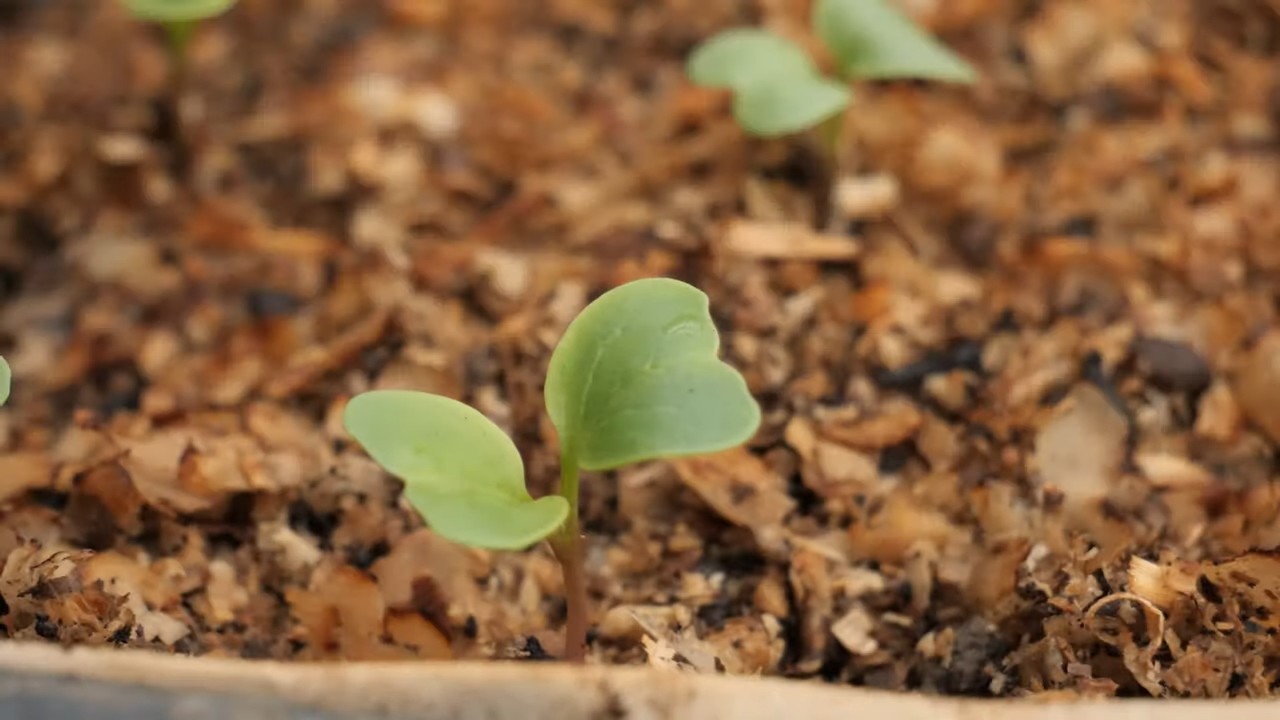
Caring for Your Radishes: Water, Weed, and Thin!
Once your radishes are planted, it’s important to provide them with the care they need to thrive.
* Watering: Radishes need consistent moisture to grow quickly and develop crisp, flavorful roots. Water regularly, especially during dry periods. Aim for about 1 inch of water per week.
* Weeding: Keep the radish bed free of weeds, as weeds can compete with the radishes for nutrients and water. Hand-pull weeds carefully to avoid disturbing the radish roots.
* Thinning: Thin the radish seedlings when they are about 1-2 inches tall. Thin to about 1-2 inches apart to allow the radishes to develop properly.
* Fertilizing: Radishes don’t need a lot of fertilizer, but a light feeding of a balanced fertilizer can help boost growth. Apply fertilizer according to package directions.
Detailed Care Tips:
* Watering Frequency: I usually water my radishes every other day, or more often during hot, dry weather. Check the soil moisture regularly and water when the top inch of soil feels dry.
* Weeding Techniques: I prefer to hand-pull weeds, but you can also use a hoe to cultivate the soil between the rows. Be careful not to damage the radish roots.
* Thinning Method: When thinning, gently pull out the extra seedlings, being careful not to disturb the roots of the remaining plants. You can eat the thinned seedlings as microgreens!
* Fertilizer Options: I like to use a liquid seaweed fertilizer, diluted according to package directions. You can also use a compost tea or a balanced granular fertilizer.
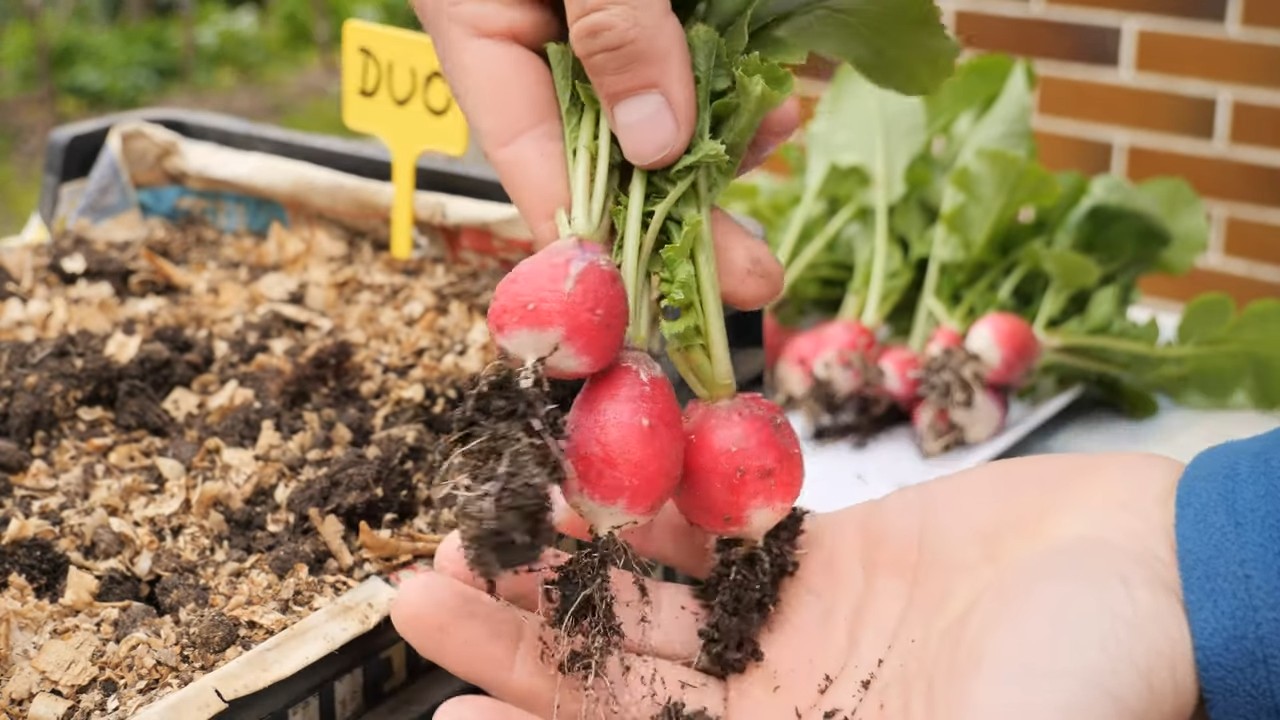
Harvesting Your Radishes: Timing is Key!
Radishes are one of the fastest-growing vegetables, and they can be ready to harvest in as little as 3-4 weeks. The key to harvesting delicious radishes is to harvest them at the right time.
* Harvest Time: Harvest radishes when they reach the desired size, usually about 1 inch in diameter. Check the seed packet for specific size recommendations for your variety.
* Harvesting Technique: Gently pull the radishes from the soil, holding them by the leaves. If the soil is dry, you may need to loosen the soil around the radishes first.
* Storage: Store radishes in the refrigerator in a plastic bag or container. They will keep for about 1-2 weeks.
Harvesting Tips for Maximum Flavor:
* Don’t Wait Too Long: Radishes that are left in the ground too long can become woody and bitter. Harvest them as soon as they reach the desired size.
* Water Before Harvesting: Watering the radishes a few hours before harvesting can make them easier to pull from the soil.
* Check the Roots: Gently brush away the soil around the base of the radish to check its size before harvesting.
* Enjoy Fresh: Radishes are best enjoyed fresh, so eat them as soon as possible after harvesting.
Troubleshooting Common Radish Problems
Even with the best care, you may encounter some problems when growing radishes. Here are a few common issues and how to address them:
Hey there, fellow gardening enthusiasts! I’m so excited to share my tried-and-true method for growing radishes that are not only delicious but also incredibly abundant. Forget those tiny, sparse harvests – I’m talking about a radish explosion! This guide is packed with all the tips and tricks I’ve learned over the years to maximize my radish yield. Let’s get our hands dirty!
Choosing the Right Radish Variety
Before we even think about planting, selecting the right radish variety is crucial. Not all radishes are created equal! Some are better suited for specific climates or growing seasons. Here are a few of my favorites:
* Cherry Belle: A classic, fast-growing variety that’s perfect for beginners. They mature quickly and have a mild, slightly sweet flavor.
* French Breakfast: These elongated radishes have a mild, peppery taste and are great for salads or snacking.
* Easter Egg: A colorful mix of red, white, pink, and purple radishes. They add a fun touch to your garden and are just as easy to grow as other varieties.
* Black Spanish: For those who like a bit of a kick, these radishes have a strong, pungent flavor. They also store well, making them a good choice for fall planting.
* Watermelon Radish: A beautiful radish with a green exterior and a vibrant pink interior. They have a mild, slightly sweet flavor and are great for adding color to salads.
Pro Tip: Consider your local climate and growing season when choosing your radish variety. Check seed packets for information on days to maturity and recommended planting times.
Preparing Your Radish Bed: The Foundation for Success
Radishes are relatively easy to grow, but they do appreciate well-prepared soil. Here’s how I get my radish bed ready for planting:
* Sunlight: Radishes need at least 6 hours of sunlight per day. Choose a location in your garden that receives plenty of sunshine.
* Soil: Radishes prefer loose, well-drained soil that’s rich in organic matter. Avoid heavy clay soils, as they can hinder root development.
* Amendments: Before planting, amend your soil with compost or well-rotted manure. This will improve drainage, add nutrients, and help retain moisture.
* pH: Radishes prefer a soil pH between 6.0 and 7.0. You can test your soil pH with a soil testing kit and amend it accordingly.
* Remove Rocks and Debris: Clear the planting area of any rocks, sticks, or other debris that could interfere with root growth.
Step-by-Step Soil Preparation:
1. Clear the area: Remove any existing weeds, grass, or debris from the planting area.
2. Loosen the soil: Use a garden fork or tiller to loosen the soil to a depth of at least 6 inches.
3. Amend the soil: Spread a 2-3 inch layer of compost or well-rotted manure over the soil surface.
4. Incorporate the amendments: Use a garden fork or tiller to mix the compost or manure into the soil.
5. Rake the soil: Rake the soil smooth and level, removing any clumps or rocks.
Planting Your Radish Seeds: Timing is Everything!
Radishes are cool-season crops, which means they thrive in cooler temperatures. The ideal time to plant radishes is in early spring or late summer/early fall.
* Spring Planting: Plant radishes as soon as the soil can be worked in the spring, usually 2-4 weeks before the last expected frost.
* Fall Planting: Plant radishes in late summer or early fall, about 4-6 weeks before the first expected frost.
* Succession Planting: To ensure a continuous harvest, plant radishes in succession every 1-2 weeks. This will provide you with a steady supply of fresh radishes throughout the growing season.
Step-by-Step Planting Instructions:
1. Create Furrows: Use a hoe or your finger to create shallow furrows in the soil, about 1/2 inch deep and 1 inch apart.
2. Sow the Seeds: Sprinkle the radish seeds evenly into the furrows, spacing them about 1 inch apart.
3. Cover the Seeds: Gently cover the seeds with soil and lightly pat down the soil surface.
4. Water Thoroughly: Water the planting area thoroughly with a gentle spray to avoid disturbing the seeds.
5. Mark the Rows: Label the rows with the radish variety and planting date.
Caring for Your Radishes: Water, Weed, and Thin!
Once your radishes are planted, it’s important to provide them with the care they need to thrive.
* Watering: Radishes need consistent moisture to grow quickly and develop crisp, flavorful roots. Water regularly, especially during dry periods. Aim for about 1 inch of water per week.
* Weeding: Keep the radish bed free of weeds, as weeds can compete with the radishes for nutrients and water. Hand-pull weeds carefully to avoid disturbing the radish roots.
* Thinning: Thin the radish seedlings when they are about 1-2 inches tall. Thin to about 1-2 inches apart to allow the radishes to develop properly.
* Fertilizing: Radishes don’t need a lot of fertilizer, but a light feeding of a balanced fertilizer can help boost growth. Apply fertilizer according to package directions.
Detailed Care Tips:
* Watering Frequency: I usually water my radishes every other day, or more often during hot, dry weather. Check the soil moisture regularly and water when the top inch of soil feels dry.
* Weeding Techniques: I prefer to hand-pull weeds, but you can also use a hoe to cultivate the soil between the rows. Be careful not to damage the radish roots.
* Thinning Method: When thinning, gently pull out the extra seedlings, being careful not to disturb the roots of the remaining plants. You can eat the thinned seedlings as microgreens!
* Fertilizer Options: I like to use a liquid seaweed fertilizer, diluted according to package directions. You can also use a compost tea or a balanced granular fertilizer.
Harvesting Your Radishes: Timing is Key!
Radishes are one of the fastest-growing vegetables, and they can be ready to harvest in as little as 3-4 weeks. The key to harvesting delicious radishes is to harvest them at the right time.
* Harvest Time: Harvest radishes when they reach the desired size, usually about 1 inch in diameter. Check the seed packet for specific size recommendations for your variety.
* Harvesting Technique: Gently pull the radishes from the soil, holding them by the leaves. If the soil is dry, you may need to loosen the soil around the radishes first.
* Storage: Store radishes in the refrigerator in a plastic bag or container. They will keep for about 1-2 weeks.
Harvesting Tips for Maximum Flavor:
* Don’t Wait Too Long: Radishes that are left in the ground too long can become woody and bitter. Harvest them as soon as they reach the desired size.
* Water Before Harvesting: Watering the radishes a few hours before harvesting can make them easier to pull from the soil.
* Check the Roots: Gently brush away the soil around the base of the radish to check its size before harvesting.
* Enjoy Fresh: Radishes are best enjoyed fresh, so eat them as soon as possible after harvesting.
Troubleshooting Common Radish Problems
Even with the best care, you may encounter some problems when growing radishes. Here are a few common issues and how to address them:
* Bolting: Bolting is when radishes prematurely flower and go to seed. This can be caused by hot weather, inconsistent watering, or poor soil. To prevent bolting, plant radishes in the cool season, water regularly, and amend the soil with compost.
* Root Maggots: Root maggots are small, white larvae that feed on the roots of radishes. They can cause stunted growth and deformed roots. To prevent root maggots, cover the radish bed with row covers or use a soil drench containing beneficial nematodes.
* Flea Beetles: Flea beetles are small, jumping insects that feed on the leaves of radishes. They can cause small holes in the leaves and weaken the plants. To control flea beetles, use row covers, insecticidal soap, or diatomaceous earth.
* Cracked Roots: Cracked roots can be caused by inconsistent watering or rapid changes in soil moisture. To prevent cracked roots, water radishes regularly and avoid letting the soil dry out completely.
My Go-To Solutions:
* For Bolting: If your radishes start
Conclusion
So, there you have it! Transforming your radish patch into a high yield radish garden is not just a pipe dream; it’s an achievable reality with a few simple, yet strategic adjustments. We’ve explored the power of soil preparation, the magic of succession planting, the importance of thinning, and the crucial role of consistent watering and fertilization. These aren’t just abstract gardening concepts; they are the building blocks of a bountiful radish harvest that will have you enjoying crisp, peppery delights for weeks on end.
But why is this DIY approach a must-try? Because it empowers you to take control of your food source, connect with nature on a deeper level, and experience the unparalleled satisfaction of harvesting vegetables you’ve nurtured from seed to table. Store-bought radishes simply can’t compare to the vibrant flavor and freshness of homegrown ones. Plus, maximizing your yield means less waste, more savings, and a reduced carbon footprint – a win-win for you and the planet.
Don’t be afraid to experiment with variations! Try interplanting your radishes with carrots or lettuce to maximize space and deter pests. Explore different radish varieties – from the classic Cherry Belle to the spicy French Breakfast or the vibrant Watermelon radish – to discover your personal favorites. Consider using raised beds or containers if you have limited space or poor soil conditions. The possibilities are endless!
Ultimately, the success of your high yield radish garden hinges on your willingness to get your hands dirty, embrace the learning process, and adapt to the unique conditions of your growing environment. So, grab your gardening gloves, gather your seeds, and embark on this rewarding journey. We’re confident that you’ll be amazed by the results.
We wholeheartedly encourage you to try these techniques and witness the transformation of your radish garden firsthand. And most importantly, we want to hear about your experience! Share your successes, your challenges, and your unique tips in the comments below. Let’s build a community of radish enthusiasts who are passionate about growing their own food and sharing their knowledge with others. Together, we can unlock the full potential of the humble radish and create gardens that are both productive and sustainable. Happy gardening!
Frequently Asked Questions (FAQ)
What exactly does “high yield” mean in the context of radishes?
High yield, in this case, refers to maximizing the number of radishes you can harvest from a given area of your garden. It’s about optimizing your growing practices to get the most out of your space and resources. Instead of just scattering seeds and hoping for the best, you’re actively managing the growing environment to encourage abundant radish production. This includes things like proper soil preparation, strategic planting, and consistent care. A high yield radish garden means you are getting more radishes per square foot compared to a less managed garden.
How often should I water my radishes for optimal growth?
Radishes need consistent moisture to thrive. Aim to water them deeply whenever the top inch of soil feels dry to the touch. This usually translates to watering every 2-3 days, but it can vary depending on the weather and soil type. During hot, dry periods, you may need to water daily. The key is to keep the soil consistently moist, but not waterlogged. Overwatering can lead to root rot, while underwatering can cause the radishes to become small and tough. Using a soaker hose or drip irrigation can help deliver water directly to the roots and minimize water waste.
What kind of fertilizer is best for radishes?
Radishes are relatively light feeders, but they still benefit from a balanced fertilizer. A fertilizer with an NPK ratio of 5-10-10 is a good choice. This means it contains 5% nitrogen, 10% phosphorus, and 10% potassium. Phosphorus promotes root development, which is crucial for radish growth, while potassium helps with overall plant health and disease resistance. Avoid fertilizers that are high in nitrogen, as this can encourage excessive leafy growth at the expense of root development. You can also amend your soil with compost or well-rotted manure before planting to provide a slow-release source of nutrients.
How do I prevent pests from attacking my radish crop?
Several pests can target radishes, including flea beetles, root maggots, and aphids. To prevent flea beetles, cover your seedlings with row covers. These lightweight fabrics allow sunlight and water to penetrate but prevent pests from reaching the plants. For root maggots, practice crop rotation and avoid planting radishes in the same spot year after year. You can also sprinkle diatomaceous earth around the base of the plants to deter them. Aphids can be controlled with a strong spray of water or by introducing beneficial insects like ladybugs to your garden. Regularly inspect your plants for signs of pests and take action promptly to prevent infestations from spreading.
How do I know when my radishes are ready to harvest?
Radishes are typically ready to harvest within 3-4 weeks of planting, depending on the variety. The best way to determine if they’re ready is to check their size. Most radish varieties are ready when they reach about 1 inch in diameter. You can also gently brush away the soil around the base of the plant to get a better look at the radish. If they’re the right size, pull one up to check. If it’s firm and has a good color, the rest are likely ready to harvest as well. Don’t leave radishes in the ground for too long, as they can become woody and bitter.
Can I grow radishes in containers?
Yes, radishes are excellent candidates for container gardening! Choose a container that is at least 6 inches deep and has good drainage. Fill it with a well-draining potting mix. Sow the seeds directly into the container, following the spacing recommendations on the seed packet. Water regularly and fertilize as needed. Container-grown radishes may need more frequent watering than those grown in the ground, especially during hot weather. Place the container in a sunny location that receives at least 6 hours of sunlight per day.
What are some good companion plants for radishes?
Radishes are known to be good companion plants for several other vegetables. They can help deter pests and improve the growth of other plants. Some good companion plants for radishes include carrots, lettuce, spinach, peas, and beans. Carrots and radishes are a particularly good combination because the radishes help break up the soil, making it easier for the carrots to grow. Lettuce and spinach benefit from the shade provided by the radish leaves, while peas and beans help fix nitrogen in the soil, which can benefit the radishes. Avoid planting radishes near hyssop, as it can inhibit their growth.
How can I extend my radish harvest throughout the growing season?
Succession planting is the key to extending your radish harvest. Sow a new batch of seeds every 1-2 weeks throughout the growing season. This will ensure a continuous supply of fresh radishes. Choose varieties that mature at different rates to further extend the harvest window. You can also grow radishes in a cold frame or greenhouse to extend the season into the fall and winter.
My radishes are all tops and no bottoms. What am I doing wrong?
This is a common problem, and it’s usually caused by one of a few factors. The most likely culprit is soil that is too rich in nitrogen. Nitrogen promotes leafy growth, so if your soil has too much, the plants will focus on producing leaves instead of roots. Avoid using fertilizers that are high in nitrogen. Another possible cause is overcrowding. If the plants are too close together, they won’t have enough room to develop properly. Thin your seedlings to ensure they have adequate space. Finally, insufficient sunlight can also contribute to this problem. Radishes need at least 6 hours of sunlight per day to thrive.
Can I eat radish greens?
Absolutely! Radish greens are nutritious and delicious. They have a peppery flavor similar to the radishes themselves. You can eat them raw in salads, sauté them with garlic and olive oil, or add them to soups and stews. Choose young, tender greens for the best flavor and texture. Wash them thoroughly before using. Radish greens are a good source of vitamins A and C, as well as calcium and iron. Don’t let them go to waste!
Leave a Comment