

Hanging sweet potato harvest – the words alone conjure images of lush, cascading vines overflowing with vibrant, earthy treasures! Have you ever dreamed of harvesting your own sweet potatoes, but thought you didn’t have the space? Or maybe you’re just looking for a unique and visually stunning way to grow your own food? Well, get ready to ditch the traditional garden bed because I’m about to share some amazing DIY tricks that will have you enjoying a bountiful hanging sweet potato harvest in no time!
The sweet potato, a staple in many cultures for centuries, boasts a rich history. Originating in Central and South America, it has been cultivated for over 5,000 years and holds significant cultural importance in various cuisines worldwide. From the sweet potato pie of the American South to the roasted sweet potatoes enjoyed across Asia, this versatile root vegetable has nourished generations.
But why should you consider growing them in a hanging basket? Space is often a premium, especially for apartment dwellers or those with small yards. This DIY method allows you to maximize your growing potential vertically, transforming balconies, patios, and even sunny windowsills into miniature sweet potato farms. Plus, it’s just plain cool! Imagine the satisfaction of reaching up and plucking a freshly grown sweet potato from your own hanging garden. I’m excited to show you how easy and rewarding it can be!
DIY Hanging Sweet Potato Harvest: From Vine to Table!
Hey there, fellow gardeners! I’m so excited to share this super fun and rewarding DIY project with you: harvesting sweet potatoes from hanging baskets! Forget digging in the dirt – this method is cleaner, easier on your back, and honestly, just plain cool. I’ve been doing this for a few years now, and I’m always amazed at the bounty I get from these hanging beauties. So, let’s get started!
Why Hanging Sweet Potatoes?
Before we dive into the how-to, let’s talk about why you might want to try this method.
* Space Saver: Perfect for small gardens, balconies, or patios. You can grow a surprising amount of sweet potatoes in a relatively small space.
* Pest Control: Hanging baskets keep your sweet potatoes away from many ground-dwelling pests and diseases.
* Easy Harvesting: No more back-breaking digging! Harvesting is as simple as tipping the basket and gently removing the potatoes.
* Aesthetic Appeal: Sweet potato vines are beautiful! They add a lush, tropical vibe to any space.
* Fun and Unique: It’s a conversation starter! Your neighbors will be amazed by your hanging sweet potato garden.
Materials You’ll Need
Okay, let’s gather our supplies. Here’s what you’ll need to create your own hanging sweet potato harvest:
* Sweet Potato Slips: These are sprouted sweet potatoes. You can buy them online or at your local garden center, or even grow your own (more on that later!). I usually get mine from a local farmer.
* Large Hanging Baskets: Choose baskets that are at least 14 inches in diameter. The bigger, the better, as sweet potatoes need room to grow. Make sure they are sturdy and can handle the weight of the soil and potatoes.
* Potting Mix: Use a high-quality potting mix that drains well. I like to use a mix specifically formulated for vegetables.
* Compost: Compost adds nutrients and improves soil structure. I usually mix in about 25% compost with my potting mix.
* Slow-Release Fertilizer: This will provide your sweet potatoes with a steady supply of nutrients throughout the growing season.
* Watering Can or Hose: For watering your plants.
* Gloves: To protect your hands.
* Optional: Landscape fabric or burlap to line the baskets (helps retain moisture).
Growing Your Own Sweet Potato Slips (Optional but Recommended!)
While you can buy sweet potato slips, it’s surprisingly easy (and rewarding!) to grow your own. Here’s how I do it:
1. Choose a Sweet Potato: Select a healthy, organic sweet potato from the grocery store or farmer’s market.
2. Prepare the Potato: Wash the sweet potato thoroughly. You can cut it in half or leave it whole, depending on its size.
3. Suspend the Potato: Use toothpicks to suspend the sweet potato over a jar or glass filled with water. The bottom half of the potato should be submerged in water.
4. Place in a Sunny Spot: Place the jar in a warm, sunny location.
5. Wait and Watch: In a few weeks, you should start to see sprouts (slips) emerging from the potato.
6. Harvest the Slips: Once the slips are about 6-8 inches long, gently twist them off the potato.
7. Root the Slips: Place the slips in a jar of water until they develop roots, usually within a week or so.
8. Plant the Slips: Once the slips have roots, they’re ready to be planted in your hanging baskets!
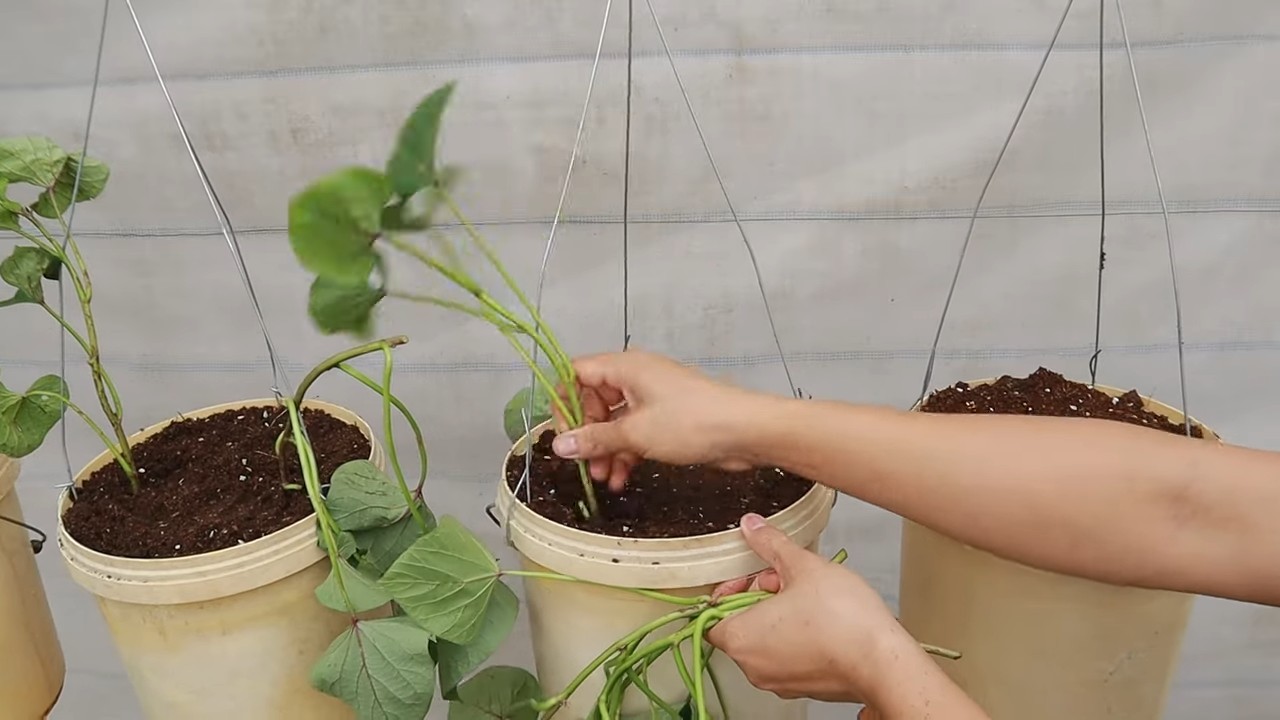
Planting Your Sweet Potato Slips
Now for the fun part! Let’s get those sweet potato slips planted in your hanging baskets.
1. Prepare the Baskets: If you’re using landscape fabric or burlap, line the inside of the hanging baskets. This will help retain moisture and prevent soil from washing out.
2. Fill the Baskets: Fill the baskets with your potting mix and compost mixture, leaving a few inches of space at the top.
3. Add Fertilizer: Sprinkle a slow-release fertilizer over the soil surface, following the instructions on the package.
4. Plant the Slips: Gently dig small holes in the soil and plant the sweet potato slips, spacing them about 6-8 inches apart. I usually plant 3-4 slips per basket, depending on the size of the basket.
5. Water Thoroughly: Water the baskets thoroughly after planting, making sure the soil is evenly moist.
Caring for Your Hanging Sweet Potatoes
Once your sweet potatoes are planted, it’s important to provide them with the right care to ensure a bountiful harvest.
1. Sunlight: Sweet potatoes need at least 6-8 hours of sunlight per day. Place your hanging baskets in a sunny location.
2. Watering: Water your sweet potatoes regularly, especially during hot, dry weather. The soil should be consistently moist, but not waterlogged. I usually water mine every day or two, depending on the weather.
3. Fertilizing: Sweet potatoes are heavy feeders, so it’s important to fertilize them regularly. In addition to the slow-release fertilizer you added at planting, you can also supplement with a liquid fertilizer every few weeks. I like to use a balanced fertilizer with a ratio of 10-10-10.
4. Pruning: Sweet potato vines can get quite long and unruly. You can prune them back as needed to keep them from getting too tangled or shading other plants. Don’t worry about hurting the plant; they are very resilient.
5. Pest Control: Keep an eye out for pests such as aphids, spider mites, and sweet potato weevils. If you notice any pests, treat them promptly with an appropriate insecticide or organic pest control method. I prefer using insecticidal soap for most pests.
6. Support: As the sweet potatoes grow, the vines may become heavy and need support. You can use stakes, trellises, or even just let them trail down from the baskets.
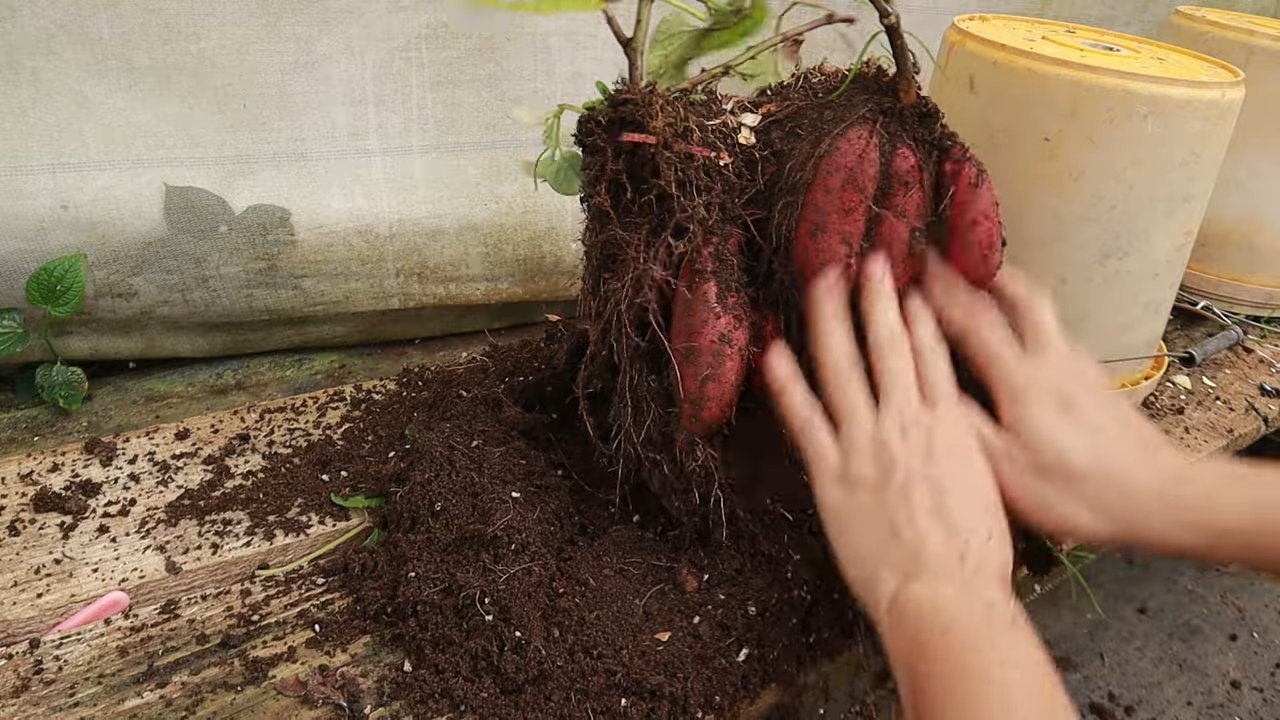
Harvesting Your Hanging Sweet Potatoes
This is the moment you’ve been waiting for! Harvesting your sweet potatoes is the most rewarding part of this project.
1. Timing: Sweet potatoes typically take about 90-120 days to mature. You’ll know they’re ready to harvest when the vines start to turn yellow and die back.
2. Prepare for Harvest: Before harvesting, stop watering your sweet potatoes for a week or two. This will help the potatoes cure and develop a sweeter flavor.
3. Harvesting: Gently tip the hanging basket and carefully remove the sweet potatoes from the soil. Be careful not to bruise or damage the potatoes.
4. Curing: After harvesting, cure your sweet potatoes for 7-10 days in a warm, humid place. This will help them develop a thicker skin and sweeter flavor. I usually cure mine in a cardboard box in my garage.
5. Storing: Store your cured sweet potatoes in a cool, dry place. They should keep for several months.
Troubleshooting
Sometimes things don’t go exactly as planned. Here are a few common problems you might encounter and how to fix them:
* Yellowing Leaves: This could be a sign of overwatering, underwatering, or nutrient deficiency. Check the soil moisture and adjust your watering accordingly. If the soil is dry, water more frequently. If the soil is soggy, water less frequently. You may also need to fertilize your sweet potatoes.
* Small Potatoes: This could be due to insufficient sunlight, poor soil, or lack of fertilizer. Make sure your sweet potatoes are getting enough sunlight and fertilize them regularly. You may also need to amend your soil with compost or other organic matter.
* Pest Infestation: Treat any pest infestations promptly with an appropriate insecticide or organic pest control method.
* Rotting Potatoes: This could be due to overwatering or poor drainage. Make sure your soil is well-draining and avoid overwatering.
Tips for Success
Here are a few extra tips to help you succeed with your hanging sweet potato harvest:
* Choose the Right Variety: Some sweet potato varieties are better suited for container gardening than others. Look for varieties that are compact and produce smaller potatoes.
* Use a Large Basket: The bigger the basket, the more room your sweet potatoes will have to grow.
* Don’t Overwater: Overwatering can lead to root rot and other problems.
* Fertilize Regularly: Sweet potatoes are heavy feeders and need plenty of nutrients to thrive.
* Be Patient: Sweet potatoes take time to mature. Don’t get discouraged if you don’t see results right away.
Enjoy Your Harvest!
And there you
Conclusion
So, there you have it! Transforming your sweet potato harvest into stunning, space-saving hanging displays is more than just a storage solution; it’s a conversation starter, a testament to resourcefulness, and a beautiful way to extend the joy of your garden long after the last frost. This DIY trick is a must-try for several compelling reasons.
First and foremost, it’s incredibly practical. Instead of letting your precious sweet potatoes languish in a dark, potentially damp basement or root cellar, you’re providing them with the ideal environment for curing and long-term storage. The air circulation afforded by hanging them prevents rot and mold, ensuring that you can enjoy the fruits (or rather, the tubers) of your labor for months to come.
Secondly, it’s aesthetically pleasing. Let’s be honest, a pile of sweet potatoes in a bin isn’t exactly a visual masterpiece. But a cascade of earthy, organically shaped sweet potatoes suspended from your porch or pantry ceiling? That’s art! It brings a touch of rustic charm and natural beauty to any space.
Thirdly, it’s incredibly satisfying. There’s a deep sense of accomplishment that comes from taking something you’ve grown with your own hands and transforming it into something both useful and beautiful. It’s a tangible connection to the earth and a reminder of the bounty that nature provides.
But the benefits don’t stop there. Consider these variations to personalize your hanging sweet potato harvest display:
* **Grouping by Variety:** If you’ve grown multiple varieties of sweet potatoes, create separate hanging displays for each. This not only looks visually appealing but also helps you keep track of which variety you’re using when cooking.
* **Adding Decorative Elements:** Weave strands of raffia, twine, or even dried flowers through the hanging sweet potatoes for added visual interest. You could also incorporate small gourds or pumpkins for a festive autumn display.
* **Creating a Living Wall:** If you have a large harvest, consider creating a “living wall” of sweet potatoes by hanging them in rows along a wall or fence. This is a particularly striking way to showcase your bounty.
* **Using Different Hanging Methods:** Experiment with different types of string, rope, or wire to create unique hanging arrangements. You could even use repurposed materials like old belts or fabric scraps.
Don’t be afraid to get creative and experiment! The beauty of this DIY project is that it’s completely customizable to your own taste and style.
We wholeheartedly encourage you to try this DIY trick with your own sweet potato harvest. It’s a simple, rewarding, and visually stunning way to preserve your hard work and add a touch of natural beauty to your home.
Once you’ve created your hanging sweet potato masterpiece, we’d love to see it! Share your photos and experiences with us on social media using [Your Social Media Hashtag]. We can’t wait to see what you create! Let’s celebrate the bounty of the harvest together and inspire others to embrace the joy of DIY and sustainable living.
Frequently Asked Questions (FAQ)
1. What is the best time to harvest sweet potatoes for hanging?
The ideal time to harvest sweet potatoes is just before the first frost in your area. The vines will start to yellow and die back, indicating that the tubers are mature. Avoid harvesting after a frost, as this can damage the sweet potatoes and shorten their storage life.
2. How do I prepare the sweet potatoes for hanging?
After harvesting, gently brush off any excess soil from the sweet potatoes. Avoid washing them, as this can promote rot. Allow the sweet potatoes to cure for about 10-14 days in a warm, humid place (around 80-85°F and 85-90% humidity). This curing process helps to heal any cuts or bruises and toughens the skin, which is essential for long-term storage. A greenhouse or a covered porch can work well for curing.
3. What’s the best way to hang the sweet potatoes?
Use soft twine, raffia, or even old pantyhose to create individual slings for each sweet potato. Avoid using wire, as it can cut into the skin and damage the tubers. Tie the slings securely around the sweet potatoes, leaving enough length to hang them from a beam, hook, or rafter. Ensure that the sweet potatoes are not touching each other to allow for good air circulation.
4. Where is the best place to hang sweet potatoes for storage?
The ideal storage location for hanging sweet potatoes is a cool, dark, and well-ventilated space. A temperature of around 55-60°F (13-16°C) is ideal. Avoid storing them in a refrigerator, as this can cause them to develop a hard core. A pantry, basement, or unheated garage can work well, as long as they are protected from freezing temperatures.
5. How long will sweet potatoes last when hung for storage?
When properly cured and stored, hanging sweet potatoes can last for several months, often up to 6-8 months or even longer. Regularly check the sweet potatoes for any signs of rot or mold and remove any affected tubers immediately to prevent the spread of spoilage.
6. Can I hang sweet potatoes that have been slightly damaged during harvesting?
It’s best to use only undamaged sweet potatoes for hanging. Any sweet potatoes with cuts, bruises, or other injuries are more likely to rot during storage. Use these damaged sweet potatoes first in your cooking.
7. What if I don’t have a place to hang my sweet potatoes?
If you don’t have a suitable place to hang your sweet potatoes, you can also store them in crates or boxes lined with newspaper or straw. Make sure to provide good air circulation and check them regularly for signs of spoilage. However, hanging them is generally the preferred method for optimal storage.
8. Can I eat sweet potatoes that have sprouted while hanging?
Yes, you can still eat sweet potatoes that have sprouted, but they may not taste as good. The sprouts will draw nutrients from the tuber, making it less sweet and potentially more fibrous. Remove the sprouts before cooking. If the sweet potato is very shriveled or has a lot of sprouts, it’s best to discard it.
9. Is this method suitable for all varieties of sweet potatoes?
Yes, this method is generally suitable for all varieties of sweet potatoes. However, some varieties may store better than others. Beauregard and Jewel are known for their good storage qualities.
10. What are some creative ways to display my hanging sweet potato harvest?
Beyond simply hanging them in a row, consider creating a cascading effect by hanging them at different heights. You can also incorporate other decorative elements like dried flowers, gourds, or even fairy lights to create a festive and eye-catching display. Get creative and have fun with it! The possibilities are endless.


Leave a Comment