

Hanging kohlrabi plastic bottle garden: Sounds intriguing, right? I know, it might seem a little out there, but trust me, this DIY project is about to revolutionize your small-space gardening game! Forget those bulky raised beds or expensive planters. We’re diving into the world of upcycling and creating a vertical garden that’s both eco-friendly and incredibly productive.
The concept of vertical gardening isn’t new. In fact, it dates back to ancient civilizations like the Hanging Gardens of Babylon, one of the Seven Wonders of the Ancient World! While we might not be building anything quite that grand, we’re tapping into that same ingenuity and resourcefulness. For centuries, people have sought creative ways to cultivate plants in limited spaces, and this hanging kohlrabi plastic bottle garden is a modern twist on that timeless tradition.
Why do you need this DIY trick in your life? Well, imagine fresh, crisp kohlrabi right outside your kitchen window, ready to be harvested whenever you please. No more trips to the grocery store for this unique vegetable! Plus, if you’re like me and live in an apartment or have a tiny backyard, space is precious. This method allows you to maximize your growing area and enjoy the benefits of homegrown produce, even without a traditional garden. So, let’s get started and transform those discarded plastic bottles into a thriving vertical oasis!
DIY Hängender Kohlrabi-Garten aus Plastikflaschen
Hallo liebe Gartenfreunde! Habt ihr Lust auf ein ungewöhnliches und platzsparendes Gartenprojekt? Ich zeige euch heute, wie ihr aus alten Plastikflaschen einen hängenden Kohlrabi-Garten zaubern könnt. Das ist nicht nur super nachhaltig, sondern auch ein echter Hingucker auf eurem Balkon oder eurer Terrasse. Lasst uns loslegen!
Was ihr für euren hängenden Kohlrabi-Garten braucht:
* Plastikflaschen: Am besten eignen sich große PET-Flaschen (z.B. 1,5 oder 2 Liter). Je nachdem, wie viele Kohlrabipflanzen ihr haben möchtet, benötigt ihr entsprechend viele Flaschen.
* Kohlrabisamen oder Jungpflanzen: Ihr könnt entweder Kohlrabi aus Samen ziehen oder direkt Jungpflanzen kaufen. Ich empfehle Jungpflanzen, wenn ihr es eilig habt.
* Erde: Gute Blumenerde oder Gemüseerde ist ideal.
* Schere oder Cuttermesser: Zum Zuschneiden der Plastikflaschen.
* Bohrmaschine oder Nagel und Hammer: Zum Anbringen von Löchern für die Aufhängung und den Wasserabzug.
* Starkes Seil oder Draht: Zum Aufhängen der Flaschen.
* Gießkanne oder Schlauch: Zum Bewässern der Pflanzen.
* Optional: Sprühfarbe oder wasserfeste Stifte zum Dekorieren der Flaschen.
* Optional: Kies oder Blähton für eine Drainageschicht.
* Optional: Handschuhe, um eure Hände sauber zu halten.
Vorbereitung der Plastikflaschen
1. Reinigung der Flaschen: Zuerst müsst ihr die Plastikflaschen gründlich reinigen. Entfernt alle Etiketten und spült die Flaschen innen und außen mit warmem Wasser und Spülmittel aus. Lasst sie anschließend gut trocknen.
2. Zuschneiden der Flaschen: Jetzt kommt der spannende Teil! Ihr müsst die Flaschen so zuschneiden, dass sie als Pflanzgefäße dienen können. Es gibt verschiedene Möglichkeiten, wie ihr das machen könnt:
* Variante 1: Horizontales Zuschneiden: Schneidet die Flasche horizontal in der Mitte durch. Der obere Teil wird später umgedreht und in den unteren Teil gesteckt, sodass er als Bewässerungssystem dient.
* Variante 2: Vertikales Zuschneiden: Schneidet ein großes Rechteck aus der Seite der Flasche. So entsteht eine Art “Balkonkasten”. Diese Variante eignet sich gut, wenn ihr mehrere Kohlrabipflanzen in einer Flasche haben möchtet.
* Variante 3: Nur ein Loch schneiden: Schneidet nur ein kreisrundes Loch in die Seite der Flasche, groß genug, um eine Kohlrabipflanze einzusetzen. Diese Variante ist besonders platzsparend.
Ich persönlich bevorzuge Variante 1, da sie ein einfaches Bewässerungssystem ermöglicht. Wählt die Variante, die euch am besten gefällt und am einfachsten erscheint.
3. Löcher für die Aufhängung bohren: Nachdem ihr die Flaschen zugeschnitten habt, müsst ihr Löcher für die Aufhängung bohren. Bohrt oder schlagt mit Nagel und Hammer zwei Löcher gegenüberliegend in den oberen Rand der Flasche. Achtet darauf, dass die Löcher groß genug sind, um das Seil oder den Draht hindurchzufädeln.
4. Löcher für den Wasserabzug bohren: Damit sich kein Wasser in den Flaschen staut und die Wurzeln der Kohlrabipflanzen faulen, müsst ihr Löcher für den Wasserabzug bohren. Bohrt oder schlagt mehrere kleine Löcher in den Boden der Flasche.
5. Optional: Dekoration der Flaschen: Wenn ihr möchtet, könnt ihr die Flaschen jetzt noch dekorieren. Bemalt sie mit Sprühfarbe oder verziert sie mit wasserfesten Stiften. Lasst eurer Kreativität freien Lauf! Ihr könnt zum Beispiel Muster aufmalen, die Namen der Pflanzen darauf schreiben oder die Flaschen in euren Lieblingsfarben gestalten.
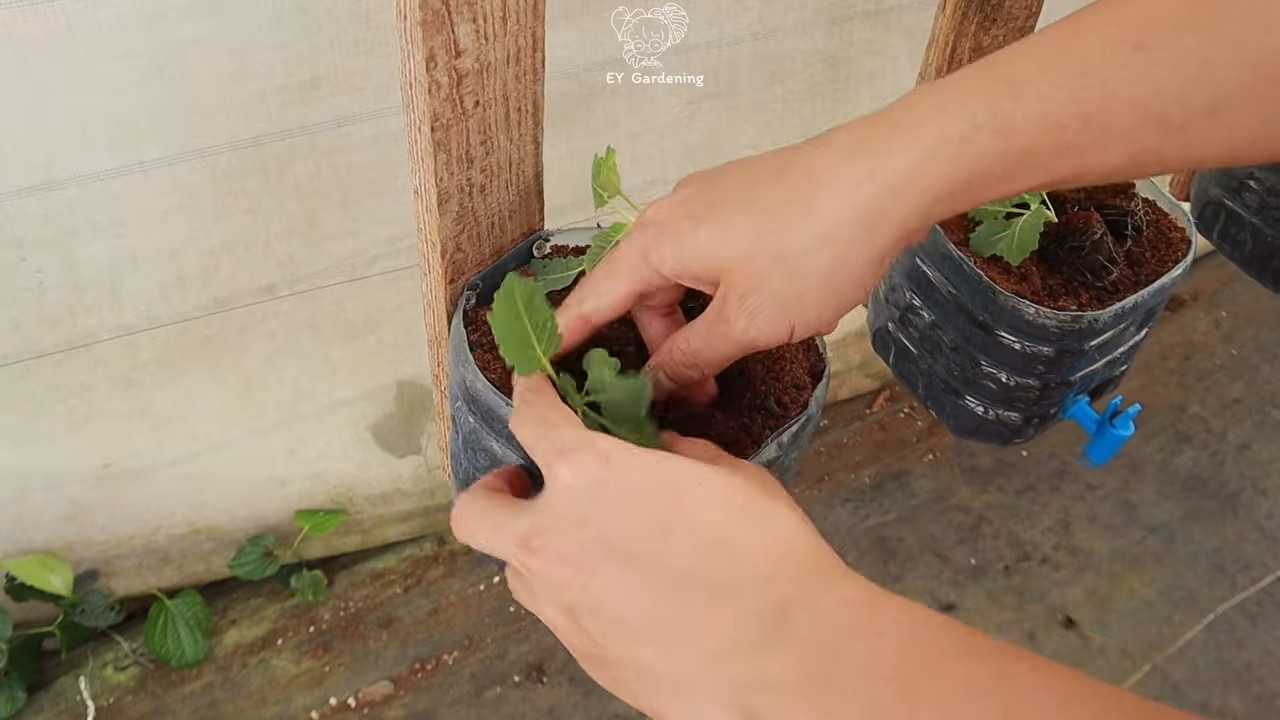
Bepflanzung der Flaschen
1. Drainageschicht einfüllen (optional): Um Staunässe zu vermeiden, könnt ihr eine Drainageschicht in die Flaschen füllen. Gebt dazu eine Schicht Kies oder Blähton auf den Boden der Flasche.
2. Erde einfüllen: Füllt die Flaschen mit Erde. Lasst dabei etwa 2-3 cm Platz bis zum Rand.
3. Kohlrabipflanzen einsetzen: Wenn ihr Jungpflanzen verwendet, nehmt sie vorsichtig aus ihren Töpfen und setzt sie in die Erde. Achtet darauf, dass die Wurzeln gut bedeckt sind. Wenn ihr Samen verwendet, sät sie gemäß den Anweisungen auf der Samenpackung aus.
4. Angießen: Gießt die Kohlrabipflanzen nach dem Einsetzen oder Aussäen gründlich an.
Aufhängen des Kohlrabi-Gartens
1. Seil oder Draht befestigen: Fädelt das Seil oder den Draht durch die Löcher in den Flaschen. Knotet die Enden des Seils oder Drahts fest zusammen, sodass die Flaschen sicher hängen.
2. Aufhängen: Sucht euch einen geeigneten Platz zum Aufhängen eures Kohlrabi-Gartens. Am besten ist ein sonniger Platz, der vor starkem Wind geschützt ist. Ihr könnt die Flaschen an einem Balkongeländer, einem Baumast oder einer Pergola aufhängen. Achtet darauf, dass die Aufhängung stabil ist und das Gewicht der bepflanzten Flaschen tragen kann.
Pflege eures hängenden Kohlrabi-Gartens
1. Bewässerung: Kohlrabi benötigt regelmäßig Wasser, besonders während der Wachstumsphase. Gießt die Pflanzen regelmäßig, aber vermeidet Staunässe. Überprüft die Erde regelmäßig und gießt, wenn sie sich trocken anfühlt. Bei der Variante mit dem umgedrehten Flaschenhals, könnt ihr das Wasser in den oberen Teil der Flasche gießen. Die Erde zieht sich dann nach Bedarf das Wasser.
2. Düngung: Um ein gesundes Wachstum zu fördern, solltet ihr die Kohlrabipflanzen regelmäßig düngen. Verwendet dazu einen organischen Dünger oder einen speziellen Gemüsedünger. Beachtet die Anweisungen auf der Düngerpackung.
3. Schutz vor Schädlingen: Kohlrabi kann von verschiedenen Schädlingen befallen werden, wie zum Beispiel Kohlweißlingen oder Erdflöhen. Kontrolliert die Pflanzen regelmäßig auf Schädlinge und bekämpft sie gegebenenfalls mit geeigneten Mitteln. Es gibt viele biologische Schädlingsbekämpfungsmittel, die ihr verwenden könnt.
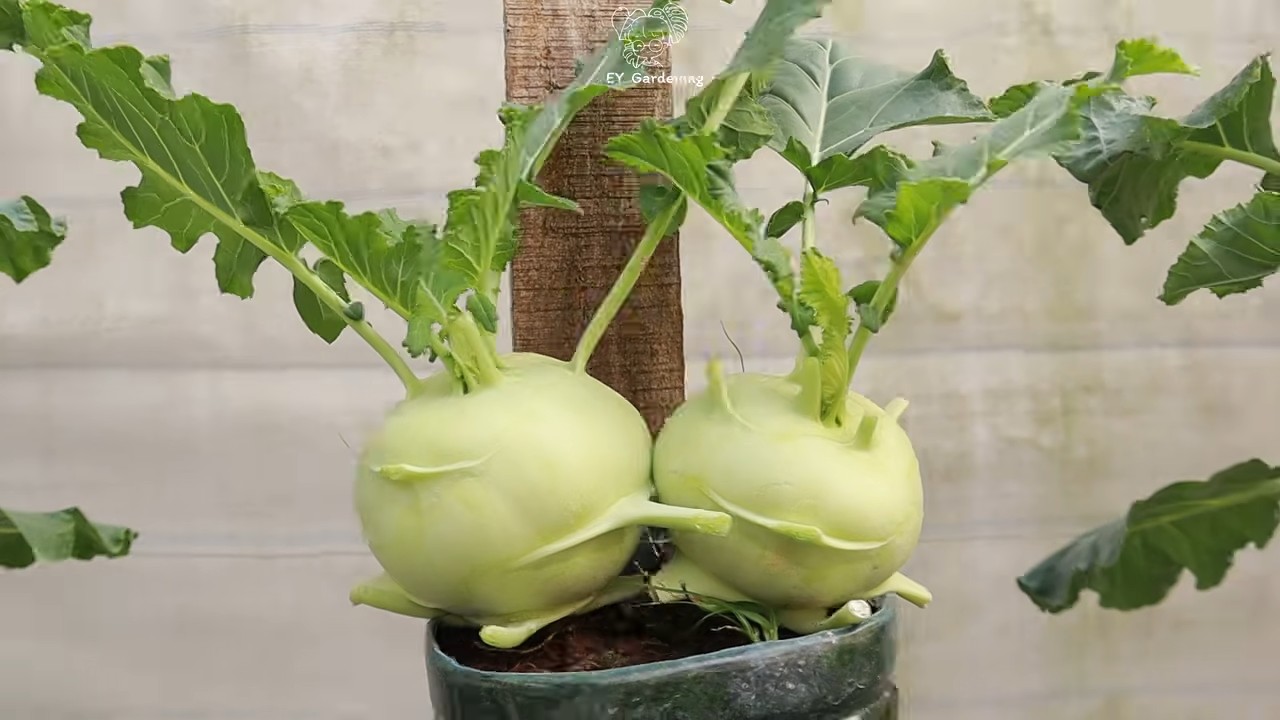
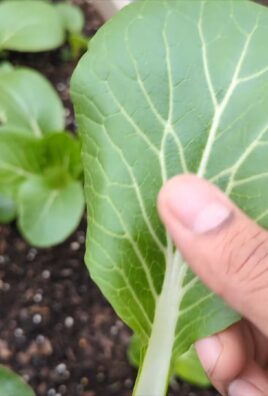
4. Ernte: Kohlrabi kann geerntet werden, wenn die Knollen eine Größe von etwa 8-10 cm erreicht haben. Schneidet die Knollen mit einem scharfen Messer ab. Die Blätter können ebenfalls gegessen werden.
Zusätzliche Tipps und Tricks
* Verschiedene Kohlrabisorten: Es gibt verschiedene Kohlrabisorten, die sich in Farbe, Größe und Geschmack unterscheiden. Probiert verschiedene Sorten aus, um euren Favoriten zu finden.
* Mischkultur: Kohlrabi verträgt sich gut mit anderen Gemüsesorten, wie zum Beispiel Salat, Radieschen oder Spinat. Pflanzt diese Gemüsesorten zusammen mit dem Kohlrabi in die Flaschen, um den Platz optimal zu nutzen.
* Überwinterung: Kohlrabi ist nicht winterhart. Wenn ihr euren hängenden Kohlrabi-Garten überwintern möchtet, müsst ihr die Pflanzen an einen frostfreien Ort bringen.
* Upcycling: Verwendet nicht nur Plastikflaschen, sondern auch andere recycelte Materialien für euren hängenden Garten, wie zum Beispiel alte Dosen oder Eimer.
* Beschriftung: Beschriftet die Flaschen mit den Namen der Pflanzen, damit ihr den Überblick behaltet.
* Standortwechsel: Dreht die Flaschen regelmäßig, damit die Pflanzen gleichmäßig mit Licht versorgt werden.
Häufige Fehler und wie man sie vermeidet
* Zu wenig Wasser: Kohlrabi benötigt viel Wasser, besonders an heißen Tagen. Achtet darauf, die Pflanzen regelmäßig zu gießen.
* Staunässe: Vermeidet Staunässe, indem ihr für eine
Conclusion
So, there you have it! Transforming discarded plastic bottles into a thriving, space-saving hanging kohlrabi garden is not just a fun project; it’s a sustainable solution that brings fresh, homegrown produce right to your doorstep, balcony, or even windowsill. We’ve shown you how to create a vertical garden that’s both aesthetically pleasing and incredibly practical, especially if you’re short on space.
But why is this DIY trick a must-try? Beyond the obvious environmental benefits of recycling plastic, this method offers several compelling advantages. Firstly, it’s incredibly cost-effective. You’re repurposing materials that would otherwise end up in a landfill, saving you money on expensive planters. Secondly, it’s a fantastic way to control the growing environment for your kohlrabi. You can easily move the bottles to optimize sunlight exposure, protect them from harsh weather, and monitor soil moisture levels. Thirdly, it’s a visually appealing and unique addition to any home or garden, sparking conversation and showcasing your commitment to sustainable living.
Don’t limit yourself to just kohlrabi! This hanging bottle garden technique is incredibly versatile. Consider experimenting with other leafy greens like lettuce, spinach, or even herbs like basil, mint, or parsley. For a splash of color, try growing strawberries or small flowering plants. You can also adjust the size of the bottles to accommodate different plant sizes and root systems. For larger plants, consider using larger bottles or even combining multiple bottles into a single, larger container.
Variations to Explore:
* Tiered Gardens: Create a tiered effect by hanging the bottles at different heights, maximizing sunlight exposure and adding visual interest.
* Painted Bottles: Personalize your garden by painting the bottles with vibrant colors or decorative patterns. Use non-toxic paints to ensure the safety of your plants.
* Self-Watering Systems: Incorporate a simple self-watering system by adding a wick made of cotton rope or felt that draws water from a reservoir at the bottom of the bottle.
* Integrated Trellis: For climbing plants, attach a small trellis to the bottle to provide support and encourage vertical growth.
* Indoor Illumination: If growing indoors, supplement natural light with grow lights to ensure your plants receive adequate illumination.
We strongly encourage you to give this DIY hanging kohlrabi plastic bottle garden a try. It’s a rewarding project that combines creativity, sustainability, and the joy of growing your own food. The satisfaction of harvesting fresh, homegrown kohlrabi from a garden you created yourself is truly unparalleled.
But the real magic happens when you share your experiences. We want to see your creations! Take photos of your hanging bottle gardens, share your tips and tricks, and let us know what worked (and what didn’t) in the comments below. Your feedback will help others learn and inspire even more people to embrace this sustainable gardening method. Let’s build a community of eco-conscious gardeners, one plastic bottle at a time. So, grab those bottles, get your hands dirty, and start growing! We can’t wait to see what you create. Remember, even small actions can make a big difference in creating a more sustainable future. This hanging kohlrabi garden is a testament to that.
Frequently Asked Questions (FAQ)
What kind of plastic bottles are best for this project?
Ideally, you should use PET (polyethylene terephthalate) plastic bottles, which are commonly used for water and soda. These bottles are durable, lightweight, and readily available. Avoid using bottles that have contained harsh chemicals or cleaning products, as these may contaminate the soil and harm your plants. Thoroughly wash and rinse the bottles before using them. Consider the size of the bottle in relation to the plant you intend to grow. Larger bottles are better for plants with more extensive root systems.
How do I ensure proper drainage in the bottles?
Proper drainage is crucial to prevent root rot. Make sure to drill or poke several drainage holes in the bottom of each bottle. You can also add a layer of gravel or small stones to the bottom of the bottle before adding soil to improve drainage. Monitor the soil moisture regularly and avoid overwatering. The number and size of the drainage holes may need to be adjusted depending on the climate and watering habits.
What type of soil should I use for growing kohlrabi in plastic bottles?
A well-draining potting mix is essential for growing kohlrabi in containers. Avoid using garden soil, as it can become compacted and hinder drainage. A good potting mix should contain a blend of peat moss, perlite, and vermiculite. You can also add compost or other organic matter to enrich the soil and provide essential nutrients. Consider using a potting mix specifically formulated for vegetables for optimal results.
How often should I water my hanging kohlrabi garden?
The frequency of watering will depend on several factors, including the climate, the size of the bottles, and the type of soil used. Generally, you should water your kohlrabi plants when the top inch of soil feels dry to the touch. Avoid overwatering, as this can lead to root rot. During hot and dry weather, you may need to water more frequently. Check the soil moisture regularly and adjust your watering schedule accordingly.
How much sunlight do kohlrabi plants need?
Kohlrabi plants need at least 6 hours of direct sunlight per day to thrive. Choose a location for your hanging garden that receives ample sunlight. If you are growing your plants indoors, you may need to supplement natural light with grow lights. Rotate the bottles regularly to ensure that all sides of the plants receive adequate sunlight. Insufficient sunlight can result in leggy growth and reduced yields.
How do I fertilize my kohlrabi plants in a hanging bottle garden?
Kohlrabi plants are heavy feeders and require regular fertilization. Use a balanced liquid fertilizer diluted to half strength every 2-3 weeks. You can also add slow-release fertilizer granules to the soil at planting time. Avoid over-fertilizing, as this can burn the roots. Monitor the plants for signs of nutrient deficiencies, such as yellowing leaves, and adjust your fertilization schedule accordingly.
How do I protect my hanging kohlrabi garden from pests and diseases?
Regularly inspect your plants for signs of pests and diseases. Common pests that affect kohlrabi include aphids, cabbage worms, and flea beetles. You can control these pests by handpicking them off the plants, using insecticidal soap, or applying neem oil. To prevent diseases, ensure good air circulation around the plants and avoid overwatering. Remove any infected leaves or plants immediately to prevent the spread of disease.
Can I grow kohlrabi in a hanging bottle garden during the winter?
Whether you can grow kohlrabi in a hanging bottle garden during the winter depends on your climate. Kohlrabi is a cool-season crop and can tolerate light frosts. If you live in a mild climate, you may be able to grow kohlrabi outdoors during the winter. However, if you live in a colder climate, you will need to protect your plants from freezing temperatures. You can move the bottles indoors or cover them with frost blankets.
How do I harvest kohlrabi from a hanging bottle garden?
Kohlrabi is typically ready to harvest when the bulb is about 2-3 inches in diameter. To harvest, simply cut the bulb from the plant just above the soil line. You can also harvest the leaves, which are edible and can be used in salads or cooked like spinach. Harvest the kohlrabi before it becomes too large, as it can become tough and woody.
What are some other plants that I can grow in a hanging bottle garden?
The possibilities are endless! Besides kohlrabi, you can grow a wide variety of plants in a hanging bottle garden, including lettuce, spinach, herbs, strawberries, tomatoes, peppers, and even small flowering plants. Choose plants that are well-suited to container gardening and that have similar growing requirements. Experiment with different combinations of plants to create a visually appealing and productive garden.
Leave a Comment