

Growing Yacon at Home might sound like an exotic adventure, and trust me, it kind of is! Have you ever dreamt of harvesting sweet, juicy tubers right from your own backyard? Well, Yacon, also known as the Peruvian ground apple, makes that dream a delicious reality. For centuries, this fascinating plant has been a staple in the Andes, cherished not only for its unique flavor but also for its impressive health benefits. Imagine pulling up a harvest of naturally sweet, low-calorie treats – that’s the magic of Yacon!
But why should you consider growing Yacon at home? In today’s world, where we’re increasingly conscious of what we eat and where it comes from, having control over our food source is incredibly empowering. Plus, Yacon is surprisingly easy to grow, even for beginner gardeners. This DIY guide will walk you through every step, from selecting the right variety to harvesting your very own crop of sweet, crunchy tubers. Forget those bland supermarket snacks – get ready to cultivate a taste of the Andes right in your own backyard! I’m excited to share all my tips and tricks to make your Yacon growing experience a success.
Yacon zu Hause anbauen: Dein umfassender DIY-Leitfaden
Hallo Gartenfreunde! Habt ihr schon mal von Yacon gehört? Diese faszinierende Pflanze, auch bekannt als Erdbirne, produziert süße, knollige Wurzeln, die eine tolle Alternative zu Süßkartoffeln oder Äpfeln sind. Und das Beste daran? Ihr könnt Yacon ganz einfach selbst zu Hause anbauen! Ich zeige euch, wie es geht, Schritt für Schritt.
Was du über Yacon wissen solltest
Bevor wir loslegen, hier ein paar wichtige Infos über Yacon:
* Klima: Yacon bevorzugt ein mildes Klima mit langen, warmen Sommern. Sie ist frostempfindlich, daher ist es wichtig, sie vor dem ersten Frost zu ernten.
* Boden: Ein gut durchlässiger, humusreicher Boden ist ideal. Yacon mag keine Staunässe.
* Sonne: Yacon braucht viel Sonne, mindestens 6 Stunden pro Tag.
* Vermehrung: Yacon wird in der Regel durch Rhizome (Wurzelstöcke) vermehrt, nicht durch Samen.
* Ernte: Die Ernte erfolgt im Herbst, nachdem das Laub abgestorben ist.
Benötigte Materialien und Werkzeuge
Bevor wir mit dem Anbau beginnen, stellen wir sicher, dass wir alles Notwendige zur Hand haben. Hier ist eine Liste der Materialien und Werkzeuge, die du brauchst:
* Yacon-Rhizome (Wurzelstöcke)
* Gartenschaufel oder Spaten
* Gießkanne oder Gartenschlauch
* Kompost oder anderer organischer Dünger
* Mulch (z.B. Stroh oder Holzhackschnitzel)
* Gartenvlies (optional, für den Schutz vor Frost)
* Pflanzgefäße (optional, für den Anbau im Topf)
Yacon anbauen: Schritt-für-Schritt-Anleitung
Jetzt geht’s ans Eingemachte! Hier ist eine detaillierte Anleitung, wie du Yacon erfolgreich anbauen kannst:
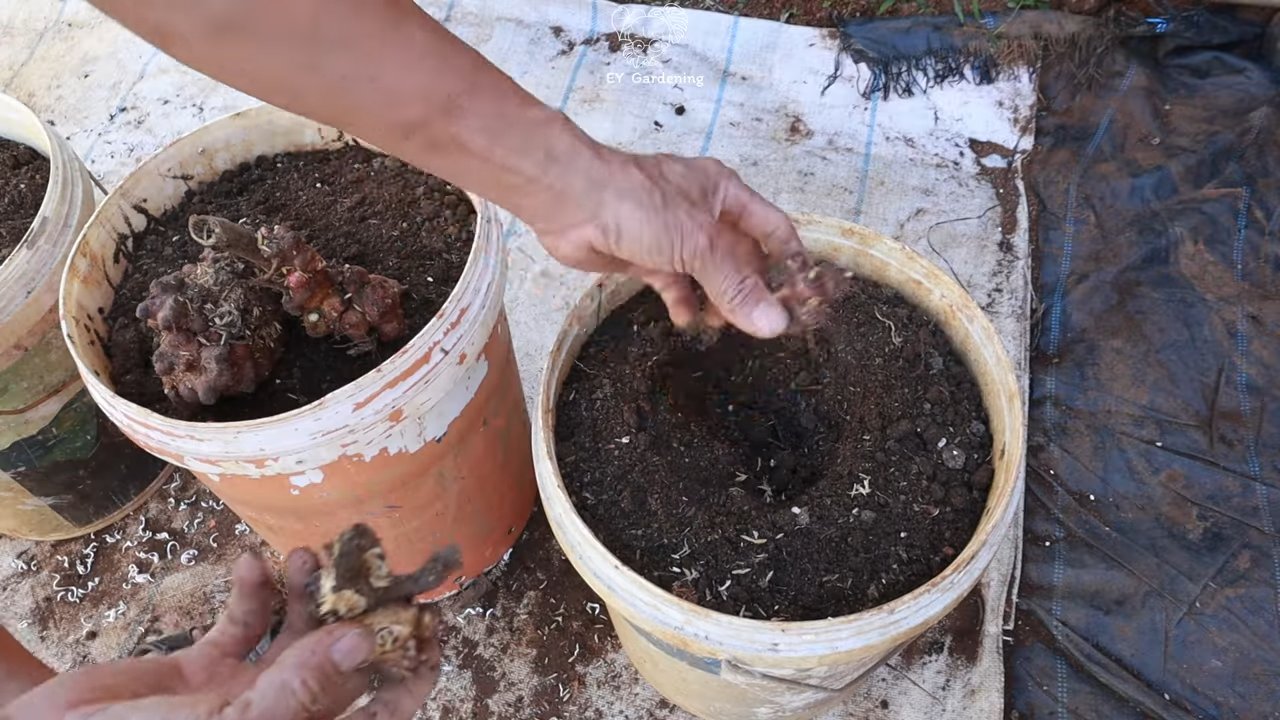
1. Vorbereitung der Rhizome
Die Rhizome sind das Herzstück unserer Yacon-Pflanzen. Hier ist, wie du sie vorbereitest:
1. Rhizome auswählen: Wähle gesunde, feste Rhizome mit mindestens 2-3 Augen (Knospen) aus.
2. Rhizome teilen (optional): Wenn deine Rhizome sehr groß sind, kannst du sie vorsichtig mit einem sauberen Messer teilen, sodass jedes Stück mindestens ein Auge hat.
3. Vorziehen (optional): Um den Wachstumsprozess zu beschleunigen, kannst du die Rhizome im Frühjahr (ca. 4-6 Wochen vor dem letzten Frost) in Töpfen vorziehen. Fülle die Töpfe mit Anzuchterde und lege die Rhizome horizontal hinein, sodass die Augen nach oben zeigen. Gieße sie leicht an und stelle sie an einen hellen, warmen Ort.
2. Vorbereitung des Bodens
Ein guter Boden ist entscheidend für das Wachstum deiner Yacon-Pflanzen. So bereitest du ihn vor:
1. Standort auswählen: Wähle einen sonnigen Standort mit gut durchlässigem Boden.
2. Boden lockern: Grabe den Boden mit einer Schaufel oder einem Spaten um und lockere ihn auf. Entferne Steine und Unkraut.
3. Boden verbessern: Mische Kompost oder anderen organischen Dünger in den Boden ein, um ihn mit Nährstoffen anzureichern und die Drainage zu verbessern.
3. Pflanzen der Rhizome
Jetzt ist es Zeit, die Rhizome in die Erde zu bringen:
1. Pflanzlöcher graben: Grabe Pflanzlöcher im Abstand von ca. 60-90 cm. Die Löcher sollten etwa 10-15 cm tief sein.
2. Rhizome einsetzen: Lege die Rhizome horizontal in die Pflanzlöcher, sodass die Augen nach oben zeigen.
3. Mit Erde bedecken: Bedecke die Rhizome mit Erde und drücke sie leicht an.
4. Angießen: Gieße die Pflanzen gründlich an.
4. Pflege der Yacon-Pflanzen
Die richtige Pflege ist wichtig, damit deine Yacon-Pflanzen gut wachsen und viele Knollen produzieren:
1. Gießen: Gieße die Pflanzen regelmäßig, besonders während trockener Perioden. Achte darauf, dass der Boden nicht austrocknet, aber vermeide Staunässe.
2. Düngen: Dünge die Pflanzen während der Wachstumsperiode regelmäßig mit einem organischen Dünger.
3. Unkraut entfernen: Halte den Bereich um die Pflanzen herum unkrautfrei.
4. Mulchen: Bedecke den Boden um die Pflanzen herum mit Mulch (z.B. Stroh oder Holzhackschnitzel), um die Feuchtigkeit zu speichern, Unkraut zu unterdrücken und den Boden zu schützen.
5. Stützen (optional): Yacon-Pflanzen können sehr groß werden und unter dem Gewicht der Blätter umknicken. Wenn nötig, kannst du sie mit Stäben oder einem Rankgitter stützen.
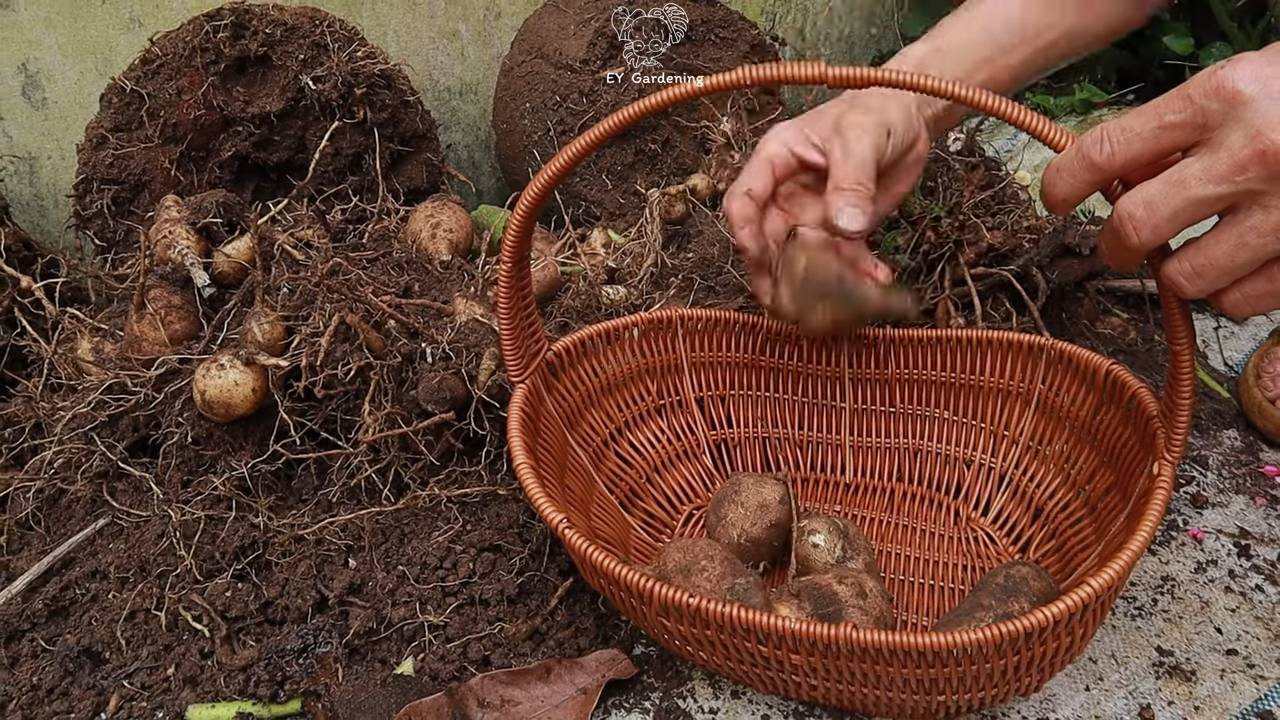
5. Ernte der Yacon-Knollen
Die Ernte ist der Höhepunkt unserer Arbeit! So erntest du die Yacon-Knollen:
1. Zeitpunkt der Ernte: Die Ernte erfolgt im Herbst, nachdem das Laub abgestorben ist. Das ist in der Regel im Oktober oder November der Fall.
2. Knollen ausgraben: Grabe die Knollen vorsichtig mit einer Schaufel oder einem Spaten aus. Achte darauf, sie nicht zu beschädigen.
3. Knollen reinigen: Entferne die Erde von den Knollen.
4. Knollen lagern: Lagere die Knollen an einem kühlen, dunklen und trockenen Ort. Sie können mehrere Monate gelagert werden.
Yacon im Topf anbauen: Eine Alternative für kleine Gärten
Wenn du keinen Garten hast oder nur wenig Platz zur Verfügung steht, kannst du Yacon auch im Topf anbauen. Hier sind ein paar Tipps:
* Topfgröße: Wähle einen großen Topf mit einem Durchmesser von mindestens 40 cm.
* Erde: Verwende eine hochwertige Blumenerde, die gut durchlässig ist.
* Drainage: Achte darauf, dass der Topf Drainagelöcher hat, damit überschüssiges Wasser abfließen kann.
* Standort: Stelle den Topf an einen sonnigen Standort.
* Pflege: Gieße und dünge die Pflanzen regelmäßig.
Häufige Probleme und Lösungen
Auch beim Yacon-Anbau können Probleme auftreten. Hier sind einige häufige Probleme und wie du sie lösen kannst:
* Schädlinge: Yacon ist relativ resistent gegen Schädlinge. Gelegentlich können Schnecken oder Blattläuse auftreten. Bekämpfe sie mit natürlichen Mitteln wie Schneckenkorn oder einer Seifenlösung.
* Krankheiten: Yacon kann von Pilzkrankheiten befallen werden, besonders bei feuchtem Wetter. Sorge für eine gute Belüftung und vermeide Staunässe.
* Frostschäden: Yacon ist frostempfindlich. Schütze die Pflanzen vor Frost, indem du sie mit Gartenvlies abdeckst oder sie in einen frostfreien Raum bringst.
Yacon in der Küche: Vielseitige Verwendungsmöglichkeiten
Die Yacon-Knollen sind nicht nur lecker, sondern auch sehr vielseitig in der Küche einsetzbar. Hier sind ein paar Ideen:
* Roh essen: Die Knollen können roh gegessen werden. Sie schmecken süß und knackig, ähnlich wie Äpfel oder Birnen.
* Salate: Die Knollen können in Salaten verwendet werden.
* Gekocht oder gebraten: Die Knollen können gekocht, gebraten oder gebacken werden. Sie sind eine tolle Beilage zu Fleisch oder Gemüse.
* Süßspeisen: Die Knollen können in Süßspeisen wie Kuchen, Muffins oder Eis verwendet werden.
* Yacon-Sirup: Aus den Knollen kann Yacon-Sirup hergestellt werden, ein natürlicher Süßstoff mit niedrigem glykämischen Index.
Zusätzliche Tipps für den erfolgreichen Yacon-Anbau
Hier sind noch ein paar zusätzliche Tipps, die dir helfen, Yacon erfolgreich anzubauen:
* Boden testen: Lass deinen Boden testen, um sicherzustellen, dass er die richtigen Nährstoffe enthält.
*
Conclusion
So, there you have it! Growing yacon at home is not only achievable, but it’s a deeply rewarding experience that connects you to the food you eat in a profound way. From the initial excitement of planting the rhizomes to the ultimate satisfaction of harvesting those sweet, crisp tubers, every step of the process is filled with learning and discovery.
Why is this DIY trick a must-try? Because it empowers you to cultivate a unique and healthy food source right in your own backyard. Yacon offers a delicious alternative to traditional sweeteners, boasting a low glycemic index that makes it a fantastic choice for those managing blood sugar levels. Beyond its health benefits, growing yacon is also an environmentally friendly practice. It requires minimal intervention, thrives in various soil conditions, and contributes to the biodiversity of your garden.
But the beauty of growing yacon lies not just in its practicality, but also in its versatility. Feel free to experiment with different planting locations to find the sweet spot in your garden. Try companion planting with nitrogen-fixing legumes to enrich the soil naturally. And don’t be afraid to get creative in the kitchen! Yacon can be enjoyed raw, roasted, juiced, or even fermented into a delicious probiotic beverage.
Consider these variations to elevate your yacon growing experience:
* Vertical Gardening: If you’re short on space, try growing yacon in large containers or grow bags. This allows you to maximize your yield even in limited areas.
* Succession Planting: Plant yacon rhizomes in stages throughout the spring to extend your harvest season. This ensures a continuous supply of fresh tubers.
* Yacon Syrup Experimentation: Once you’ve mastered the basics, explore different methods of making yacon syrup. Experiment with varying cooking times and temperatures to achieve your desired consistency and flavor. You can even add spices like cinnamon or vanilla for a unique twist.
* Yacon Leaf Tea: Don’t discard the leaves! Yacon leaves can be dried and used to make a refreshing and healthful tea.
We wholeheartedly encourage you to embark on this yacon-growing adventure. It’s a chance to connect with nature, nourish your body, and discover the joy of homegrown goodness.
And now, we want to hear from you! Have you tried growing yacon at home? What challenges did you face, and what successes did you celebrate? Share your experiences, tips, and tricks in the comments below. Let’s build a community of yacon enthusiasts and learn from each other’s journeys. Your insights could inspire others to take the plunge and discover the wonders of growing yacon for themselves. Let’s cultivate a greener, healthier future, one yacon tuber at a time!
Frequently Asked Questions (FAQ)
What exactly is yacon, and why should I grow it?
Yacon (Smallanthus sonchifolius) is a perennial plant native to the Andes region of South America. It’s primarily grown for its crisp, sweet tubers, which are similar in texture to an apple or pear. The tubers are rich in fructooligosaccharides (FOS), a type of prebiotic fiber that promotes gut health and has a low glycemic index, making it a suitable sweetener alternative for people with diabetes or those watching their blood sugar levels. Growing yacon at home allows you to have a fresh, healthy, and sustainable food source right in your backyard. It’s also a relatively easy plant to cultivate, making it a great option for beginner gardeners.
When is the best time to plant yacon?
The ideal time to plant yacon is in the spring, after the last frost has passed. Yacon is sensitive to frost, so it’s crucial to wait until the weather has warmed up consistently. In colder climates, you can start the rhizomes indoors a few weeks before the last frost to give them a head start. This will allow you to transplant them outdoors once the weather is favorable.
How do I plant yacon rhizomes?
Yacon is grown from rhizomes, which are underground stems with buds. To plant them, dig a hole about 4-6 inches deep and space the rhizomes about 18-24 inches apart. Place the rhizomes horizontally in the hole with the buds facing upwards. Cover them with soil and water thoroughly. Choose a location that receives at least 6-8 hours of sunlight per day.
What kind of soil does yacon need?
Yacon prefers well-drained soil that is rich in organic matter. Before planting, amend the soil with compost or well-rotted manure to improve its fertility and drainage. Yacon can tolerate a range of soil pH levels, but it thrives best in slightly acidic to neutral soil (pH 6.0-7.0).
How often should I water yacon?
Yacon needs consistent moisture, especially during the growing season. Water deeply whenever the top inch of soil feels dry to the touch. Avoid overwatering, as this can lead to root rot. Mulching around the plants can help retain moisture and suppress weeds.
Does yacon need fertilizer?
Yacon benefits from regular fertilization, especially during the early stages of growth. Use a balanced fertilizer with equal amounts of nitrogen, phosphorus, and potassium. Apply the fertilizer according to the package instructions. You can also side-dress the plants with compost or well-rotted manure throughout the growing season.
When is yacon ready to harvest?
Yacon is typically ready to harvest in the fall, after the first frost has killed back the foliage. The tubers will continue to sweeten after harvesting, so it’s best to leave them in the ground as long as possible. To harvest, carefully dig around the plants and lift the tubers out of the soil. Be gentle, as the tubers can be easily bruised.
How do I store yacon tubers?
After harvesting, cure the yacon tubers for a few days in a cool, dry place. This allows the skins to toughen up and helps prevent spoilage. Store the cured tubers in a cool, dark, and well-ventilated location, such as a root cellar or basement. They can be stored for several months under the right conditions.
Can I eat yacon leaves?
Yes, yacon leaves are edible and can be used to make tea. The leaves contain antioxidants and other beneficial compounds. To make yacon leaf tea, simply dry the leaves and steep them in hot water for a few minutes.
Are there any pests or diseases that affect yacon?
Yacon is generally resistant to pests and diseases. However, it can be susceptible to slugs and snails, especially when the plants are young. Use organic pest control methods, such as diatomaceous earth or beer traps, to protect your plants. Root rot can also be a problem in poorly drained soil.
Can I grow yacon in containers?
Yes, yacon can be grown in containers, but you’ll need to use a large container with good drainage. Choose a container that is at least 18 inches in diameter and depth. Fill the container with a well-draining potting mix and plant the rhizomes as described above. Water regularly and fertilize as needed.
How can I make yacon syrup?
To make yacon syrup, wash and peel the yacon tubers. Chop them into small pieces and simmer them in water until they are soft. Strain the mixture through a cheesecloth or fine-mesh sieve to remove the solids. Simmer the liquid over low heat until it thickens into a syrup. The cooking time will vary depending on the desired consistency. Store the syrup in a sterilized jar in the refrigerator.
What are some other ways to use yacon?
Besides eating it raw and making syrup, yacon can be used in a variety of other ways. It can be roasted, baked, or grilled. It can also be added to salads, smoothies, and juices. Yacon can even be fermented to make a probiotic beverage.
Is yacon safe for everyone to eat?
Yacon is generally safe for most people to eat. However, some people may experience digestive discomfort, such as gas or bloating, due to the high FOS content. Start with small amounts and gradually increase your intake to allow your body to adjust. People with fructose intolerance may need to avoid yacon. As always, consult with your doctor or a registered dietitian if you have any concerns.


Leave a Comment