

Growing Strawberries Indoors might seem like a far-fetched dream, especially if you don’t have a sprawling garden. But guess what? It’s totally achievable, and I’m here to show you how! For centuries, strawberries have been prized for their sweet, juicy flavor and vibrant color. From ancient Roman gardens to medieval monastery plots, these little red gems have always held a special place in our hearts (and stomachs!).
But let’s face it, not everyone has the space or the climate for a traditional strawberry patch. That’s where the magic of indoor gardening comes in. Imagine plucking fresh, sun-ripened strawberries right from your kitchen windowsill, even in the dead of winter! No more relying on store-bought berries that lack that homegrown flavor.
This DIY guide is packed with simple, effective tricks and hacks to help you successfully growing strawberries indoors. We’ll cover everything from choosing the right varieties and containers to mastering the art of pollination and pest control. So, ditch the grocery store berries and get ready to enjoy the sweet taste of success with your very own indoor strawberry garden! Let’s get started!
Growing Strawberries Indoors: A Berry Good DIY Project!
Hey there, fellow plant enthusiasts! Ever dreamt of plucking fresh, juicy strawberries right from your kitchen in the middle of winter? Well, dream no more! I’m going to walk you through a super fun and rewarding DIY project: growing strawberries indoors. It’s easier than you think, and the taste of homegrown berries is absolutely unbeatable.
What You’ll Need
Before we dive in, let’s gather our supplies. This is crucial for a smooth and successful strawberry-growing adventure.
* Strawberry Plants: You have a few options here.
* Bare-root plants: These are dormant plants that need to be woken up. They’re usually the most economical choice.
* Established plants: These are already growing in pots and are ready to go. They’re a bit more expensive but offer a head start.
* Strawberry Seeds: While possible, growing from seed is a much longer and more challenging process. I recommend starting with plants for your first indoor strawberry garden.
* Pots or Containers: Choose containers that are at least 6-8 inches deep and wide. Strawberries have shallow roots, but they still need room to spread. Hanging baskets are also a great option!
* Potting Mix: Use a high-quality potting mix that’s well-draining. Avoid using garden soil, as it can compact and suffocate the roots. A mix specifically formulated for fruits and vegetables is ideal.
* Grow Lights: Strawberries need a lot of light – at least 6-8 hours per day. If you don’t have a sunny windowsill, invest in a good set of grow lights. LED grow lights are energy-efficient and work wonders.
* Fertilizer: A balanced, water-soluble fertilizer formulated for strawberries or fruits and vegetables is essential for healthy growth and abundant fruit production.
* Watering Can or Spray Bottle: For gentle and even watering.
* Small Brush or Cotton Swab: For hand-pollinating your strawberry flowers (more on that later!).
* Optional:
* Pebbles or Gravel: To improve drainage at the bottom of your pots.
* Mulch: To help retain moisture and suppress weeds. Straw or wood chips work well.
* Humidity Tray: To increase humidity around your plants, especially in dry climates.
Choosing the Right Strawberry Variety
Not all strawberry varieties are created equal when it comes to indoor growing. Some are better suited for containers and indoor conditions than others. Here are a few of my favorites:
* ‘Everbearing’ Varieties: These varieties produce fruit throughout the growing season, rather than just in one big flush. They’re perfect for continuous harvests indoors. Examples include ‘Albion’, ‘Seascape’, and ‘Ozark Beauty’.
* ‘Day-Neutral’ Varieties: Similar to everbearing varieties, day-neutral strawberries produce fruit regardless of the day length. ‘Tristar’ and ‘Tribute’ are popular choices.
* ‘Alpine’ Strawberries: These are smaller, intensely flavored strawberries that are well-suited for containers. They don’t produce runners, making them less messy.
Planting Your Strawberries
Now for the fun part! Let’s get those strawberry plants into their new homes.
1. Prepare Your Pots: If you’re using new pots, give them a good rinse. If you’re reusing pots, make sure they’re clean and free of any old soil or debris. Add a layer of pebbles or gravel to the bottom of each pot to improve drainage.
2. Fill with Potting Mix: Fill the pots with your chosen potting mix, leaving about an inch of space at the top.
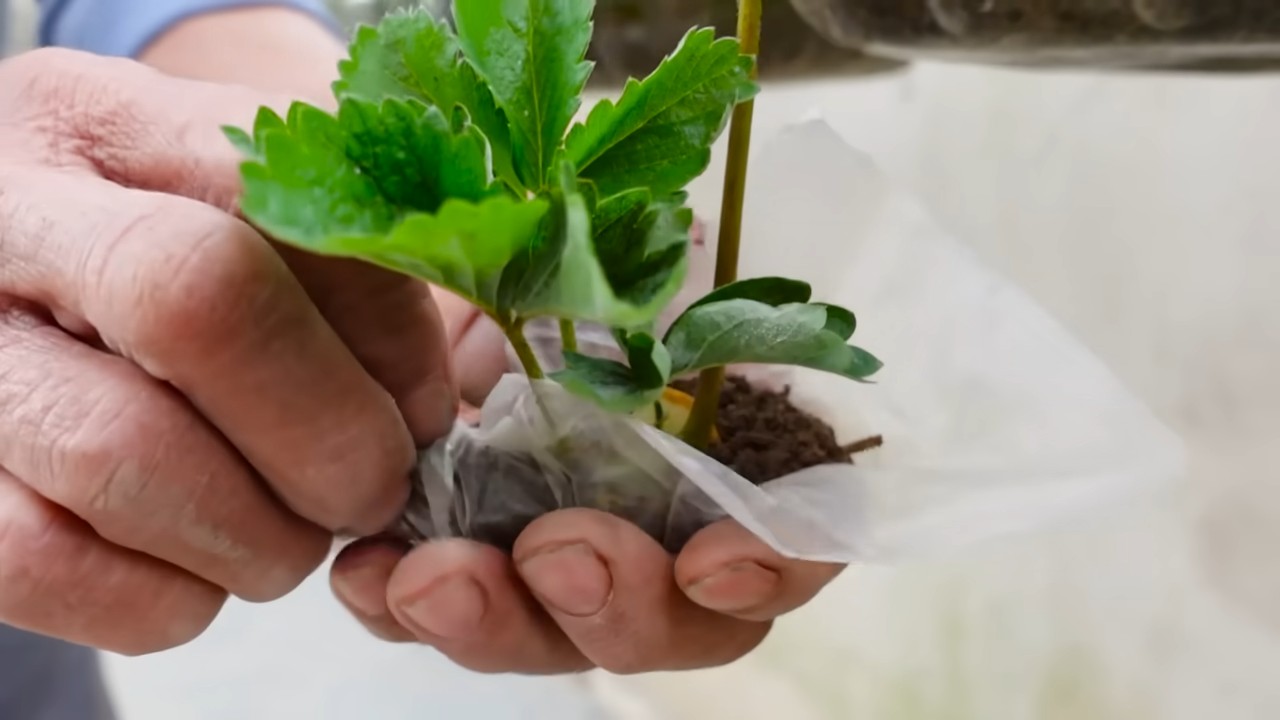
3. Plant the Strawberries:
* Bare-root plants: Soak the roots in water for about 30 minutes before planting. Create a small mound in the center of the pot and spread the roots over the mound. Make sure the crown (the point where the roots meet the stem) is just above the soil line.
* Established plants: Gently remove the plant from its nursery pot. Loosen the roots slightly and place the plant in the center of your prepared pot. Again, make sure the crown is just above the soil line.
4. Backfill with Potting Mix: Fill in the remaining space around the plant with potting mix, gently firming the soil.
5. Water Thoroughly: Water the newly planted strawberries thoroughly until water drains out of the bottom of the pot. This helps settle the soil and encourages root growth.
6. Add Mulch (Optional): If you’re using mulch, spread a thin layer around the base of the plants, being careful not to cover the crown.
Providing the Right Environment
Strawberries are pretty adaptable, but they do have specific needs to thrive indoors.
1. Light: As I mentioned earlier, light is crucial. Place your strawberry plants in a location that receives at least 6-8 hours of direct sunlight per day. If you don’t have enough natural light, use grow lights. Position the grow lights a few inches above the plants and adjust as they grow. I usually use a timer to ensure they get consistent light exposure.
2. Temperature: Strawberries prefer temperatures between 60-80°F (15-27°C). Avoid placing them near drafts or extreme temperature fluctuations.
3. Humidity: Strawberries like moderate humidity. If your indoor environment is dry, you can increase humidity by using a humidity tray, misting the plants regularly, or placing a humidifier nearby.
4. Watering: Water your strawberry plants when the top inch of soil feels dry to the touch. Avoid overwatering, as this can lead to root rot. Water deeply and evenly, allowing excess water to drain out of the bottom of the pot.
5. Fertilizing: Feed your strawberry plants with a balanced, water-soluble fertilizer every 2-3 weeks during the growing season. Follow the instructions on the fertilizer package.
Hand-Pollinating Your Strawberries
This is a key step for indoor strawberry growing! Since you don’t have bees or other pollinators buzzing around, you’ll need to play the role of pollinator yourself.
1. Identify the Flowers: Strawberry flowers are small and white with a yellow center.
2. Use a Small Brush or Cotton Swab: Gently brush the pollen from the center of one flower onto the center of another flower. Repeat this process for all the flowers on your plants.
3. Repeat Regularly: Pollinate your strawberry flowers every few days, especially when they’re first opening.
Caring for Your Strawberry Plants
Regular care is essential for healthy strawberry plants and abundant fruit production.
1. Remove Runners: Strawberry plants produce runners, which are long stems that grow out from the main plant. If you want to focus on fruit production, remove the runners as they appear. You can also root the runners to create new strawberry plants.
2. Prune Dead or Damaged Leaves: Regularly inspect your plants for dead or damaged leaves and remove them. This helps prevent disease and encourages new growth.
3. Watch for Pests and Diseases: Keep an eye out for common strawberry pests like aphids, spider mites, and whiteflies. Treat infestations promptly with insecticidal soap or neem oil. Also, watch for signs of fungal diseases like powdery mildew and gray mold. Improve air circulation and avoid overwatering to prevent these diseases.
4. Rotate Your Plants: If you’re using grow lights, rotate your plants regularly to ensure they receive even light exposure on all sides.
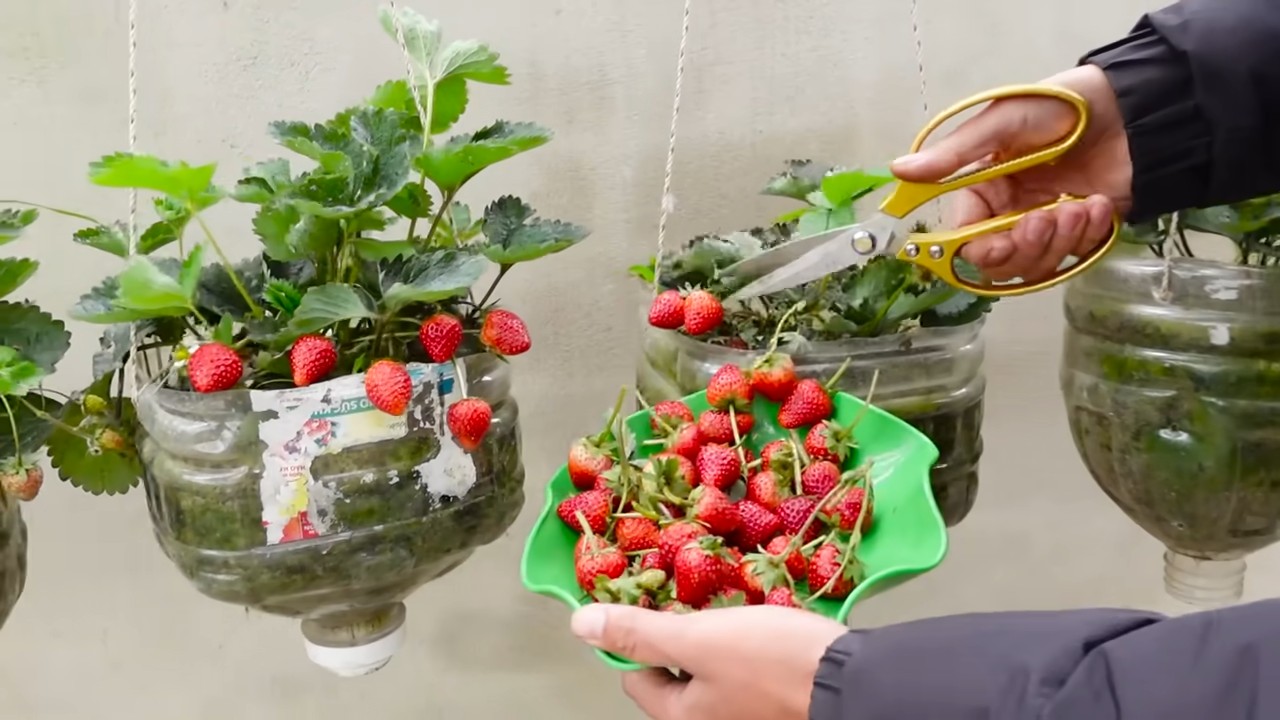
Harvesting Your Strawberries
The moment you’ve been waiting for! Harvesting your homegrown strawberries.
1. Wait for Ripeness: Strawberries are ready to harvest when they’re fully red and slightly soft to the touch.
2. Gently Pick the Berries: Gently grasp the stem just above the berry and twist or snip it off.
3. Enjoy Your Harvest: Eat your strawberries fresh, use them in desserts, or freeze them for later.
Troubleshooting Common Problems
Even with the best care, you might encounter some challenges along the way. Here are a few common problems and how to address them:
* No Fruit Production:
* Insufficient Light: Make sure your plants are getting enough light.
* Poor Pollination: Hand-pollinate your flowers regularly.
* Lack of Nutrients: Fertilize your plants regularly.
* Yellowing Leaves:
* Overwatering: Allow the soil to dry out slightly between waterings.
* Nutrient Deficiency: Fertilize your plants with a balanced fertilizer.
* Pests:
* Aphids, Spider Mites, Whiteflies: Treat infestations with insecticidal soap or neem oil.
* Diseases:
Conclusion
So, there you have it! Growing strawberries indoors might seem like a daunting task at first, but with a little patience, the right setup, and these simple DIY tricks, you can enjoy the sweet taste of homegrown berries all year round. We’ve covered everything from choosing the right variety and providing adequate light to ensuring proper pollination and preventing common problems.
Why is this DIY approach a must-try? Because it puts you in control. You’re not relying on grocery store produce that may have traveled long distances and lost some of its flavor and nutritional value. You’re cultivating your own little patch of sunshine, bringing a touch of nature indoors, and reaping the delicious rewards of your labor. Plus, it’s incredibly satisfying to watch those tiny green berries plump up and turn a vibrant red, knowing you nurtured them from start to finish.
But don’t stop there! Experiment with different strawberry varieties to find your personal favorite. Try using different types of growing mediums, like coco coir or perlite, to see how they affect the growth and flavor of your berries. Consider adding companion plants, such as basil or thyme, to your indoor strawberry garden to deter pests and enhance the flavor of your strawberries. You can even explore hydroponic systems for an even more efficient and space-saving way to grow your indoor strawberries.
The possibilities are endless!
And remember, growing strawberries indoors is a learning process. Don’t be discouraged if you encounter a few bumps along the way. Just keep experimenting, keep learning, and keep enjoying the journey.
We are confident that with these tips, you’ll be well on your way to enjoying a bountiful harvest of delicious, homegrown strawberries. Now it’s your turn to get your hands dirty! We encourage you to try this DIY trick and experience the joy of growing your own strawberries indoors.
Once you’ve given it a go, we’d love to hear about your experience. Share your tips, tricks, and triumphs in the comments below. Let us know what worked for you, what challenges you faced, and what delicious recipes you’ve created with your homegrown strawberries. Together, we can create a community of indoor strawberry growers and share the sweet rewards of our labor. Happy growing!
Frequently Asked Questions (FAQs)
Q: What are the best strawberry varieties to grow indoors?
A: Everbearing varieties are generally the best choice for indoor growing because they produce fruit throughout the growing season, rather than just once a year. Some popular everbearing varieties include:
* Tristan: Known for its beautiful pink flowers and sweet, flavorful berries.
* Albion: A reliable and productive variety with large, firm berries.
* Seascape: A heat-tolerant variety that produces consistently good yields.
* Ozark Beauty: A classic everbearing variety with excellent flavor.
* Eversweet: As the name suggests, this variety is known for its exceptionally sweet berries.
Consider the size of your growing space and the amount of light available when choosing a variety. Some varieties are more compact and better suited for smaller spaces.
Q: How much light do indoor strawberries need?
A: Strawberries need at least 6-8 hours of direct sunlight per day to thrive. If you don’t have a sunny window, you’ll need to supplement with artificial grow lights. LED grow lights are a great option because they are energy-efficient and provide the full spectrum of light that plants need. Position the grow lights a few inches above the plants and adjust the height as the plants grow. A timer can be used to automatically turn the lights on and off.
Q: How often should I water my indoor strawberry plants?
A: Water your strawberry plants when the top inch of soil feels dry to the touch. Avoid overwatering, as this can lead to root rot. Ensure that your pots have drainage holes to allow excess water to escape. The frequency of watering will depend on factors such as the temperature, humidity, and type of growing medium. In general, you may need to water more frequently during the warmer months and less frequently during the cooler months.
Q: How do I pollinate my indoor strawberry plants?
A: Strawberries are self-pollinating, but they still need help to transfer pollen from the male to the female parts of the flower. Outdoors, this is typically done by bees and other insects. Indoors, you’ll need to hand-pollinate your plants. You can do this by using a small paintbrush or cotton swab to gently brush the pollen from the center of one flower to the center of another. You can also use a fan to gently blow air over the plants, which will help to distribute the pollen. Repeat this process every few days when the plants are flowering.
Q: What kind of fertilizer should I use for indoor strawberries?
A: Use a balanced fertilizer specifically formulated for strawberries. Look for a fertilizer with an NPK ratio (nitrogen, phosphorus, potassium) of around 10-10-10 or 12-12-12. Fertilize your plants every 2-4 weeks during the growing season, following the instructions on the fertilizer package. Avoid over-fertilizing, as this can burn the roots of the plants. Organic fertilizers, such as compost tea or fish emulsion, are also a good option.
Q: How do I prevent pests and diseases in my indoor strawberry plants?
A: Prevention is key when it comes to pests and diseases. Inspect your plants regularly for signs of problems, such as aphids, spider mites, or powdery mildew. If you spot any pests, you can try washing them off with a strong stream of water or using insecticidal soap. For fungal diseases, you can try spraying the plants with a fungicide. Ensure good air circulation around the plants to help prevent fungal problems. Avoid overcrowding the plants and remove any dead or dying leaves.
Q: How long does it take for indoor strawberries to produce fruit?
A: It typically takes about 4-6 weeks from the time the flowers are pollinated to the time the berries are ripe. The exact time will depend on the variety of strawberry, the growing conditions, and the amount of light the plants receive. Be patient and don’t pick the berries until they are fully ripe and have a deep red color.
Q: Can I grow strawberries indoors year-round?
A: Yes, you can grow strawberries indoors year-round if you provide them with the right conditions. This includes adequate light, proper watering, fertilization, and pollination. You may need to adjust your care routine depending on the season. For example, you may need to provide more light during the winter months.
Q: My strawberry plants are producing runners. Should I remove them?
A: Runners are long, slender stems that grow out from the main plant. They are used to propagate new plants. If you want to propagate new strawberry plants, you can allow the runners to root in small pots filled with soil. However, if you are primarily interested in fruit production, it’s best to remove the runners. This will allow the plant to focus its energy on producing berries rather than new plants. Simply snip off the runners with a pair of scissors or pruning shears.

Leave a Comment