

Growing sprouts at home is easier than you might think, and I’m here to show you how! Forget those expensive, pre-packaged sprouts from the grocery store – we’re about to embark on a fun and incredibly rewarding DIY adventure that will bring fresh, nutritious greens right to your kitchen counter.
Sprouting, in its essence, is an ancient practice. Cultures around the world, from the Far East to the Mediterranean, have long recognized the incredible nutritional power packed within these tiny germinated seeds. Think about it: sprouts are essentially baby plants, bursting with vitamins, minerals, and enzymes, all concentrated in a readily digestible form. For centuries, they’ve been a staple in diets focused on health and vitality.
But why should *you* bother with growing sprouts at home? Well, beyond the historical significance and nutritional benefits, it’s about control and freshness. Let’s face it, store-bought sprouts can sometimes be a bit… lackluster. They might be nearing their expiration date, or you might not be entirely sure where they came from. With this DIY guide, you’ll know exactly what you’re eating, and you’ll be able to harvest your sprouts at their peak flavor and nutritional value. Plus, it’s a fantastic way to add a burst of freshness to salads, sandwiches, and stir-fries, especially during the colder months when fresh produce can be harder to come by. So, are you ready to ditch the store-bought sprouts and embrace the joy of homegrown goodness? Let’s get started!
Sprossen selber ziehen: Eine einfache Anleitung für Anfänger
Hallo liebe Gartenfreunde und Gesundheitsbewusste! Ich zeige euch heute, wie ihr ganz einfach zu Hause eure eigenen Sprossen ziehen könnt. Es ist super easy, kostengünstig und ihr habt immer frische, vitaminreiche Leckerbissen zur Hand. Los geht’s!
Was sind Sprossen und warum sollte ich sie selber ziehen?
Sprossen sind im Grunde genommen gekeimte Samen. Sie sind vollgepackt mit Vitaminen, Mineralien, Enzymen und Antioxidantien. Im Vergleich zu den ursprünglichen Samen enthalten Sprossen oft eine höhere Konzentration an Nährstoffen. Außerdem sind sie leicht verdaulich und eine tolle Ergänzung für Salate, Suppen, Sandwiches oder einfach pur als Snack.
Warum selber ziehen? Ganz einfach: Ihr wisst genau, was drin ist! Keine Pestizide, keine langen Transportwege, maximale Frische und ein unschlagbarer Preis. Und es macht auch noch Spaß!
Benötigte Materialien und Vorbereitung
Bevor wir loslegen, brauchen wir ein paar Dinge:
* Sprossengläser oder ein Keimgerät: Ich persönlich mag Sprossengläser am liebsten, weil sie einfach zu reinigen sind und wenig Platz wegnehmen. Es gibt aber auch spezielle Keimgeräte mit mehreren Etagen, wenn ihr größere Mengen ziehen wollt.
* Sprossensamen: Achtet darauf, dass ihr spezielle Sprossensamen kauft. Diese sind unbehandelt und für den Verzehr geeignet. Beliebte Sorten sind Alfalfa, Radieschen, Brokkoli, Linsen, Mungbohnen und Kresse.
* Sauberes Wasser: Am besten gefiltertes Wasser oder abgekochtes, abgekühltes Wasser verwenden.
* Ein feinmaschiges Sieb oder ein Tuch: Zum Abspülen der Sprossen.
* Ein dunkler, kühler Ort: Während der Keimung brauchen die Sprossen Dunkelheit.
Die Schritt-für-Schritt Anleitung zum Sprossen ziehen im Glas
So, jetzt geht’s ans Eingemachte! Hier ist meine bewährte Methode für das Sprossen ziehen im Glas:
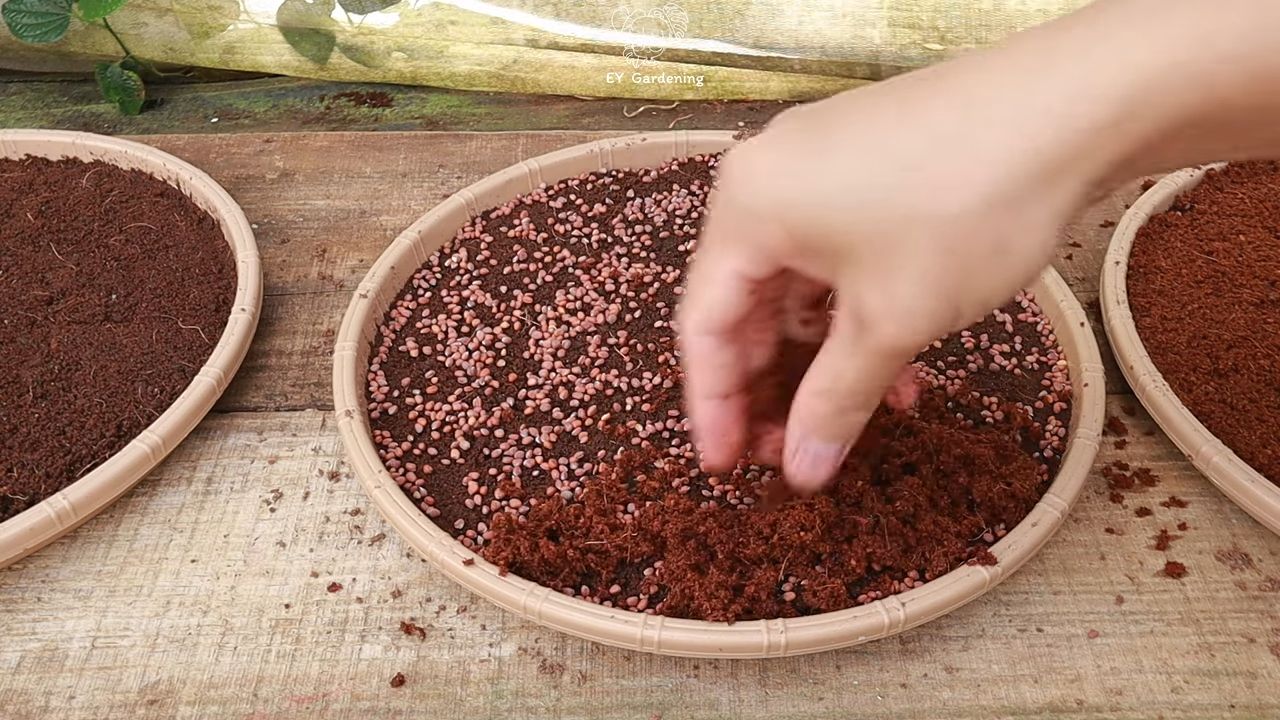
1. Samen einweichen: Gebt die Sprossensamen in euer Sprossenglas. Die Menge hängt von der Sorte und der Größe des Glases ab. Als Faustregel gilt: Das Glas sollte nur zu etwa einem Viertel gefüllt sein. Füllt das Glas mit reichlich Wasser auf und lasst die Samen für 6-12 Stunden einweichen. Das Einweichen weckt die Samen auf und startet den Keimprozess.
2. Wasser abgießen und spülen: Nach dem Einweichen gießt ihr das Wasser ab. Achtet darauf, dass keine Samen im Abfluss landen! Spült die Samen gründlich mit frischem Wasser durch. Das ist wichtig, um Schimmelbildung zu vermeiden.
3. Glas abdecken und dunkel stellen: Decken Sie das Glas mit einem feinmaschigen Sieb oder einem Tuch ab und befestigen Sie es mit einem Gummiband. Stellt das Glas an einen dunklen, kühlen Ort. Ein Küchenschrank oder eine Speisekammer eignen sich gut.
4. Regelmäßig spülen: Das ist der wichtigste Schritt! Spült die Sprossen 2-3 Mal täglich mit frischem Wasser durch. Das verhindert Schimmelbildung und hält die Sprossen feucht. Lasst das Wasser nach dem Spülen gut ablaufen.
5. Licht hinzufügen (optional): Nach ein paar Tagen, wenn die Sprossen gekeimt sind, könnt ihr sie für ein paar Stunden am Tag ans Licht stellen. Das fördert die Chlorophyllbildung und macht die Sprossen grüner. Achtet aber darauf, dass sie nicht direkter Sonneneinstrahlung ausgesetzt sind, da sie sonst austrocknen können.
6. Ernten und genießen: Je nach Sorte sind die Sprossen nach 3-7 Tagen erntereif. Sie sollten knackig und frisch aussehen. Spült die Sprossen vor dem Verzehr noch einmal gründlich ab.
7. Lagerung: Die fertigen Sprossen könnt ihr im Kühlschrank in einem luftdichten Behälter für bis zu einer Woche aufbewahren.
Spezielle Tipps für verschiedene Sprossensorten
Jede Sprossensorte hat ihre Eigenheiten. Hier ein paar Tipps, die euch helfen, das Beste aus euren Sprossen herauszuholen:
* Alfalfa: Alfalfa-Sprossen sind sehr beliebt und einfach zu ziehen. Sie brauchen viel Licht, um grün zu werden.
* Radieschen: Radieschen-Sprossen haben einen würzigen Geschmack. Sie keimen relativ schnell.
* Brokkoli: Brokkoli-Sprossen sind reich an Sulforaphan, einem potenten Antioxidans.
* Linsen: Linsen-Sprossen sind eine gute Proteinquelle. Sie brauchen etwas länger zum Keimen.
* Mungbohnen: Mungbohnen-Sprossen sind die Grundlage für Sojasprossen. Sie sind sehr einfach zu ziehen und wachsen schnell.
* Kresse: Kresse-Sprossen sind sehr einfach zu ziehen und können sogar auf einem feuchten Tuch wachsen. Sie haben einen pfeffrigen Geschmack.
Häufige Probleme und Lösungen
Auch beim Sprossen ziehen kann es mal zu Problemen kommen. Hier sind ein paar häufige Probleme und wie ihr sie lösen könnt:
* Schimmelbildung: Schimmelbildung ist das häufigste Problem. Sie entsteht durch mangelnde Hygiene oder unzureichendes Spülen. Achtet darauf, dass ihr die Sprossen regelmäßig spült und dass das Wasser gut ablaufen kann. Wenn ihr Schimmel entdeckt, solltet ihr die betroffenen Sprossen entsorgen.
* Faule Sprossen: Faule Sprossen riechen unangenehm und sind schleimig. Sie entstehen durch zu viel Feuchtigkeit oder zu hohe Temperaturen. Achtet darauf, dass die Sprossen nicht zu feucht sind und dass sie an einem kühlen Ort stehen.
* Keine Keimung: Wenn die Samen nicht keimen, kann das verschiedene Ursachen haben. Möglicherweise sind die Samen zu alt oder sie wurden falsch gelagert. Achtet darauf, dass ihr frische Sprossensamen verwendet und dass ihr sie kühl und trocken lagert. Es kann auch sein, dass die Samen zu wenig Wasser bekommen haben.
Sprossen im Keimgerät ziehen
Neben dem Sprossenglas gibt es auch Keimgeräte. Diese bestehen meist aus mehreren Etagen, in denen die Sprossen gleichzeitig keimen können. Die Vorteile eines Keimgeräts sind:
* Größere Mengen: Ihr könnt größere Mengen Sprossen gleichzeitig ziehen.
* Bessere Belüftung: Die Sprossen werden besser belüftet, was das Risiko von Schimmelbildung reduziert.
* Einfachere Handhabung: Die Handhabung ist oft einfacher als beim Sprossenglas.
Die Vorgehensweise beim Sprossen ziehen im Keimgerät ist ähnlich wie beim Sprossenglas. Ihr weicht die Samen ein, spült sie regelmäßig und stellt das Gerät an einen dunklen, kühlen Ort. Achtet darauf, dass ihr die Anweisungen des Herstellers befolgt.
Sicherheitshinweise
Obwohl Sprossen sehr gesund sind, gibt es ein paar Sicherheitshinweise zu beachten:
* Hygiene: Achtet auf eine gute Hygiene, um Schimmelbildung zu vermeiden.
* Sprossensamen: Verwendet nur spezielle Sprossensamen, die für den Verzehr geeignet sind.
* Allergien: Wenn ihr Allergien habt, solltet ihr vorsichtig sein und nur kleine Mengen Sprossen essen.
* Schwangerschaft: Schwangere Frauen sollten Sprossen nur gekocht essen, um das Risiko von Listerien zu vermeiden.
Meine Lieblingsrezepte mit Sprossen
Ich liebe Sprossen und verwende sie in vielen verschiedenen Gerichten. Hier sind ein paar meiner Lieblingsrezepte:
* Sprossen-Salat: Ein einfacher Salat mit Sprossen, Gurke, Tomate und einem leichten Dressing.
* Sprossen-Sandwich: Ein Sandwich mit Sprossen, Avocado, Käse und Salat.
* Sprossen-Suppe: Eine cremige Suppe mit Sprossen, Gemüse und Kokosmilch.
* Sprossen-Pfannkuchen: Pfannkuchen mit Sprossen, Gemüse und einem Dip.
Ich hoffe, diese Anleitung hat euch geholfen, eure eigenen Sprossen zu ziehen. Es ist wirklich einfach und macht Spaß! Probiert es aus und lasst mich wissen, wie es euch gefällt. Viel Erfolg!
Conclusion
So, there you have it! Growing sprouts at home is not only incredibly easy and cost-effective, but it’s also a fantastic way to inject a burst of fresh, nutrient-packed goodness into your diet. Forget those expensive, pre-packaged sprouts from the grocery store that often lack flavor and freshness. With just a few simple supplies and a little patience, you can cultivate your own vibrant, delicious sprouts right in your kitchen.
This DIY trick is a must-try for several reasons. First and foremost, you have complete control over the quality and cleanliness of your sprouts. You know exactly where they came from and how they were grown, eliminating any concerns about pesticides or contamination. Secondly, the flavor of homegrown sprouts is simply unmatched. They are noticeably fresher and more vibrant than store-bought varieties, adding a delightful crunch and subtle sweetness to your salads, sandwiches, and stir-fries. Finally, growing sprouts at home is an incredibly rewarding experience. Watching those tiny seeds transform into edible greens in just a few days is truly fascinating and a great way to connect with the natural world.
But the fun doesn’t stop there! Feel free to experiment with different types of seeds to discover your favorite sprout varieties. Mung beans, alfalfa, broccoli, radish, and lentils are all excellent choices, each offering a unique flavor profile and nutritional benefits. You can even create your own custom sprout mixes to tailor the taste to your liking. Consider adding a touch of spice by including mustard seeds or a hint of sweetness with clover seeds.
For a variation, try growing your sprouts in a sprouting bag instead of a jar. Sprouting bags are made of breathable fabric that allows for excellent air circulation and drainage, which can help prevent mold growth. Another option is to use a multi-tiered sprouting system, which allows you to grow multiple batches of sprouts simultaneously.
Don’t be intimidated if you’ve never grown sprouts before. It’s a surprisingly simple process, and even if you make a few mistakes along the way, you’ll quickly learn what works best for you. The key is to be patient, consistent, and to provide your sprouts with the right amount of moisture and air circulation.
We are confident that once you try this DIY trick, you’ll be hooked! Imagine the satisfaction of harvesting your own fresh, organic sprouts and adding them to your meals. It’s a simple yet powerful way to improve your health, reduce your grocery bill, and connect with the natural world.
So, what are you waiting for? Gather your supplies, choose your favorite seeds, and get sprouting! We encourage you to try this simple method of growing sprouts at home and share your experiences with us. Let us know what varieties you’ve tried, what challenges you’ve encountered, and what tips you’ve discovered along the way. We can’t wait to hear about your sprouting adventures! Share your photos and stories on social media using [Your Hashtag] and inspire others to join the sprouting revolution! Happy sprouting!
Frequently Asked Questions (FAQ)
What types of seeds are best for sprouting?
The best seeds for sprouting are those specifically labeled for sprouting or microgreens. These seeds have been tested for germination rates and are free from harmful bacteria. Popular choices include alfalfa, broccoli, radish, mung beans, lentils, clover, and mustard seeds. Avoid using seeds that are treated with pesticides or fungicides, as these chemicals can be harmful to your health. Always purchase your seeds from a reputable source to ensure their quality and safety.
How long does it take for sprouts to grow?
The sprouting time varies depending on the type of seed. Generally, most sprouts will be ready to harvest in 3 to 7 days. Mung beans, for example, typically sprout in 3 to 4 days, while alfalfa and broccoli sprouts may take 5 to 7 days. Keep a close eye on your sprouts and harvest them when they have reached your desired size and flavor. Overgrown sprouts can become bitter and less palatable.
How often should I rinse my sprouts?
Rinsing your sprouts is crucial for preventing mold growth and ensuring their freshness. You should rinse your sprouts at least twice a day, preferably in the morning and evening. Use cool, clean water and gently swirl the sprouts around to remove any debris or bacteria. Be sure to drain the water thoroughly after rinsing to prevent the sprouts from becoming waterlogged.
What if my sprouts start to smell bad?
A foul odor is a sign that your sprouts may be contaminated with bacteria or mold. If you notice a bad smell, discard the sprouts immediately. Do not attempt to salvage them, as they could be harmful to your health. To prevent this from happening, ensure that you are rinsing your sprouts regularly and providing them with adequate air circulation. Avoid overcrowding the sprouting jar or bag, as this can also contribute to mold growth.
Can I eat the roots of the sprouts?
Yes, the roots of most sprouts are perfectly safe to eat. In fact, they are often the most nutritious part of the sprout. The roots contain a high concentration of vitamins, minerals, and enzymes. However, if you prefer, you can trim the roots before eating the sprouts.
How do I store my sprouts after harvesting?
After harvesting your sprouts, rinse them thoroughly and drain them well. Pat them dry with a clean paper towel or cloth. Store the sprouts in an airtight container in the refrigerator. They should last for up to a week if stored properly. Be sure to check the sprouts regularly for any signs of spoilage, such as a slimy texture or a foul odor.
What are the nutritional benefits of sprouts?
Sprouts are packed with nutrients, including vitamins, minerals, enzymes, and antioxidants. They are a good source of protein, fiber, and essential fatty acids. Sprouts are also low in calories and carbohydrates, making them a healthy addition to any diet. Eating sprouts can help boost your immune system, improve digestion, and protect against chronic diseases.
Can I grow sprouts in the dark?
While sprouts don’t require light to germinate, exposing them to indirect sunlight for the last day or two of their growth cycle can enhance their flavor and color. The sunlight helps the sprouts develop chlorophyll, which gives them a vibrant green hue and a slightly sweeter taste. However, avoid exposing the sprouts to direct sunlight, as this can cause them to dry out and become bitter.
What if I see mold growing on my sprouts?
Distinguishing between mold and root hairs can be tricky. Root hairs are fine, white, and fuzzy, and they grow directly from the seed. Mold, on the other hand, is often discolored (e.g., gray, black, or green) and has a musty or unpleasant odor. If you are unsure whether what you see is mold or root hairs, it’s best to err on the side of caution and discard the sprouts.
Are there any sprouts I should avoid growing at home?
Yes, there are a few types of sprouts that are not recommended for home sprouting due to the risk of foodborne illness. These include kidney bean sprouts and lima bean sprouts, which contain toxins that can be harmful if not properly cooked. Always research the safety of a particular type of seed before attempting to sprout it at home. When in doubt, consult with a trusted source or purchase pre-sprouted seeds from a reputable supplier.
Leave a Comment