

Growing Purple Basil can transform your garden from ordinary to extraordinary! Imagine vibrant, deep purple foliage adding a touch of drama and delicious flavor to your culinary creations. Have you ever wanted to impress your friends with a unique pesto or garnish a summer salad with something truly special? This is your chance!
Basil, in general, has a rich history, dating back thousands of years. Originating in Southeast Asia, it was revered in ancient cultures for its medicinal and spiritual properties. Purple basil, a more modern cultivar, carries on this legacy with its own unique twist. It’s not just about aesthetics; it’s about connecting with a plant that has nourished and inspired people for generations.
But why should *you* specifically learn these DIY tricks for growing purple basil? Well, let’s face it, store-bought herbs can be expensive and often lack the freshness and flavor of homegrown varieties. Plus, there’s something incredibly satisfying about nurturing a plant from seed to harvest. I’m going to share some simple, yet effective, DIY hacks that will help you cultivate thriving purple basil, even if you don’t have a green thumb. These tips will save you money, reduce waste, and allow you to enjoy the freshest, most flavorful basil imaginable. Get ready to unlock the secrets to a bountiful purple basil harvest!
Growing Vibrant Purple Basil: A DIY Guide for the Home Gardener
Hey there, fellow plant enthusiasts! I’m so excited to share my secrets to growing gorgeous, intensely purple basil right in your own backyard (or even on your windowsill!). Purple basil isn’t just a pretty face; it adds a unique flavor and visual appeal to your dishes. Trust me, once you’ve tasted pesto made with fresh purple basil, you’ll never go back!
This guide will walk you through everything you need to know, from choosing the right variety to harvesting your bountiful crop. Let’s get started!
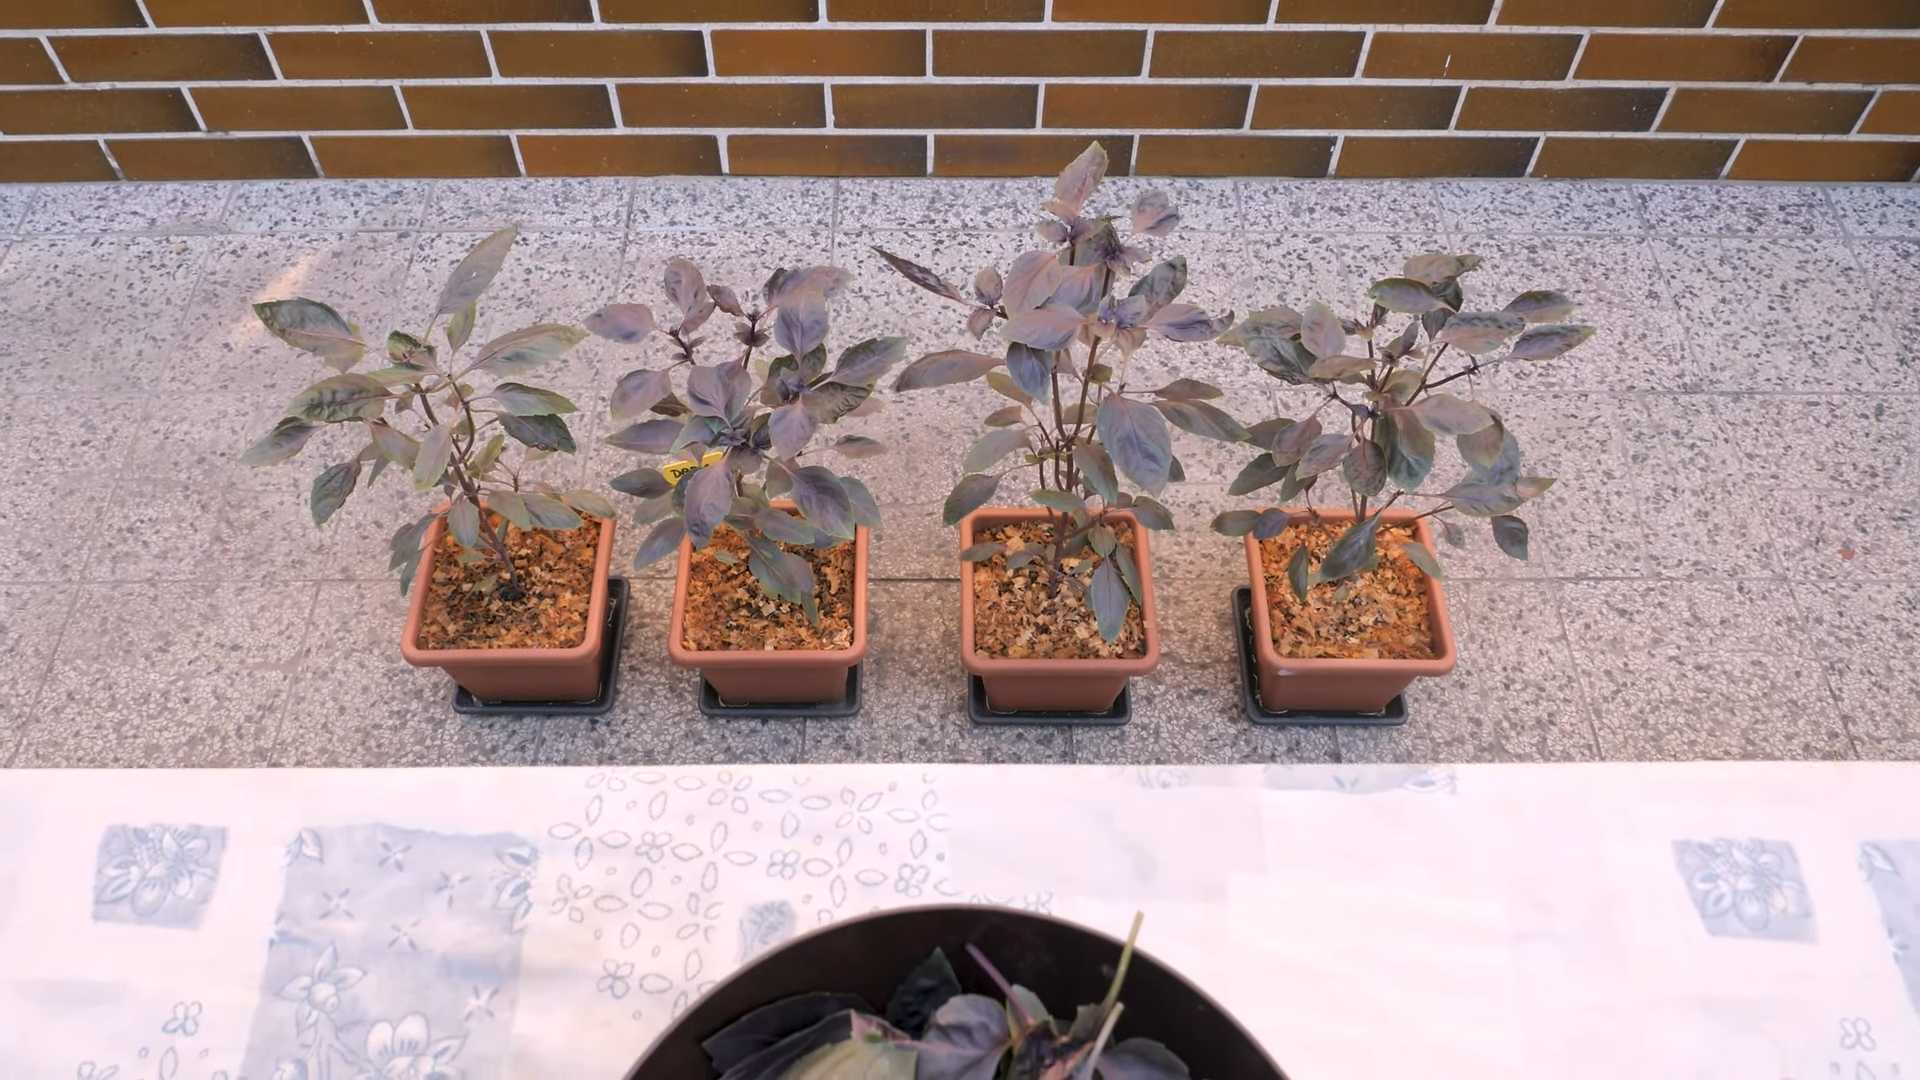
Choosing Your Purple Basil Variety
Not all purple basil is created equal! There are several varieties, each with slightly different characteristics. Here are a few of my favorites:
* ‘Dark Opal’: This is probably the most well-known purple basil. It has a deep, almost black-purple color and a strong, slightly spicy flavor. It’s a reliable grower and a great choice for beginners.
* ‘Purple Ruffles’: As the name suggests, this variety has beautifully ruffled leaves with a vibrant purple hue. It’s a bit more ornamental than ‘Dark Opal’ but still offers a delicious flavor.
* ‘Red Rubin’: This variety boasts a slightly sweeter flavor than ‘Dark Opal’ and a reddish-purple color. It’s also known for being a bit more heat-tolerant.
* ‘Amethyst Improved’: This is a newer variety that’s known for its improved disease resistance and vibrant purple color. It’s a great option if you’ve had trouble with basil diseases in the past.
When choosing your variety, consider your climate, your taste preferences, and how you plan to use your basil. I personally love ‘Dark Opal’ for its intense color and flavor, but ‘Purple Ruffles’ is a close second for its beauty.
Getting Started: Seeds vs. Seedlings
You have two main options for starting your purple basil: from seeds or from seedlings (also known as transplants).
* Starting from Seeds: This is the more economical option, and it gives you more control over the entire growing process. However, it requires a bit more patience and attention.
* Starting from Seedlings: This is the quicker and easier option, especially if you’re a beginner. You can find seedlings at most garden centers in the spring.
I’ve done both, and honestly, I enjoy the process of starting from seeds. There’s something so rewarding about watching those tiny seeds sprout and grow into beautiful plants!
Starting Purple Basil from Seeds: A Step-by-Step Guide
If you’re going the seed route, here’s how to do it:
1. Gather Your Supplies: You’ll need:
* Purple basil seeds
* Seed starting trays or small pots
* Seed starting mix (a light, well-draining soil)
* A spray bottle filled with water
* A warm, sunny location or a grow light
* Optional: A heat mat
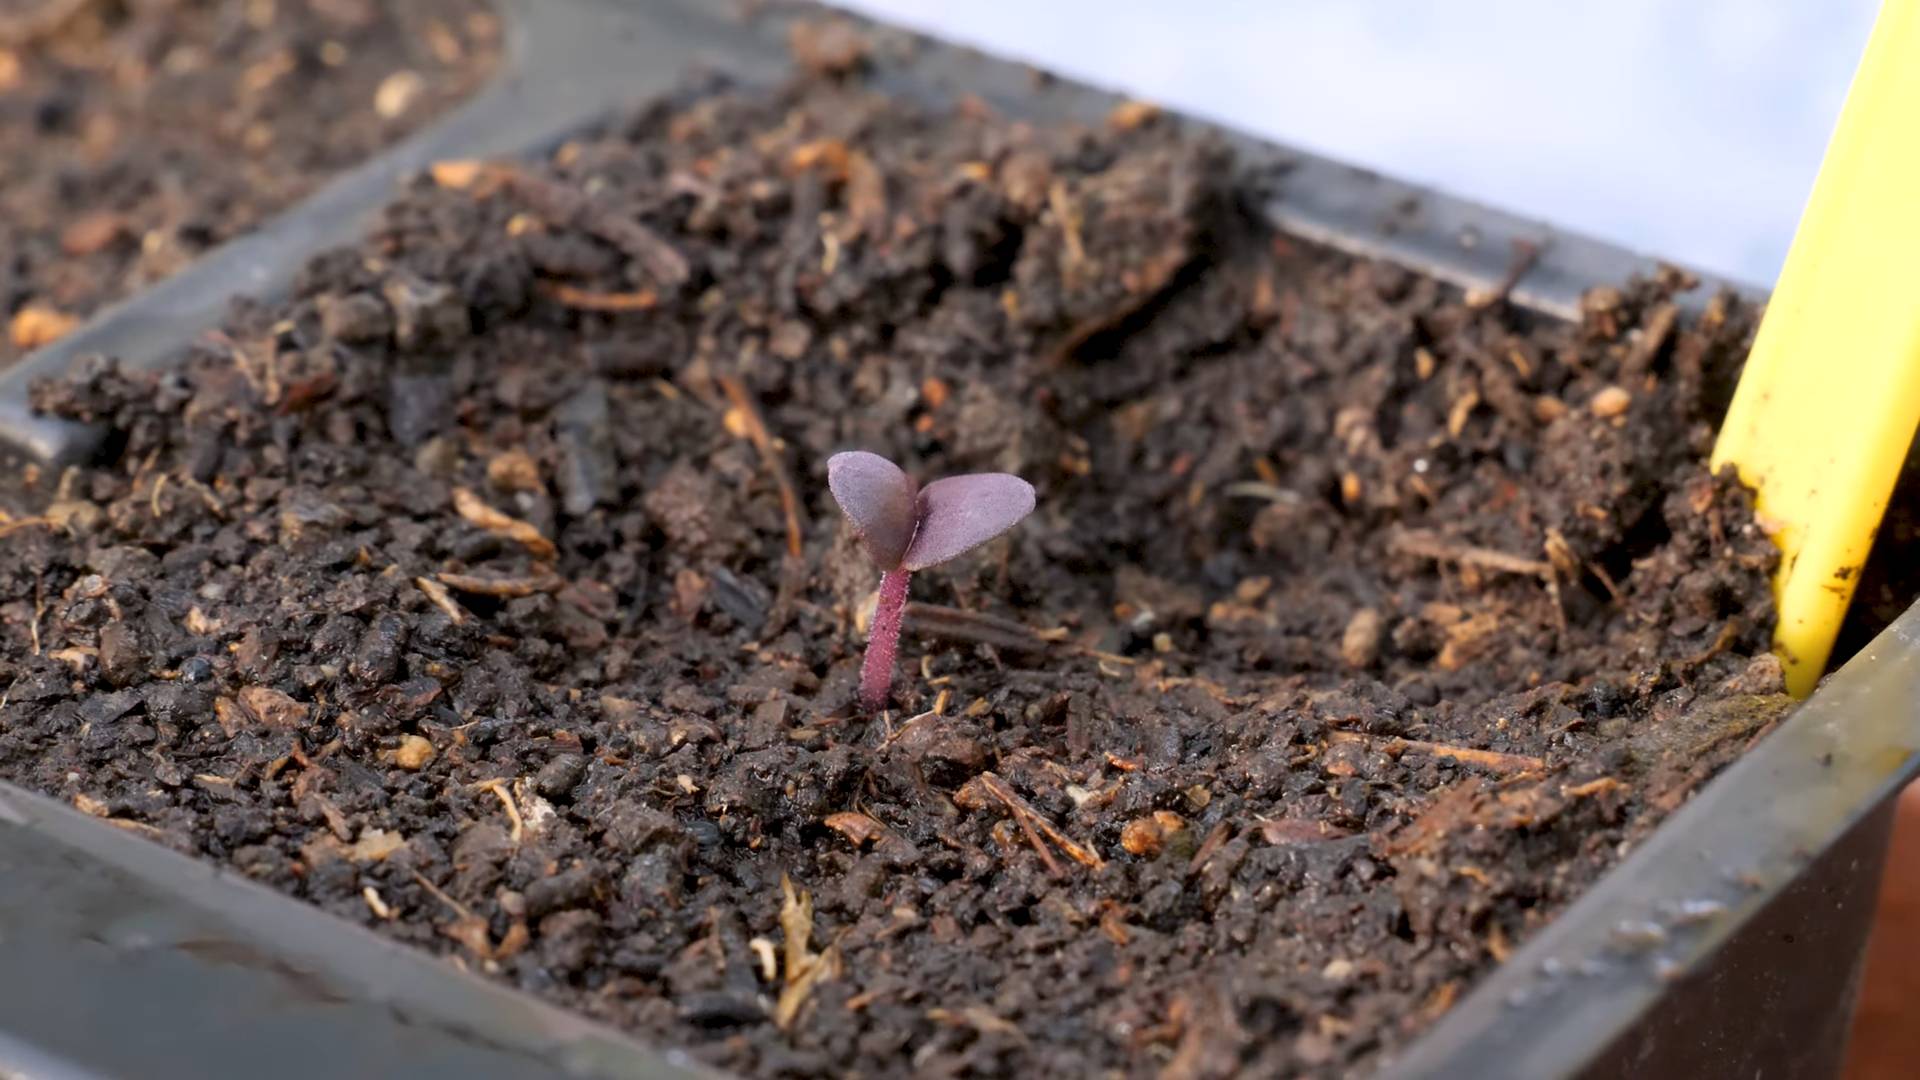
2. Sow the Seeds: Fill your seed starting trays or pots with seed starting mix. Moisten the soil with your spray bottle. Sprinkle a few seeds on top of the soil in each cell or pot. Gently press the seeds into the soil, but don’t bury them too deep. Basil seeds need light to germinate.
3. Provide Warmth and Light: Cover the trays or pots with a clear plastic lid or plastic wrap to create a humid environment. Place them in a warm, sunny location or under a grow light. A heat mat can also help speed up germination. The ideal temperature for germination is around 70-80°F (21-27°C).
4. Keep the Soil Moist: Check the soil daily and mist it with water as needed to keep it consistently moist but not soggy.
5. Wait for Germination: Basil seeds typically germinate in 5-10 days. Once the seedlings emerge, remove the plastic lid or wrap to allow for better air circulation.
6. Thin the Seedlings: Once the seedlings have their first true leaves (the second set of leaves that appear after the initial seed leaves), thin them out so that only one strong seedling remains in each cell or pot. Use small scissors to snip off the weaker seedlings at the soil line.
7. Harden Off the Seedlings: Before transplanting your seedlings outdoors, you’ll need to “harden them off.” This means gradually exposing them to outdoor conditions over a period of 7-10 days. Start by placing them outdoors in a sheltered location for an hour or two each day, gradually increasing the amount of time they spend outdoors. This will help them acclimate to the sun, wind, and temperature changes.
Transplanting Purple Basil Seedlings
Whether you started from seeds or purchased seedlings, here’s how to transplant them into your garden:
1. Choose a Sunny Location: Purple basil thrives in full sun, meaning at least 6-8 hours of direct sunlight per day. Choose a location in your garden that receives plenty of sunlight.
2. Prepare the Soil: Basil prefers well-draining soil that is rich in organic matter. Amend your soil with compost or other organic matter to improve its fertility and drainage.
3. Dig the Holes: Dig holes that are slightly larger than the root balls of your seedlings. Space the holes about 12-18 inches apart.
4. Gently Remove the Seedlings: Carefully remove the seedlings from their pots or trays. Gently loosen the roots if they are tightly bound.
5. Plant the Seedlings: Place the seedlings in the holes and backfill with soil. Gently firm the soil around the base of the plants.
6. Water Thoroughly: Water the newly transplanted seedlings thoroughly to help them settle in.
7. Mulch (Optional): Apply a layer of mulch around the base of the plants to help retain moisture, suppress weeds, and regulate soil temperature.
Caring for Your Purple Basil Plants
Once your purple basil plants are in the ground, here’s how to keep them happy and healthy:
* Watering: Water your basil plants regularly, especially during hot, dry weather. Aim to keep the soil consistently moist but not waterlogged. Water at the base of the plants to avoid wetting the leaves, which can lead to fungal diseases.
* Fertilizing: Basil is a relatively heavy feeder, so it benefits from regular fertilization. Use a balanced organic fertilizer every few weeks to promote healthy growth.
* Pinching and Pruning: Pinching and pruning are essential for encouraging bushy growth and preventing your basil plants from flowering too early. When the plants are about 6 inches tall, pinch off the top set of leaves. This will encourage the plants to branch out and produce more leaves. Continue to pinch off the top sets of leaves throughout the growing season. Also, remove any flower buds as soon as you see them. Flowering will cause the plant to stop producing leaves and become bitter.
* Weeding: Keep your garden bed free of weeds, which can compete with your basil plants for nutrients and water.
* Pest and Disease Control: Basil is generally resistant to pests and diseases, but it can be susceptible to aphids, spider mites, and fungal diseases like downy mildew. Inspect your plants regularly for signs of pests or diseases. If you find any, treat them promptly with an appropriate organic insecticide or fungicide. Good air circulation and proper watering practices can help prevent fungal diseases.
Harvesting Your Purple Basil
The best part! You can start harvesting your purple basil leaves as soon as the plants are large enough.
* Harvesting Technique: Use scissors or pruning shears to cut off the top sets of leaves. Avoid cutting off more than one-third of the plant at a time. This will allow the plant to continue growing and producing leaves.
* Harvesting Time: Harvest your basil in the morning, after the dew has dried but before the sun gets too hot. This is when the leaves will have the most flavor.
* Storing Your Harvest: Freshly harvested basil leaves can be stored in the refrigerator for a few days. Wrap them in a damp paper towel and place them in a plastic bag. You can also freeze basil leaves for longer storage. Blanch them in boiling water for a few seconds, then plunge them into ice water. Drain them well and freeze them in freezer bags or ice cube trays.
Using Your Purple Basil
Now for the fun part: using your homegrown purple basil! Here are a few ideas:
* Pesto: Purple basil pesto is a delicious and visually stunning twist on traditional pesto.
* Salads: Add fresh purple basil leaves to salads for a burst of flavor and color.
* Soups and Stews: Use purple basil to flavor soups and stews.
* Grilled Meats and Vegetables: Sprinkle chopped purple basil over grilled meats and vegetables.
* Infused Oils and Vinegars: Infuse olive oil or vinegar with purple basil for a flavorful condiment.
* Garnish: Use purple basil leaves as a
Conclusion
So, there you have it! Growing purple basil isn’t just about adding a vibrant splash of color to your garden or windowsill; it’s about unlocking a world of culinary possibilities and enjoying the satisfaction of nurturing something beautiful and useful. We’ve explored the simple yet effective DIY trick of starting purple basil from cuttings, a method that bypasses the sometimes-finicky nature of seeds and allows you to propagate your favorite variety with ease.
Why is this DIY trick a must-try? Because it’s accessible, affordable, and incredibly rewarding. You don’t need a greenhouse or specialized equipment – just a healthy mother plant, some water, and a little patience. Plus, propagating from cuttings ensures you’re getting an exact clone of the parent plant, preserving those desirable characteristics like deep purple color and intense flavor.
But the fun doesn’t stop there! Feel free to experiment with different rooting mediums. While water works wonderfully, you can also try rooting hormone powder for potentially faster results or even directly planting the cuttings in a well-draining potting mix. Consider varying the size of your cuttings as well. Smaller cuttings might root faster, while larger ones will give you a head start on growth.
Once your purple basil plants are thriving, the real adventure begins. Use the leaves fresh in salads, pesto, or as a stunning garnish. Infuse them in oils and vinegars for a unique flavor profile. Dry them for later use in soups, stews, and spice blends. Or, get creative and incorporate them into desserts like purple basil ice cream or sorbet! The possibilities are truly endless.
Don’t be intimidated if you’ve never propagated plants before. This DIY trick is beginner-friendly, and even if you encounter a few hiccups along the way, you’ll learn valuable lessons about plant care and propagation. The key is to be observant, patient, and willing to adapt your approach as needed.
We wholeheartedly encourage you to give this DIY trick a try. It’s a fantastic way to expand your herb garden, save money on buying new plants, and connect with nature in a meaningful way. And most importantly, it’s a chance to experience the joy of growing your own food and adding a touch of purple magic to your kitchen.
So, grab your clippers, find a healthy purple basil plant, and get started! We’re confident that you’ll be amazed at how easy and rewarding it is to propagate your own purple basil. And once you’ve mastered this technique, be sure to share your experiences with us! We’d love to hear your tips, tricks, and success stories. Post photos of your thriving purple basil plants on social media and tag us – we can’t wait to see what you create! Let’s spread the purple basil love and inspire others to embrace the joy of DIY gardening.
Frequently Asked Questions (FAQ)
What is the best time of year to take purple basil cuttings?
The best time to take purple basil cuttings is during the spring or summer months when the plant is actively growing. This is when the plant has the most energy and is more likely to root successfully. However, you can take cuttings at other times of the year if your plant is healthy and receiving adequate light. If you are growing your purple basil indoors with grow lights, you can propagate year-round.
How long does it take for purple basil cuttings to root?
Typically, purple basil cuttings will start to root within 1-2 weeks. You’ll notice small white roots emerging from the cut end of the stem. However, it can sometimes take longer, depending on factors like temperature, humidity, and the health of the cutting. Be patient and continue to provide fresh water and indirect light. Once the roots are about an inch long, you can transplant the cutting into soil.
What kind of water should I use for rooting purple basil cuttings?
Tap water is generally fine for rooting purple basil cuttings, but it’s best to let it sit out for 24 hours to allow any chlorine to dissipate. Alternatively, you can use filtered water or rainwater. Avoid using distilled water, as it lacks the minerals that plants need to thrive.
How much light do purple basil cuttings need while rooting?
Purple basil cuttings need bright, indirect light while they are rooting. Avoid placing them in direct sunlight, as this can scorch the leaves and prevent rooting. A north-facing window or a spot a few feet away from an east- or west-facing window is ideal. You can also use a grow light if you don’t have access to adequate natural light.
What if my purple basil cuttings start to turn yellow or brown?
If your purple basil cuttings start to turn yellow or brown, it could be a sign of several issues. Overwatering or poor drainage can lead to root rot, which can cause the leaves to yellow. Make sure the water is changed every 1-2 days. Insufficient light can also cause yellowing, so ensure the cuttings are receiving adequate indirect light. If the leaves are turning brown and crispy, it could be a sign of underwatering or low humidity. Try misting the cuttings regularly to increase humidity.
Can I use rooting hormone to propagate purple basil cuttings?
Yes, you can use rooting hormone to propagate purple basil cuttings. Rooting hormone contains auxins, which are plant hormones that promote root development. To use rooting hormone, dip the cut end of the stem in the powder or liquid before placing it in water or soil. While rooting hormone can speed up the rooting process, it’s not essential. Purple basil cuttings often root readily without it.
What type of soil is best for planting rooted purple basil cuttings?
A well-draining potting mix is best for planting rooted purple basil cuttings. You can use a commercial potting mix or make your own by combining equal parts of peat moss, perlite, and vermiculite. Avoid using garden soil, as it can be too heavy and may contain pests or diseases.
How often should I water my purple basil plant after transplanting?
After transplanting your rooted purple basil cutting, water it thoroughly until water drains out of the bottom of the pot. Then, allow the soil to dry out slightly between waterings. Overwatering can lead to root rot, so it’s important to avoid keeping the soil constantly wet. Check the soil moisture by sticking your finger into the soil – if the top inch feels dry, it’s time to water.
How can I encourage my purple basil plant to grow bushier?
To encourage your purple basil plant to grow bushier, pinch off the top set of leaves when the plant is about 6 inches tall. This will encourage the plant to produce side shoots, resulting in a fuller, more compact plant. You can continue to pinch off the tips of the stems as needed to maintain the desired shape and size.
My purple basil plant is flowering. Should I remove the flowers?
Yes, you should remove the flowers from your purple basil plant. When basil plants flower, they stop producing as many leaves and the flavor of the leaves can become bitter. Pinch off the flower buds as soon as you see them to encourage the plant to continue producing flavorful leaves. You can also use the flowers in salads or as a garnish.
Leave a Comment