

Growing Kale in Soil Bags: Unlock the secrets to a bountiful harvest, even without a traditional garden! Have you ever dreamed of fresh, vibrant kale gracing your dinner table, but felt limited by space or soil conditions? I know I have! Well, get ready to turn that dream into reality with this incredibly easy and rewarding DIY project.
For centuries, resourceful gardeners have sought innovative ways to cultivate their own food. From ancient rooftop gardens in bustling cities to modern-day container gardening, the desire to connect with nature and enjoy homegrown goodness has always been strong. This method of growing kale in soil bags is a modern twist on that age-old ingenuity, offering a practical and accessible solution for everyone.
Why is this DIY trick so essential? Because it empowers you to grow your own nutritious kale virtually anywhere! Whether you have a tiny balcony, a sunny patio, or even just a well-lit corner, growing kale in soil bags eliminates the need for extensive garden beds and complex soil preparation. Plus, it’s a fantastic way to recycle those large soil bags you might otherwise discard. Imagine the satisfaction of harvesting your own organic kale, knowing you’ve not only nourished yourself but also contributed to a more sustainable lifestyle. Let’s dive in and discover how simple and fun it can be!
Growing Kale in Soil Bags: A Beginner’s Guide
Hey there, fellow gardening enthusiasts! I’m super excited to share one of my favorite gardening hacks with you: growing kale in soil bags! It’s a fantastic way to maximize space, minimize weeding, and enjoy fresh, homegrown kale even if you don’t have a traditional garden bed. Trust me, it’s easier than you think, and the results are incredibly rewarding. Let’s dive in!
Why Grow Kale in Soil Bags?
Before we get started, let’s talk about why this method is so awesome.
* Space-Saving: Perfect for small patios, balconies, or even just a sunny corner.
* Easy Weeding: Less soil exposed means fewer weeds to battle. Hallelujah!
* Good Drainage: Soil bags naturally provide excellent drainage, preventing root rot.
* Portability: You can move your kale around to chase the sun or protect it from harsh weather.
* Cost-Effective: Soil bags are generally cheaper than raised beds or large containers.
* Beginner-Friendly: It’s a simple and forgiving method, ideal for newbie gardeners.
Materials You’ll Need
Alright, let’s gather our supplies. Here’s what you’ll need to get started:
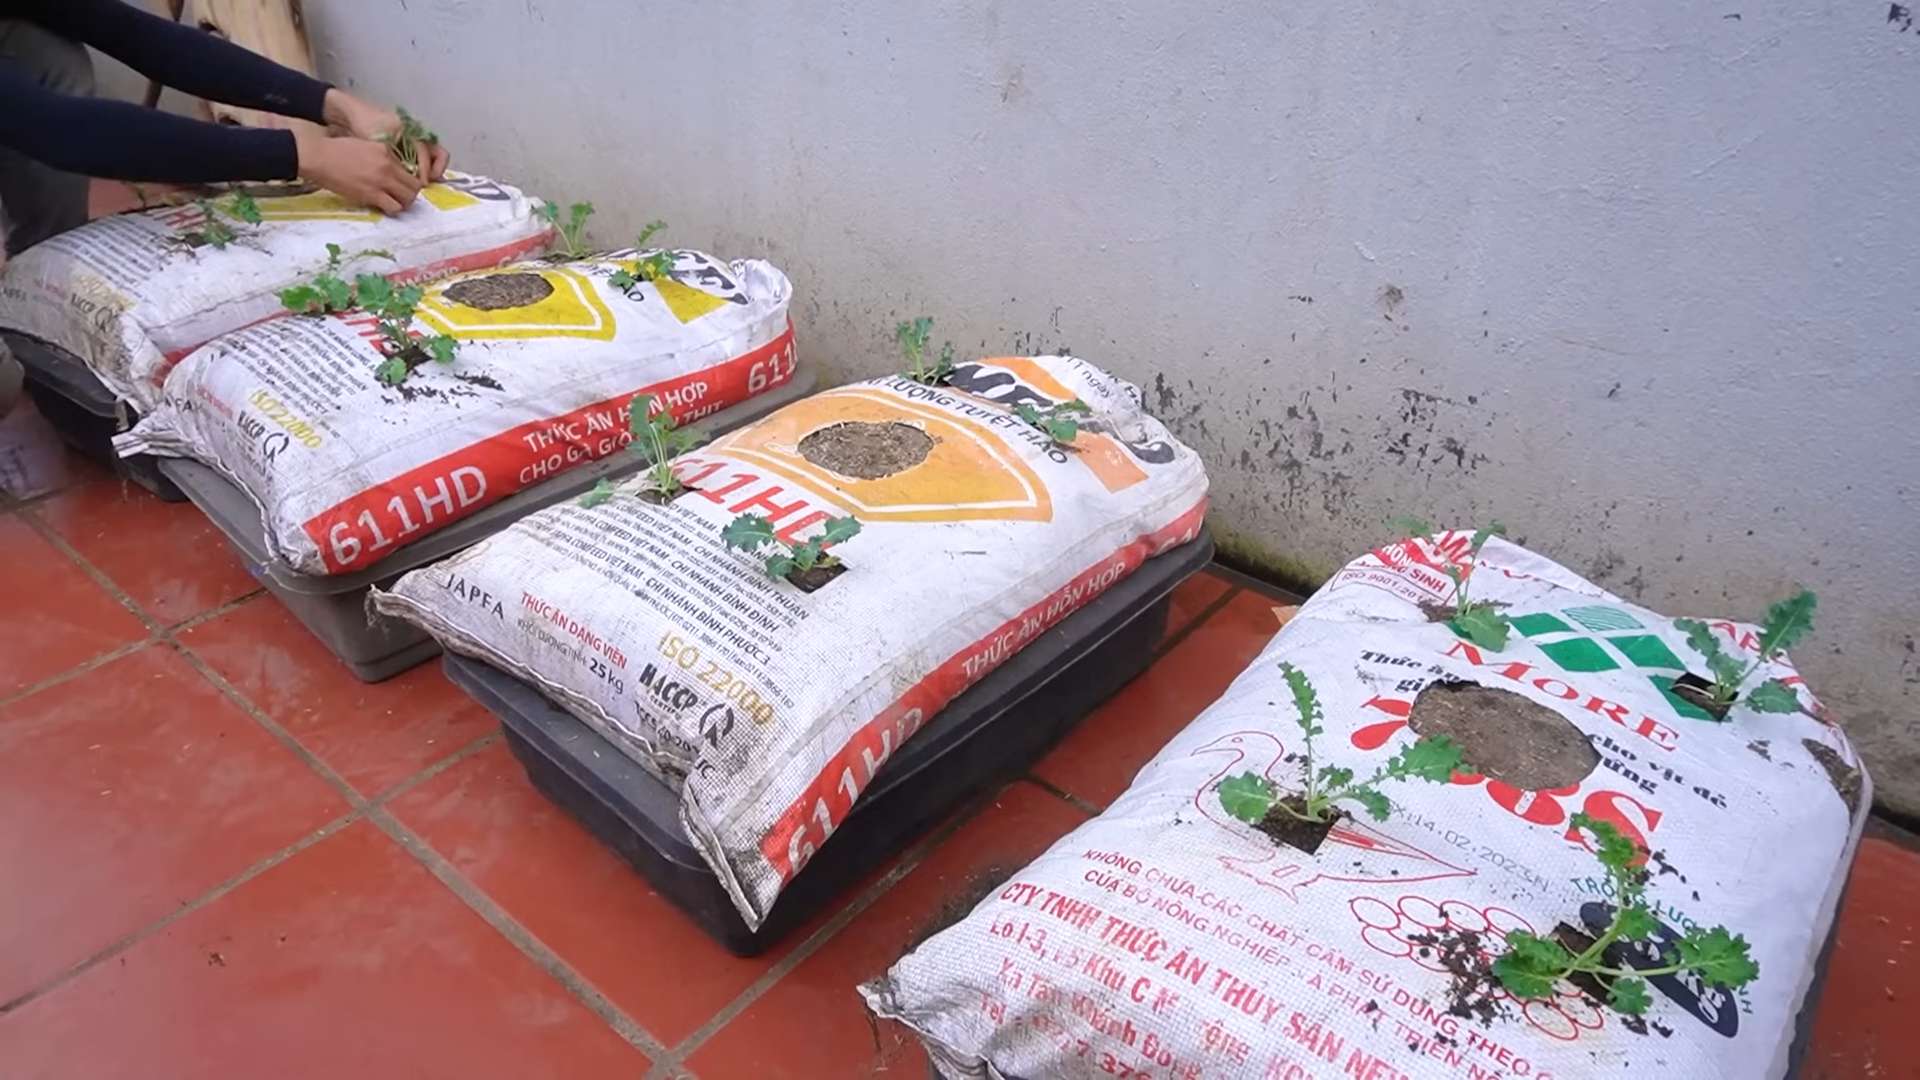
* Soil Bags: Choose heavy-duty polypropylene bags designed for gardening. You can find these at most garden centers or online. I usually go for the 2-cubic-foot size, but you can adjust based on your space and desired kale yield.
* Potting Mix: Don’t skimp on the potting mix! Use a high-quality, well-draining mix specifically formulated for vegetables. Avoid using garden soil directly, as it can compact and hinder drainage.
* Kale Seeds or Seedlings: You can start from seeds or buy seedlings from a local nursery. Seedlings will give you a head start, but seeds are more economical. I personally love starting from seed, it’s so rewarding to watch them sprout!
* Fertilizer: A slow-release granular fertilizer or a liquid fertilizer formulated for leafy greens will keep your kale happy and healthy.
* Watering Can or Hose: For, well, watering!
* Utility Knife or Scissors: To make drainage holes and planting slits in the bag.
* Gloves (Optional): To keep your hands clean.
* Trowel (Optional): For transplanting seedlings.
Step-by-Step Instructions: Planting Your Kale
Okay, let’s get our hands dirty! Here’s how to plant your kale in soil bags:
1. Prepare the Soil Bag:
* Lay the soil bag flat on a level surface in a sunny location. Kale needs at least 6 hours of sunlight per day.
* Using your utility knife or scissors, carefully cut several drainage holes in the bottom of the bag. I usually make about 6-8 holes, spaced evenly. This is crucial to prevent waterlogging.
* Now, cut open the top of the bag. Be careful not to cut too deep and damage the soil inside.
2. Amend the Soil (If Necessary):
* While most potting mixes are ready to go, you can add some amendments to boost the nutrient content. I like to mix in a handful of slow-release fertilizer per bag. You can also add compost or worm castings for extra goodness.
* Gently mix the fertilizer or amendments into the top layer of the potting mix.
3. Planting from Seeds:
* If you’re starting from seeds, sow them directly into the soil bag.
* Make small indentations in the soil, about 1/2 inch deep, spaced about 6-8 inches apart.
* Place 2-3 seeds in each indentation. This ensures that at least one seed will germinate.
* Cover the seeds lightly with soil and gently water the bag.
* Keep the soil consistently moist but not soggy. Germination usually takes about 5-10 days.
* Once the seedlings emerge, thin them out to one plant per indentation, selecting the strongest and healthiest seedling.
4. Planting Seedlings:
* If you’re using seedlings, gently remove them from their containers.
* Dig small holes in the soil bag, spaced about 6-8 inches apart, large enough to accommodate the root balls of the seedlings.
* Place the seedlings in the holes and gently backfill with soil.
* Water the seedlings thoroughly after planting.
5. Create Planting Slits (Optional):
* For a fuller harvest, you can create additional planting slits along the sides of the soil bag.
* Using your utility knife, carefully cut horizontal slits in the bag, about 4-6 inches long and spaced about 8-10 inches apart.
* Plant kale seedlings or sow seeds in these slits, following the same instructions as above.
* This will allow you to grow kale all around the bag, maximizing your yield.
6. Watering and Fertilizing:
* Water your kale regularly, especially during hot and dry weather. The soil should be consistently moist but not waterlogged. Check the soil moisture by sticking your finger into the soil. If it feels dry an inch or two down, it’s time to water.
* Fertilize your kale every 2-3 weeks with a liquid fertilizer formulated for leafy greens. Follow the instructions on the fertilizer label.
* Alternatively, you can side-dress your kale with compost or worm castings every few weeks.
7. Sunlight:
* Ensure your kale receives at least 6 hours of direct sunlight per day. If you live in a particularly hot climate, some afternoon shade can be beneficial to prevent the leaves from scorching.
8. Pest Control:
* Keep an eye out for common kale pests, such as aphids, cabbage worms, and flea beetles.
* You can control these pests with organic methods, such as hand-picking, insecticidal soap, or neem oil.
* Regularly inspect your plants for signs of pests and take action promptly to prevent infestations from getting out of control.
Harvesting Your Kale
Now for the best part – harvesting!
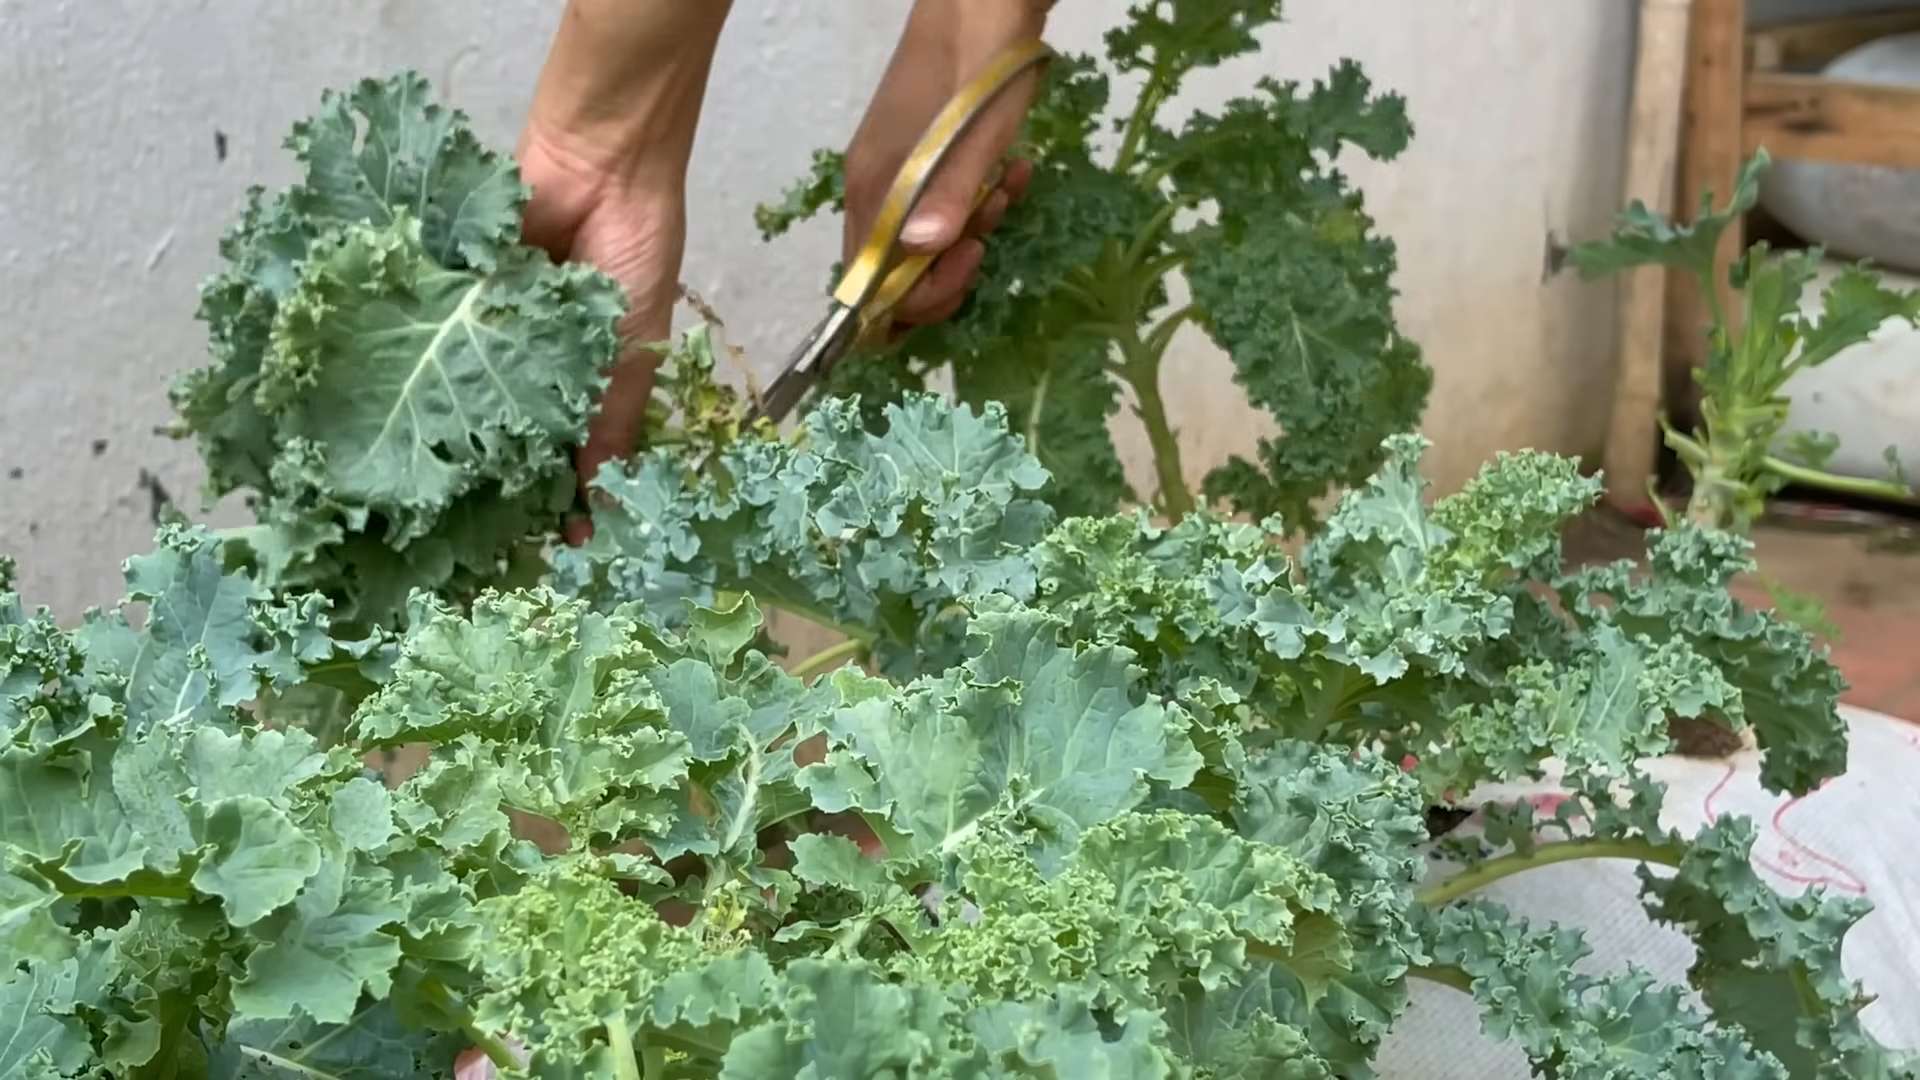
* You can start harvesting kale leaves when they are about 4-6 inches long.
* Harvest the outer leaves first, leaving the inner leaves to continue growing.
* Simply snip off the leaves with scissors or a knife.
* Avoid harvesting more than one-third of the plant at a time, as this can stress the plant and reduce its yield.
* Kale is most flavorful after a light frost, so don’t be afraid to leave it in the garden during the cooler months.
Troubleshooting
Even with the best planning, sometimes things don’t go exactly as expected. Here are a few common issues you might encounter and how to deal with them:
* Yellowing Leaves: This can be a sign of overwatering, underwatering, or nutrient deficiency. Check the soil moisture and adjust your watering accordingly. Fertilize your kale with a balanced fertilizer to provide essential nutrients.
* Pest Infestations: As mentioned earlier, keep an eye out for pests and take action promptly. Organic pest control methods are usually effective for minor infestations.
* Slow Growth: This can be due to insufficient sunlight, poor soil, or lack of nutrients. Ensure your kale is getting enough sunlight and fertilize it regularly.
* Bolting (Premature Flowering): Kale can bolt in hot weather, which can make the leaves bitter. To prevent bolting, provide some afternoon shade and water your kale regularly.
Choosing the Right Kale Variety
There are tons of different kale varieties to choose from, each with its own unique flavor and texture. Here are a few of my favorites:
* Lacinato (Dinosaur) Kale: This variety has dark green, bumpy leaves and a slightly nutty flavor. It’s great for salads, soups, and stir-fries.
* Curly Kale: This is the most common type of kale, with tightly curled leaves and a slightly bitter flavor. It’s perfect for kale chips and smoothies.
* Red Russian Kale: This variety has flat, fringed leaves with a reddish-purple hue. It has a milder flavor than other types of kale and is great for salads and sautéing.
* Redbor Kale: This variety has deeply ruffled, purple leaves and a slightly sweet flavor. It’s a beautiful and delicious addition to any garden.
Tips for Success
Here are a few extra tips to help you succeed with growing kale in soil bags:
* Choose the Right Location: Make sure your soil bags are in a location that receives at least 6 hours of sunlight per day.
* Use High-Quality Potting Mix: Don’t skimp on the potting mix! Use a well-draining mix specifically formulated for vegetables
Conclusion
So, there you have it! Growing kale in soil bags is not just a gardening hack; it’s a game-changer for anyone looking to enjoy fresh, homegrown greens, regardless of space or experience. We’ve walked you through the simple steps, highlighting the benefits of this method – from its portability and convenience to its cost-effectiveness and superior drainage.
Why is this a must-try? Because it democratizes gardening. No longer do you need acres of land or a perfectly prepared garden bed to cultivate your own delicious and nutritious kale. Soil bags offer a contained, manageable environment that’s perfect for beginners and seasoned gardeners alike. They minimize weeding, simplify watering, and allow you to move your kale plants to the sunniest spot in your yard, maximizing their growth potential.
But the beauty of this method lies in its adaptability. Feel free to experiment with different kale varieties! Try growing curly kale, dinosaur kale (lacinato), or even red Russian kale for a vibrant splash of color in your garden. You can also companion plant with herbs like rosemary or thyme around the base of your kale plants to deter pests and enhance the flavor of your harvest. Consider adding a layer of mulch, such as straw or wood chips, to the top of the soil bag to help retain moisture and suppress weeds even further.
For those in hotter climates, consider using lighter-colored soil bags to reflect sunlight and prevent the soil from overheating. You might also want to provide some afternoon shade during the hottest months to protect your kale from scorching. In cooler climates, dark-colored bags can help absorb heat and extend the growing season.
Don’t be afraid to get creative with your soil bag setup! You can arrange them in rows, stack them to create a vertical garden, or even hang them from a sturdy fence or railing. The possibilities are endless!
Growing kale in soil bags is an incredibly rewarding experience. There’s nothing quite like the satisfaction of harvesting your own fresh, organic kale and knowing that you grew it yourself. It’s a simple, sustainable way to add more greens to your diet and connect with nature.
We wholeheartedly encourage you to give this DIY trick a try. It’s easy, affordable, and incredibly effective. And most importantly, it’s fun! Once you experience the joy of harvesting your own homegrown kale, you’ll be hooked.
We’re eager to hear about your experiences! Share your photos, tips, and tricks in the comments below. Let us know what kale varieties you’re growing, what challenges you’ve faced, and what successes you’ve celebrated. Together, we can create a community of soil bag kale growers and inspire others to embrace this simple and sustainable gardening method. Happy gardening!
Frequently Asked Questions (FAQ)
What type of soil should I use for growing kale in soil bags?
The best type of soil for growing kale in soil bags is a well-draining, nutrient-rich potting mix. Avoid using garden soil, as it can be too heavy and compact, hindering drainage and root growth. Look for a potting mix that contains a blend of peat moss, perlite, and vermiculite. These ingredients help to retain moisture while also providing good aeration. You can also amend your potting mix with compost or aged manure to boost its nutrient content. Kale is a heavy feeder, so providing it with plenty of nutrients is essential for healthy growth. A slightly acidic to neutral pH (around 6.0 to 7.0) is ideal for kale.
How often should I water my kale plants in soil bags?
Watering frequency depends on several factors, including the weather, the size of your soil bag, and the stage of growth of your kale plants. Generally, you should water your kale plants whenever the top inch of soil feels dry to the touch. During hot, dry weather, you may need to water them daily, while during cooler, wetter weather, you may only need to water them every few days. Be sure to water thoroughly, allowing the water to drain out of the bottom of the bag. Avoid overwatering, as this can lead to root rot. A good rule of thumb is to check the soil moisture regularly and water accordingly. You can use a moisture meter or simply stick your finger into the soil to gauge its moisture level.
How much sunlight does kale need when grown in soil bags?
Kale thrives in full sun, which means it needs at least 6 hours of direct sunlight per day. However, it can also tolerate partial shade, especially in hotter climates. If you live in an area with intense summer heat, providing some afternoon shade can help prevent your kale plants from scorching. When growing kale in soil bags, you have the advantage of being able to move your plants to the sunniest spot in your yard. Observe your plants throughout the day to see how much sunlight they are receiving and adjust their location accordingly. If your kale plants are not getting enough sunlight, they may become leggy and produce fewer leaves.
What are some common pests and diseases that affect kale, and how can I prevent them?
Kale is susceptible to several common pests and diseases, including aphids, cabbage worms, flea beetles, and fungal diseases like powdery mildew. To prevent these problems, start by choosing disease-resistant kale varieties. Inspect your plants regularly for signs of pests or diseases and take action promptly. You can control aphids and cabbage worms by handpicking them off the plants or by spraying them with insecticidal soap or neem oil. Flea beetles can be deterred by covering your kale plants with row covers. To prevent fungal diseases, ensure good air circulation around your plants and avoid overwatering. You can also apply a fungicide if necessary. Companion planting with herbs like rosemary, thyme, and sage can also help to deter pests.
Can I grow kale in soil bags during the winter?
Yes, you can grow kale in soil bags during the winter, especially in mild climates. Kale is a cold-hardy vegetable that can tolerate temperatures as low as 20°F (-7°C). In colder climates, you may need to provide some protection for your kale plants, such as covering them with a cold frame or a layer of mulch. You can also move your soil bags to a sheltered location, such as a garage or shed, during periods of extreme cold. Winter-grown kale tends to be sweeter and more flavorful than kale grown during the summer.
How do I harvest kale from soil bags?
Harvesting kale from soil bags is easy. Simply cut off the outer leaves of the plant, leaving the inner leaves to continue growing. You can harvest kale leaves as soon as they are large enough to eat. Avoid harvesting more than one-third of the plant at a time, as this can stress the plant and reduce its yield. Kale leaves are best harvested in the morning, after the dew has dried. Wash the leaves thoroughly before eating.
Can I reuse the soil bags for growing other vegetables after harvesting kale?
Yes, you can reuse the soil bags for growing other vegetables after harvesting kale, but it’s important to replenish the soil with nutrients. Kale is a heavy feeder, so it will have depleted the soil of many essential nutrients. Before planting a new crop, amend the soil with compost, aged manure, or a slow-release fertilizer. You may also want to consider rotating your crops to prevent the buildup of soilborne diseases. Avoid planting other members of the brassica family (such as broccoli, cabbage, or cauliflower) in the same soil bag immediately after harvesting kale, as they are susceptible to the same pests and diseases.
How long does it take for kale to grow in soil bags?
The time it takes for kale to grow in soil bags depends on several factors, including the variety of kale, the weather, and the growing conditions. Generally, you can expect to start harvesting kale leaves about 50 to 75 days after planting. However, some varieties of kale may mature more quickly than others. You can also speed up the growth of your kale plants by providing them with plenty of sunlight, water, and nutrients.
What are the benefits of growing kale in soil bags compared to traditional gardening methods?
Growing kale in soil bags offers several benefits compared to traditional gardening methods. Soil bags are portable, making it easy to move your plants to the sunniest spot in your yard or to protect them from extreme weather. They also provide excellent drainage, which helps to prevent root rot. Soil bags are also relatively inexpensive and easy to set up, making them a great option for beginners. Additionally, soil bags minimize weeding and require less maintenance than traditional garden beds. Finally, growing kale in soil bags allows you to control the quality of the soil and ensure that your plants are getting the nutrients they need.
Leave a Comment