

Growing garlic from cloves is easier than you might think, and I’m here to show you how! Forget those bland, store-bought bulbs – imagine the satisfaction of harvesting your own pungent, flavorful garlic right from your backyard. This DIY guide will unlock the secrets to cultivating this culinary staple, even if you’ve never gardened before.
Garlic has a rich history, dating back thousands of years. Ancient Egyptians revered it, feeding it to the pyramid builders for strength and endurance. From warding off evil spirits to flavoring dishes across cultures, garlic has always held a special place in human history. Now, you can connect with that history by growing your own!
Why should you learn this DIY trick? Well, for starters, homegrown garlic tastes significantly better than what you find in supermarkets. Plus, you’ll know exactly where your food comes from and what’s gone into its cultivation. More importantly, growing garlic from cloves is a sustainable and rewarding way to add fresh, healthy ingredients to your meals. It’s a fantastic way to save money, reduce your carbon footprint, and enjoy the therapeutic benefits of gardening. So, grab your gloves, and let’s get started on this exciting journey!
Growing Garlic From Cloves: A Beginner’s Guide
Hey there, fellow garden enthusiasts! Ever thought about growing your own garlic? It’s surprisingly easy, super rewarding, and you get the freshest, most flavorful garlic you can imagine. Plus, it’s a great way to save money and reduce your reliance on store-bought produce. I’m going to walk you through the whole process, step-by-step, so you can have your own garlic crop in no time.
Choosing the Right Garlic
Before we get our hands dirty, let’s talk about garlic selection. This is a crucial step because the quality of your cloves directly impacts the success of your harvest.
* Hardneck vs. Softneck: There are two main types of garlic: hardneck and softneck. Hardneck varieties are generally more flavorful and cold-hardy, making them ideal for colder climates. They also produce scapes (those curly flower stalks) which are delicious when sauteed or used in pesto. Softneck varieties are better suited for warmer climates and tend to store longer. They’re also the type you usually see braided.
* Variety Matters: Within hardneck and softneck, there are tons of different varieties. Do some research to find out which varieties grow well in your area. Your local garden center or agricultural extension office can be a great resource.
* Source Your Garlic Wisely: Don’t just grab a bulb from the grocery store! Grocery store garlic is often treated to prevent sprouting, which means it won’t grow well. Instead, buy your garlic from a reputable seed company, nursery, or farmer’s market. Look for organic garlic to avoid any potential pesticide residue.
* Choose the Best Bulbs: When selecting your garlic, look for large, firm bulbs with plump, healthy cloves. Avoid bulbs that are soft, shriveled, or show signs of mold or disease. The bigger the clove, the bigger the bulb it will produce.
Preparing for Planting
Okay, you’ve got your garlic. Now let’s get ready to plant!
* Timing is Key: Garlic is typically planted in the fall, about 4-6 weeks before the ground freezes. This allows the cloves to develop roots before winter sets in. In warmer climates, you can plant in late winter or early spring.
* Sunlight: Garlic needs at least 6 hours of sunlight per day, so choose a sunny spot in your garden.
* Soil Preparation: Garlic prefers well-drained soil that is rich in organic matter. Amend your soil with compost or well-rotted manure before planting. This will provide the garlic with the nutrients it needs to thrive.
* Soil pH: Aim for a soil pH between 6.0 and 7.0. You can test your soil pH with a soil testing kit. If your soil is too acidic, you can add lime to raise the pH.
* Spacing: Space your cloves about 6-8 inches apart in rows that are 12-18 inches apart. This will give the garlic enough room to grow.
Planting Your Garlic Cloves
Alright, time to get those cloves in the ground!
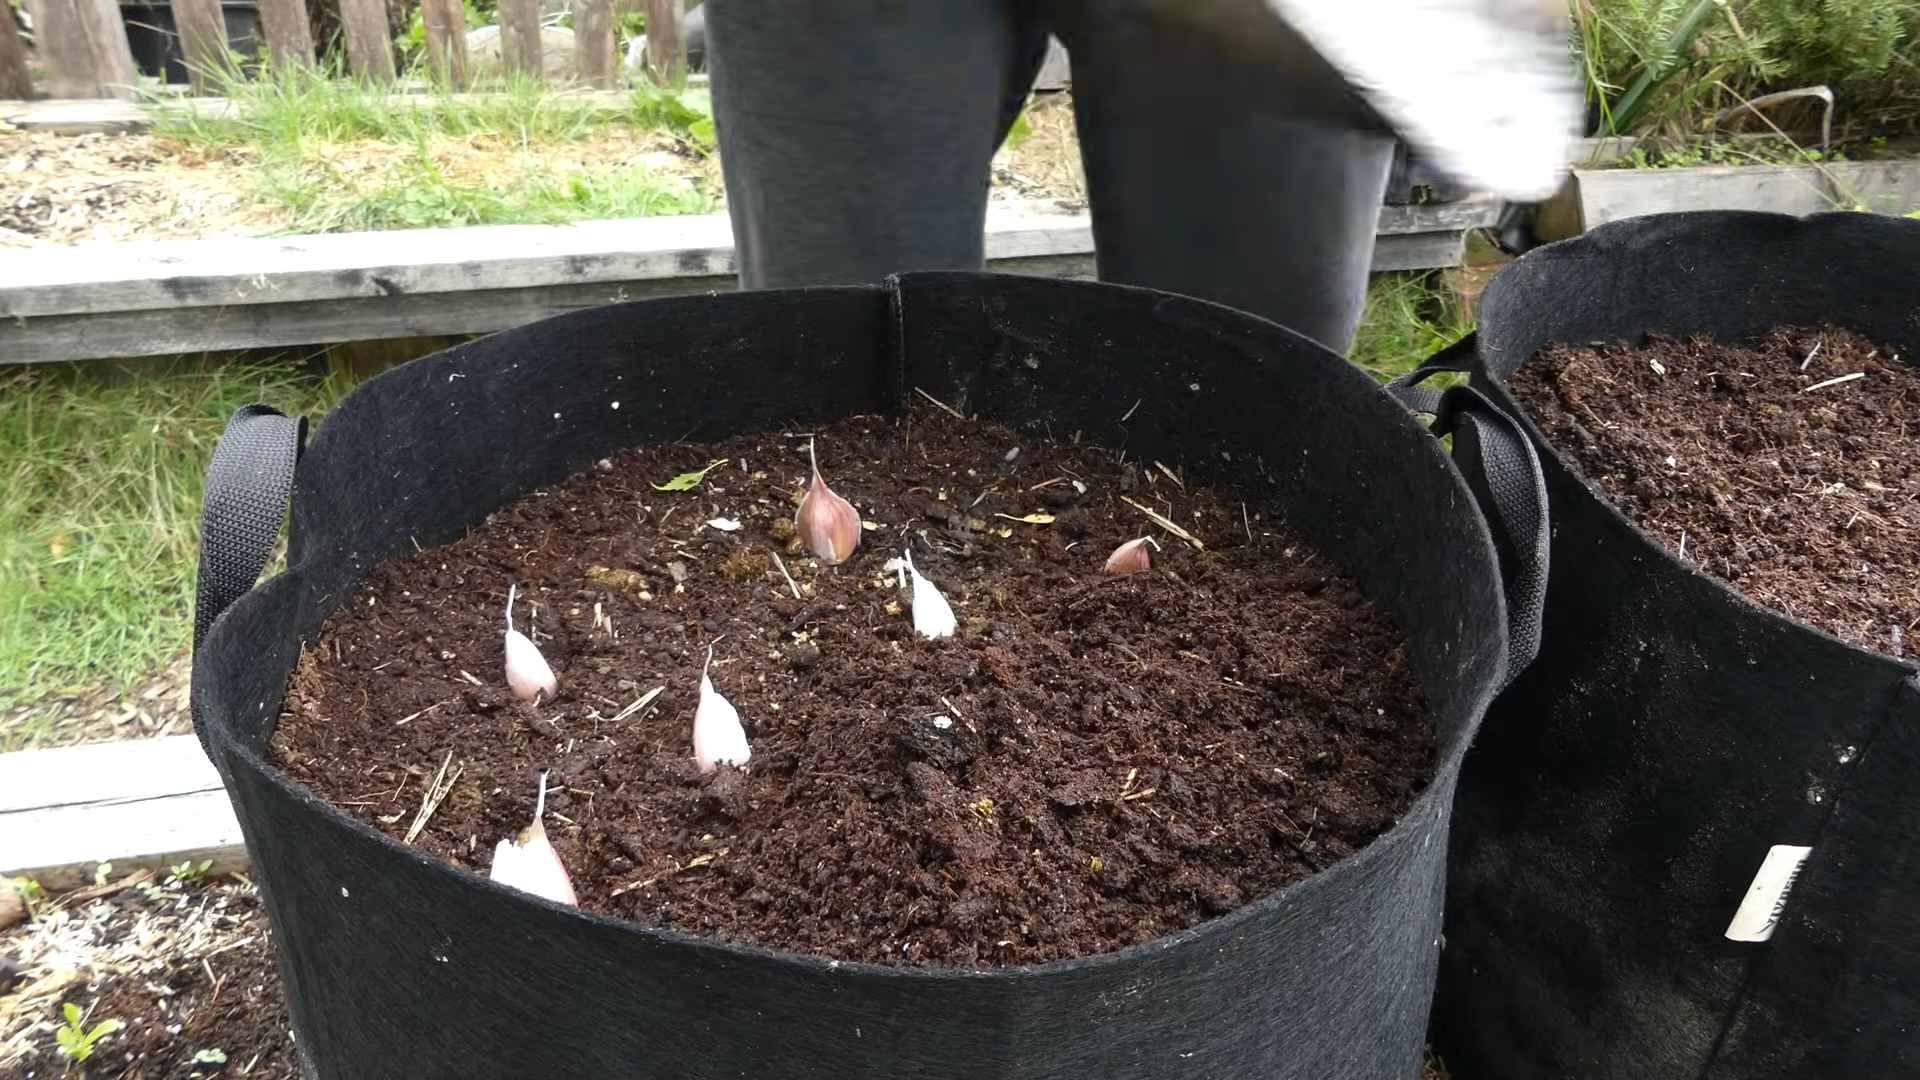
1. Separate the Cloves: Gently separate the cloves from the bulb just before planting. Leave the papery skin on each clove intact. Don’t peel them!
2. Planting Depth: Plant the cloves about 2-3 inches deep, with the pointed end facing up. The flat end is where the roots will emerge.
3. Cover with Soil: Cover the cloves with soil and gently firm the soil around them.
4. Water Thoroughly: Water the planting area thoroughly after planting. This will help settle the soil and encourage root growth.
5. Mulch: Apply a layer of mulch, such as straw or shredded leaves, to help retain moisture, suppress weeds, and protect the cloves from extreme temperatures. A 4-6 inch layer is ideal.
Caring for Your Garlic
Now that your garlic is planted, it’s time to give it some TLC.
* Watering: Garlic needs consistent moisture, especially during the spring when it’s actively growing. Water deeply whenever the soil feels dry to the touch. Avoid overwatering, as this can lead to rot.
* Weeding: Keep the planting area free of weeds. Weeds compete with garlic for nutrients and water. Hand-pull weeds carefully to avoid disturbing the garlic roots.
* Fertilizing: Garlic is a heavy feeder, so it benefits from regular fertilization. In the spring, when the plants start to grow, fertilize with a balanced organic fertilizer or compost tea.
* Scape Removal (Hardneck Varieties): If you’re growing hardneck garlic, you’ll notice scapes forming in the spring. These curly flower stalks should be removed to encourage bulb growth. Simply snip them off with scissors or pruners. Don’t throw them away! Scapes are delicious and can be used in a variety of dishes.
* Pest and Disease Control: Garlic is generally pest-resistant, but it can be susceptible to certain diseases, such as white rot and bulb mites. Practice good garden hygiene to prevent these problems. Remove any infected plants immediately.
Harvesting Your Garlic
The moment you’ve been waiting for! Harvesting your own garlic is incredibly satisfying.
* When to Harvest: Garlic is typically ready to harvest in mid-summer, about 8-9 months after planting. The leaves will start to turn yellow and brown, and the stalks will begin to fall over.
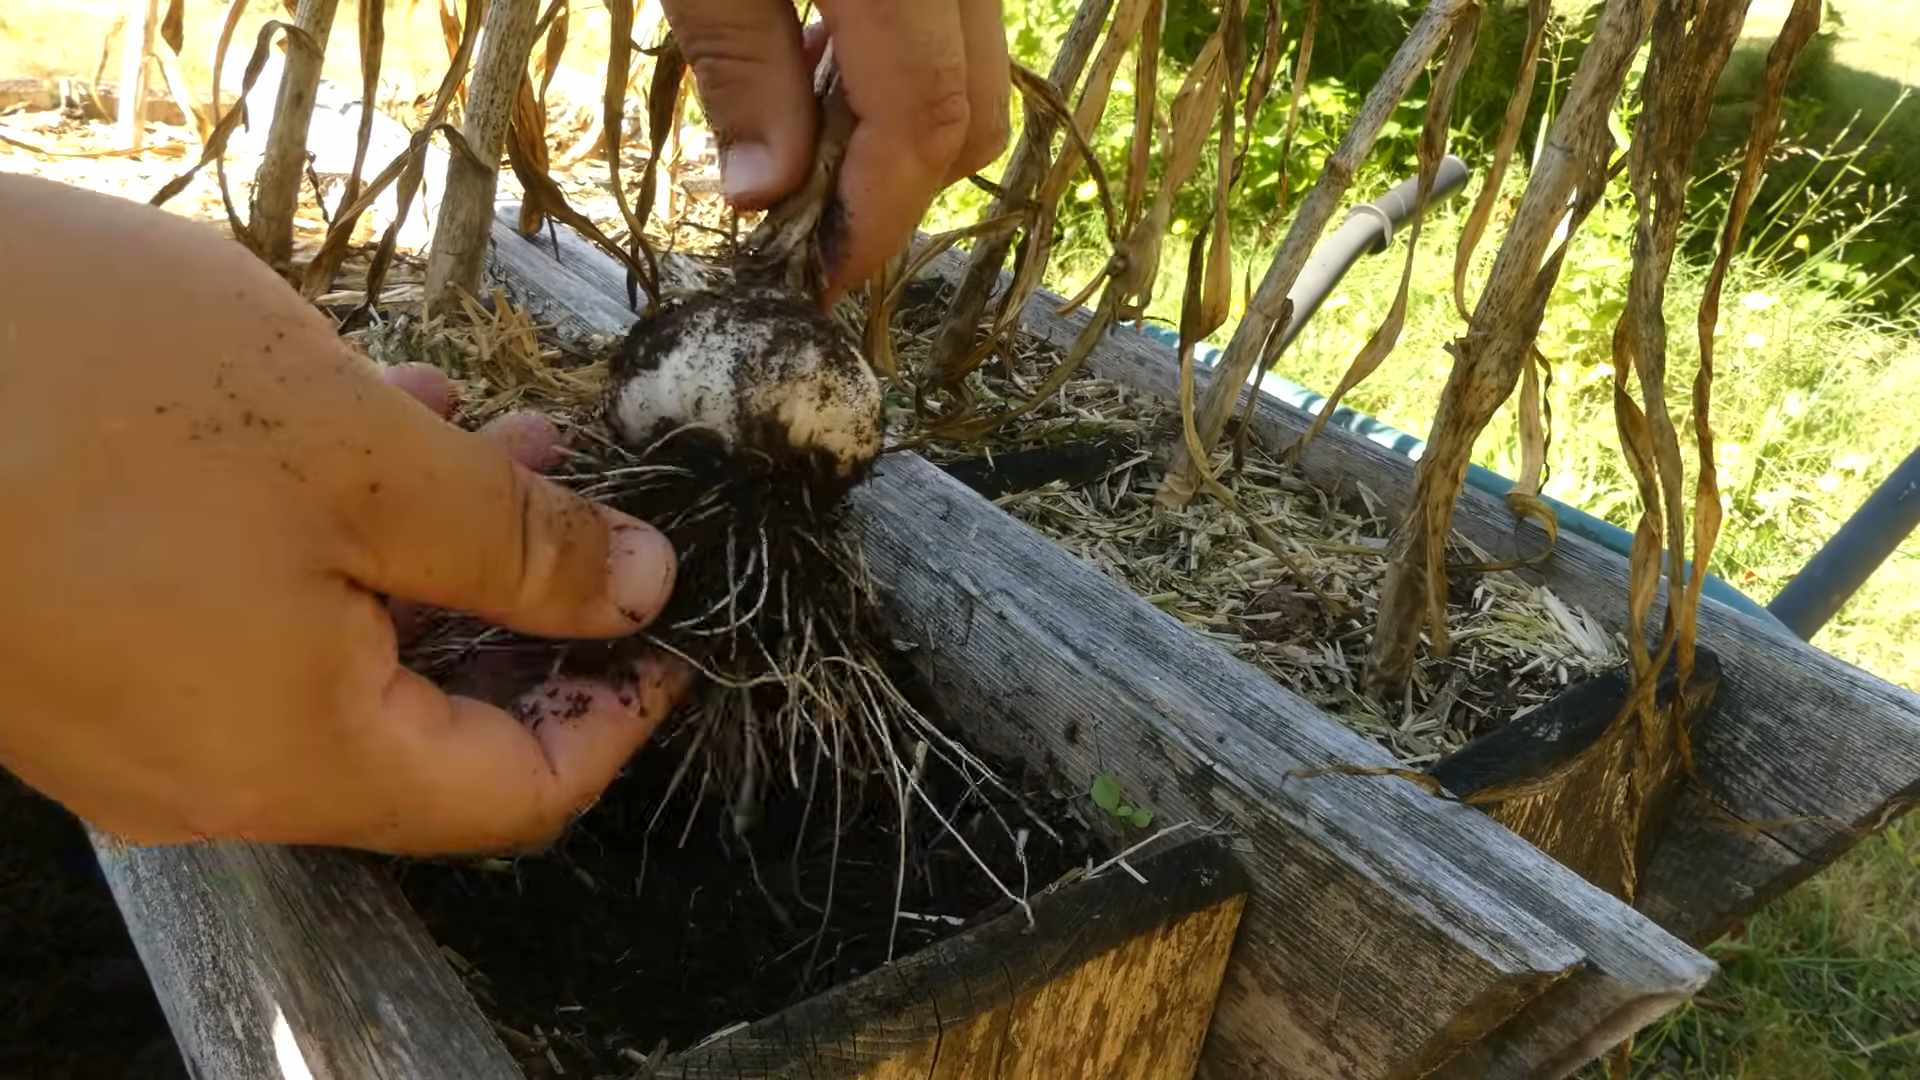
* How to Harvest: Gently loosen the soil around the bulbs with a garden fork or trowel. Carefully lift the bulbs from the ground, being careful not to damage them.
* Curing Your Garlic: Curing is essential for long-term storage. Brush off any excess soil from the bulbs, but don’t wash them. Tie the garlic plants together in bundles of 6-8 bulbs and hang them in a cool, dry, well-ventilated place for 2-4 weeks.
* Storing Your Garlic: Once the garlic is cured, cut off the roots and stalks, leaving about an inch of stalk attached to the bulb. Store the bulbs in a cool, dry, dark place. Properly cured garlic can last for several months.
Troubleshooting
Even with the best planning, sometimes things don’t go exactly as expected. Here are a few common problems you might encounter and how to deal with them:
* Small Bulbs: If your garlic bulbs are small, it could be due to a number of factors, such as poor soil, insufficient sunlight, or inadequate watering. Make sure your garlic is getting enough sunlight, water, and nutrients.
* Rotting Bulbs: Rotting bulbs are usually caused by overwatering or poor drainage. Make sure your soil is well-drained and avoid overwatering.
* Pests and Diseases: Keep an eye out for pests and diseases. If you notice any problems, take action immediately to prevent them from spreading.
Enjoying Your Homegrown Garlic
Congratulations! You’ve successfully grown your own garlic. Now it’s time to enjoy the fruits (or rather, bulbs) of your labor. Use your homegrown garlic in all your favorite recipes. It’s so much more flavorful than store-bought garlic. You can also save some of your best bulbs to plant next year.
Growing garlic from cloves is a rewarding experience that anyone can do. With a little bit of planning and effort, you can have a bountiful harvest of delicious, homegrown garlic. Happy gardening!
Conclusion
So, there you have it! Growing garlic from cloves isn’t just a gardening project; it’s a rewarding journey from your kitchen to your table. It’s about connecting with the food you eat, understanding its origins, and enjoying the unparalleled flavor of homegrown garlic. Forget those bland, imported bulbs – this is about unlocking the potent, aromatic essence of fresh, locally-sourced (even if “local” is your own backyard!) garlic.
Why is this DIY trick a must-try? Because it’s incredibly simple, surprisingly productive, and undeniably satisfying. You’re taking something you’d normally discard – a single clove – and transforming it into a whole new bulb of deliciousness. Plus, you have complete control over the growing process, ensuring your garlic is free from unwanted chemicals and pesticides. Think of the bragging rights when you serve a dish seasoned with garlic you grew yourself!
But the benefits don’t stop there. Growing your own garlic is also a fantastic way to extend the growing season. By planting in the fall, you’re giving your garlic a head start, allowing it to develop strong roots and build resilience over the winter months. This translates to larger, more flavorful bulbs come harvest time.
Ready to get creative? Consider these variations to personalize your garlic-growing experience:
* Experiment with different garlic varieties: From the robust flavor of hardneck garlic to the milder taste of softneck varieties, there’s a garlic type to suit every palate. Try planting a few different kinds to discover your favorites.
* Companion planting: Garlic is a natural pest repellent, making it a great companion plant for other vegetables like tomatoes, peppers, and strawberries. Plant garlic strategically in your garden to protect your other crops.
* Container gardening: Don’t have a garden? No problem! Garlic thrives in containers, making it a perfect option for apartment dwellers or those with limited space. Just be sure to choose a pot that’s at least 8 inches deep to accommodate the bulb’s growth.
* Garlic scapes: Don’t forget about the scapes! These curly flower stalks that emerge from hardneck garlic are a culinary delicacy. Harvest them in the spring and use them in pesto, stir-fries, or as a flavorful addition to salads.
Growing garlic from cloves is more than just a gardening task; it’s an investment in flavor, sustainability, and self-sufficiency. It’s a chance to reconnect with nature, learn new skills, and enjoy the fruits (or rather, the bulbs!) of your labor.
So, what are you waiting for? Grab a few cloves, find a sunny spot, and get planting! We’re confident that you’ll be amazed by the results. And don’t forget to share your experience with us! We’d love to hear about your garlic-growing adventures, see photos of your bountiful harvests, and learn any tips or tricks you discover along the way. Share your stories on social media using #HomegrownGarlic and let’s inspire others to join the garlic-growing revolution! Happy planting!
Frequently Asked Questions (FAQ)
What kind of garlic should I use to grow from cloves?
The best garlic to use for growing from cloves is garlic that is specifically sold for planting. This is because garlic sold for eating may have been treated to prevent sprouting. Look for “seed garlic” at your local garden center or online. You can use garlic from the grocery store, but it’s important to choose organic garlic, as non-organic garlic may have been treated with chemicals that inhibit sprouting. Also, consider your climate. Hardneck varieties generally do better in colder climates, while softneck varieties are more suited to warmer regions. Experiment to see what works best in your area.
When is the best time to plant garlic cloves?
The ideal time to plant garlic cloves is in the fall, typically 4-6 weeks before the ground freezes. This allows the cloves to establish roots before winter sets in. In colder climates, this is usually around October or November. In warmer climates, you can plant later, around November or December. The key is to give the cloves enough time to develop roots but not so much time that they start to sprout above ground before winter.
How deep should I plant the garlic cloves?
Plant garlic cloves about 2 inches deep, with the pointed end facing up. Space the cloves about 6 inches apart in rows that are 12 inches apart. This spacing allows for adequate air circulation and prevents overcrowding, which can lead to disease.
What kind of soil is best for growing garlic?
Garlic prefers well-drained soil that is rich in organic matter. Amend your soil with compost or well-rotted manure before planting to improve drainage and fertility. Garlic also prefers a slightly acidic to neutral soil pH (around 6.0 to 7.0).
How much sun does garlic need?
Garlic needs at least 6 hours of sunlight per day to thrive. Choose a sunny location in your garden or on your patio for your garlic plants.
How often should I water garlic?
Water garlic regularly, especially during dry periods. Keep the soil consistently moist but not waterlogged. Avoid overwatering, as this can lead to bulb rot. A good rule of thumb is to water deeply once a week, or more often if the soil dries out quickly.
Do I need to fertilize garlic?
Yes, garlic benefits from fertilization. Apply a balanced fertilizer in the spring when the plants start to actively grow. You can also side-dress with compost or well-rotted manure. Avoid over-fertilizing, as this can lead to excessive foliage growth at the expense of bulb development.
How do I know when to harvest garlic?
Garlic is typically ready to harvest in mid-summer, when the lower leaves start to turn yellow and brown. The scapes (if you’re growing hardneck garlic) will also start to curl and straighten out. To check if the bulbs are ready, carefully dig up a few plants and inspect the bulbs. The bulbs should be plump and well-formed, with papery skins.
How do I cure garlic after harvesting?
After harvesting, cure the garlic in a well-ventilated, dry place for 2-3 weeks. This allows the bulbs to dry out and develop their full flavor. You can hang the garlic in bunches or spread it out on screens or racks. Avoid direct sunlight, as this can bleach the bulbs.
How long will homegrown garlic last?
Properly cured garlic can last for several months. Store the garlic in a cool, dry, and dark place. Avoid storing garlic in the refrigerator, as this can cause it to sprout. Softneck garlic generally stores longer than hardneck garlic.
What are garlic scapes and how do I use them?
Garlic scapes are the curly flower stalks that grow from hardneck garlic plants. They are a culinary delicacy with a mild garlic flavor. Harvest the scapes in the spring when they start to curl. You can use them in pesto, stir-fries, soups, or as a flavorful addition to salads.
Can I grow garlic in containers?
Yes, garlic can be grown successfully in containers. Choose a pot that is at least 8 inches deep and wide to accommodate the bulb’s growth. Use a well-draining potting mix and water regularly.
What are some common pests and diseases that affect garlic?
Common pests that affect garlic include aphids, thrips, and nematodes. Common diseases include white rot, bulb rot, and downy mildew. Practice good garden hygiene to prevent pest and disease problems. This includes removing plant debris, rotating crops, and avoiding overwatering.
Can I save cloves from my homegrown garlic to plant next year?
Absolutely! Saving cloves from your homegrown garlic is a great way to ensure a continuous supply of garlic. Choose the largest and healthiest bulbs to save for planting. Store the cloves in a cool, dry place until planting time in the fall. This is a sustainable and rewarding way to grow your own garlic year after year.

Leave a Comment