

Growing Eggplants at Home can seem daunting, but trust me, with a few clever tricks and a little DIY spirit, you can be harvesting your own delicious eggplants in no time! Imagine serving up a vibrant eggplant parmesan made with produce you nurtured from seed to table – that’s the magic we’re unlocking today.
Eggplants, also known as aubergines, have a rich history, tracing back to ancient Asia where they were cultivated for centuries. They eventually made their way to Europe and the Americas, becoming a staple in diverse cuisines. From the Mediterranean’s moussaka to Asia’s stir-fries, the eggplant’s versatility is undeniable.
But why bother growing eggplants at home when you can just buy them at the store? Well, for starters, homegrown eggplants taste infinitely better! They’re fresher, more flavorful, and you have complete control over what goes into them – no pesticides or questionable practices. Plus, let’s be honest, there’s something incredibly satisfying about nurturing a plant and reaping the rewards of your labor. In this article, I’m going to share some simple DIY tricks and hacks that will help you overcome common challenges and enjoy a bountiful eggplant harvest, even if you’re a beginner gardener. Let’s get our hands dirty!
Growing Eggplants at Home: A DIY Guide for Bountiful Harvests
Hey there, fellow gardening enthusiasts! I’m so excited to share my tried-and-true method for growing eggplants right in your own backyard. Eggplants, with their glossy, vibrant hues and delicious flavor, are a fantastic addition to any garden. While they might seem a bit intimidating at first, trust me, with a little know-how and some tender loving care, you can absolutely cultivate a thriving eggplant patch. Let’s dive in!
Choosing the Right Eggplant Variety
Before we get our hands dirty, it’s crucial to select the right eggplant variety for your climate and preferences. There are so many amazing options out there!
* Classic Globe Eggplants: These are your standard, large, purple eggplants, perfect for eggplant parmesan or grilling. ‘Black Beauty’ is a popular and reliable choice.
* Italian Eggplants: These tend to be smaller and more elongated than globe eggplants, with a sweeter, milder flavor. ‘Listada de Gandia’ with its beautiful purple and white stripes, is a real showstopper.
* Asian Eggplants: These are long and slender, with a delicate skin and creamy flesh. ‘Ichiban’ and ‘Long Purple’ are excellent choices for stir-fries and Asian-inspired dishes.
* White Eggplants: For something a little different, try a white eggplant like ‘Casper’. They have a mild, almost mushroom-like flavor.
Consider your local climate and growing season when making your selection. Some varieties are more heat-tolerant than others, and some mature faster. Check the seed packet or plant label for specific information.
Starting Your Eggplant Seeds (or Buying Seedlings)
You have two main options here: starting your eggplants from seed or purchasing seedlings from a nursery. Starting from seed gives you more control over the process and allows you to choose from a wider variety of options. However, it requires a bit more time and effort.
Starting from Seed:
1. Timing is Key: Eggplants need a long growing season, so start your seeds indoors 8-10 weeks before the last expected frost. I usually start mine in late February or early March.
2. Prepare Your Seed Starting Mix: Use a sterile seed starting mix to prevent diseases. I like to use a mix of peat moss, vermiculite, and perlite.
3. Sow the Seeds: Fill your seed starting trays or pots with the mix and sow the seeds about ¼ inch deep. Gently water the soil.
4. Provide Warmth and Light: Eggplants need warmth to germinate. Aim for a soil temperature of 80-90°F (27-32°C). You can use a heat mat to help maintain the temperature. Place the trays under grow lights or in a sunny window.
5. Keep the Soil Moist: Water regularly to keep the soil consistently moist, but not soggy.
6. Thin the Seedlings: Once the seedlings have their first true leaves (the second set of leaves), thin them out, leaving only the strongest seedling in each cell or pot.
7. Harden Off the Seedlings: Before transplanting your seedlings outdoors, you need to harden them off. This means gradually exposing them to outdoor conditions over a period of 7-10 days. Start by placing them in a sheltered spot for a few hours each day, gradually increasing the amount of time they spend outdoors.
Buying Seedlings:
If you’re short on time or don’t have the space to start seeds indoors, buying seedlings is a great option.
1. Choose Healthy Seedlings: Look for seedlings that are sturdy, green, and free from pests and diseases. Avoid plants that are leggy or have yellowing leaves.
2. Check the Roots: Gently remove the seedling from its pot and inspect the roots. They should be white and healthy, not brown or root-bound.
Preparing Your Garden Bed
Eggplants need a sunny location and well-drained soil. Choose a spot in your garden that receives at least 6-8 hours of sunlight per day.
1. Soil Testing: Before planting, it’s a good idea to test your soil to determine its pH and nutrient levels. Eggplants prefer a slightly acidic soil with a pH of 6.0-6.8.
2. Amend the Soil: Amend the soil with plenty of organic matter, such as compost or well-rotted manure. This will improve drainage, fertility, and water retention. I usually add a generous layer of compost to my garden bed before planting.
3. Consider Raised Beds: If you have heavy clay soil, consider planting your eggplants in raised beds. This will improve drainage and prevent root rot.
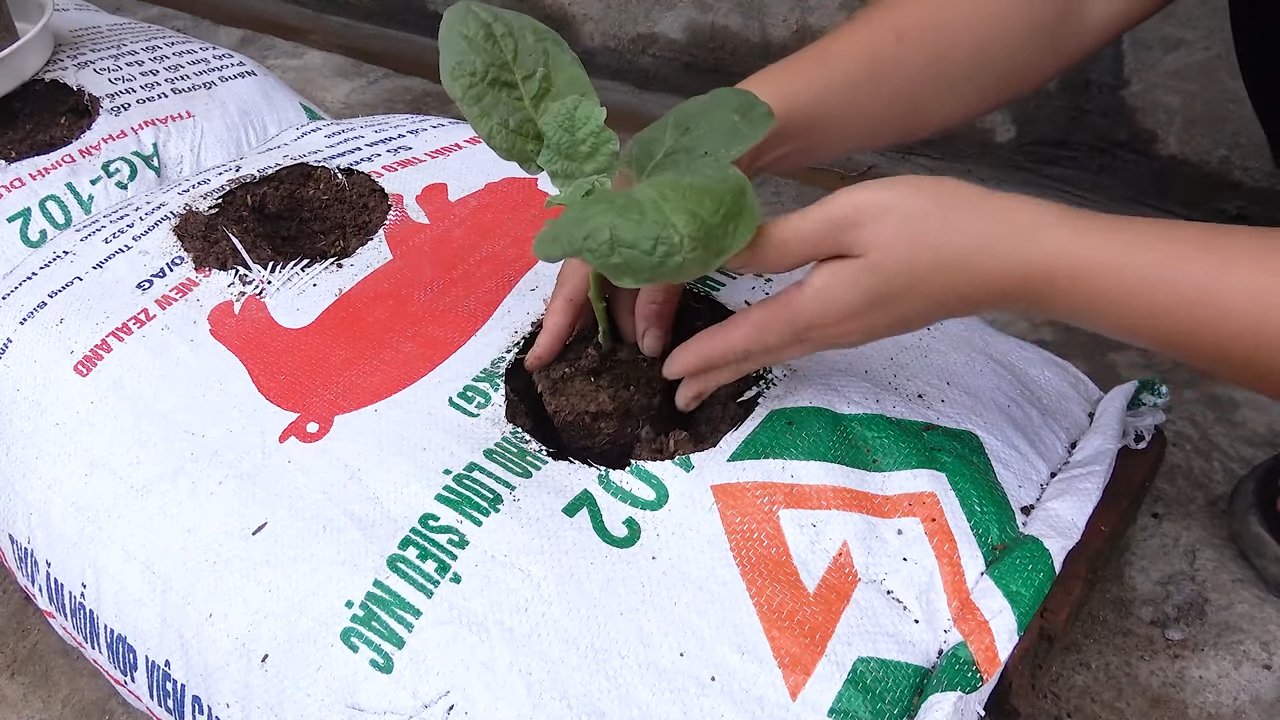
Transplanting Your Eggplant Seedlings
Once the danger of frost has passed and the soil has warmed up, it’s time to transplant your eggplant seedlings into the garden.
1. Choose a Cloudy Day: Transplanting on a cloudy day will help reduce stress on the seedlings.
2. Dig the Holes: Dig holes that are slightly larger than the root balls of the seedlings. Space the holes about 18-24 inches apart.
3. Gently Remove the Seedlings: Gently remove the seedlings from their pots, being careful not to damage the roots.
4. Plant the Seedlings: Place the seedlings in the holes and backfill with soil. Gently firm the soil around the base of the plants.
5. Water Thoroughly: Water the seedlings thoroughly after planting.
6. Mulch: Apply a layer of mulch around the plants to help retain moisture, suppress weeds, and regulate soil temperature. I like to use straw or shredded leaves.
Caring for Your Eggplant Plants
Now that your eggplants are in the ground, it’s time to provide them with the care they need to thrive.
1. Watering: Eggplants need consistent moisture, especially during hot weather. Water deeply and regularly, aiming for about 1 inch of water per week. Avoid overhead watering, as this can promote fungal diseases.
2. Fertilizing: Eggplants are heavy feeders, so they need regular fertilization. Use a balanced fertilizer, such as 10-10-10, every 2-3 weeks. You can also side-dress with compost or manure.
3. Staking: As your eggplant plants grow, they may need staking to support the heavy fruits. Use stakes or cages to prevent the plants from falling over.
4. Pruning: Pruning can help improve air circulation and promote fruit production. Remove any suckers (small shoots that grow from the base of the plant) and any yellowing or diseased leaves.
5. Pest and Disease Control: Eggplants are susceptible to a variety of pests and diseases, including aphids, flea beetles, and blossom-end rot. Inspect your plants regularly and take action if you notice any problems.
* Aphids: These tiny insects can suck the sap from your plants, causing them to weaken and yellow. You can control aphids with insecticidal soap or neem oil.
* Flea Beetles: These small beetles can chew holes in the leaves of your plants. You can control flea beetles with row covers or insecticidal soap.
* Blossom-End Rot: This is a common problem in eggplants, caused by a calcium deficiency. To prevent blossom-end rot, make sure your soil is well-drained and that you are providing your plants with adequate calcium. You can also use a calcium spray.
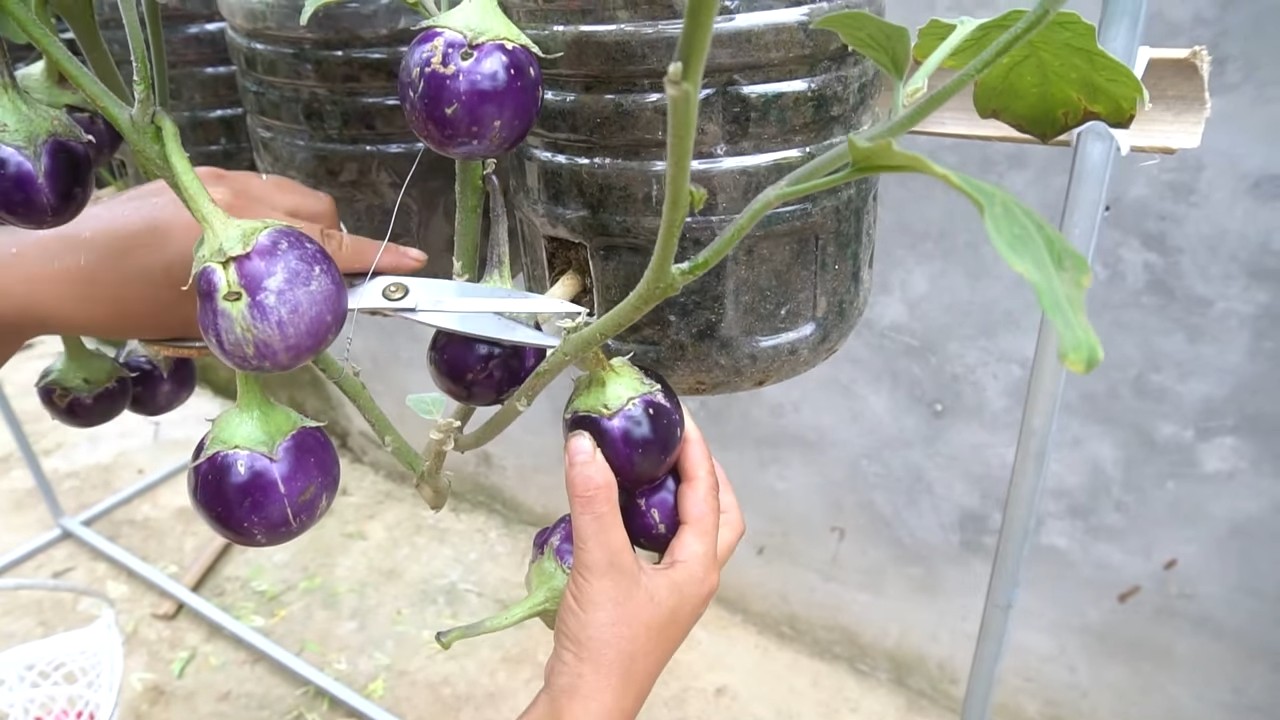
Harvesting Your Eggplants
The moment you’ve been waiting for! Harvesting your eggplants at the right time is crucial for optimal flavor and texture.
1. Timing is Everything: Eggplants are typically ready to harvest 65-80 days after transplanting. The fruits should be firm, glossy, and have a deep, even color.
2. Check the Skin: The skin should be smooth and unblemished. If the skin is dull or wrinkled, the eggplant is likely overripe.
3. Gently Squeeze: Gently squeeze the eggplant. If it feels firm and slightly resistant, it’s ready to harvest. If it feels soft or mushy, it’s overripe.
4. Use a Sharp Knife: Use a sharp knife or pruning shears to cut the eggplant from the plant, leaving about 1 inch of stem attached.
5. Handle with Care: Eggplants are delicate and can bruise easily, so handle them with care.
6. Store Properly: Store your eggplants in the refrigerator for up to a week.
Troubleshooting Common Eggplant Problems
Even with the best care, you might encounter some challenges along the way. Here are a few common problems and how to address them:
* Lack of Fruit: If your eggplant plants are not producing fruit, it could be due to a number of factors, including lack of pollination, insufficient sunlight, or nutrient deficiencies. Make sure your plants are getting
Conclusion
So, there you have it! Growing eggplants at home, while it might seem daunting at first, is a deeply rewarding experience that brings the vibrant flavors of summer right to your table. We’ve explored the essential steps, from selecting the perfect variety for your climate to nurturing your plants with the right soil, sunlight, and care. But the real magic lies in the DIY trick we’ve unveiled: the homemade Epsom salt solution.
Why is this a must-try? Because it’s a game-changer for eggplant production. Eggplants are heavy feeders, and magnesium deficiency can significantly impact their growth and fruit development. This simple, cost-effective solution provides a readily available source of magnesium, leading to healthier, more robust plants, and ultimately, a more bountiful harvest. Forget expensive, commercially produced fertilizers packed with chemicals you can’t pronounce. This is a natural, sustainable way to boost your eggplant yield and ensure you’re enjoying the purest, most flavorful fruits possible.
But don’t stop there! Experiment with variations to find what works best for your garden. Try adding a small amount of bone meal to the soil at planting time for an extra boost of phosphorus, which promotes strong root development. Consider companion planting with basil or marigolds to deter pests naturally. And for those in cooler climates, using black plastic mulch can help warm the soil and extend the growing season.
The beauty of gardening is that it’s a constant learning process. There’s no one-size-fits-all approach, and what works for one gardener might not work for another. That’s why we encourage you to embrace the spirit of experimentation and discover what makes your eggplants thrive.
Ready to transform your eggplant growing experience? Give this DIY Epsom salt trick a try. We’re confident you’ll see a noticeable difference in the health and productivity of your plants. And most importantly, we want to hear about your results! Share your experiences, tips, and photos in the comments below. Let’s build a community of eggplant enthusiasts and learn from each other’s successes (and even the occasional setbacks!). Together, we can unlock the secrets to growing the most delicious, homegrown eggplants imaginable. So, get your hands dirty, embrace the challenge, and prepare to be amazed by the fruits (or rather, vegetables!) of your labor. Happy gardening!
Frequently Asked Questions (FAQ)
What exactly does Epsom salt do for eggplants?
Epsom salt is primarily composed of magnesium sulfate. Magnesium is a crucial nutrient for plant growth, playing a vital role in photosynthesis, chlorophyll production, and nutrient uptake. Eggplants are heavy feeders, meaning they require a significant amount of nutrients from the soil. Magnesium deficiency can manifest as yellowing leaves, stunted growth, and reduced fruit production. The Epsom salt solution provides a readily available source of magnesium, helping to correct deficiencies and promote healthier, more productive plants. The sulfate component also aids in nutrient absorption.
How often should I apply the Epsom salt solution?
A general guideline is to apply the Epsom salt solution every two to three weeks during the growing season. However, it’s essential to observe your plants for signs of magnesium deficiency. If you notice yellowing leaves (especially between the veins), stunted growth, or poor fruit development, you may need to increase the frequency of application. Conversely, if your plants appear healthy and vigorous, you can reduce the frequency. Avoid over-application, as excessive magnesium can lead to nutrient imbalances.
Can I use too much Epsom salt? What are the signs of over-application?
Yes, it is possible to overdo it with Epsom salt. While it’s a beneficial amendment, excessive amounts can disrupt the nutrient balance in the soil and potentially harm your plants. Signs of over-application include leaf burn (browning or scorching of leaf edges), stunted growth, and difficulty absorbing other essential nutrients like calcium. If you suspect you’ve over-applied Epsom salt, flush the soil thoroughly with water to help leach out the excess magnesium.
Is it better to apply the Epsom salt solution as a foliar spray or directly to the soil?
Both foliar sprays and soil applications can be effective. Foliar sprays allow for rapid absorption of magnesium through the leaves, providing a quick boost to the plant. Soil applications, on the other hand, provide a more sustained release of magnesium over time. Many gardeners find that a combination of both methods works best. You can start with a foliar spray to address any immediate deficiencies and then follow up with soil applications every few weeks to maintain adequate magnesium levels.
What other nutrients are important for growing healthy eggplants?
In addition to magnesium, eggplants require a balanced supply of other essential nutrients, including nitrogen, phosphorus, potassium, calcium, and micronutrients. Nitrogen promotes leafy growth, phosphorus supports root development and flowering, and potassium contributes to overall plant health and fruit production. Calcium is crucial for preventing blossom-end rot, a common problem in eggplants. A well-balanced fertilizer specifically formulated for vegetables can provide these essential nutrients.
My eggplant leaves are turning yellow, but I’m already using Epsom salt. What else could be the problem?
While magnesium deficiency is a common cause of yellowing leaves in eggplants, other factors can also contribute to this issue. Overwatering or poor drainage can lead to root rot, which can impair nutrient uptake and cause yellowing leaves. Nutrient deficiencies other than magnesium, such as nitrogen or iron deficiency, can also cause similar symptoms. Pests, such as spider mites or aphids, can also damage leaves and cause them to turn yellow. Carefully inspect your plants for signs of pests or diseases and adjust your watering and fertilization practices as needed. A soil test can help determine if there are any nutrient imbalances in your soil.
Can I use Epsom salt on other vegetables in my garden?
Yes, Epsom salt can be beneficial for other vegetables that are prone to magnesium deficiency, such as tomatoes, peppers, and potatoes. However, it’s essential to use it judiciously and only when needed. Observe your plants for signs of magnesium deficiency and adjust the application rate accordingly. A soil test can help determine if your soil is deficient in magnesium and whether Epsom salt is necessary.
Where can I buy Epsom salt?
Epsom salt is readily available at most drugstores, pharmacies, garden centers, and online retailers. Look for Epsom salt that is labeled for horticultural use, as it is typically purer and free of additives that could harm your plants.
Is there an organic alternative to Epsom salt?
While Epsom salt is a naturally occurring mineral, some gardeners prefer to use entirely organic alternatives. Compost tea, made from well-rotted compost, can provide a range of essential nutrients, including magnesium. Seaweed extract is another excellent source of micronutrients and can be applied as a foliar spray or soil drench. Dolomitic limestone can also be added to the soil to increase magnesium and calcium levels, but it takes longer to break down and become available to plants.

Leave a Comment