

Growing black tomatoes at home might sound like something only a seasoned gardener can achieve, but trust me, it’s totally within your reach! Have you ever seen those deep, almost mysterious, purple-black tomatoes at the farmer’s market and wondered how they get that incredible color and flavor? Well, you’re about to find out! For centuries, gardeners have been experimenting with different tomato varieties, and the black tomato, with its rich, earthy taste, has become a prized possession for foodies and home growers alike.
But why should you bother growing black tomatoes at home? Beyond their unique appearance and delicious taste, growing your own tomatoes, especially these beauties, is incredibly rewarding. You’ll have access to fresh, organic produce right in your backyard, free from harmful pesticides and bursting with flavor that you just can’t find in store-bought varieties. Plus, it’s a fantastic way to connect with nature, relieve stress, and impress your friends with your gardening prowess! This article is packed with easy-to-follow DIY tricks and hacks that will guide you through every step of the process, from selecting the right seeds to harvesting your very own crop of delectable black tomatoes. Get ready to transform your garden into a black tomato paradise!
Growing Black Tomatoes: A DIY Guide to Delicious Darkness
Hey there, fellow gardening enthusiasts! Ever dreamt of biting into a juicy, almost-black tomato, bursting with unique flavor? Well, dream no more! Growing black tomatoes at home is totally achievable, and I’m here to guide you through the entire process. It might seem a little intimidating at first, but trust me, with a little patience and these tips, you’ll be harvesting your own dark beauties in no time.
Choosing Your Black Tomato Variety
First things first, let’s talk about varieties. “Black tomato” isn’t just one type; it’s a whole family of deliciousness! Here are a few popular options to consider:
* Black Krim: This is a classic! It’s known for its rich, slightly salty flavor and flattened shape. It’s also relatively easy to grow, making it a great choice for beginners.
* Cherokee Purple: Don’t let the name fool you; this one’s definitely in the black tomato family. It has a complex, sweet, and smoky flavor that’s absolutely divine.
* Black Prince: This variety is smaller and more compact, making it ideal for smaller gardens or containers. It has a slightly tart flavor and is known for its high yields.
* Paul Robeson: Named after the famous singer and actor, this tomato is known for its smooth texture and rich, earthy flavor.
* Japanese Black Trifele: This pear-shaped tomato has a unique look and a sweet, slightly tangy flavor.
Consider your taste preferences, garden space, and climate when making your choice. I personally love Black Krim for its reliability and amazing flavor, but experiment and find your favorite!
Starting Your Seeds (or Buying Seedlings)
You have two main options here: starting your own seeds indoors or buying seedlings from a nursery. Starting from seed gives you more control over the process and can be more cost-effective, but it requires a bit more time and effort.
Starting Seeds Indoors:
This is how I usually do it because I love watching the little sprouts emerge!
1. Gather Your Supplies: You’ll need:
* Tomato seeds (of your chosen black tomato variety, of course!)
* Seed starting trays or small pots
* Seed starting mix (this is important! Regular potting soil is too heavy)
* A spray bottle
* A heat mat (optional, but helpful)
* A grow light (also optional, but highly recommended)
2. Sow the Seeds: Fill your seed starting trays or pots with the seed starting mix. Moisten the mix with the spray bottle 鈥?you want it damp, not soggy. Sow 2-3 seeds per cell or pot, about 录 inch deep.
3. Provide Warmth and Light: Place the trays on a heat mat (if using) and under a grow light (if using). If you don’t have a heat mat, a warm spot in your house will do. The ideal temperature for germination is around 75-85掳F (24-29掳C). If you don’t have a grow light, place the trays near a sunny window, but be sure to rotate them regularly to prevent the seedlings from leaning towards the light.
4. Keep the Soil Moist: Use the spray bottle to keep the soil consistently moist, but not waterlogged.
5. Wait for Germination: Tomato seeds typically germinate in 5-10 days.
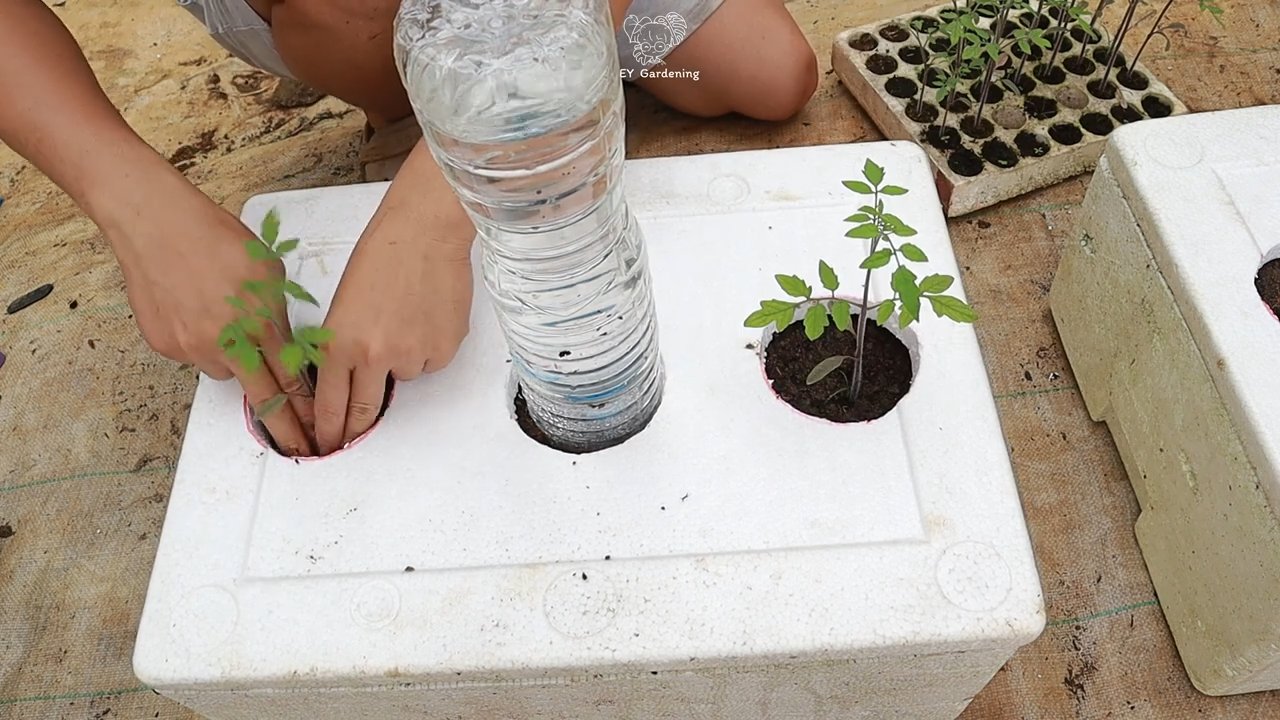
6. Thin the Seedlings: Once the seedlings have emerged and have a couple of sets of true leaves (the leaves that look like tomato leaves, not just the initial seed leaves), thin them to one seedling per cell or pot. Choose the strongest, healthiest-looking seedling and snip off the others at the soil line.
7. Harden Off the Seedlings: Before transplanting the seedlings outdoors, you need to “harden them off.” This means gradually exposing them to outdoor conditions to acclimate them to the sun, wind, and temperature changes. Start by placing the seedlings outdoors in a sheltered spot for an hour or two each day, gradually increasing the amount of time they spend outside over the course of a week or two.
Buying Seedlings:
If you’re short on time or space, buying seedlings is a perfectly fine option!
1. Choose Healthy Seedlings: Look for seedlings that are about 6-8 inches tall, with thick stems and healthy green leaves. Avoid seedlings that are leggy (tall and spindly), yellowed, or have any signs of disease or pests.
2. Harden Off the Seedlings: Even if you buy seedlings, it’s still a good idea to harden them off for a few days before transplanting them into the garden.
Preparing Your Garden Bed
Black tomatoes, like all tomatoes, need plenty of sunshine and well-drained soil.
1. Choose a Sunny Location: Tomatoes need at least 6-8 hours of direct sunlight per day.
2. Prepare the Soil: Amend the soil with plenty of compost or other organic matter. This will improve drainage, fertility, and water retention. I like to add a generous amount of composted manure to my tomato beds.
3. Check the Soil pH: Tomatoes prefer a soil pH of 6.0-6.8. You can test your soil pH with a soil testing kit. If your soil is too acidic, you can add lime to raise the pH. If it’s too alkaline, you can add sulfur to lower the pH.
4. Consider Raised Beds: If your soil is heavy clay or poorly drained, consider growing your tomatoes in raised beds. This will improve drainage and make it easier to control the soil conditions.
Transplanting Your Tomato Seedlings
Now for the exciting part 鈥?getting those little plants into the ground!
1. Wait for Warm Weather: Don’t transplant your tomato seedlings until the danger of frost has passed and the soil has warmed up to at least 60掳F (16掳C).
2. Dig Holes: Dig holes that are slightly larger than the root balls of your seedlings. Space the holes about 2-3 feet apart, depending on the variety of tomato you’re growing.
3. Add Fertilizer: Add a handful of slow-release tomato fertilizer to each hole. This will give your plants a boost of nutrients as they get established.
4. Plant the Seedlings: Gently remove the seedlings from their pots and loosen the root balls. Place the seedlings in the holes and backfill with soil. Bury the stem up to the first set of leaves. This will encourage the plant to develop more roots along the buried stem, making it stronger and more productive.
5. Water Thoroughly: Water the seedlings thoroughly after planting.
6. Add Support: Tomatoes need support to keep them from falling over and to keep the fruit off the ground. You can use stakes, cages, or trellises. I prefer cages because they’re easy to use and provide good support. Install the support at the time of planting to avoid damaging the roots later.
Caring for Your Black Tomato Plants
Once your tomato plants are in the ground, it’s important to provide them with proper care to ensure a bountiful harvest.
1. Water Regularly: Tomatoes need consistent watering, especially during hot, dry weather. Water deeply and regularly, aiming to keep the soil consistently moist but not waterlogged. Avoid watering the foliage, as this can encourage disease. Drip irrigation or soaker hoses are ideal for watering tomatoes.
2. Fertilize Regularly: Tomatoes are heavy feeders and need regular fertilization to produce a good crop. Fertilize every 2-3 weeks with a balanced tomato fertilizer.
3. Prune Your Plants: Pruning helps to improve air circulation, reduce disease, and encourage fruit production. Remove suckers (the small shoots that grow between the main stem and the branches) regularly. You can also remove some of the lower leaves to improve air circulation.
4. Watch for Pests and Diseases: Tomatoes are susceptible to a variety of pests and diseases. Monitor your plants regularly for signs of trouble. Common pests include aphids, tomato hornworms, and whiteflies. Common diseases include early blight, late blight, and blossom end rot. Treat pests and diseases promptly with appropriate organic or chemical controls.
5. Mulch Around the Plants: Mulching helps to retain moisture, suppress weeds, and regulate soil temperature. Use organic mulch such as straw, hay, or wood chips.
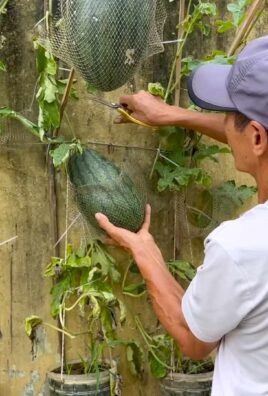
Harvesting Your Black Tomatoes
This is the moment you’ve been waiting for!
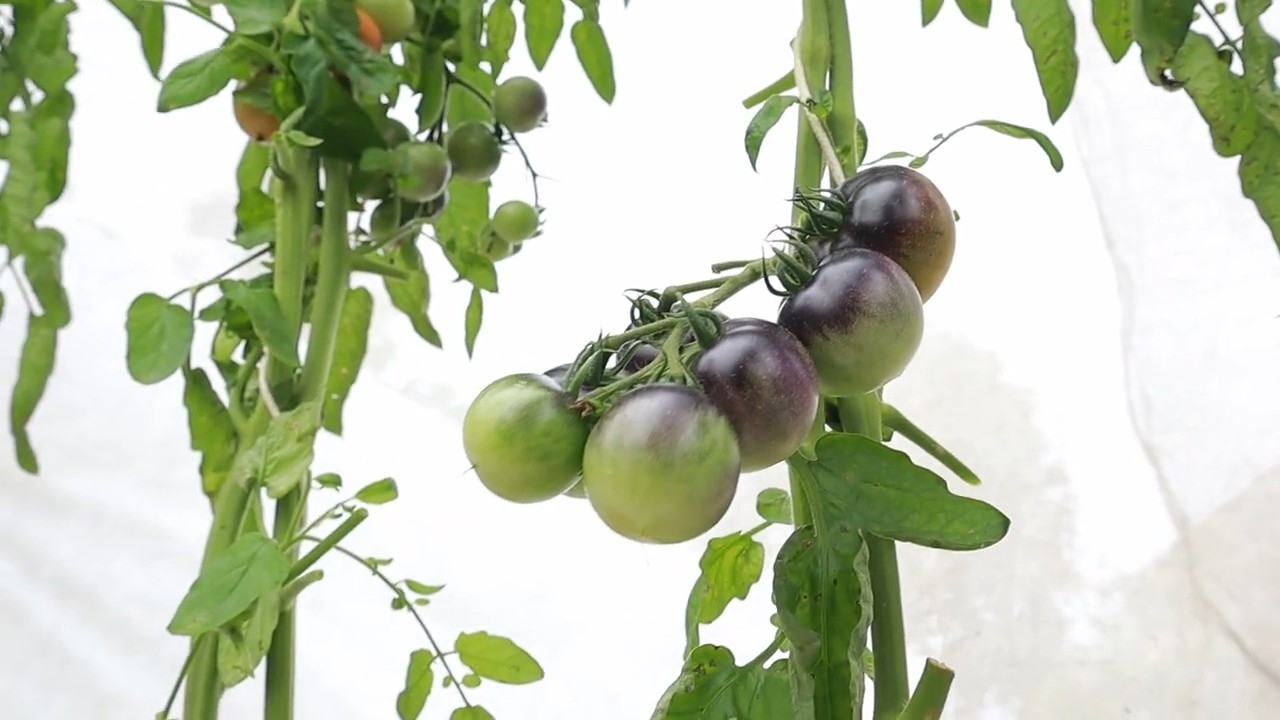
1. Look for Color Change: Black tomatoes are ripe when they turn a deep, almost black color. They should also be slightly soft to the touch.
2. Gently Twist and Pull: Gently twist and pull the tomato from the vine. If it doesn’t come off easily, it’s not quite ripe yet.
3. Enjoy Your Harvest: Black tomatoes are delicious eaten fresh, sliced in salads, or used in sauces and salsas
Conclusion
So, there you have it! Growing black tomatoes at home isn’t just a gardening project; it’s an adventure in flavor, a testament to your green thumb, and a conversation starter all rolled into one. We’ve walked you through the essential steps, from selecting the right variety to nurturing your plants to their full, dark, and delicious potential.
Why is this DIY trick a must-try? Because store-bought tomatoes, even the heirloom varieties, often lack the intense, smoky sweetness that truly defines a perfectly grown black tomato. You control the environment, the nutrients, and the care, resulting in a fruit that bursts with unparalleled flavor. Imagine slicing into a deep, mahogany-colored tomato, the aroma filling your kitchen, and the taste transporting you to a sun-drenched garden. That’s the promise of growing your own.
But the beauty of gardening lies in its adaptability. Feel free to experiment! Try different companion plants like basil or marigolds to deter pests and enhance flavor. Consider using different types of organic fertilizer to see how they impact the size and taste of your tomatoes. If you live in a particularly hot climate, provide afternoon shade to prevent sunscald. For those in cooler regions, consider starting your seeds indoors earlier to extend the growing season.
Variations and Suggestions:
* Grafted Black Tomatoes: If you’re looking for increased disease resistance and vigor, consider purchasing grafted black tomato plants. The rootstock is typically a hardier variety, providing a strong foundation for your black tomato scion.
* Container Gardening: Don’t have a large garden? No problem! Black tomatoes thrive in large containers (at least 20 gallons). Just ensure they receive plenty of sunlight and consistent watering.
* Hydroponics: For the adventurous gardener, hydroponic systems can provide precise control over nutrients and water, leading to impressive yields.
* Seed Saving: Once you’ve grown a particularly exceptional black tomato, save the seeds for future generations. This ensures you’ll always have access to your favorite variety.
We wholeheartedly encourage you to embark on this rewarding journey. The satisfaction of harvesting your own homegrown black tomatoes is truly unmatched. It’s a chance to connect with nature, learn new skills, and enjoy the fruits (literally!) of your labor.
Don’t be afraid to get your hands dirty, experiment, and learn from your mistakes. Gardening is a continuous learning process, and every season brings new challenges and opportunities.
So, grab your seeds, prepare your soil, and get ready to experience the magic of growing black tomatoes at home. We can’t wait to hear about your experiences! Share your photos, tips, and triumphs with us in the comments below. Let’s build a community of black tomato enthusiasts and inspire others to discover the joy of homegrown goodness. Happy gardening!
Frequently Asked Questions (FAQ)
What are the best black tomato varieties to grow?
Several excellent black tomato varieties are available, each with its unique characteristics. Some popular choices include:
* Black Krim: Known for its rich, slightly salty flavor and flattened shape. It’s a good choice for slicing and sandwiches.
* Cherokee Purple: Despite its name, this tomato has a dusky rose-purple color with dark shoulders. It boasts a complex, sweet, and slightly smoky flavor.
* Black Prince: A smaller, more compact variety that’s ideal for container gardening. It has a sweet, slightly tart flavor.
* Paul Robeson: Named after the famous singer and actor, this tomato is known for its deep, rich flavor and smooth texture.
* Japanese Black Trifele: Pear-shaped with a unique, slightly spicy flavor.
The best variety for you will depend on your personal preferences and growing conditions. Consider trying a few different varieties to see which ones you like best.
How much sunlight do black tomatoes need?
Black tomatoes, like all tomatoes, require at least 6-8 hours of direct sunlight per day. Insufficient sunlight can lead to leggy plants, reduced fruit production, and bland-tasting tomatoes. Choose a sunny location in your garden or on your patio for your tomato plants. If you’re growing them indoors, use grow lights to supplement natural sunlight.
What type of soil is best for growing black tomatoes?
Black tomatoes thrive in well-drained, fertile soil that is rich in organic matter. Amend your soil with compost, aged manure, or other organic materials to improve its drainage, fertility, and water-holding capacity. The ideal soil pH for tomatoes is between 6.0 and 6.8. You can test your soil pH using a soil testing kit and adjust it accordingly.
How often should I water my black tomato plants?
Water your black tomato plants deeply and regularly, especially during hot, dry weather. Aim to keep the soil consistently moist but not waterlogged. Water at the base of the plants to avoid wetting the foliage, which can increase the risk of fungal diseases. Mulching around the plants can help to retain moisture and suppress weeds.
What are some common pests and diseases that affect black tomatoes?
Black tomatoes are susceptible to the same pests and diseases as other tomato varieties. Some common pests include aphids, tomato hornworms, and whiteflies. Common diseases include early blight, late blight, and blossom end rot. Monitor your plants regularly for signs of pests or diseases and take appropriate action. Organic pest control methods, such as insecticidal soap and neem oil, can be effective for controlling many pests. Proper watering, good air circulation, and disease-resistant varieties can help to prevent diseases.
How do I prevent blossom end rot in my black tomatoes?
Blossom end rot is a common problem in tomatoes, caused by a calcium deficiency. It manifests as a dark, leathery spot on the bottom of the fruit. To prevent blossom end rot, ensure your soil is rich in calcium and that your plants receive consistent watering. You can add calcium to the soil by incorporating bone meal or crushed eggshells. Avoid over-fertilizing with nitrogen, as this can interfere with calcium uptake.
When is the best time to harvest black tomatoes?
Black tomatoes are ready to harvest when they are fully colored, slightly soft to the touch, and easily detach from the vine. The color will deepen to a rich, dark hue, and the shoulders of the tomato may still have a slight green tinge. Taste is the best indicator of ripeness. If the tomato smells fragrant and yields slightly to gentle pressure, it’s likely ready to pick.
Can I grow black tomatoes in containers?
Yes, black tomatoes can be successfully grown in containers. Choose a large container (at least 20 gallons) with drainage holes. Use a high-quality potting mix and provide your plants with plenty of sunlight, water, and fertilizer. Container-grown tomatoes may require more frequent watering and fertilization than those grown in the ground.
How do I save seeds from my black tomatoes?
To save seeds from your black tomatoes, select a ripe, healthy tomato. Cut it open and scoop out the seeds and pulp into a jar. Add a small amount of water and let the mixture ferment for a few days, stirring occasionally. This process helps to remove the gelatinous coating around the seeds. After fermentation, rinse the seeds thoroughly and spread them out on a paper towel to dry completely. Store the dried seeds in an airtight container in a cool, dark place.
Leave a Comment