

Growing bitter melon indoors might seem like a challenge, but trust me, it’s totally achievable and incredibly rewarding! Have you ever dreamt of harvesting your own exotic vegetables right from the comfort of your home? Imagine the satisfaction of plucking a fresh, vibrant bitter melon, knowing you nurtured it from seed to fruit. This DIY guide is your passport to that experience!
Bitter melon, also known as bitter gourd or karela, has a rich history, deeply rooted in Asian and African cultures. For centuries, it’s been celebrated not only for its unique, slightly bitter flavor but also for its impressive health benefits. From traditional medicine to culinary delights, this fascinating fruit has played a significant role in various societies.
But why bother growing bitter melon indoors? Well, for starters, it allows you to control the growing environment, shielding your precious plants from unpredictable weather, pests, and diseases. Plus, if you live in a region with a shorter growing season, indoor cultivation extends your harvest time, ensuring a steady supply of this nutritious vegetable. I’ve found that many people struggle with getting their bitter melon plants to thrive outdoors, so bringing them inside offers a fantastic solution. Let’s dive into the secrets of successfully cultivating this intriguing fruit within the cozy confines of your home!
Growing Bitter Melon Indoors: A Comprehensive DIY Guide
Hey there, fellow gardening enthusiasts! Ever thought about growing your own bitter melon? It might seem intimidating, but trust me, with a little patience and this guide, you can absolutely cultivate this unique and healthy vegetable right in your own home. I’m going to walk you through every step, from seed to harvest, so you can enjoy fresh, homegrown bitter melon whenever you want.
Choosing the Right Variety and Starting Seeds
First things first, let’s talk about choosing the right variety. Some bitter melon varieties are better suited for indoor growing than others. Look for compact or dwarf varieties, as they won’t require as much space. ‘Baby’ or ‘Dwarf’ types are usually good choices.
Here’s how to get those seeds started:
* Soaking the Seeds: Bitter melon seeds have a tough outer shell, so soaking them helps with germination.
* Scarifying the Seeds (Optional but Recommended): Gently nicking the seed coat with a nail file or sandpaper can also speed up germination. Be careful not to damage the inner seed.
* Choosing a Seed Starting Mix: Use a well-draining seed starting mix.
* Providing Warmth: Bitter melon loves warmth, so a heat mat can be incredibly helpful.
Now, let’s get to the step-by-step instructions:
1. Soak the Seeds: Place your bitter melon seeds in a small bowl of warm water. Let them soak for 24-48 hours. This softens the seed coat and encourages germination. I usually change the water once after 24 hours to keep things fresh.
2. Scarify the Seeds (Optional): Gently rub the seed coat with a nail file or a piece of fine-grit sandpaper. Just a light nick is enough. This helps water penetrate the seed more easily.
3. Prepare Your Seed Starting Trays or Pots: Fill your seed starting trays or small pots (about 2-3 inches in diameter) with a good quality seed starting mix. Moisten the mix thoroughly, but don’t let it get soggy.
4. Sow the Seeds: Make a small hole about ½ inch deep in the center of each pot or cell. Place one seed in each hole and cover it gently with the seed starting mix.
5. Water Gently: Water the seeds gently using a spray bottle or a watering can with a fine rose. You want to keep the soil moist but not waterlogged.
6. Provide Warmth and Humidity: Cover the seed starting tray or pots with a clear plastic dome or plastic wrap to create a humid environment. Place the tray on a heat mat if you have one. The ideal temperature for germination is between 75-85°F (24-29°C).
7. Monitor Germination: Keep an eye on your seeds. They should germinate within 7-14 days. Once the seedlings emerge, remove the plastic cover and move the tray to a bright location.
Transplanting Seedlings and Setting Up Your Growing Space
Once your seedlings have developed a few sets of true leaves (usually after 2-3 weeks), it’s time to transplant them into larger pots. This is a crucial step, so let’s get it right!
* Choosing the Right Pot Size: Bitter melon plants need plenty of room to grow, so choose a pot that is at least 10-12 inches in diameter and depth.
* Selecting a Well-Draining Potting Mix: Use a high-quality potting mix that drains well.
* Providing Support: Bitter melon is a vine, so it needs a trellis or other support structure to climb on.
Here’s the transplanting process:
1. Prepare Your Larger Pots: Fill your larger pots with a well-draining potting mix. Make a hole in the center of each pot that is large enough to accommodate the root ball of your seedling.
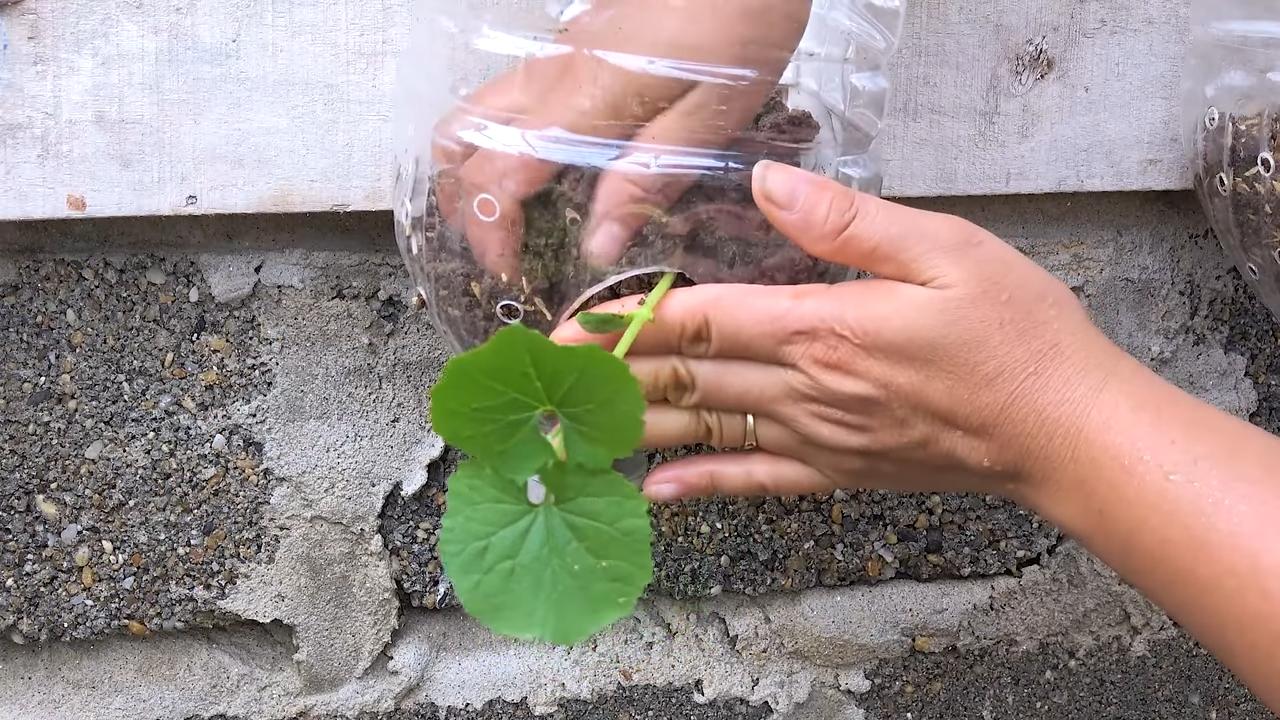
2. Gently Remove the Seedlings: Carefully remove the seedlings from their seed starting trays or pots. Be gentle to avoid damaging the roots. If the roots are tightly bound, gently loosen them with your fingers.
3. Transplant the Seedlings: Place the seedlings in the prepared holes and cover the roots with potting mix. Gently firm the soil around the base of the plant.
4. Water Thoroughly: Water the transplanted seedlings thoroughly.
5. Provide Support: Install a trellis or other support structure in the pot. This could be a bamboo stake, a small trellis, or even a tomato cage. Bitter melon vines can grow quite long, so make sure the support is sturdy enough to handle the weight.
6. Choose the Right Location: Place your potted bitter melon plants in a location that receives at least 6-8 hours of direct sunlight per day. A south-facing window is ideal. If you don’t have enough natural light, you may need to supplement with grow lights.
Caring for Your Bitter Melon Plants
Now that your plants are settled in, it’s time to focus on providing them with the care they need to thrive. This includes watering, fertilizing, and pruning.
* Watering: Bitter melon plants need consistent moisture, but they don’t like to sit in soggy soil.
* Fertilizing: Regular fertilization is essential for healthy growth and fruit production.
* Pruning: Pruning helps to encourage branching and fruit production.
* Pollination: Bitter melon flowers are usually pollinated by insects, but indoors, you may need to hand-pollinate them.
Here’s a detailed breakdown of each aspect of care:
1. Watering: Water your bitter melon plants regularly, especially during hot weather. Check the soil moisture by sticking your finger about an inch into the soil. If it feels dry, it’s time to water. Water deeply, until water drains out of the bottom of the pot. Avoid overwatering, as this can lead to root rot. I usually water every 2-3 days, but this will depend on the temperature and humidity in your home.
2. Fertilizing: Feed your bitter melon plants every 2-3 weeks with a balanced liquid fertilizer. Look for a fertilizer with an NPK ratio of 10-10-10 or similar. Follow the instructions on the fertilizer label. You can also use organic fertilizers like compost tea or fish emulsion.
3. Pruning: Prune your bitter melon plants regularly to encourage branching and fruit production. Pinch off the tips of the vines to promote lateral growth. You can also remove any yellowing or dead leaves. I usually prune my plants every few weeks to keep them tidy and productive.
4. Hand-Pollination: Bitter melon flowers are either male or female. The female flowers have a small, immature fruit behind the flower, while the male flowers do not. To hand-pollinate, use a small paintbrush to transfer pollen from the male flowers to the female flowers. Gently brush the pollen onto the stigma (the sticky part in the center of the female flower). Do this in the morning, when the flowers are open. You’ll know if pollination was successful if the small fruit behind the female flower starts to swell.
5. Pest and Disease Control: Keep an eye out for pests like aphids, spider mites, and whiteflies. If you spot any pests, treat them with insecticidal soap or neem oil. You can also prevent pests by keeping your plants healthy and providing good air circulation. Bitter melon plants can also be susceptible to fungal diseases like powdery mildew. To prevent fungal diseases, avoid overwatering and provide good air circulation. If you see signs of fungal disease, treat the plants with a fungicide.
Harvesting Your Bitter Melon
After all your hard work, it’s finally time to harvest your bitter melon!
* Knowing When to Harvest: Bitter melon is typically harvested when it is still green and slightly immature.
* Harvesting Techniques: Use a sharp knife or scissors to cut the fruit from the vine.
Here’s how to harvest your bitter melon:
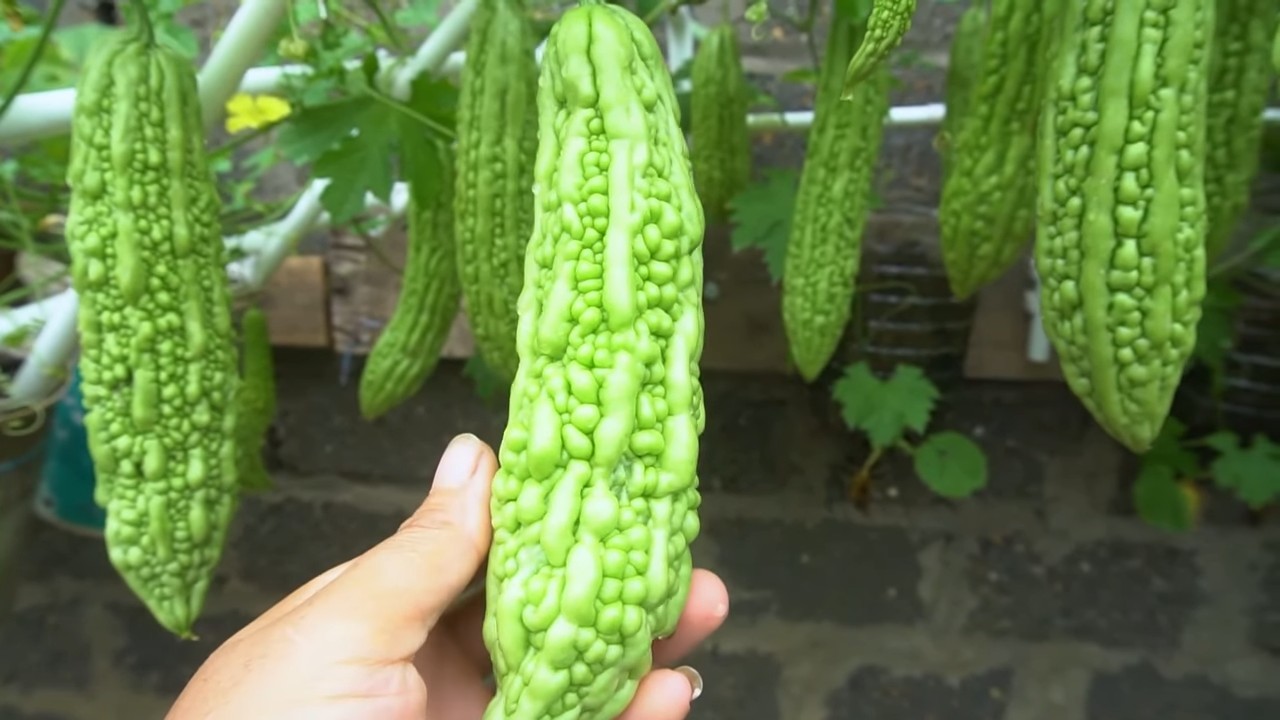
1. Check for Ripeness: Bitter melon is usually ready to harvest about 2-3 months after planting. The fruit should be green and firm, but not too hard. The skin should be smooth and free of blemishes. If the fruit starts to turn yellow or orange, it is overripe and will be more bitter.
2. Harvest Carefully: Use a sharp knife or scissors to cut the fruit from the vine. Leave a small stem attached to the fruit.
3. Enjoy Your Harvest: Bitter melon can be eaten raw or cooked. It is often used in stir-fries, soups, and stews. It has a distinctively bitter flavor, which some people find appealing. You can reduce the bitterness by soaking the sliced melon in salted water for 30 minutes before cooking.
And there you have it! You’ve successfully grown bitter melon indoors. With a little care and attention, you can enjoy fresh, homegrown bitter melon all year round. Happy gardening!
Conclusion
So, there you have it! Growing bitter melon indoors might seem like a daunting task, but with the right approach and a little patience, you can successfully cultivate this unique and nutritious vegetable right in your own home. We’ve walked you through the essential steps, from selecting the right variety and preparing the soil to providing adequate light and support.
Why is this DIY trick a must-try? Because it offers a multitude of benefits. Firstly, it allows you to enjoy fresh, homegrown bitter melon regardless of your climate or outdoor space limitations. Imagine the satisfaction of harvesting your own produce, knowing exactly where it came from and how it was grown. Secondly, growing bitter melon indoors gives you complete control over the growing environment, minimizing the risk of pests and diseases that can plague outdoor gardens. You can tailor the conditions to perfectly suit the plant’s needs, maximizing its growth and yield. Thirdly, it’s a fantastic way to add a touch of greenery to your home and engage in a rewarding and therapeutic activity. Watching your bitter melon vine climb and produce fruit is a truly fulfilling experience.
But the benefits don’t stop there. Homegrown bitter melon is often fresher and more flavorful than store-bought varieties. You can harvest it at its peak ripeness, ensuring the best possible taste and nutritional value. Plus, you’ll be reducing your carbon footprint by eliminating the need for transportation and packaging.
Looking for variations? Consider experimenting with different trellising methods to find what works best for your space. You could use a traditional trellis, a tomato cage, or even create your own custom support system. You can also try growing different varieties of bitter melon, each with its own unique flavor and appearance. Some popular choices include the Chinese bitter melon, which is longer and smoother, and the Indian bitter melon, which is smaller and more bumpy.
Don’t be afraid to get creative with your growing setup. You can use grow lights to supplement natural sunlight, especially during the winter months. You can also add companion plants to your container to attract pollinators and deter pests. Marigolds, basil, and nasturtiums are all excellent choices.
Ultimately, the key to success with growing bitter melon indoors is to be patient, observant, and willing to learn. Pay close attention to your plant’s needs and adjust your care accordingly. Don’t be discouraged if you encounter challenges along the way. Every gardener faces setbacks from time to time. The important thing is to learn from your mistakes and keep trying.
We strongly encourage you to give this DIY trick a try. It’s a rewarding and sustainable way to enjoy fresh, homegrown bitter melon, regardless of your location or experience level. We are confident that you will find the process both enjoyable and educational.
And most importantly, we want to hear about your experience! Share your tips, tricks, and photos with us in the comments section below. Let’s create a community of indoor bitter melon growers and learn from each other. Your insights could be invaluable to other readers who are just starting out. So, grab your seeds, prepare your soil, and get ready to embark on a rewarding gardening adventure. Happy growing! Remember, successful **growing bitter melon indoors** is within your reach!
Frequently Asked Questions (FAQ)
1. What is the best variety of bitter melon to grow indoors?
The best variety of bitter melon to grow indoors depends on your personal preferences and the space you have available. Generally, smaller varieties like the Indian bitter melon (also known as karela) tend to be more manageable in containers. However, you can also successfully grow larger varieties like the Chinese bitter melon if you have a large enough pot and a sturdy trellis. Consider the size of your growing space and the flavor profile you prefer when making your selection. Research different varieties and read reviews to find one that suits your needs. Some varieties are also more disease-resistant than others, which can be a significant advantage when growing indoors.
2. How much sunlight does bitter melon need when grown indoors?
Bitter melon requires at least 6-8 hours of direct sunlight per day to thrive. If you don’t have a south-facing window that provides sufficient sunlight, you’ll need to supplement with grow lights. LED grow lights are a great option because they are energy-efficient and provide the full spectrum of light that plants need. Position the grow lights close enough to the plant to provide adequate illumination, but not so close that they burn the leaves. You can also use a light meter to measure the light intensity and ensure that it’s within the optimal range for bitter melon. Remember to rotate your plant regularly to ensure that all sides receive equal exposure to light.
3. What type of soil is best for growing bitter melon in containers?
Bitter melon prefers well-draining soil that is rich in organic matter. A good potting mix for bitter melon should consist of a combination of peat moss, perlite, and vermiculite. You can also add compost or aged manure to improve the soil’s fertility and drainage. Avoid using garden soil, as it can be too heavy and compacted for container gardening. Make sure the pot you choose has drainage holes to prevent waterlogging, which can lead to root rot. You can also add a layer of gravel or pebbles at the bottom of the pot to improve drainage.
4. How often should I water my indoor bitter melon plant?
Water your bitter melon plant regularly, keeping the soil consistently moist but not waterlogged. The frequency of watering will depend on factors such as the size of the pot, the temperature, and the humidity. Check the soil moisture level regularly by sticking your finger into the soil. If the top inch of soil feels dry, it’s time to water. Water deeply, until water drains out of the drainage holes. Avoid overwatering, as this can lead to root rot. During hot weather, you may need to water more frequently.
5. How do I pollinate my indoor bitter melon plant?
Bitter melon is a monoecious plant, meaning it has separate male and female flowers on the same plant. To ensure pollination, you’ll need to manually transfer pollen from the male flowers to the female flowers. You can do this using a small paintbrush or cotton swab. Gently brush the pollen from the male flower’s anthers and transfer it to the female flower’s stigma. The female flowers can be identified by the small fruit that forms behind the flower. Pollinate your plants in the morning, when the flowers are most receptive. You may need to pollinate several flowers to ensure a good fruit set.
6. What are some common pests and diseases that affect indoor bitter melon plants?
Common pests that can affect indoor bitter melon plants include aphids, spider mites, and whiteflies. These pests can be controlled with insecticidal soap or neem oil. Diseases that can affect bitter melon plants include powdery mildew and root rot. Powdery mildew can be prevented by providing good air circulation and avoiding overhead watering. Root rot can be prevented by using well-draining soil and avoiding overwatering. Regularly inspect your plants for signs of pests or diseases and take action promptly to prevent them from spreading.
7. How long does it take for bitter melon to mature and be ready for harvest?
Bitter melon typically takes about 60-90 days to mature and be ready for harvest. The exact time will depend on the variety, growing conditions, and climate. The fruits are ready to harvest when they are still green and firm. If you wait too long, the fruits will turn yellow and become bitter. Harvest the fruits by cutting them from the vine with a sharp knife or pruning shears. Handle the fruits carefully to avoid bruising them.
8. Can I grow bitter melon indoors year-round?
Yes, you can grow bitter melon indoors year-round if you provide the right conditions. This includes adequate light, temperature, and humidity. You may need to use grow lights to supplement natural sunlight during the winter months. You’ll also need to maintain a consistent temperature of around 70-80°F. You can use a humidifier to increase the humidity if necessary. With proper care, you can enjoy fresh, homegrown bitter melon all year long.
9. How do I encourage more fruit production on my indoor bitter melon plant?
To encourage more fruit production, ensure your plant receives adequate sunlight, water, and nutrients. Fertilize regularly with a balanced fertilizer or a fertilizer specifically formulated for fruiting vegetables. Prune your plant to encourage branching and remove any dead or diseased leaves. Hand-pollinate the flowers regularly to ensure a good fruit set. You can also try pinching off the tips of the vines to encourage the plant to focus its energy on fruit production.
10. What are some creative ways to use homegrown bitter melon?
Homegrown bitter melon can be used in a variety of dishes. It can be stir-fried, stuffed, pickled, or added to soups and stews. It can also be juiced or used to make tea. Bitter melon has a distinctively bitter flavor, which can be an acquired taste. To reduce the bitterness, you can soak the sliced melon in salted water for 30 minutes before cooking. Experiment with different recipes and find ways to incorporate bitter melon into your diet. It’s a nutritious and versatile vegetable that can add a unique flavor to your meals.

Leave a Comment