

Growing bean sprouts towel method might sound like something out of a forgotten gardening manual, but trust me, it’s a super simple and rewarding way to bring fresh, crunchy goodness right into your kitchen! Forget those pricey trips to the grocery store for a handful of sprouts that might be past their prime. I’m going to show you how to cultivate your own little sprout farm using just a towel and a few other household items.
Sprouting, in general, has a rich history, dating back thousands of years. Ancient cultures recognized the incredible nutritional value packed into these tiny powerhouses. In many Asian cuisines, sprouts are a staple, adding a burst of flavor and vital nutrients to everything from stir-fries to salads. But you don’t need to be a seasoned gardener or a culinary expert to enjoy the benefits of fresh sprouts.
Why should you learn this particular DIY trick? Well, for starters, it’s incredibly cost-effective. A bag of dried beans is far cheaper than buying pre-sprouted ones. Plus, you have complete control over the freshness and quality. More importantly, in a world where we’re all trying to eat healthier and be more sustainable, growing bean sprouts towel method is a fantastic way to connect with your food and reduce your reliance on store-bought produce. It’s a fun project for kids, a satisfying hobby for adults, and a delicious addition to any meal. So, let’s dive in and discover how easy it is to grow your own bean sprouts!
DIY: So einfach ziehst du Bohnensprossen mit der Handtuch-Methode!
Ich liebe frische Bohnensprossen! Sie sind knackig, gesund und peppen jedes Gericht auf. Aber im Supermarkt sind sie oft teuer und nicht immer frisch. Deshalb zeige ich dir heute, wie du sie ganz einfach zu Hause mit der Handtuch-Methode ziehen kannst. Es ist super easy und du brauchst kaum Material!
Was du brauchst:
* Bohnen: Am besten eignen sich Mungbohnen, aber du kannst auch Adzukibohnen oder andere Sprossenbohnen verwenden. Achte darauf, dass sie unbehandelt und keimfähig sind. Ich kaufe meine meistens im Bioladen oder online.
* Ein sauberes Geschirrtuch oder Mulltuch: Es sollte nicht zu dünn sein, damit es die Feuchtigkeit gut hält.
* Ein großes Glas oder eine Schüssel: Darin werden die Bohnen eingeweicht.
* Ein Sieb: Zum Abspülen der Bohnen.
* Ein Teller oder eine flache Schale: Darauf legst du das Handtuch mit den Bohnen.
* Eine Sprühflasche: Um das Handtuch feucht zu halten.
* Geduld: Sprossen brauchen ein paar Tage, um zu wachsen.
Schritt-für-Schritt-Anleitung:
Phase 1: Das Einweichen der Bohnen
1. Bohnen vorbereiten: Gib die Bohnen in das große Glas oder die Schüssel. Ich nehme meistens so ca. 100-150g, das reicht für eine ordentliche Portion Sprossen.
2. Gründlich spülen: Spüle die Bohnen unter fließendem Wasser ab, um Staub und Schmutz zu entfernen. Das ist wichtig, damit sich keine Bakterien bilden.
3. Einweichen: Fülle das Glas oder die Schüssel mit reichlich kaltem Wasser. Die Bohnen sollten komplett bedeckt sein. Lass sie jetzt für 8-12 Stunden einweichen. Ich mache das meistens über Nacht. Das Einweichen weicht die harte Schale auf und aktiviert den Keimprozess.
4. Wasser abgießen: Nach dem Einweichen gieße das Wasser ab und spüle die Bohnen noch einmal gründlich im Sieb ab.
Phase 2: Die Handtuch-Methode
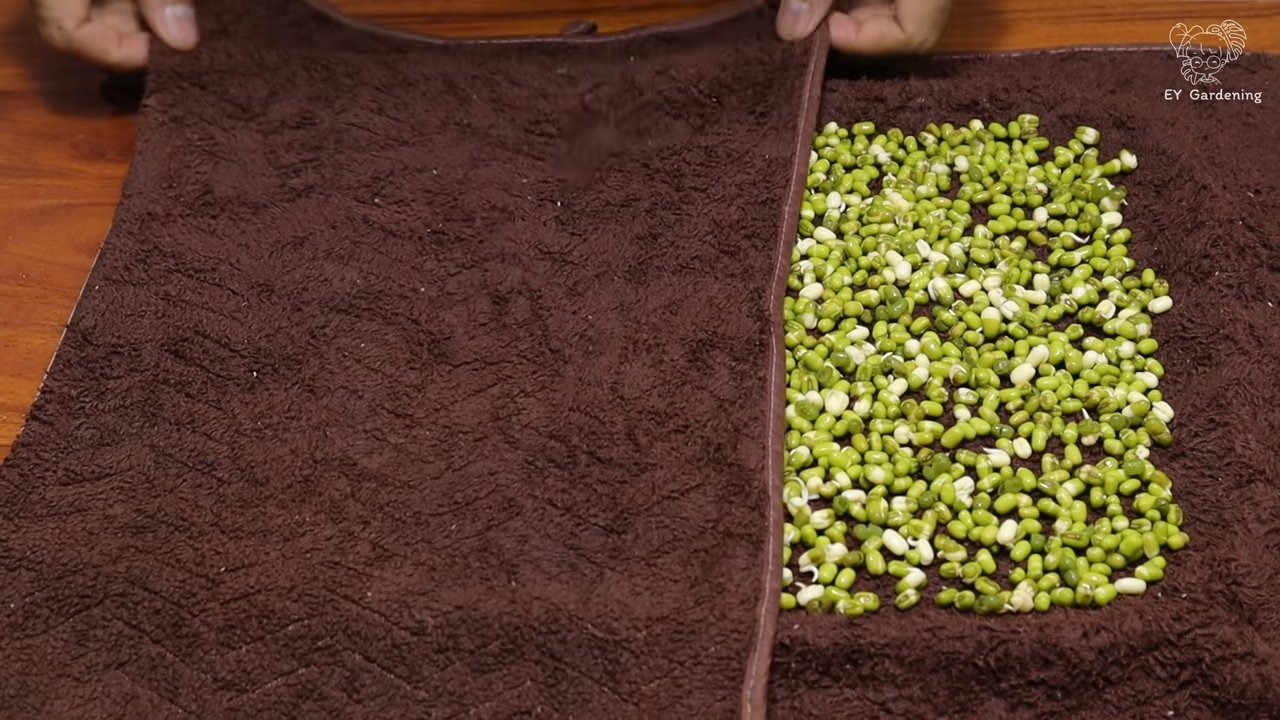
1. Handtuch vorbereiten: Befeuchte das Geschirrtuch oder Mulltuch gründlich mit Wasser. Es sollte richtig nass sein, aber nicht tropfen. Wringe es leicht aus.
2. Handtuch auslegen: Lege das feuchte Handtuch auf den Teller oder die flache Schale.
3. Bohnen verteilen: Verteile die eingeweichten Bohnen gleichmäßig auf dem feuchten Handtuch. Achte darauf, dass sie nicht zu dicht liegen, damit sie genug Platz zum Wachsen haben.
4. Handtuch einschlagen: Schlage das Handtuch über die Bohnen, so dass sie komplett bedeckt sind. Das sorgt für eine dunkle und feuchte Umgebung, die die Sprossen zum Wachsen brauchen.
5. Feuchtigkeit bewahren: Besprühe das Handtuch regelmäßig mit Wasser, damit es immer feucht bleibt. Ich mache das mindestens 2-3 Mal am Tag. Du kannst auch eine Sprühflasche mit Wasser neben den Teller stellen, damit du es nicht vergisst.
6. Standort wählen: Stelle den Teller mit dem Handtuch an einen dunklen und kühlen Ort. Direkte Sonneneinstrahlung ist nicht gut, da sie die Sprossen austrocknen kann. Ein Küchenschrank oder eine dunkle Ecke in der Küche sind ideal.
Phase 3: Die Pflege und Ernte
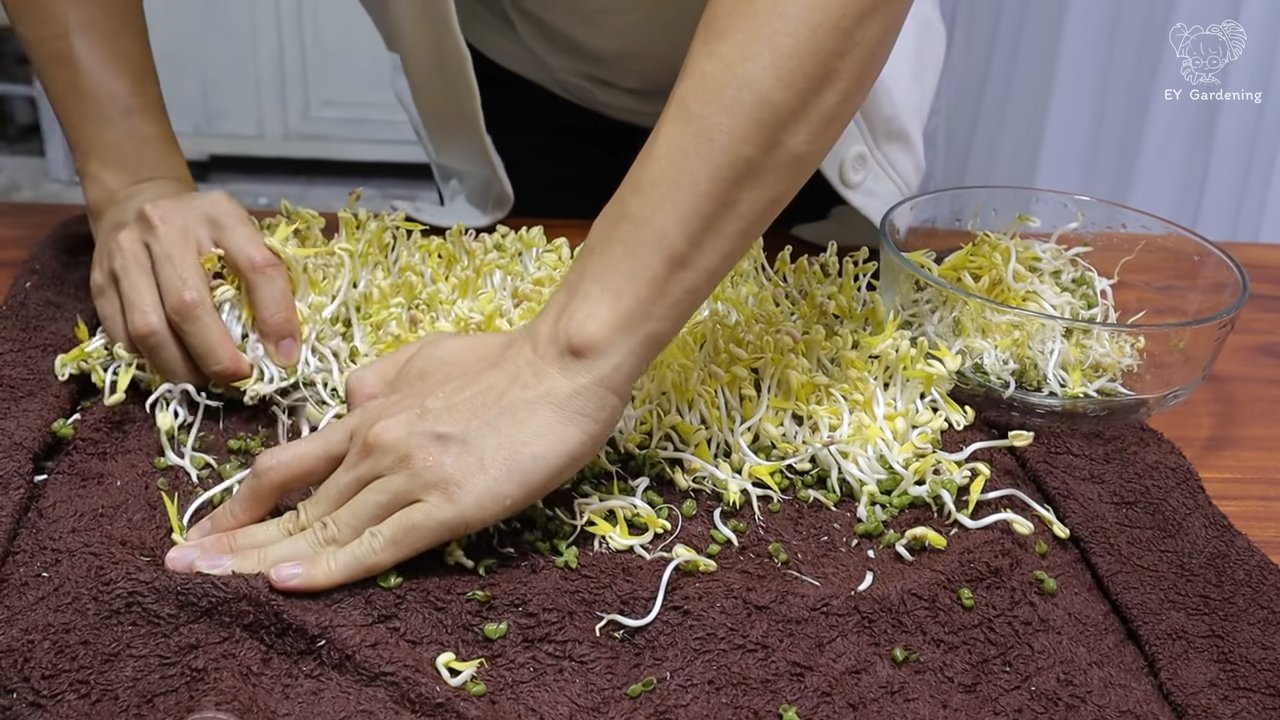
1. Regelmäßige Kontrolle: Kontrolliere die Bohnen täglich. Achte darauf, dass das Handtuch immer feucht ist und dass sich kein Schimmel bildet. Wenn du Schimmel entdeckst, solltest du die betroffenen Bohnen sofort entfernen.
2. Spülen: Spüle die Bohnen einmal täglich unter fließendem Wasser ab. Das hilft, Bakterienwachstum zu verhindern und sorgt für frische Sprossen.
3. Wachstum beobachten: Nach 2-5 Tagen sollten die ersten Sprossen zu sehen sein. Die genaue Wachstumsdauer hängt von der Temperatur und der Luftfeuchtigkeit ab.
4. Ernten: Wenn die Sprossen die gewünschte Länge erreicht haben (meistens so 2-3 cm), kannst du sie ernten. Spüle sie noch einmal gründlich ab und entferne die grünen Schalen, falls du sie nicht magst.
5. Lagern: Die geernteten Sprossen kannst du im Kühlschrank in einem luftdichten Behälter für 2-3 Tage aufbewahren.
Tipps und Tricks für perfekte Bohnensprossen:
* Hygiene ist wichtig: Achte darauf, dass alle Utensilien sauber sind, um Bakterienwachstum zu vermeiden.
* Qualität der Bohnen: Verwende nur keimfähige Bohnen von guter Qualität.
* Regelmäßige Feuchtigkeit: Das Handtuch muss immer feucht sein, aber nicht tropfen.
* Dunkelheit: Sprossen wachsen am besten im Dunkeln.
* Belüftung: Sorge für eine gute Belüftung, um Schimmelbildung zu verhindern.
* Nicht zu viele Bohnen: Verteile die Bohnen nicht zu dicht, damit sie genug Platz zum Wachsen haben.
* Verschiedene Bohnensorten: Probiere verschiedene Bohnensorten aus, um deinen Favoriten zu finden.
* Geschmack verbessern: Du kannst die Sprossen vor dem Verzehr kurz in kochendem Wasser blanchieren, um den Geschmack zu mildern.
* Verwendung: Bohnensprossen sind vielseitig einsetzbar. Du kannst sie roh in Salaten, Sandwiches oder Wraps verwenden, oder sie in Wok-Gerichten, Suppen oder Currys mitkochen.
Warum die Handtuch-Methode?
Ich finde die Handtuch-Methode super, weil sie so einfach und unkompliziert ist. Du brauchst keine teuren Geräte oder spezielle Behälter. Außerdem ist sie sehr platzsparend und du kannst sie überall durchführen. Und das Beste: Du hast immer frische und gesunde Bohnensprossen zur Hand!
Häufige Fehler und wie du sie vermeidest:
* Schimmelbildung: Das ist oft ein Zeichen für zu viel Feuchtigkeit oder mangelnde Belüftung. Achte darauf, dass das Handtuch nicht zu nass ist und spüle die Bohnen regelmäßig ab.
* Austrocknung: Wenn das Handtuch zu trocken ist, können die Sprossen nicht richtig wachsen. Besprühe es regelmäßig mit Wasser.
* Faule Bohnen: Entferne faule oder beschädigte Bohnen, bevor du sie einweichst, um die Ausbreitung von Bakterien zu verhindern.
* Zu wenig Platz: Wenn die Bohnen zu dicht liegen, können sie nicht richtig wachsen und es kann zu Schimmelbildung kommen. Verteile sie gleichmäßig auf dem Handtuch.
Ich hoffe, diese Anleitung hilft dir dabei, deine eigenen Bohnensprossen zu ziehen. Es ist wirklich kinderleicht und macht Spaß! Viel Erfolg!
Conclusion
So, there you have it! Growing bean sprouts using the towel method is not just a fun project; it’s a game-changer for anyone who loves fresh, crunchy sprouts but wants to avoid the often-questionable quality and high prices of store-bought varieties. This simple, low-tech approach puts you in complete control of the process, ensuring you get the freshest, most nutritious sprouts possible, right in your own kitchen.
Why is this a must-try? Because it’s incredibly easy, cost-effective, and yields impressive results. Forget about complicated sprouting systems or specialized equipment. All you need are a few common household items – a clean towel, a jar or container, and some bean seeds – and you’re on your way to enjoying a constant supply of delicious, homegrown sprouts. The towel method provides the perfect environment for germination, maintaining consistent moisture and darkness, which are crucial for successful sprouting.
But the benefits don’t stop there. Growing your own bean sprouts allows you to experiment with different types of beans and seeds. While mung beans are the most popular choice for classic bean sprouts, don’t be afraid to branch out and try adzuki beans, lentils, or even alfalfa seeds. Each variety offers a unique flavor and texture, adding exciting new dimensions to your salads, sandwiches, stir-fries, and more.
Consider these variations to personalize your sprouting experience:
* Spicy Sprouts: Add a pinch of red pepper flakes to the water during the soaking and rinsing stages for a subtle kick.
* Garlic Infusion: Place a clove of garlic in the jar during the sprouting process to impart a delicate garlic flavor.
* Herbal Enhancement: Add a sprig of fresh herbs like cilantro or parsley to the jar for a fragrant and flavorful twist.
Beyond the culinary advantages, growing bean sprouts is also a rewarding and educational experience. It’s a fantastic way to connect with nature, learn about the life cycle of plants, and appreciate the simple pleasures of growing your own food. Plus, it’s a great activity to do with kids, teaching them about responsibility and healthy eating habits.
We are confident that once you try this method, you’ll be hooked. The satisfaction of watching those tiny seeds transform into crunchy, flavorful sprouts is truly unmatched. So, ditch the store-bought sprouts and embrace the joy of homegrown goodness.
We encourage you to give this DIY bean sprout growing method a try. It’s easier than you think, and the results are well worth the effort. And most importantly, we want to hear about your experience! Share your photos, tips, and variations in the comments below. Let’s build a community of sprout enthusiasts and inspire others to discover the joys of growing their own food. Happy sprouting!
Frequently Asked Questions (FAQ)
What types of beans are best for sprouting using the towel method?
Mung beans are the most commonly used and arguably the easiest to sprout using the towel method. They produce the classic bean sprouts you find in many Asian dishes. However, you can also successfully sprout other types of beans and seeds, including adzuki beans, lentils, chickpeas, alfalfa seeds, radish seeds, and broccoli seeds. Keep in mind that different beans may have slightly different sprouting times and requirements, so it’s always a good idea to do some research beforehand. For example, some seeds may require a longer soaking period or a different level of darkness. Experimenting with different varieties is part of the fun!
How long does it take to grow bean sprouts using the towel method?
Generally, it takes between 3 to 5 days to grow bean sprouts using the towel method. The exact time will depend on the type of bean, the temperature of your environment, and the humidity levels. Mung beans typically sprout within 3 to 4 days. You’ll know they’re ready when the sprouts are about 2-3 inches long and have developed small roots. Remember to rinse the sprouts regularly during the sprouting process to keep them moist and prevent mold growth.
How do I prevent mold from growing on my bean sprouts?
Mold growth is a common concern when sprouting beans, but it’s easily preventable with a few simple precautions. The most important factor is proper hygiene. Always use clean equipment, including your jar, towel, and water. Rinse the sprouts thoroughly at least twice a day with fresh, cool water. This helps to remove any bacteria or mold spores that may be present. Ensure good air circulation around the jar or container to prevent moisture buildup. Avoid overcrowding the jar with too many beans, as this can also contribute to mold growth. If you do notice any mold, discard the entire batch of sprouts immediately.
How do I store bean sprouts after they are grown?
Once your bean sprouts are ready, rinse them thoroughly and drain them well. Pat them dry with a clean paper towel to remove excess moisture. Store the sprouts in an airtight container lined with a paper towel in the refrigerator. The paper towel will help to absorb any excess moisture and keep the sprouts fresh for longer. Properly stored bean sprouts can last for up to a week in the refrigerator. Before using them, give them another quick rinse to ensure they are still fresh and crisp.
Can I eat the bean sprouts raw?
Yes, you can eat bean sprouts raw, and many people enjoy them that way in salads and sandwiches. However, it’s important to be aware of the potential risks associated with eating raw sprouts. Sprouts are grown in warm, moist conditions, which can be conducive to bacterial growth. To minimize the risk of foodborne illness, it’s crucial to wash the sprouts thoroughly before eating them. If you are pregnant, elderly, or have a weakened immune system, it’s generally recommended to cook bean sprouts before consuming them to kill any harmful bacteria.
What if my bean sprouts don’t sprout?
There are several reasons why your bean sprouts might not sprout. The most common cause is using old or non-viable seeds. Make sure you are using fresh bean seeds that are specifically intended for sprouting. Another reason could be improper soaking. Ensure that you soak the beans for the recommended amount of time, usually 8-12 hours. Insufficient moisture can also prevent sprouting. Make sure the towel is consistently damp but not soaking wet. Temperature also plays a role. The ideal temperature for sprouting is between 70-75°F (21-24°C). If the temperature is too cold or too hot, it can inhibit sprouting. Finally, make sure the sprouts are kept in a dark environment, as light can also hinder germination.
Can I reuse the towel for sprouting?
Yes, you can reuse the towel for sprouting, but it’s essential to clean it thoroughly after each batch to prevent the buildup of bacteria and mold. Wash the towel in hot water with soap or detergent. You can also add a small amount of bleach to the wash to disinfect it. Make sure to rinse the towel thoroughly to remove any traces of soap or bleach. Allow the towel to air dry completely before using it again. It’s also a good idea to have a dedicated towel specifically for sprouting to avoid cross-contamination.
Are there any health benefits to eating bean sprouts?
Yes, bean sprouts are a nutritious addition to your diet. They are low in calories and fat and are a good source of vitamins, minerals, and fiber. Bean sprouts are particularly rich in vitamin C, vitamin K, and folate. They also contain antioxidants, which can help protect your body against damage from free radicals. The fiber in bean sprouts can aid in digestion and promote gut health. Incorporating bean sprouts into your diet can contribute to overall health and well-being.


Leave a Comment