

Grow Watermelon at Home – sounds like a summer dream, right? Imagine biting into a juicy, sweet watermelon you nurtured from a tiny seed, right in your own backyard! Forget those bland, store-bought melons; we’re talking about homegrown goodness bursting with flavor.
Watermelons have a rich history, dating back thousands of years to Africa. Ancient Egyptians even depicted them in their art and placed them in tombs for the afterlife! Today, growing your own watermelon is more than just a historical nod; it’s a way to connect with nature and enjoy the fruits (literally!) of your labor.
But why should you bother with this DIY project? Well, for starters, you control everything – from the soil to the sunlight – ensuring a healthier, tastier treat. Plus, let’s be honest, there’s a certain satisfaction in saying, “I grew this!” And in today’s world, where we’re all looking for ways to be more self-sufficient and eco-friendly, learning how to grow watermelon at home is a fantastic skill to acquire.
This article is your ultimate guide to successfully cultivating watermelons, even if you’re a complete beginner. I’ll share my favorite tricks and hacks, from choosing the right variety to warding off pests, so you can enjoy a bountiful harvest. Get ready to roll up your sleeves and transform your garden into a watermelon wonderland!
Grow Your Own Juicy Watermelons: A DIY Guide
Hey there, fellow gardening enthusiasts! Ever dreamt of biting into a sweet, homegrown watermelon on a hot summer day? Well, dream no more! Growing your own watermelons is totally achievable, even if you don’t have acres of land. I’m going to walk you through everything you need to know, from choosing the right variety to harvesting that perfect melon. Let’s get started!
Choosing the Right Watermelon Variety
Before we even think about planting, we need to pick the right watermelon variety. This is super important because different varieties have different needs and grow best in different climates. Here’s a quick rundown of some popular choices:
* ‘Sugar Baby’: This is a classic, compact variety that’s perfect for smaller gardens. It produces small, round melons with a deep red flesh. It matures relatively quickly, usually in about 75-80 days.
* ‘Crimson Sweet’: A widely popular variety known for its excellent flavor and disease resistance. It produces large, oblong melons with a bright red flesh and dark green rind. Expect a longer growing season, around 85 days.
* ‘Jubilee’: Another large variety, ‘Jubilee’ watermelons are oblong with a light green rind and dark green stripes. They’re known for their sweet, juicy flesh and good disease resistance. They also need around 85 days to mature.
* ‘Yellow Doll’: If you’re looking for something a little different, try ‘Yellow Doll’. This variety produces small, round melons with a bright yellow flesh that’s incredibly sweet. It matures in about 70-75 days.
* ‘Bush Sugar Baby’: If space is a real constraint, this bush variety is your best bet. It produces smaller melons on compact vines, making it ideal for container gardening.
Consider your local climate and the amount of space you have when making your choice. I personally love ‘Sugar Baby’ for its early maturity and manageable size.
Preparing the Soil
Watermelons are heavy feeders, meaning they need nutrient-rich soil to thrive. Proper soil preparation is key to a successful harvest.
* Sunlight: Watermelons need at least 6-8 hours of direct sunlight per day. Choose a location in your garden that gets plenty of sun.
* Soil Type: Watermelons prefer well-drained, sandy loam soil. This type of soil warms up quickly in the spring and provides good drainage, preventing root rot.
* Soil pH: The ideal soil pH for watermelons is between 6.0 and 6.8. You can test your soil pH with a soil testing kit, which you can find at most garden centers.
* Amendments: Before planting, amend your soil with plenty of organic matter, such as compost or well-rotted manure. This will improve drainage, add nutrients, and help retain moisture.
Planting Watermelon Seeds or Seedlings
You can start watermelons from seeds or purchase seedlings from a local nursery. Starting from seeds gives you more control over the process, but seedlings can give you a head start.
* Starting Seeds Indoors (Optional): If you live in a cooler climate with a short growing season, you can start your watermelon seeds indoors about 4-6 weeks before the last expected frost.
* Use peat pots or biodegradable pots to avoid disturbing the roots when transplanting.
* Sow seeds about 1 inch deep in a seed-starting mix.
* Keep the soil moist and warm (around 80-85°F) until germination. A heat mat can be helpful.
* Once the seedlings emerge, provide them with plenty of light. A grow light is ideal.
* Direct Sowing: If you live in a warmer climate with a longer growing season, you can direct sow watermelon seeds directly into the garden.
* Wait until the soil temperature reaches at least 70°F.
* Sow seeds about 1 inch deep and 2-3 feet apart.
* Water thoroughly after planting.
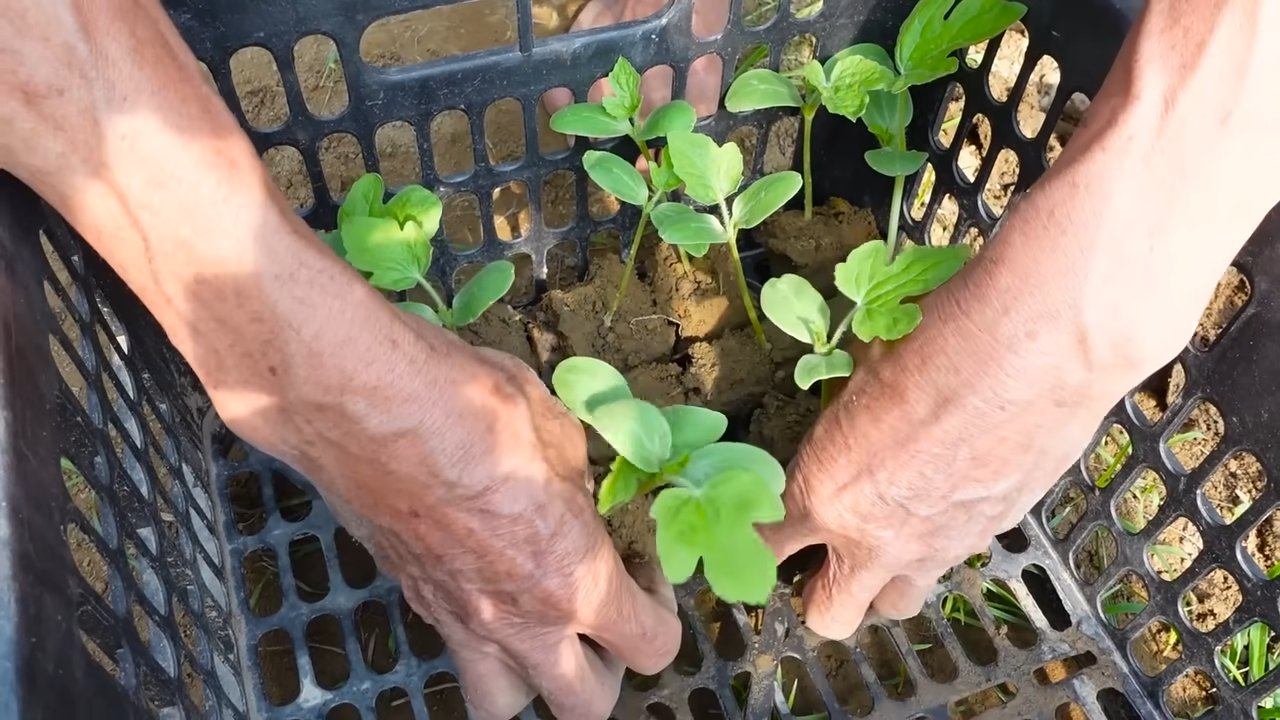
* Transplanting Seedlings: If you started your seeds indoors or purchased seedlings, it’s time to transplant them into the garden.
* Harden off the seedlings by gradually exposing them to outdoor conditions for a week before transplanting.
* Choose a cloudy day to transplant to minimize stress.
* Dig a hole slightly larger than the root ball.
* Gently remove the seedling from its pot and place it in the hole.
* Backfill with soil and water thoroughly.
* Space seedlings 2-3 feet apart.
Caring for Your Watermelon Plants
Once your watermelon plants are in the ground, it’s important to provide them with the care they need to thrive.
* Watering: Watermelons need consistent moisture, especially during fruit development. Water deeply and regularly, aiming for about 1-2 inches of water per week. Avoid overhead watering, which can promote fungal diseases. Drip irrigation is a great option.
* Fertilizing: Watermelons are heavy feeders, so regular fertilization is important.
* Apply a balanced fertilizer (e.g., 10-10-10) at planting time.
* Side-dress with a nitrogen-rich fertilizer when the vines begin to run.
* Switch to a phosphorus and potassium-rich fertilizer when the fruits begin to set.
* Weeding: Keep the area around your watermelon plants free of weeds. Weeds compete with watermelons for nutrients and water. Mulching can help suppress weeds and retain moisture.
* Pruning (Optional): Some gardeners prune their watermelon vines to encourage larger fruit.
* Remove any suckers (small shoots that grow from the base of the plant).
* Pinch off the ends of the vines after the first few fruits have set.
* Pest and Disease Control: Watermelons can be susceptible to various pests and diseases.
* Common Pests: Aphids, squash bugs, cucumber beetles. Use insecticidal soap or neem oil to control these pests.
* Common Diseases: Powdery mildew, anthracnose, fusarium wilt. Use a fungicide to prevent or treat these diseases. Ensure good air circulation to minimize fungal problems.
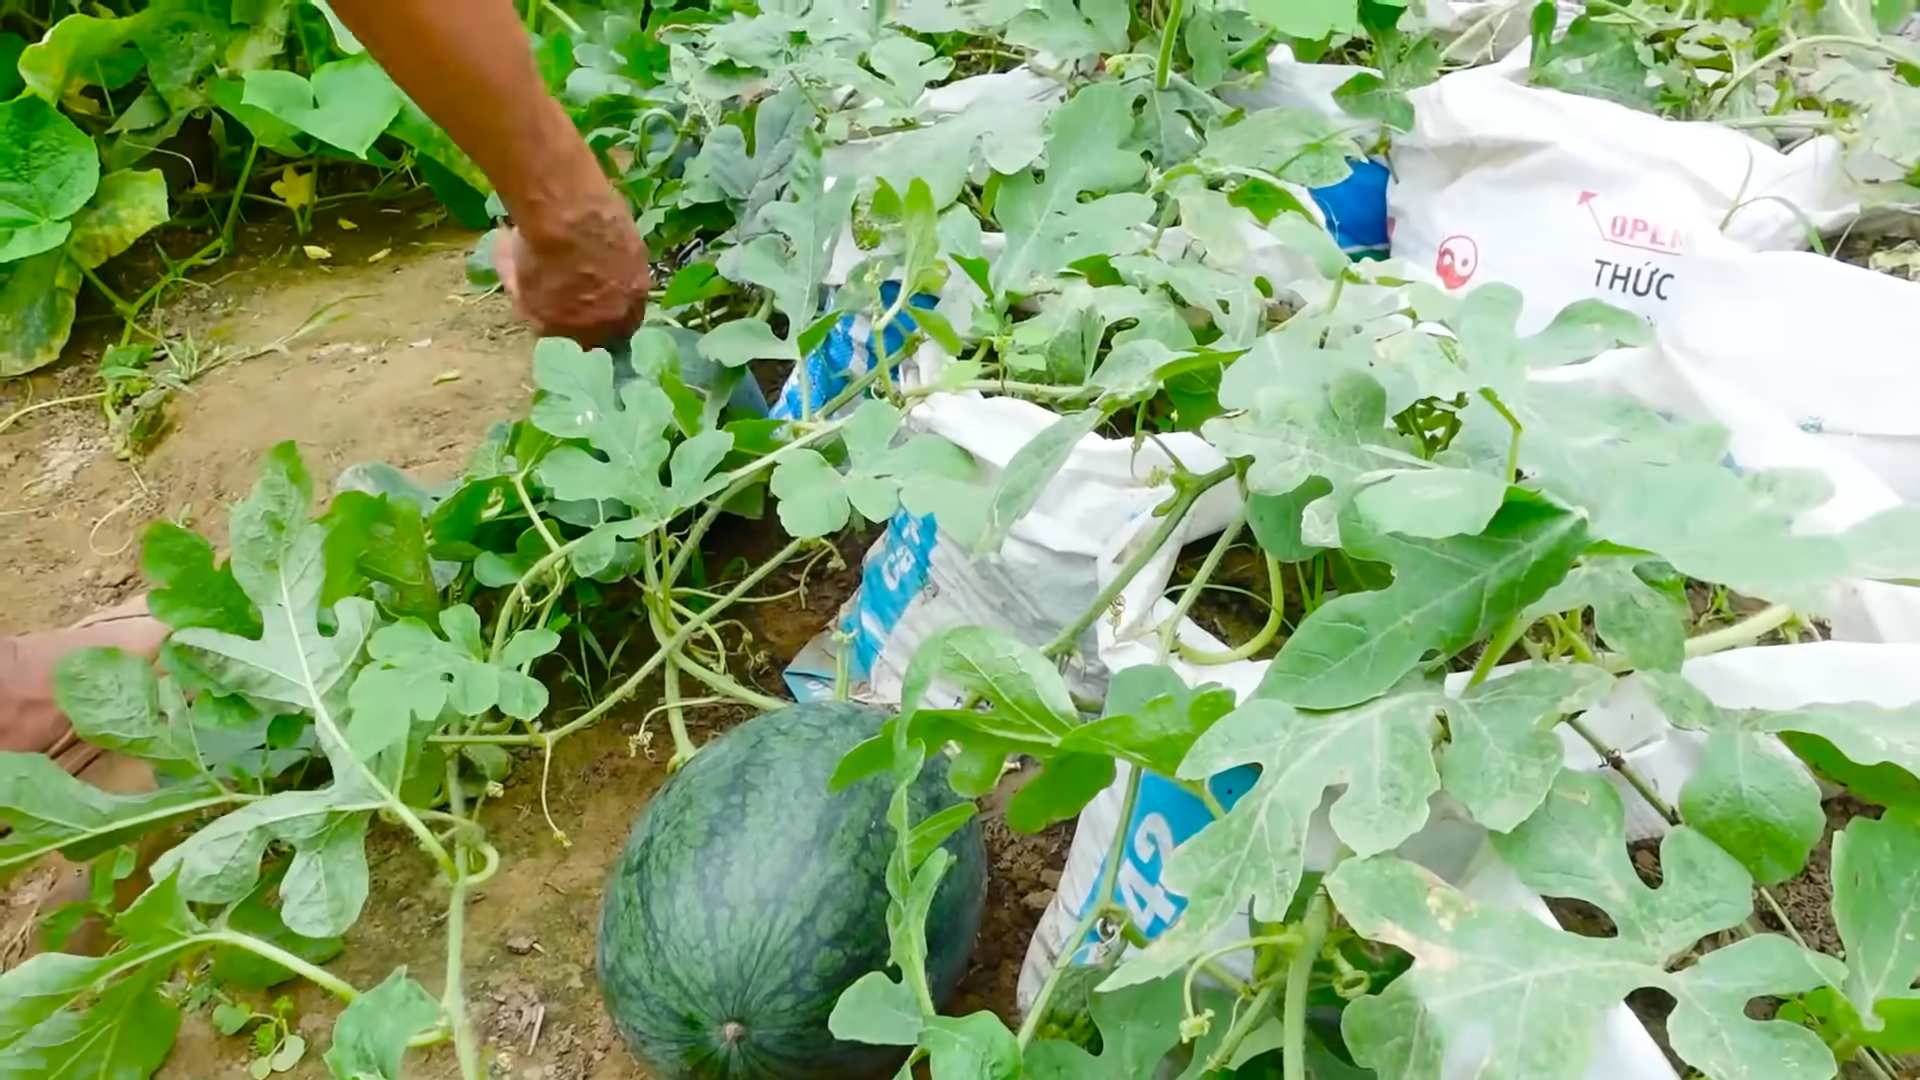
* Supporting the Fruit: As the watermelons grow larger, they may need support to prevent them from rotting on the ground. You can use straw, cardboard, or even old tires to elevate the fruit.
Hand Pollination (If Needed)
Watermelons have separate male and female flowers. Bees are usually responsible for pollination, but if you’re not seeing many bees in your garden, you may need to hand-pollinate.
1. Identify Male and Female Flowers: Male flowers have a long, thin stem, while female flowers have a small, immature watermelon at the base.
2. Pollinate in the Morning: The best time to hand-pollinate is in the morning, when the flowers are open.
3. Transfer Pollen: Use a small paintbrush or cotton swab to collect pollen from the male flower.
4. Apply Pollen to Female Flower: Gently brush the pollen onto the stigma (the sticky part) of the female flower.
5. Repeat: Repeat this process for several female flowers.
Harvesting Your Watermelons
Knowing when to harvest your watermelons is crucial for getting that perfect, sweet flavor. Here are a few signs to look for:
* The Tendril Test: The tendril closest to the watermelon stem should be brown and dry.
* The Ground Spot: The spot where the watermelon rests on the ground (the ground spot) should be yellow or cream-colored.
* The Thump Test: Give the watermelon a gentle thump. A ripe watermelon will sound hollow.
* Days to Maturity: Check the seed packet or plant tag for the days to maturity. This is a good guideline, but it’s not always accurate.
Once you’ve determined that your watermelon is ripe, use a sharp knife to cut it from the vine, leaving a few inches of stem attached.
Enjoying Your Homegrown Watermelon
Congratulations! You’ve successfully grown your own watermelon. Now it’s time to enjoy the fruits (or rather, the melons) of your labor.
* Chill the Watermelon: Place the watermelon in the refrigerator for a few hours before cutting it. This will enhance the flavor and make it even more refreshing.
* Cut and Serve: Cut the watermelon into wedges or cubes and enjoy!
* Store Leftovers: Store leftover watermelon in an airtight container in the refrigerator.
Troubleshooting Common Problems
Even with the best care, you may encounter some problems while growing watermelons. Here are a few common issues and how to address them:
* Poor Fruit Set: This can be caused by lack of pollination, extreme temperatures, or nutrient deficiencies.
Conclusion
So, there you have it! Growing watermelons at home, while it might seem daunting at first, is entirely achievable with a little planning, patience, and the right approach. We’ve walked you through the essential steps, from selecting the perfect variety for your climate to nurturing those precious seedlings and providing the support they need to thrive. The satisfaction of harvesting your own juicy, sweet watermelon, knowing you cultivated it from seed to fruit, is truly unparalleled. It’s a rewarding experience that connects you to nature and provides a delicious, healthy treat for you and your loved ones.
But why is this DIY watermelon growing trick a must-try? Beyond the sheer joy of homegrown produce, consider the benefits: you control the entire process, ensuring your watermelons are free from harmful pesticides and chemicals. You can choose heirloom varieties that offer unique flavors and textures unavailable in supermarkets. Plus, growing your own food is a fantastic way to reduce your carbon footprint and support sustainable practices. And let’s not forget the bragging rights! Imagine serving a slice of your own homegrown watermelon at your next barbecue – your guests will be amazed.
Don’t be afraid to experiment! There are countless variations you can try to personalize your watermelon growing journey. Consider companion planting – basil, marigolds, and nasturtiums are excellent choices for deterring pests and attracting beneficial insects. You could also explore different trellising methods to maximize space and improve air circulation. For those with limited space, bush or dwarf watermelon varieties are perfect for container gardening. And if you’re feeling adventurous, try grafting your watermelon onto a more vigorous rootstock for increased disease resistance and yield.
Ultimately, growing watermelons at home is an investment in your health, your environment, and your happiness. It’s a chance to learn new skills, connect with nature, and enjoy the fruits (literally!) of your labor. We encourage you to take the plunge and give it a try. You might be surprised at how easy and rewarding it can be.
We’re confident that with the information provided, you’re well-equipped to embark on your watermelon growing adventure. Remember to adapt the techniques to your specific climate and growing conditions. And most importantly, don’t be discouraged by setbacks – gardening is a learning process, and every season brings new opportunities.
So, grab your seeds, prepare your soil, and get ready to experience the sweet taste of success. We can’t wait to hear about your watermelon growing triumphs! Share your experiences, tips, and photos with us in the comments below. Let’s build a community of passionate home gardeners and celebrate the joy of growing our own food. Happy growing! Let us know if you have any questions about how to grow watermelon at home.
Frequently Asked Questions (FAQ)
Q: What is the best time to start watermelon seeds indoors?
A: The ideal time to start watermelon seeds indoors is typically 4-6 weeks before the last expected frost in your area. This allows the seedlings to develop a strong root system before being transplanted outdoors. Check your local weather forecasts and planting calendars to determine the appropriate timing for your region. Starting too early can result in leggy, weak seedlings, while starting too late may shorten your growing season and reduce your harvest.
Q: How much space do watermelons need to grow?
A: Watermelons are sprawling plants that require a significant amount of space. As a general rule, allow at least 3-4 feet between plants in rows that are 6-8 feet apart. Bush or dwarf varieties require less space, typically around 2-3 feet between plants. Consider the mature size of the watermelon variety you’re growing when determining spacing. Proper spacing is crucial for adequate air circulation, sunlight penetration, and nutrient uptake. Overcrowding can lead to increased disease susceptibility and reduced fruit production.
Q: What kind of soil is best for growing watermelons?
A: Watermelons thrive in well-drained, sandy loam soil that is rich in organic matter. The soil should have a slightly acidic to neutral pH, ideally between 6.0 and 6.8. Before planting, amend the soil with compost, aged manure, or other organic materials to improve drainage, fertility, and water retention. Avoid heavy clay soils, as they can become waterlogged and inhibit root growth. If you have clay soil, consider growing watermelons in raised beds or containers with a well-draining potting mix.
Q: How often should I water my watermelon plants?
A: Watermelons need consistent moisture, especially during fruit development. Water deeply and regularly, aiming for about 1-2 inches of water per week. Avoid overhead watering, as it can increase the risk of fungal diseases. Instead, use a soaker hose or drip irrigation system to deliver water directly to the roots. Monitor the soil moisture regularly and adjust watering frequency as needed, depending on weather conditions and soil type. During hot, dry periods, you may need to water more frequently.
Q: What are some common pests and diseases that affect watermelons?
A: Watermelons are susceptible to various pests and diseases, including aphids, squash bugs, vine borers, powdery mildew, and fusarium wilt. Regularly inspect your plants for signs of infestation or disease. Use organic pest control methods, such as insecticidal soap or neem oil, to manage pests. To prevent diseases, ensure good air circulation, avoid overhead watering, and practice crop rotation. Choose disease-resistant watermelon varieties whenever possible. If you suspect a serious disease outbreak, consult with your local agricultural extension office for diagnosis and treatment recommendations.
Q: How do I know when my watermelon is ripe?
A: Determining watermelon ripeness can be tricky, but there are several indicators to look for. The tendril closest to the fruit should be brown and dry. The spot where the watermelon rests on the ground (the ground spot) should turn from white to a creamy yellow. The watermelon should also sound dull and hollow when thumped. Avoid picking watermelons based solely on size or color, as these can be misleading. With practice, you’ll develop a feel for identifying ripe watermelons.
Q: Can I grow watermelons in containers?
A: Yes, you can grow watermelons in containers, but it requires careful planning and attention. Choose a large container, at least 20 gallons in size, with good drainage. Use a high-quality potting mix that is well-draining and rich in organic matter. Select bush or dwarf watermelon varieties, as they are better suited for container gardening. Provide adequate support for the vines, such as a trellis or stake. Water regularly and fertilize frequently, as container-grown plants tend to dry out and deplete nutrients more quickly. Place the container in a sunny location that receives at least 6-8 hours of direct sunlight per day.
Q: How can I improve the sweetness of my watermelons?
A: Several factors can influence the sweetness of watermelons. Ensure your plants receive adequate sunlight, as sunlight is essential for sugar production. Provide consistent moisture, but avoid overwatering, especially as the fruit approaches maturity. Fertilize with a balanced fertilizer during the early stages of growth, and then switch to a fertilizer higher in potassium during fruit development. Avoid stressing the plants, as stress can reduce sugar content. Finally, harvest the watermelons at the peak of ripeness, as sugar content increases as the fruit matures.
Leave a Comment