

Grow Water Spinach at Home – sounds like a dream, right? Imagine fresh, vibrant, and nutritious greens right at your fingertips, ready to be tossed into your favorite stir-fries or salads. Well, stop dreaming and start doing! This isn’t some complicated gardening feat reserved for experts; it’s a surprisingly simple and rewarding DIY project that anyone can tackle, even with limited space and experience.
Water spinach, also known as kangkong, has a rich history, deeply rooted in Southeast Asian cuisine. For generations, it’s been a staple, prized for its delicious flavor and impressive nutritional benefits. But beyond its culinary appeal, growing your own water spinach offers a sense of self-sufficiency and connection to nature. I think it’s a great way to get in touch with your food.
In today’s world, where access to fresh, affordable produce can be a challenge, learning how to grow water spinach at home is more relevant than ever. You’ll not only save money on groceries but also enjoy the satisfaction of harvesting your own organic, pesticide-free vegetables. Plus, it’s a fantastic way to reduce your carbon footprint and contribute to a more sustainable lifestyle. So, are you ready to ditch the store-bought greens and embark on this exciting gardening adventure with me? Let’s get started!

Growing Water Spinach (Kangkong) at Home: A Beginner’s Guide
Hey there, fellow plant enthusiasts! Ever wanted to grow your own fresh, delicious water spinach (also known as kangkong or ong choy) right in your backyard or even on your balcony? Well, you’re in the right place! I’m going to walk you through everything you need to know to successfully cultivate this fast-growing, nutritious leafy green at home. Trust me, it’s easier than you think, and the reward of harvesting your own homegrown veggies is totally worth it.
What You’ll Need
Before we dive into the nitty-gritty, let’s gather our supplies. Here’s a checklist of everything you’ll need to get started:
* Water Spinach Seeds or Cuttings: You can find these at most Asian grocery stores or online seed retailers. Seeds are generally easier for beginners, but cuttings can provide a quicker harvest.
* Container or Growing Bed: Choose a container that’s at least 6-8 inches deep. A large pot, a plastic tub, or even a repurposed container will work. If you have space, a small raised bed is also a great option.
* Potting Mix: Use a well-draining potting mix that’s rich in organic matter. You can also amend regular garden soil with compost or aged manure.
* Water: Water spinach loves water, so make sure you have a reliable water source.
* Sunlight: Water spinach needs at least 4-6 hours of direct sunlight per day.
* Optional:
* Liquid fertilizer (balanced NPK ratio)
* Compost tea
* pH testing kit
Getting Started: From Seed to Sprout
If you’re starting from seeds, here’s how to get them germinated and ready for planting:
1. Soaking the Seeds: To speed up germination, soak the water spinach seeds in warm water for 12-24 hours. This helps soften the seed coat and encourages sprouting. I usually put them in a small bowl and leave them overnight.
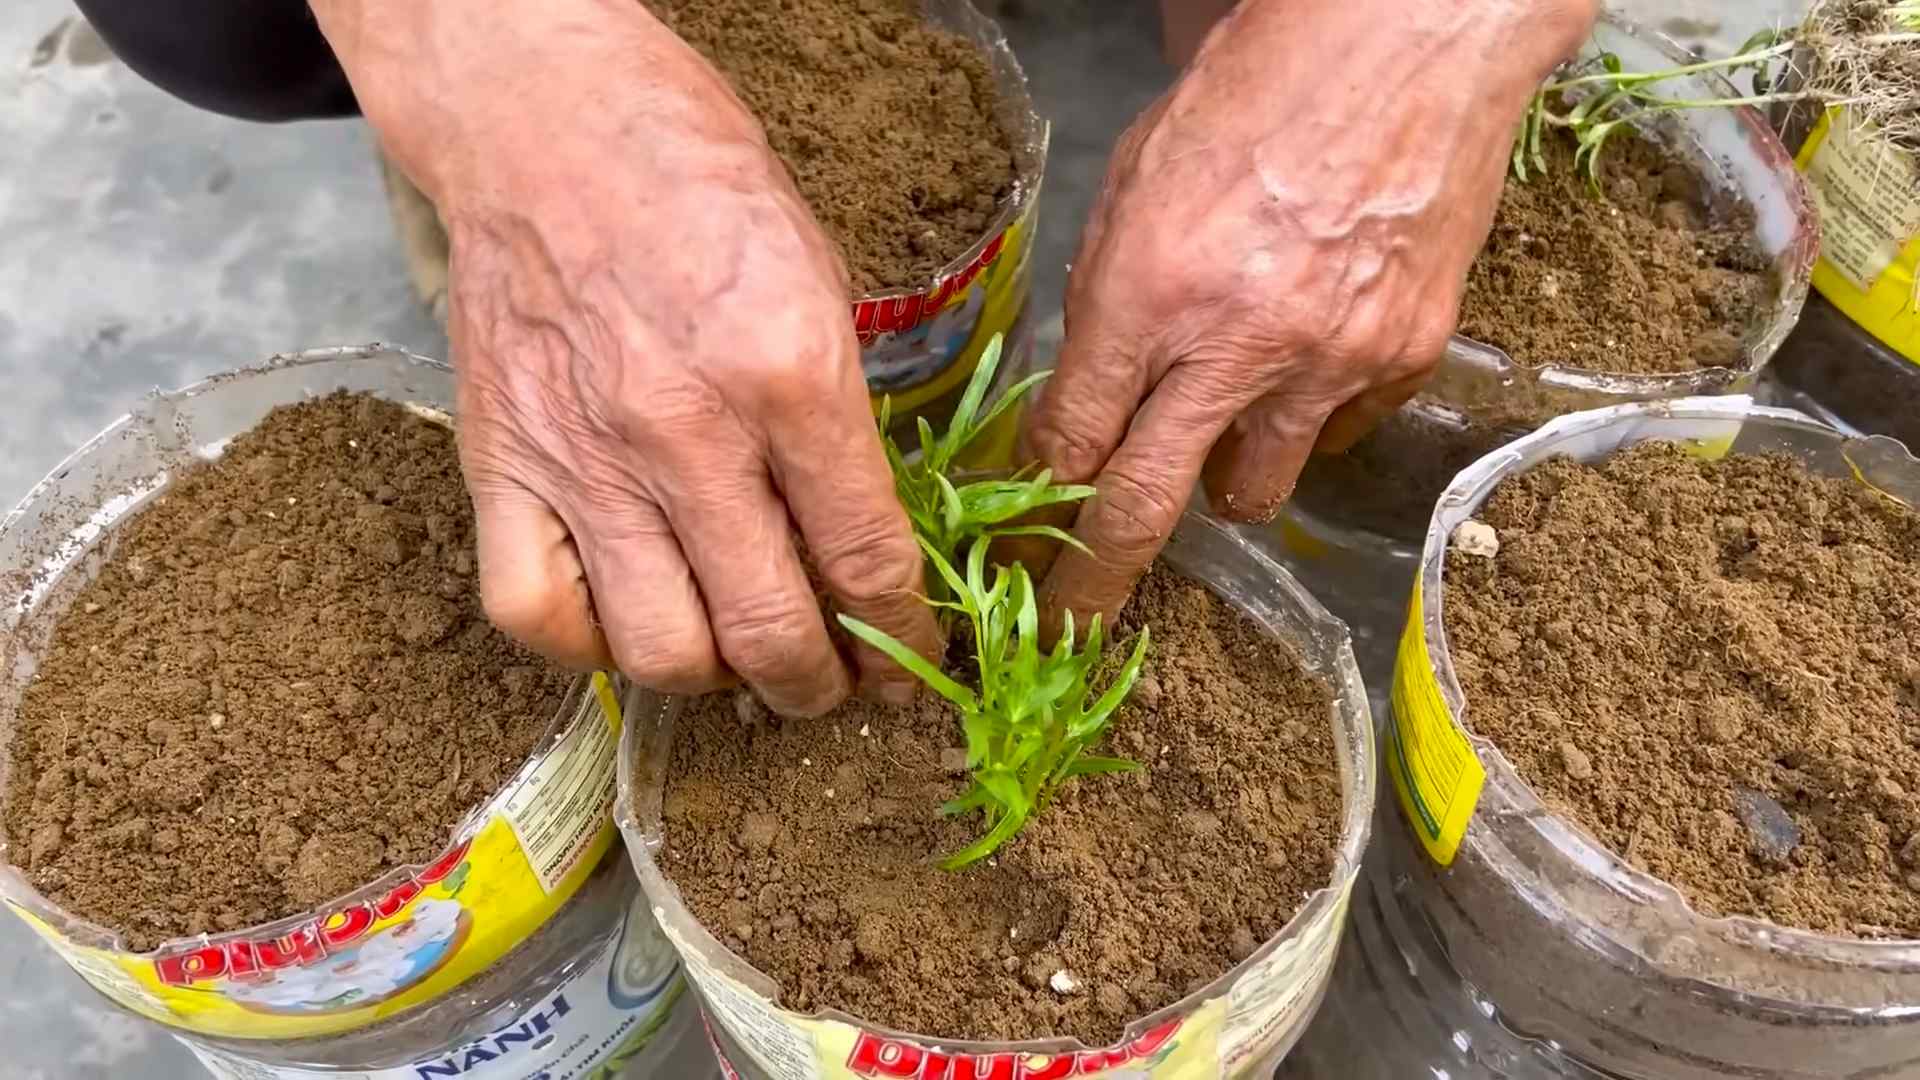
2. Sowing the Seeds: Fill your container with potting mix, leaving about an inch of space at the top. Moisten the soil thoroughly. Sprinkle the seeds evenly over the surface of the soil, and then cover them with a thin layer (about ¼ inch) of soil. Gently pat the soil down.
3. Creating a Humid Environment: Water spinach seeds germinate best in a humid environment. You can create this by covering the container with a clear plastic bag or plastic wrap. Make sure to poke a few holes in the plastic for ventilation.
4. Finding the Right Spot: Place the container in a warm, sunny location. The ideal temperature for germination is between 70-85°F (21-29°C).
5. Maintaining Moisture: Keep the soil consistently moist, but not waterlogged. Check the soil daily and mist it with water if it feels dry.
6. Waiting for Sprouts: Germination usually takes about 5-10 days. Once the seedlings emerge, remove the plastic covering.
Planting Cuttings (An Alternative Method)
If you’re using cuttings, this method is even faster!
1. Selecting Cuttings: Choose healthy, mature stems that are about 6-8 inches long. Look for stems with several nodes (the points where leaves emerge).
2. Preparing the Cuttings: Remove the leaves from the bottom 2-3 inches of the stem. This will encourage root growth.
3. Rooting the Cuttings: You can root the cuttings in water or directly in soil.
* Water Method: Place the cuttings in a glass or jar of water, making sure that the bottom nodes are submerged. Change the water every 1-2 days. Roots should start to appear within a week or two.
* Soil Method: Dip the cut ends of the cuttings in rooting hormone (optional, but it can help speed up the process). Plant the cuttings directly into moist potting mix, burying the bottom 2-3 inches of the stem.
4. Maintaining Moisture: Keep the soil consistently moist, especially if you’re rooting the cuttings directly in soil. You can also cover the cuttings with a plastic bag to create a humid environment.
5. Waiting for Roots: It usually takes about 1-2 weeks for the cuttings to develop roots. Once the roots are established, you can treat them like established plants.
Caring for Your Water Spinach
Now that your water spinach is growing, here’s how to keep it happy and healthy:
1. Watering: Water spinach loves water, so keep the soil consistently moist. Water deeply whenever the top inch of soil feels dry. In hot weather, you may need to water daily. I usually check the soil moisture in the morning and evening.
2. Sunlight: Ensure your water spinach receives at least 4-6 hours of direct sunlight per day. If you’re growing it indoors, you may need to supplement with grow lights.
3. Fertilizing: Water spinach is a heavy feeder, so it benefits from regular fertilization. Use a balanced liquid fertilizer (e.g., 20-20-20) diluted to half strength every 2-3 weeks. You can also use compost tea or other organic fertilizers.
4. Pruning: Regular pruning encourages bushier growth and prevents the plants from becoming leggy. Pinch off the tips of the stems every few weeks.
5. Pest Control: Water spinach is generally pest-resistant, but it can occasionally be affected by aphids or spider mites. If you notice any pests, you can spray the plants with insecticidal soap or neem oil. I prefer using organic methods whenever possible.
6. pH Levels: Water spinach thrives in slightly acidic to neutral soil, with a pH range of 6.0 to 7.0. If you’re unsure about your soil’s pH, you can use a pH testing kit to check it. If the pH is too high (alkaline), you can amend the soil with sulfur or peat moss. If the pH is too low (acidic), you can add lime.
Harvesting Your Bounty
The best part of growing water spinach is, of course, the harvest! Here’s how to harvest your homegrown greens:
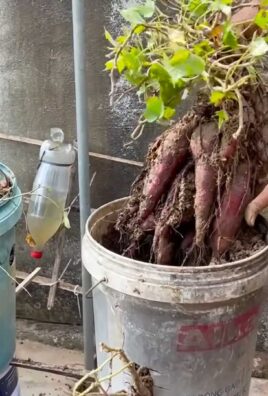
1. When to Harvest: You can start harvesting water spinach about 4-6 weeks after planting. The stems should be about 6-8 inches long.
2. How to Harvest: Use scissors or a sharp knife to cut the stems about 2-3 inches above the soil line. This will encourage new growth.
3. Harvesting Frequency: You can harvest water spinach every 1-2 weeks. The more you harvest, the more it will grow!
4. Storing Your Harvest: Freshly harvested water spinach is best used immediately. However, you can store it in the refrigerator for up to a week. Wrap the stems in a damp paper towel and place them in a plastic bag.
Troubleshooting
Even with the best care, you might encounter some challenges. Here are a few common problems and how to address them:
* Yellowing Leaves: This could be a sign of overwatering, underwatering, or nutrient deficiency. Check the soil moisture and adjust your watering schedule accordingly. Fertilize the plants with a balanced fertilizer.
* Slow Growth: This could be due to insufficient sunlight, poor soil, or lack of nutrients. Make sure the plants are getting enough sunlight and fertilize them regularly.
* Pests: Inspect the plants regularly for pests. If you find any, treat them with insecticidal soap or neem oil.
* Leggy Growth: This is usually caused by insufficient sunlight. Move the plants to a sunnier location or supplement with grow lights. Pruning can also help encourage bushier growth.
Enjoying Your Homegrown Water Spinach
Now that you’ve harvested your own water spinach, it’s time to enjoy the fruits (or rather, vegetables) of your labor! Water spinach is a versatile ingredient that can be used in a variety of dishes. Here are a few ideas:
* Stir-fries: Water spinach is a classic ingredient in stir-fries. Simply sauté it with garlic, ginger, and your favorite sauce.
* Soups: Add water spinach to soups for a nutritious and flavorful boost.
* Salads: Use young, tender water spinach leaves in salads.
Hey there, fellow plant enthusiasts! Ever wanted to grow your own fresh, delicious water spinach (also known as kangkong or ong choy) right in your backyard or even on your balcony? Well, you’re in the right place! I’m going to walk you through everything you need to know to successfully cultivate this fast-growing, nutritious leafy green at home. Trust me, it’s easier than you think, and the reward of harvesting your own homegrown veggies is totally worth it.
What You’ll Need
Before we dive into the nitty-gritty, let’s gather our supplies. Here’s a checklist of everything you’ll need to get started:
* Water Spinach Seeds or Cuttings: You can find these at most Asian grocery stores or online seed retailers. Seeds are generally easier for beginners, but cuttings can provide a quicker harvest.
* Container or Growing Bed: Choose a container that’s at least 6-8 inches deep. A large pot, a plastic tub, or even a repurposed container will work. If you have space, a small raised bed is also a great option.
* Potting Mix: Use a well-draining potting mix that’s rich in organic matter. You can also amend regular garden soil with compost or aged manure.
* Water: Water spinach loves water, so make sure you have a reliable water source.
* Sunlight: Water spinach needs at least 4-6 hours of direct sunlight per day.
* Optional:
* Liquid fertilizer (balanced NPK ratio)
* Compost tea
* pH testing kit
Getting Started: From Seed to Sprout
If you’re starting from seeds, here’s how to get them germinated and ready for planting:
1. Soaking the Seeds: To speed up germination, soak the water spinach seeds in warm water for 12-24 hours. This helps soften the seed coat and encourages sprouting. I usually put them in a small bowl and leave them overnight.
2. Sowing the Seeds: Fill your container with potting mix, leaving about an inch of space at the top. Moisten the soil thoroughly. Sprinkle the seeds evenly over the surface of the soil, and then cover them with a thin layer (about ¼ inch) of soil. Gently pat the soil down.
3. Creating a Humid Environment: Water spinach seeds germinate best in a humid environment. You can create this by covering the container with a clear plastic bag or plastic wrap. Make sure to poke a few holes in the plastic for ventilation.
4. Finding the Right Spot: Place the container in a warm, sunny location. The ideal temperature for germination is between 70-85°F (21-29°C).
5. Maintaining Moisture: Keep the soil consistently moist, but not waterlogged. Check the soil daily and mist it with water if it feels dry.
6. Waiting for Sprouts: Germination usually takes about 5-10 days. Once the seedlings emerge, remove the plastic covering.
Planting Cuttings (An Alternative Method)
If you’re using cuttings, this method is even faster!
1. Selecting Cuttings: Choose healthy, mature stems that are about 6-8 inches long. Look for stems with several nodes (the points where leaves emerge).
2. Preparing the Cuttings: Remove the leaves from the bottom 2-3 inches of the stem. This will encourage root growth.
3. Rooting the Cuttings: You can root the cuttings in water or directly in soil.
* Water Method: Place the cuttings in a glass or jar of water, making sure that the bottom nodes are submerged. Change the water every 1-2 days. Roots should start to appear within a week or two.
* Soil Method: Dip the cut ends of the cuttings in rooting hormone (optional, but it can help speed up the process). Plant the cuttings directly into moist potting mix, burying the bottom 2-3 inches of the stem.
4. Maintaining Moisture: Keep the soil consistently moist, especially if you’re rooting the cuttings directly in soil. You can also cover the cuttings with a plastic bag to create a humid environment.
5. Waiting for Roots: It usually takes about 1-2 weeks for the cuttings to develop roots. Once the roots are established, you can treat them like established plants.
Caring for Your Water Spinach
Now that your water spinach is growing, here’s how to keep it happy and healthy:
1. Watering: Water spinach loves water, so keep the soil consistently moist. Water deeply whenever the top inch of soil feels dry. In hot weather, you may need to water daily. I usually check the soil moisture in the morning and evening.
2. Sunlight: Ensure your water spinach receives at least 4-6 hours of direct sunlight per day. If you’re growing it indoors, you may need to supplement with grow lights.
3. Fertilizing: Water spinach is a heavy feeder, so it benefits from regular fertilization. Use a balanced liquid fertilizer (e.g., 20-20-20) diluted to half strength every 2-3 weeks. You can also use compost tea or other organic fertilizers.
4. Pruning: Regular pruning encourages bushier growth and prevents the plants from becoming leggy. Pinch off the tips of the stems every few weeks.
5. Pest Control: Water spinach is generally pest-resistant, but it can occasionally be affected by aphids or spider mites. If you notice any pests, you can spray the plants with insecticidal soap or neem oil. I prefer using organic methods whenever possible.
6. pH Levels: Water spinach thrives in slightly acidic to neutral soil, with a pH range of 6.0 to 7.0. If you’re unsure about your soil’s pH, you can use a pH testing kit to check it. If the pH is too high (alkaline), you can amend the soil with sulfur or peat moss. If the pH is too low (acidic), you can add lime.
Harvesting Your Bounty
The best part of growing water spinach is, of course, the harvest! Here’s how to harvest your homegrown greens:
1. When to Harvest: You can start harvesting water spinach about 4-6 weeks after planting. The stems should be about 6-8 inches long.
2. How to Harvest: Use scissors or a sharp knife to cut the stems about 2-3 inches above the soil line. This will encourage new growth.
3. Harvesting Frequency: You can harvest water spinach every 1-2 weeks. The more you harvest, the more it will grow!
4. Storing Your Harvest: Freshly harvested water spinach is best used immediately. However, you can store it in the refrigerator for up to a week. Wrap the stems in a damp paper towel and place them in a plastic bag.
Troubleshooting
Even with the best care, you might encounter some challenges. Here are a few common problems and how to address them:
* Yellowing Leaves: This could be a sign of overwatering, underwatering, or nutrient deficiency. Check the soil moisture and adjust your watering schedule accordingly. Fertilize the plants with a balanced fertilizer.
* Slow Growth: This could be due to insufficient sunlight, poor soil, or lack of nutrients. Make sure the plants are getting enough sunlight and fertilize them regularly.
* Pests: Inspect the plants regularly for pests. If you find any, treat them with insecticidal soap or neem oil.
* Leggy Growth: This is usually caused by insufficient sunlight. Move the plants to a sunnier location or supplement with grow lights. Pruning can also help encourage bushier growth.
Enjoying Your Homegrown Water Spinach
Now that you’ve harvested your own water spinach, it’s time to enjoy the fruits (or rather, vegetables) of your labor! Water spinach is a versatile ingredient that can be used in a variety of dishes. Here are a few ideas:
* Stir-fries: Water spinach is a classic ingredient in stir-fries. Simply sauté it with garlic, ginger, and your favorite sauce.
* Soups: Add water spinach to soups for a nutritious and flavorful boost.
* Salads: Use young, tender water spinach leaves in salads.
* Steamed: Steam water spinach and serve it with a dipping sauce.
* Juices: Add water spinach to your favorite green juice recipes.
Growing water spinach at home is a rewarding experience that allows you to enjoy fresh, healthy greens right from your own garden. With a little bit of care and attention, you can easily cultivate this delicious vegetable and impress your friends and family with your green thumb! Happy gardening!
Conclusion
So, there you have it! Growing your own water spinach at home is not only achievable, but it’s also incredibly rewarding. Forget those wilted, overpriced bunches at the grocery store. With a little effort and this simple DIY trick, you can have a constant supply of fresh, crisp, and delicious water spinach right at your fingertips.
Why is this a must-try? Because it’s about more than just saving money. It’s about connecting with your food, understanding where it comes from, and enjoying the unparalleled flavor of homegrown produce. Water spinach, also known as ong choy, is a nutritional powerhouse, packed with vitamins, minerals, and antioxidants. And when you grow it yourself, you know exactly what’s going into it – no pesticides, no questionable additives, just pure, unadulterated goodness.
Beyond the basic method we’ve outlined, there’s plenty of room for experimentation. Try different containers – from repurposed buckets to dedicated hydroponic systems. Explore various nutrient solutions to see what works best for your specific environment. Consider growing different varieties of water spinach, each with its own unique flavor profile and texture. Some varieties are more heat-tolerant, while others are better suited for cooler climates.
For those with limited space, consider growing water spinach in a vertical garden or even indoors under grow lights. This opens up the possibility of enjoying fresh water spinach year-round, regardless of the weather outside. You can also experiment with companion planting. Try growing water spinach alongside other water-loving plants like watercress or even certain types of herbs.
The possibilities are truly endless! The key is to start small, be patient, and don’t be afraid to experiment. Observe your plants closely, adjust your methods as needed, and most importantly, have fun!
We are confident that once you taste the difference between store-bought and homegrown water spinach, you’ll be hooked. This DIY project is not just a gardening endeavor; it’s a gateway to a healthier, more sustainable lifestyle. It’s a chance to reconnect with nature, learn new skills, and enjoy the fruits (or rather, the vegetables) of your labor.
So, what are you waiting for? Grab your seeds, gather your supplies, and get ready to embark on your own water spinach growing adventure. We can’t wait to hear about your experiences! Share your tips, tricks, and photos with us in the comments below. Let’s build a community of water spinach enthusiasts and inspire others to discover the joys of homegrown goodness. Let us know how our DIY water spinach growing guide worked for you!
Frequently Asked Questions (FAQ)
What exactly is water spinach, and what does it taste like?
Water spinach (Ipomoea aquatica), also known as ong choy, morning glory, or swamp cabbage, is a semi-aquatic leafy green vegetable commonly used in Asian cuisine. It has long, hollow stems and arrow-shaped leaves. The taste is mild and slightly sweet, with a subtle earthy flavor. The texture is crisp and slightly crunchy when cooked properly. It’s often compared to spinach or bok choy, but with a more delicate flavor.
How long does it take to grow water spinach from seed?
Generally, you can expect to harvest your first batch of water spinach about 4-6 weeks after planting seeds. The exact time will depend on factors such as temperature, sunlight, and nutrient availability. Soaking the seeds overnight before planting can help speed up germination.
What kind of container is best for growing water spinach?
Almost any container that can hold water will work for growing water spinach. Plastic tubs, buckets, large pots, or even repurposed containers like old bathtubs are all suitable options. The container should be at least 12 inches deep to allow for adequate root growth. Make sure the container is food-grade if you’re using a recycled one.
What kind of soil or growing medium should I use?
Water spinach can be grown in soil, but it thrives in a water-based environment. You can use a soilless potting mix, coco coir, or even just plain water with added nutrients. If using soil, make sure it’s well-draining and rich in organic matter. For hydroponic setups, a nutrient solution specifically formulated for leafy greens is recommended.
How much sunlight does water spinach need?
Water spinach needs at least 6 hours of direct sunlight per day to thrive. If you’re growing it indoors, you’ll need to supplement with grow lights. Position the grow lights about 12-18 inches above the plants and keep them on for 14-16 hours per day.
How often should I water water spinach?
If you’re growing water spinach in soil, keep the soil consistently moist but not waterlogged. If you’re growing it in a water-based system, ensure the water level is maintained and the roots are submerged. Change the water every week or two to prevent algae growth and maintain nutrient levels.
What kind of nutrients does water spinach need?
Water spinach is a heavy feeder, meaning it requires a good supply of nutrients to grow well. Use a balanced fertilizer or nutrient solution that is rich in nitrogen, phosphorus, and potassium. You can also add compost or other organic matter to the soil to provide additional nutrients.
How do I harvest water spinach?
You can harvest water spinach by cutting the stems about 4-6 inches above the water or soil line. The plant will then regrow from the cut stems, allowing you to harvest multiple times. Harvest regularly to encourage new growth and prevent the plants from becoming too leggy.
What are some common pests and diseases that affect water spinach?
Water spinach is generally pest-resistant, but it can be susceptible to aphids, spider mites, and whiteflies. These pests can be controlled with insecticidal soap or neem oil. Fungal diseases can also be a problem, especially in humid conditions. Ensure good air circulation and avoid overwatering to prevent fungal growth.
Can I grow water spinach indoors?
Yes, you can absolutely grow water spinach indoors, especially if you live in a climate with cold winters. You’ll need to provide adequate light, either through a sunny window or with grow lights. A hydroponic system is often the easiest way to grow water spinach indoors, as it provides a consistent supply of water and nutrients.
Is water spinach safe to eat?
Yes, water spinach is generally safe to eat when grown properly. However, it’s important to source your seeds from a reputable supplier and avoid growing water spinach in contaminated water. Thoroughly wash the leaves before eating to remove any dirt or debris.
How do I store harvested water spinach?
Store harvested water spinach in the refrigerator in a plastic bag or container. It will keep for several days. For longer storage, you can blanch the leaves and freeze them.
Can I grow water spinach in a pond or aquarium?
While water spinach can technically grow in a pond or aquarium, it’s not recommended. It can quickly become invasive and take over the entire water body. Additionally, it can deplete the water of oxygen, harming fish and other aquatic life.
What are some ways to cook water spinach?
Water spinach is a versatile vegetable that can be cooked in many different ways. It can be stir-fried, boiled, steamed, or added to soups and stews. It’s often used in Asian dishes such as stir-fried water spinach with garlic, water spinach salad, and water spinach curry.
Where can I buy water spinach seeds?
Water spinach seeds can be found online at various seed retailers. Look for reputable suppliers that offer high-quality seeds. You may also be able to find water spinach seeds at your local garden center or Asian grocery store.


Leave a Comment