

Grow sweet melons at home, even if you think you don’t have a green thumb! Have you ever bitten into a perfectly ripe, juicy melon and thought, “I wish I could grow these myself?” Well, you absolutely can! For centuries, cultivating melons has been a cherished tradition in many cultures, from ancient Egypt where they were buried with pharaohs, to the sun-drenched fields of Italy where families have perfected their melon-growing techniques for generations.
But let’s be honest, the idea of growing melons can seem a little daunting. They’re often perceived as finicky and requiring vast amounts of space. That’s where these DIY tricks and hacks come in! I’m going to share some simple, yet effective methods to help you grow sweet melons at home, regardless of your garden size or experience level.
Imagine the satisfaction of harvesting your own homegrown melons, bursting with flavor and sweetness that store-bought varieties simply can’t match. These tips will not only save you money but also provide you with fresh, healthy produce and a rewarding gardening experience. So, grab your gardening gloves, and let’s get started on your melon-growing adventure!

Growing Sweet Melons at Home: A DIY Guide
Okay, melon lovers, let’s get down to business! Growing your own sweet, juicy melons at home might seem intimidating, but trust me, it’s totally doable. I’m going to walk you through everything you need to know, from choosing the right variety to harvesting your delicious reward. Get ready to impress your friends and family with your homegrown goodness!
Choosing Your Melon Variety
Before we even think about planting, we need to pick the perfect melon for your garden and climate. Different melons thrive in different conditions, so doing a little research upfront will save you a lot of heartache later. Here are some popular and relatively easy-to-grow options:
* **Cantaloupe:** A classic choice! Cantaloupes are known for their orange flesh and sweet, musky flavor. They generally need a long growing season (75-90 days).
* **Honeydew:** These melons have smooth, pale green skin and sweet, light green flesh. They also require a long growing season (65-100 days).
* **Watermelon:** Who doesn’t love watermelon? There are tons of varieties, from the classic red-fleshed to yellow and even seedless options. Watermelons need plenty of space and a long growing season (70-90 days). Look for “icebox” varieties if you have limited space.
* **Galia Melon:** This is a hybrid melon with a netted rind like a cantaloupe but with green flesh like a honeydew. It’s known for its aromatic and sweet flavor.
* **Personal-Sized Melons:** If you’re short on space, look for varieties specifically bred to be smaller, like ‘Sugar Baby’ watermelon or smaller cantaloupe types.
Consider your local climate and growing season when making your choice. Check seed packets or online resources for specific recommendations for your area.
Preparing Your Melon Patch
Melons are sun-loving, hungry plants, so proper preparation is key to a successful harvest.
* **Sunlight:** Melons need at least 6-8 hours of direct sunlight per day. Choose a location in your garden that gets plenty of sun.
* **Soil:** Melons prefer well-drained soil that is rich in organic matter. Amend your soil with compost or well-rotted manure before planting. This will improve drainage, fertility, and water retention.
* **Soil pH:** Aim for a soil pH between 6.0 and 6.8. You can test your soil pH with a home testing kit or send a sample to your local agricultural extension office.
* **Space:** Melons need plenty of space to sprawl. Cantaloupes and honeydews typically need 2-3 feet between plants, while watermelons need 3-4 feet. Consider using trellises for smaller melon varieties to save space.
* **Watering:** Melons need consistent moisture, especially during fruit development. Water deeply and regularly, especially during dry spells.
Starting Your Melon Seeds
You can either direct sow melon seeds in your garden or start them indoors. Starting indoors gives you a head start, especially in areas with short growing seasons.
Starting Seeds Indoors:
1. **Timing:** Start your seeds indoors about 4-6 weeks before the last expected frost.
2. **Containers:** Use seed starting trays or small pots filled with seed starting mix.
3. **Sowing:** Sow seeds about ½ inch deep.
4. **Watering:** Keep the soil consistently moist but not soggy.
5. **Warmth:** Melons need warm temperatures to germinate. Use a heat mat to keep the soil temperature between 70-80°F (21-27°C).
6. **Light:** Once the seedlings emerge, provide them with plenty of light. Place them under grow lights or in a sunny window.
7. **Hardening Off:** Before transplanting your seedlings outdoors, you need to “harden them off.” This means gradually exposing them to outdoor conditions over a period of 7-10 days. Start by placing them in a sheltered location for a few hours each day, gradually increasing the amount of time they spend outdoors.
Direct Sowing Seeds:
1. **Timing:** Direct sow seeds after the last expected frost when the soil temperature has warmed to at least 60°F (16°C).
2. **Planting:** Sow seeds about ½ inch deep and space them according to the recommendations for your chosen variety.
3. **Watering:** Keep the soil consistently moist until the seedlings emerge.
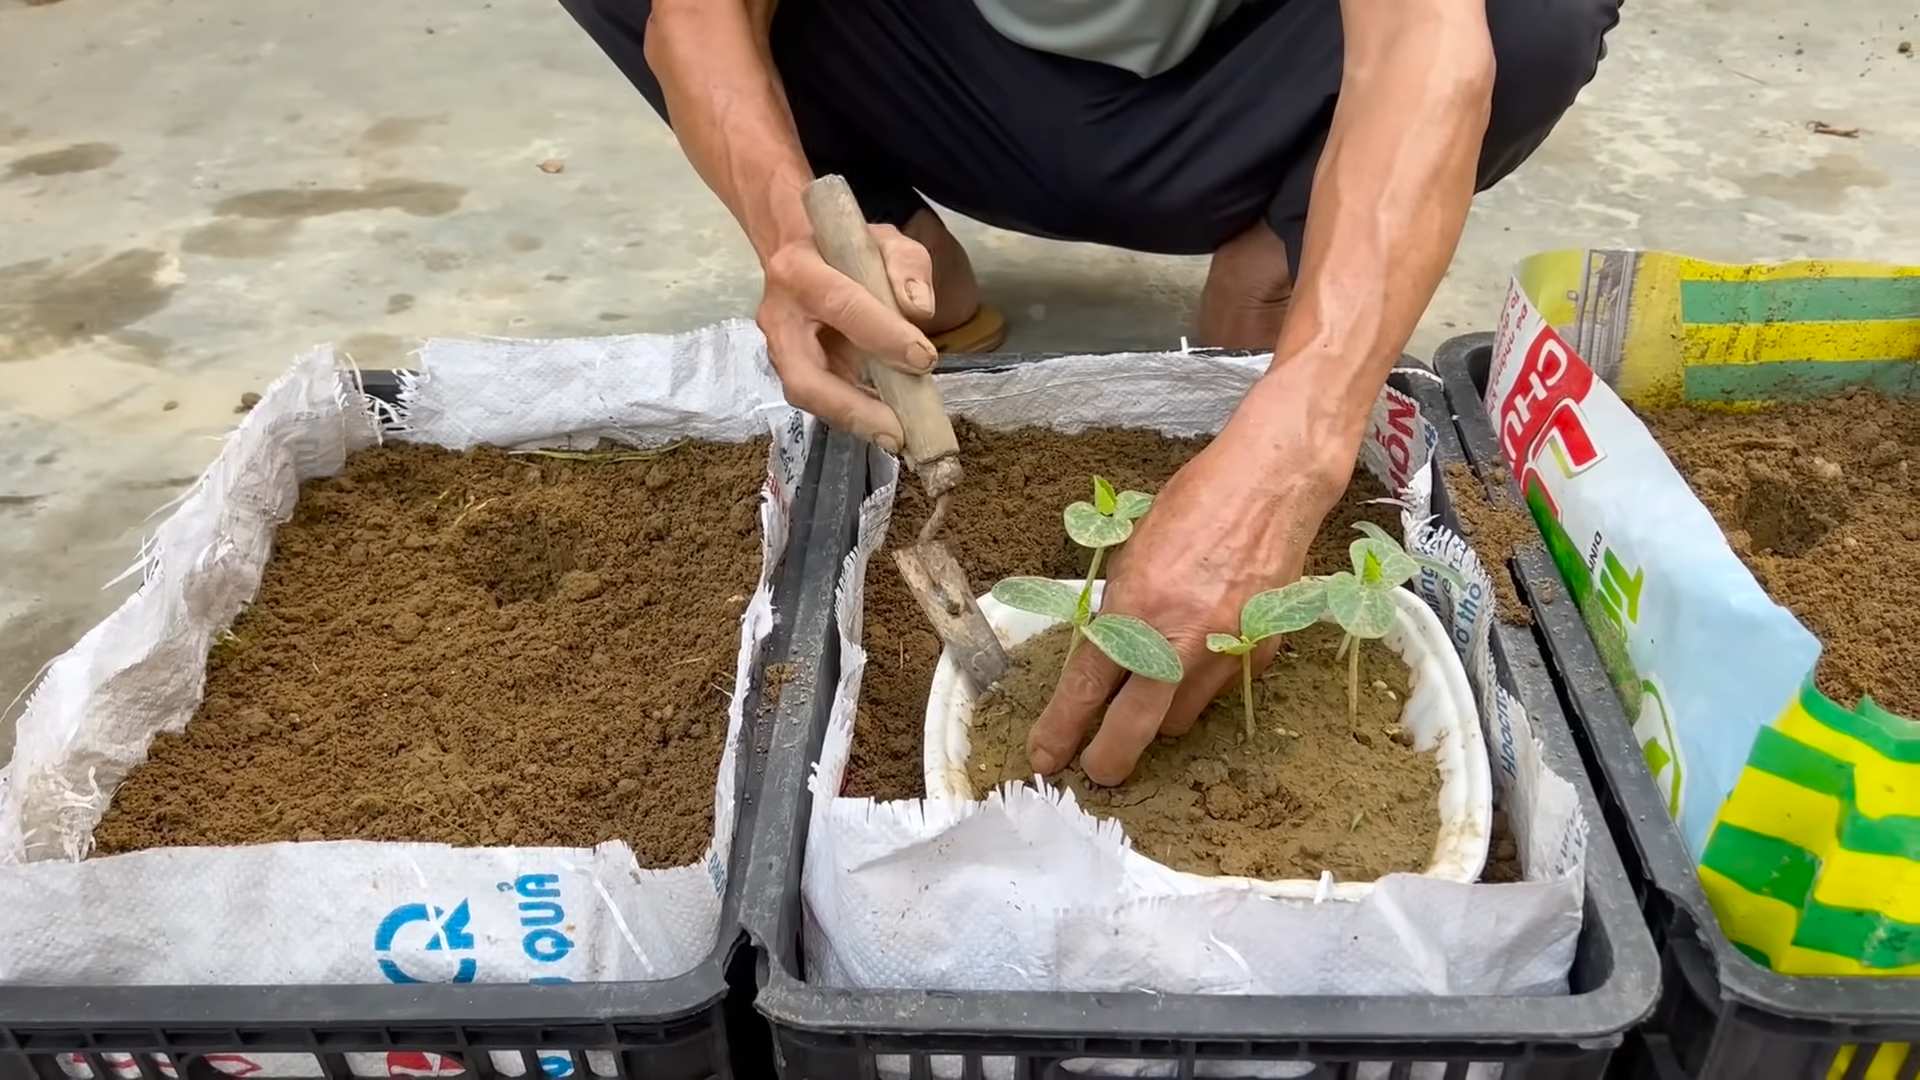
Transplanting Melon Seedlings
Once your seedlings have developed a few true leaves and the weather has warmed up, it’s time to transplant them into your garden.
1. **Prepare the Planting Hole:** Dig a hole that is slightly larger than the root ball of the seedling.
2. **Amend the Soil:** Mix some compost or well-rotted manure into the soil at the bottom of the hole.
3. **Carefully Remove the Seedling:** Gently remove the seedling from its container, being careful not to damage the roots.
4. **Place the Seedling in the Hole:** Place the seedling in the hole so that the top of the root ball is level with the surrounding soil.
5. **Fill the Hole:** Fill the hole with soil and gently firm it around the base of the plant.
6. **Water Thoroughly:** Water the seedling thoroughly after planting.
7. **Mulch:** Apply a layer of mulch around the base of the plant to help retain moisture and suppress weeds.
Caring for Your Melon Plants
Now that your melon plants are in the ground, it’s time to provide them with the care they need to thrive.
* **Watering:** Water deeply and regularly, especially during dry spells. Aim to water at the base of the plant to avoid wetting the foliage, which can lead to fungal diseases.
* **Fertilizing:** Melons are heavy feeders, so fertilize them regularly with a balanced fertilizer. Follow the instructions on the fertilizer package. You can also side-dress your plants with compost or well-rotted manure.
* **Weeding:** Keep your melon patch free of weeds. Weeds compete with melon plants for water and nutrients.
* **Pest Control:** Keep an eye out for pests such as aphids, squash bugs, and cucumber beetles. Use organic pest control methods such as insecticidal soap or neem oil to control these pests.
* **Pollination:** Melons need to be pollinated in order to produce fruit. If you’re not seeing any fruit developing, you may need to hand-pollinate your plants. To hand-pollinate, use a small paintbrush to transfer pollen from the male flowers to the female flowers. Female flowers have a small fruit at the base of the flower, while male flowers do not.
* **Trellising (Optional):** For smaller melon varieties, consider using trellises to save space and improve air circulation. This can also help to prevent fruit rot.
Protecting Your Melons
As your melons start to ripen, you may need to protect them from pests and diseases.
* **Pest Protection:** Birds, squirrels, and other animals love to eat melons. Protect your melons by covering them with netting or cages.
* **Disease Prevention:** Fungal diseases such as powdery mildew and downy mildew can be a problem for melon plants. Prevent these diseases by providing good air circulation, avoiding overhead watering, and applying a fungicide if necessary.
Harvesting Your Melons
Harvesting your melons at the right time is crucial for getting the best flavor. Here are some tips for determining when your melons are ripe:
* **Cantaloupe:** The stem should slip easily from the fruit when it’s ripe. The skin will also turn from green to tan or yellow. The melon will also have a sweet, musky aroma.
* **Honeydew:** The skin will turn from green to creamy yellow. The blossom end of the melon will also be slightly soft.
* **Watermelon:** The tendril closest to the melon will turn brown and dry. The bottom of the melon (where it rests on the ground) will turn from white to yellow. When you thump the melon, it should sound hollow.
Don’t be afraid to experiment! The best way to learn when your melons are ripe is to try harvesting them at different stages and see what tastes best to you.
Enjoying Your Homegrown Melons
Congratulations! You’ve successfully grown your own sweet, juicy melons at home. Now it’s time to enjoy the fruits (or rather, melons) of your labor.
* **Storage:** Store ripe melons in the refrigerator for up to a week.
* **Serving:** Melons are delicious eaten fresh, but they can also be used in salads, smoothies, and other recipes.
* **Seed Saving:** If you want to grow the same variety of melon next year, you can save the seeds from your ripe melons. Allow the seeds to dry completely before storing them in an airtight container in a cool, dry place.
Troubleshooting Common Melon Problems
Even with the best care, you
Conclusion
So, there you have it! Growing sweet melons at home, while it might seem daunting at first, is entirely achievable with a little know-how and the right approach. This DIY trick, focusing on [specific aspect of growing melons, e.g., soil preparation, pollination, pest control – choose one based on the article’s content, and replace this bracketed text], is a game-changer. It’s not just about getting *any* melon; it’s about cultivating incredibly flavorful, juicy, and satisfying melons that rival anything you’d find at the grocery store. The satisfaction of biting into a melon you nurtured from seed to fruit is truly unparalleled.
This method, particularly the focus on [reiterate the specific aspect], allows you to control the growing environment, ensuring optimal conditions for sweetness development. Think about it: no more bland, watery melons! Instead, imagine the vibrant orange flesh, bursting with sugary goodness, a testament to your gardening prowess.
But the beauty of this DIY trick lies not only in its effectiveness but also in its adaptability. Feel free to experiment with different melon varieties. Perhaps you’re partial to the classic cantaloupe, or maybe you’re intrigued by the unique flavor of a honeydew. Don’t be afraid to try growing watermelons, either! The principles remain the same, although you might need to adjust the spacing and support systems depending on the variety.
Consider also experimenting with different soil amendments. While the recommended [specific soil amendment from the article] works wonders, you could try incorporating other organic materials like composted manure or worm castings to further enrich the soil and boost melon growth. Another variation could involve different trellising methods. If space is limited, vertical gardening is your friend! Explore different trellis designs to find one that suits your needs and adds a touch of visual appeal to your garden.
Furthermore, think about companion planting. Marigolds, for instance, are known to deter pests, while basil can improve the flavor of your melons. Experiment with different companion plants to create a thriving and balanced ecosystem in your melon patch.
This isn’t just about following a recipe; it’s about embarking on a gardening adventure. It’s about connecting with nature, learning new skills, and reaping the rewards of your hard work. And the best part? You get to enjoy the most delicious, homegrown melons imaginable!
We wholeheartedly encourage you to give this DIY trick a try. Don’t be intimidated by the process; take it one step at a time, and remember that even experienced gardeners face challenges. The key is to learn from your mistakes and keep experimenting.
Once you’ve harvested your first batch of homegrown melons, we’d love to hear about your experience! Share your photos, tips, and stories in the comments section below. Let’s create a community of melon-growing enthusiasts and inspire others to embark on this rewarding journey. What varieties did you try? What challenges did you face? What successes did you celebrate? Your insights could be invaluable to fellow gardeners.
So, grab your seeds, prepare your soil, and get ready to grow the sweetest melons you’ve ever tasted! Happy gardening!
Frequently Asked Questions (FAQ)
What is the best time to start growing melons?
The ideal time to start growing melons depends on your climate. Generally, you should start seeds indoors about 4-6 weeks before the last expected frost. Melons are warm-weather crops and need consistent temperatures of at least 70°F (21°C) to thrive. If you live in a warmer climate with a longer growing season, you can direct sow the seeds once the soil has warmed up. Check your local frost dates and adjust your planting schedule accordingly. Starting indoors gives your melons a head start and protects them from early-season pests and diseases.
How much sunlight do melons need?
Melons are sun-loving plants and require at least 6-8 hours of direct sunlight per day. Insufficient sunlight can result in smaller, less flavorful fruits. Choose a planting location that receives full sun throughout the day. If you live in a particularly hot climate, some afternoon shade might be beneficial to prevent the plants from overheating. Monitor your plants closely and adjust their position if necessary to ensure they are getting enough sunlight.
What kind of soil is best for growing melons?
Melons thrive in well-drained, fertile soil that is rich in organic matter. The ideal soil pH is between 6.0 and 6.8. Before planting, amend the soil with compost, aged manure, or other organic materials to improve drainage and fertility. Avoid heavy clay soils, as they can become waterlogged and hinder root growth. If you have clay soil, consider growing your melons in raised beds or containers. A soil test can help you determine the pH and nutrient levels of your soil and guide you in making necessary amendments.
How often should I water my melon plants?
Melons need consistent watering, especially during fruit development. Water deeply and regularly, aiming to keep the soil consistently moist but not waterlogged. Avoid overhead watering, as this can promote fungal diseases. Instead, use a soaker hose or drip irrigation system to water at the base of the plants. The frequency of watering will depend on the weather conditions and soil type. Check the soil moisture regularly and water when the top inch feels dry. Reduce watering as the fruits ripen to concentrate the sugars and improve flavor.
How do I know when my melons are ripe?
Determining when a melon is ripe can be tricky, but there are several indicators to look for. For cantaloupes, the stem should slip easily from the fruit with a gentle tug. The skin should also change color from green to tan or yellow, and the melon should have a fragrant aroma. For watermelons, look for a dull thud when you tap the fruit. The underside of the melon, where it rests on the ground, should also turn from white to yellow. Honeydew melons are ripe when the skin turns creamy yellow and the blossom end is slightly soft. Experience is the best teacher, so pay attention to the subtle cues and learn from each harvest.
What are some common pests and diseases that affect melons?
Melons are susceptible to various pests and diseases, including aphids, squash bugs, vine borers, powdery mildew, and fusarium wilt. Regularly inspect your plants for signs of infestation or disease. Use organic pest control methods, such as insecticidal soap or neem oil, to control aphids and squash bugs. Protect your plants from vine borers by wrapping the stems with aluminum foil or netting. Prevent powdery mildew by ensuring good air circulation and avoiding overhead watering. Choose disease-resistant varieties whenever possible. Crop rotation can also help prevent soilborne diseases.
Can I grow melons in containers?
Yes, you can grow melons in containers, but you’ll need to choose a large container (at least 20 gallons) and provide adequate support for the vines. Dwarf or bush varieties of melons are best suited for container gardening. Use a high-quality potting mix and fertilize regularly. Container-grown melons tend to dry out more quickly than those grown in the ground, so water frequently. Place the container in a sunny location and provide a trellis or other support for the vines to climb.
How do I pollinate my melon plants?
Melons require pollination to produce fruit. If you don’t see bees or other pollinators visiting your plants, you may need to hand-pollinate them. To hand-pollinate, use a small paintbrush to transfer pollen from the male flowers to the female flowers. Male flowers have a long, thin stem, while female flowers have a small, immature fruit at the base. Pollinate in the morning when the flowers are open.
What kind of fertilizer should I use for my melon plants?
Melons benefit from regular fertilization, especially during fruit development. Use a balanced fertilizer with equal amounts of nitrogen, phosphorus, and potassium. Avoid over-fertilizing with nitrogen, as this can promote leafy growth at the expense of fruit production. You can also use organic fertilizers, such as compost tea or fish emulsion. Apply fertilizer according to the package directions.
How can I improve the sweetness of my melons?
Several factors can influence the sweetness of your melons. Choose varieties that are known for their sweetness. Ensure that your plants receive adequate sunlight and water. Avoid over-watering as the fruits ripen. Fertilize regularly with a balanced fertilizer. Allow the fruits to ripen fully on the vine before harvesting. Some gardeners also believe that stressing the plants slightly by withholding water for a few days before harvest can concentrate the sugars and improve flavor.

Leave a Comment