

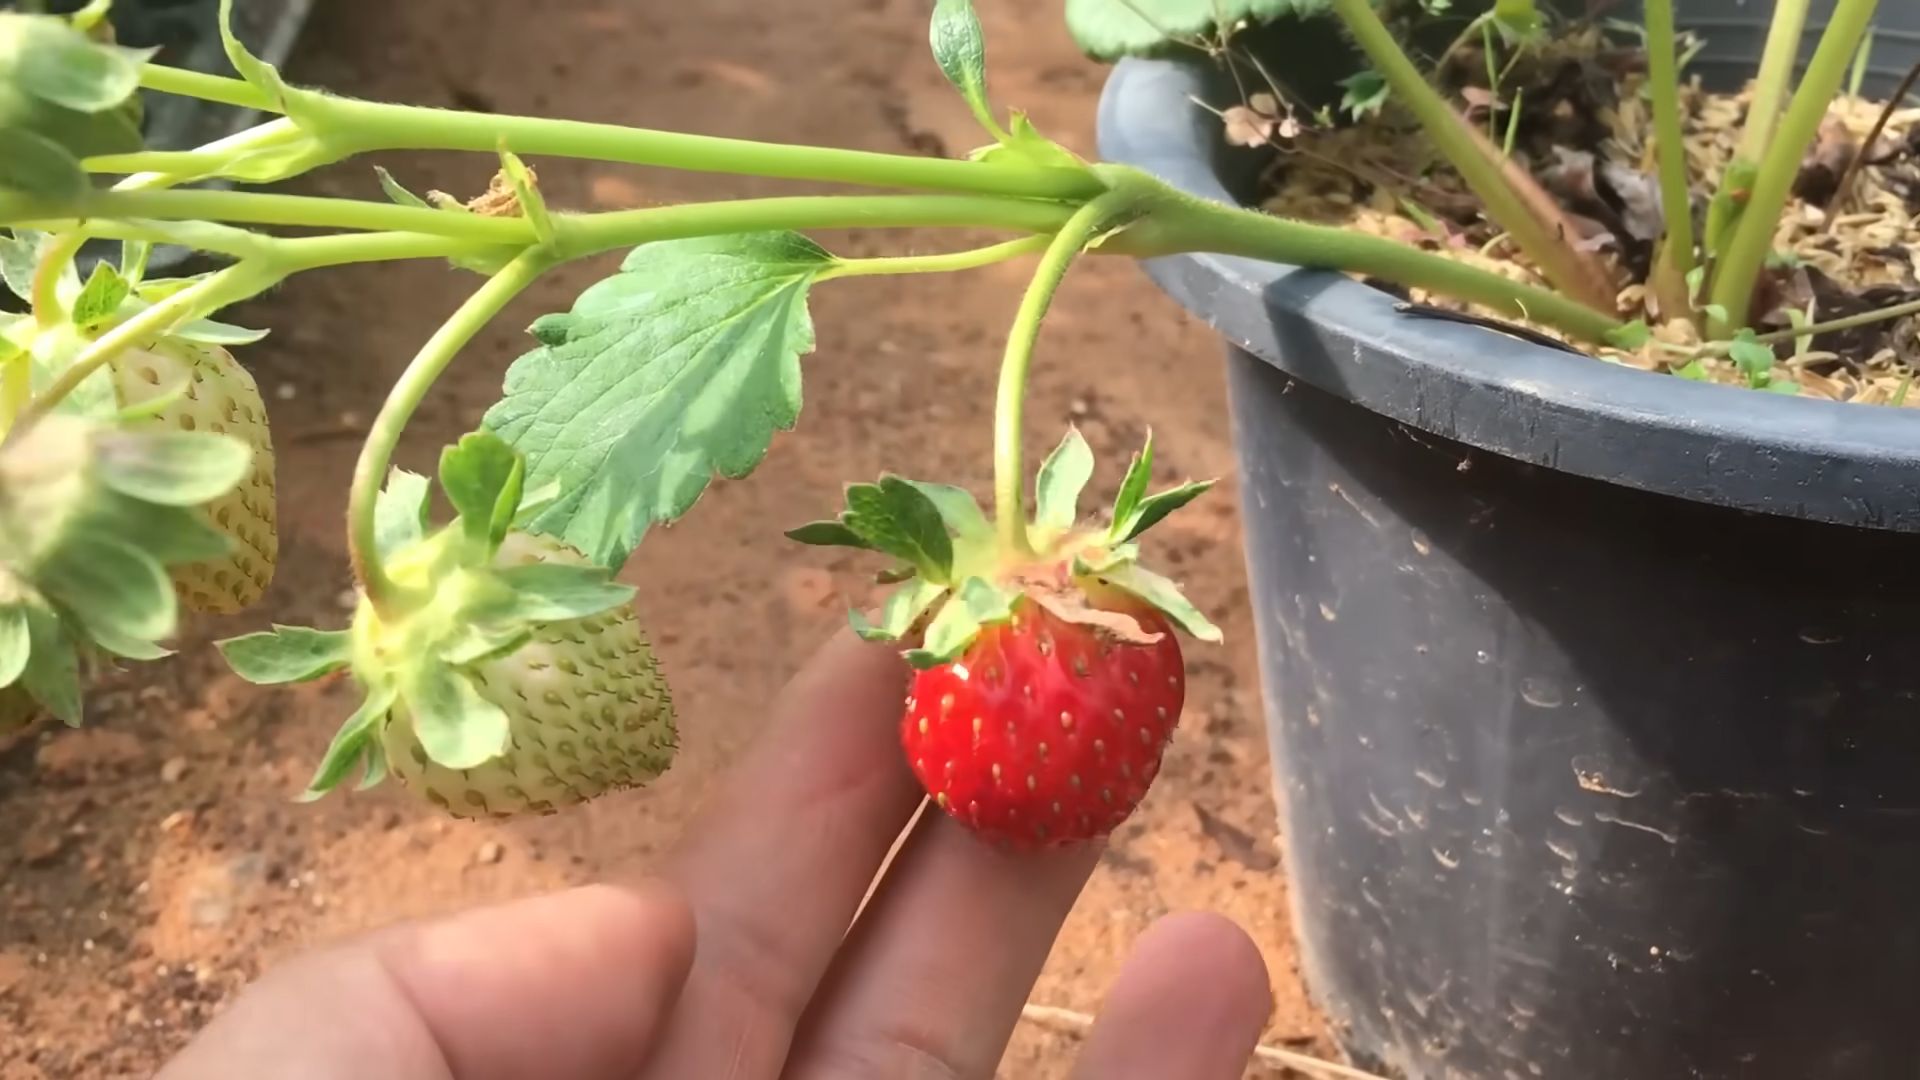
Grow Strawberries From Seed? Absolutely! Imagine biting into a juicy, sun-ripened strawberry that you nurtured from a tiny seed. It’s a rewarding experience that brings a touch of magic to your garden and your taste buds. For centuries, strawberries have been cherished for their sweet flavor and vibrant color, appearing in folklore, art, and culinary traditions across the globe. While traditionally propagated from runners, learning how to grow strawberries from seed opens up a world of possibilities, allowing you to cultivate unique varieties and enjoy a deeper connection with your food.
Let’s be honest, buying strawberry plants can be expensive, and sometimes the selection at your local nursery is limited. That’s where this DIY guide comes in! I’m going to show you simple, step-by-step instructions to successfully grow strawberries from seed, even if you’re a complete beginner. We’ll cover everything from seed selection and germination to transplanting and ongoing care. This isn’t just about saving money; it’s about the satisfaction of creating something beautiful and delicious from scratch. So, grab your gardening gloves, and let’s embark on this exciting journey together!
DIY Floating Shelves: A Simple Guide to Adding Style and Storage
Hey there, fellow DIY enthusiasts! I’m so excited to share this project with you – creating your own floating shelves. They’re stylish, space-saving, and surprisingly easy to build. Plus, you get the satisfaction of saying, “I made that!” every time you look at them. Let’s get started!
What You’ll Need: Gathering Your Supplies
Before we dive in, let’s make sure you have everything you need. This will save you from running to the hardware store mid-project (we’ve all been there!).
* Lumber: This is the star of the show! Choose the type of wood that best suits your style and budget. Pine is a good, affordable option, but you could also use oak, maple, or even reclaimed wood for a more rustic look. The amount you need will depend on the number and size of shelves you want to create. I recommend planning out your shelf dimensions beforehand. For this guide, let’s assume we’re making two shelves that are 36 inches long, 8 inches deep, and 1.5 inches thick. You’ll need enough lumber to cut two pieces that size.
* Shelf Support Brackets (Hidden): These are what make the shelves “float.” Make sure you choose brackets that are strong enough to support the weight you plan to put on the shelves. Look for brackets specifically designed for floating shelves. They usually consist of metal rods that slide into pre-drilled holes in the back of the shelf.
* Wood Screws: You’ll need these to attach the support brackets to the wall. Choose screws that are long enough to securely anchor the brackets into the wall studs. I usually go for 2.5-3 inch screws.
* Wall Anchors (Optional): If you can’t find wall studs where you want to install your shelves, you’ll need wall anchors. Choose anchors that are rated for the weight you plan to put on the shelves. Toggle bolts are a good option for heavier items.
* Wood Glue: This will help strengthen the bond between the wood pieces, especially if you’re building up the thickness of your shelves.
* Wood Filler: For filling any nail holes or imperfections in the wood.
* Sandpaper: You’ll need various grits of sandpaper (e.g., 80, 120, 220) to smooth the wood.
* Primer and Paint/Stain: Choose a primer and paint or stain that complements your decor.
* Polyurethane (Optional): For sealing and protecting the finished shelves.
* Tools:
* Measuring Tape
* Pencil
* Level
* Stud Finder
* Drill with various drill bits (including a bit that matches the diameter of the support bracket rods)
* Screwdriver
* Saw (Circular saw, miter saw, or hand saw)
* Sander (Optional, but it makes sanding much easier)
* Clamps
* Safety Glasses
* Dust Mask
Step-by-Step Instructions: Building Your Floating Shelves
Okay, let’s get our hands dirty! Follow these steps carefully, and you’ll have beautiful floating shelves in no time.
1. Prepare the Wood
1. Cut the Wood: Using your saw, cut the lumber to the desired dimensions for your shelves. Remember, we’re aiming for two shelves that are 36 inches long, 8 inches deep, and 1.5 inches thick. If you’re using thicker lumber, you might only need one piece per shelf. If you’re using thinner lumber, you’ll need to glue two pieces together to achieve the desired thickness.
2. Glue (If Necessary): If you’re using multiple pieces of wood to create the thickness of your shelves, apply wood glue to the surfaces that will be joined together. Clamp the pieces together tightly and let the glue dry completely according to the manufacturer’s instructions (usually 24 hours).
3. Sand the Wood: Once the glue is dry (if applicable), sand the wood thoroughly, starting with a coarser grit sandpaper (like 80 or 120) to remove any imperfections. Then, move to a finer grit sandpaper (like 220) to smooth the surface. Sand all edges and corners to round them slightly. This will give your shelves a more professional look and prevent splinters.
2. Drill Holes for the Support Brackets
1. Measure and Mark: This is a crucial step! Use your measuring tape and pencil to mark the locations for the support bracket rods on the back of each shelf. The number of brackets you need will depend on the length of your shelves and the weight you plan to put on them. For a 36-inch shelf, I recommend using at least two brackets, spaced evenly apart. Make sure the marks are centered horizontally on the back of the shelf.
2. Drill the Holes: Using your drill and the drill bit that matches the diameter of the support bracket rods, carefully drill the holes at the marked locations. Drill deep enough to accommodate the length of the rods, but be careful not to drill all the way through the shelf! I usually wrap tape around the drill bit to mark the desired depth.
3. Test Fit: Insert the support bracket rods into the holes to make sure they fit snugly. If the holes are too tight, you can gently enlarge them with the drill. If they’re too loose, you can add a small amount of wood glue to the holes before inserting the brackets.
3. Finishing the Shelves
1. Apply Wood Filler (If Necessary): If you have any nail holes or imperfections in the wood, apply wood filler to fill them in. Let the filler dry completely according to the manufacturer’s instructions.
2. Sand Again: Once the wood filler is dry, sand the filled areas smooth with fine-grit sandpaper.
3. Prime the Wood: Apply a coat of primer to the entire surface of each shelf. This will help the paint or stain adhere better and provide a more even finish. Let the primer dry completely.
4. Paint or Stain: Apply your chosen paint or stain to the shelves. Follow the manufacturer’s instructions for application and drying times. You may need to apply multiple coats to achieve the desired color and coverage.
5. Apply Polyurethane (Optional): If you want to protect your shelves from scratches and moisture, apply a coat of polyurethane. This will also give them a more durable finish. Let the polyurethane dry completely.
4. Installing the Shelves
1. Locate Wall Studs: Use your stud finder to locate the wall studs where you want to install your shelves. Mark the locations of the studs with a pencil.
2. Position the Brackets: Hold the support brackets against the wall, aligning them with the stud locations. Use a level to make sure the brackets are perfectly horizontal. Mark the locations of the screw holes on the wall.
3. Drill Pilot Holes: Using a drill bit that is slightly smaller than the diameter of your wood screws, drill pilot holes at the marked locations on the wall. If you’re not able to hit a stud with all of your bracket screws, you’ll need to use wall anchors. Follow the manufacturer’s instructions for installing the wall anchors.
4. Attach the Brackets: Screw the support brackets to the wall using your wood screws. Make sure the brackets are securely attached and level.
5. Slide the Shelves onto the Brackets: Carefully slide the shelves onto the support bracket rods. Make sure the shelves are pushed all the way back against the wall.
6. Check for Level: Use a level to make sure the shelves are perfectly horizontal. If they’re not, you can adjust the brackets slightly until they are.
Tips and Tricks for Perfect Floating Shelves
* Choose the Right Wood: The type of wood you choose will affect the look and feel of your shelves. Consider the style of your room and the weight you plan to put on the shelves when making your decision.
* Use a Level: A level is your best friend when installing floating shelves. Make sure the brackets and shelves are perfectly horizontal to prevent items from sliding off.
* Don’t Overload the Shelves: Floating shelves are strong, but they’re not invincible. Avoid overloading them with heavy items.
* Consider the Depth: The depth of your shelves will affect how much you can store on them. Choose a depth that is appropriate for the items you plan to display.
* Get Creative with Placement: Floating shelves can be used in a variety of ways. Consider using them to display books, plants, photos, or decorative items. You can also use them to create a focal point in your room.
* Safety First: Always wear safety glasses and a dust mask when working with wood.
And there you have it! Your very own DIY floating shelves. I hope you enjoyed this
Conclusion
So, there you have it! Growing strawberries from seed might seem a little daunting at first, but the rewards – the sheer joy of nurturing a plant from its earliest beginnings and the unparalleled flavor of homegrown berries – are absolutely worth the effort. This DIY trick, this journey from tiny seed to vibrant, fruit-laden plant, is more than just gardening; it’s an exercise in patience, a connection to nature, and a guarantee of the freshest, most delicious strawberries you’ve ever tasted.
Why is this a must-try? Because you’re not just buying strawberries; you’re creating them. You control the entire process, from seed selection to soil composition, ensuring that your berries are free from unwanted chemicals and bursting with natural sweetness. Plus, you have access to varieties you might never find at your local grocery store. Imagine cultivating alpine strawberries, with their intense aroma and tiny, jewel-like fruits, or trying your hand at everbearing varieties that provide a continuous harvest throughout the season.
Don’t be afraid to experiment! Once you’ve mastered the basic technique, consider variations. Try different soil mixes to see which yields the best results. Explore different lighting conditions to optimize growth. And definitely, explore different varieties of strawberries. Some are better suited for containers, while others thrive in garden beds. Some prefer full sun, while others tolerate partial shade. The possibilities are endless!
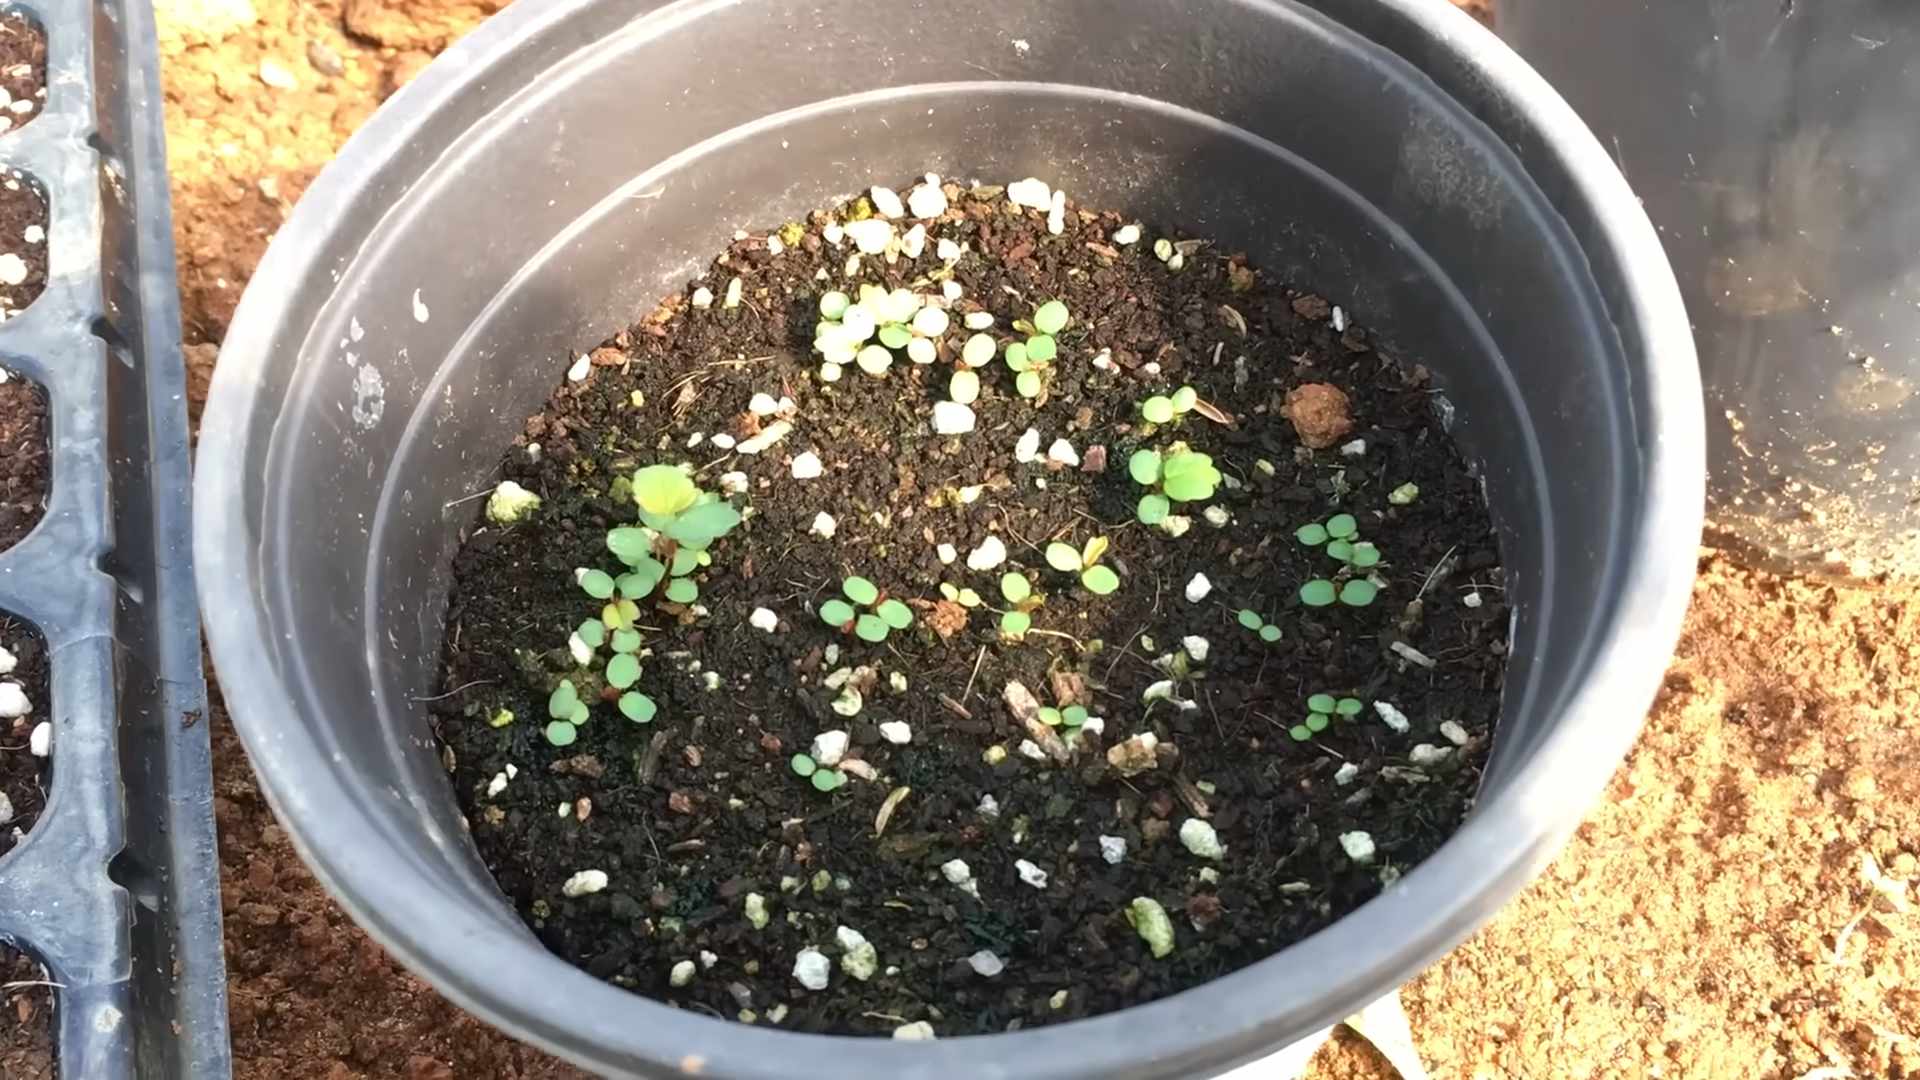
Consider starting your seeds indoors during the late winter or early spring to give them a head start. This allows you to control the environment and protect them from harsh weather conditions. You can also use a heat mat to speed up germination. Once the seedlings are strong enough, transplant them into larger pots or directly into your garden.
Another variation is to try different methods of stratification. While the refrigerator method is effective, you can also try burying the seeds in a pot of soil outdoors during the winter. The natural freeze-thaw cycle can help break dormancy and improve germination rates.
And remember, growing strawberries from seed is a learning process. Don’t be discouraged if you don’t get it right the first time. Keep experimenting, keep learning, and keep enjoying the journey. The satisfaction of harvesting your own homegrown strawberries is an experience you won’t soon forget.
We wholeheartedly encourage you to give this DIY trick a try. It’s a rewarding and fulfilling experience that will connect you with nature and provide you with delicious, homegrown strawberries. And most importantly, we want to hear about your experience! Share your tips, your successes, and even your challenges in the comments below. Let’s build a community of strawberry growers and learn from each other. Let us know what growing strawberries from seed means to you!
Frequently Asked Questions (FAQ)
Q: How long does it take to grow strawberries from seed?
A: Growing strawberries from seed requires patience. Germination can take anywhere from 1 to 6 weeks, depending on the variety and environmental conditions. After germination, it takes several months for the seedlings to mature and produce fruit. Generally, you can expect to harvest your first strawberries about a year after planting the seeds. However, some everbearing varieties may produce a small crop in the first year.
Q: What are the best strawberry varieties to grow from seed?
A: Some strawberry varieties are more easily grown from seed than others. Alpine strawberries, such as ‘Alexandria’ and ‘Yellow Wonder’, are known for their relatively easy germination and compact size, making them ideal for containers. Everbearing varieties, like ‘Tristan’ and ‘Albion’, are also good choices, as they produce fruit throughout the growing season. Day-neutral varieties, such as ‘Seascape’, are another option, as they are less sensitive to day length and produce fruit consistently. Research different varieties to find the ones that best suit your climate and growing conditions.
Q: Do strawberry seeds need stratification?
A: Yes, strawberry seeds typically require stratification, a period of cold, moist storage, to break dormancy and improve germination rates. This mimics the natural winter conditions that the seeds would experience in the wild. To stratify strawberry seeds, place them in a damp paper towel or coffee filter, seal them in a plastic bag, and refrigerate them for 4 to 6 weeks. Make sure the paper towel or coffee filter remains moist but not soaking wet. After stratification, the seeds are ready to be sown.
Q: What type of soil is best for growing strawberries from seed?
A: Strawberries prefer well-draining, slightly acidic soil with a pH between 5.5 and 6.5. A good soil mix for starting strawberry seeds is a combination of peat moss, perlite, and vermiculite. This mix provides good drainage and aeration, which are essential for healthy root development. You can also add a small amount of compost to the mix to provide nutrients. Avoid using heavy clay soils, as they can retain too much moisture and lead to root rot.
Q: How much sunlight do strawberry seedlings need?
A: Strawberry seedlings need plenty of sunlight to thrive. Aim for at least 6 to 8 hours of direct sunlight per day. If you are growing your seedlings indoors, you may need to supplement with artificial lighting, such as fluorescent grow lights. Place the lights a few inches above the seedlings and keep them on for 14 to 16 hours per day. As the seedlings grow, gradually increase the distance between the lights and the plants.
Q: How often should I water strawberry seedlings?
A: Strawberry seedlings need consistent moisture to thrive, but avoid overwatering, which can lead to root rot. Water the seedlings when the top inch of soil feels dry to the touch. Use a gentle watering can or spray bottle to avoid disturbing the delicate seedlings. Water in the morning to allow the foliage to dry before nightfall, which can help prevent fungal diseases.
Q: When should I transplant strawberry seedlings?
A: Transplant strawberry seedlings when they have developed several sets of true leaves and are large enough to handle easily. This is typically about 6 to 8 weeks after germination. Before transplanting, harden off the seedlings by gradually exposing them to outdoor conditions for a week or two. Start by placing them in a sheltered location for a few hours each day, gradually increasing the amount of time they spend outdoors. When transplanting, choose a sunny location with well-draining soil. Space the plants about 12 to 18 inches apart.
Q: How do I prevent pests and diseases in strawberry plants grown from seed?
A: Prevention is key when it comes to pests and diseases in strawberry plants. Start by using disease-free seeds and a sterile soil mix. Provide good air circulation around the plants to prevent fungal diseases. Regularly inspect the plants for signs of pests, such as aphids, spider mites, and slugs. If you find pests, treat them with insecticidal soap or neem oil. Remove any diseased leaves or fruit promptly to prevent the spread of infection. Consider using organic gardening practices to promote healthy plant growth and reduce the risk of pests and diseases.
Q: Can I grow strawberries from seed in containers?
A: Yes, many strawberry varieties are well-suited for container gardening. Choose a container that is at least 12 inches in diameter and has good drainage holes. Use a well-draining potting mix and provide plenty of sunlight. Water the plants regularly and fertilize them every few weeks with a balanced fertilizer. Container-grown strawberries may need to be watered more frequently than those grown in the ground, especially during hot weather.
Q: What are some common mistakes to avoid when growing strawberries from seed?
A: Some common mistakes to avoid when growing strawberries from seed include: using old or unviable seeds, failing to stratify the seeds, overwatering or underwatering the seedlings, providing insufficient sunlight, and neglecting to fertilize the plants. By avoiding these mistakes, you can increase your chances of success and enjoy a bountiful harvest of homegrown strawberries.
Leave a Comment