

Grow mushrooms at home? Absolutely! Imagine harvesting fresh, flavorful mushrooms right from your own kitchen, ready to elevate your next culinary creation. Forget those bland, store-bought varieties – with a few simple tricks and a little DIY spirit, you can cultivate a diverse range of delicious fungi, adding a touch of gourmet magic to your everyday meals.
Mushroom cultivation has a rich history, dating back centuries in Eastern cultures where they were prized for their medicinal and culinary properties. From ancient Chinese emperors to modern-day foodies, the allure of these fascinating fungi has endured. But you don’t need to be an expert mycologist to enjoy the fruits (or rather, the fungi) of your labor.
In today’s world, where we’re increasingly conscious of where our food comes from and eager to embrace sustainable practices, learning to grow mushrooms at home is more relevant than ever. Not only does it reduce your carbon footprint by minimizing transportation, but it also gives you complete control over the growing process, ensuring you’re consuming the freshest, most wholesome product possible. Plus, let’s be honest, there’s something incredibly satisfying about nurturing life from scratch and enjoying the literal fruits of your labor. So, are you ready to embark on this exciting journey? Let’s dive into some easy-to-follow DIY tricks that will have you harvesting your own gourmet mushrooms in no time!
Pilzzucht für Anfänger: Dein eigenes Pilzparadies zu Hause erschaffen!
Hey Pilzfreunde! Habt ihr euch jemals gefragt, wie es wäre, eure eigenen frischen, köstlichen Pilze zu Hause zu züchten? Ich kann euch sagen, es ist einfacher als ihr denkt und unglaublich befriedigend! In diesem Artikel zeige ich euch, wie ihr mit einfachen Mitteln und ein wenig Geduld eure eigenen Pilze züchten könnt. Wir konzentrieren uns hier auf Austernpilze (Pleurotus ostreatus), da diese relativ einfach zu züchten sind und schnell Ergebnisse liefern. Los geht’s!
Was du brauchst: Die Zutaten für dein Pilz-Abenteuer
Bevor wir loslegen, brauchen wir natürlich die richtigen Materialien. Keine Sorge, die meisten davon sind leicht zu bekommen oder vielleicht sogar schon in eurem Haushalt vorhanden.
* Pilzbrut (Pilzmyzel): Das ist das Herzstück unseres Projekts! Ihr könnt Austernpilzbrut online oder in spezialisierten Gartenfachgeschäften kaufen. Achtet darauf, dass die Brut frisch und von guter Qualität ist.
* Substrat: Das Substrat ist die Nahrungsgrundlage für eure Pilze. Wir verwenden hier Stroh, da es günstig und leicht zu verarbeiten ist. Ihr könnt auch Kaffeesatz, Sägespäne oder andere organische Materialien verwenden, aber Stroh ist für Anfänger ideal.
* Hitzebeständige Säcke oder Eimer: Diese benötigen wir, um das Stroh zu pasteurisieren. Große Gefrierbeutel oder Eimer mit Deckel funktionieren prima.
* Sprühflasche: Für die regelmäßige Befeuchtung der Pilze.
* Handschuhe: Um Kontamination zu vermeiden.
* Optional: Ein dunkler, kühler Raum oder Schrank für die Inkubationsphase.
Schritt-für-Schritt-Anleitung: So gelingt die Pilzzucht
Jetzt, wo wir alles haben, können wir mit der eigentlichen Pilzzucht beginnen. Keine Angst, es ist wirklich nicht schwer!
1. Das Stroh vorbereiten: Die Basis für gesundes Wachstum
Das Stroh muss pasteurisiert werden, um unerwünschte Mikroorganismen abzutöten, die mit den Pilzen konkurrieren könnten.
1. Stroh zerkleinern: Schneidet oder zerkleinert das Stroh in kleinere Stücke (ca. 5-10 cm lang). Das erleichtert die Pasteurisierung und die spätere Besiedlung durch das Myzel.
2. Stroh einweichen: Gebt das zerkleinerte Stroh in einen großen Topf oder Eimer und bedeckt es vollständig mit Wasser. Lasst es mindestens 24 Stunden einweichen. Dadurch wird das Stroh mit Feuchtigkeit gesättigt, was für die Pasteurisierung wichtig ist.
3. Pasteurisieren: Füllt einen großen Topf mit Wasser und erhitzt es auf ca. 70-80°C. Gebt das eingeweichte Stroh in hitzebeständige Säcke oder Eimer. Achtet darauf, dass die Säcke oder Eimer nicht zu voll sind, damit das Stroh gleichmäßig erhitzt wird. Taucht die Säcke oder Eimer in das heiße Wasser und lasst sie für 60-90 Minuten pasteurisieren. Die Temperatur sollte während des gesamten Prozesses konstant bleiben.
4. Abkühlen lassen: Nehmt die Säcke oder Eimer aus dem heißen Wasser und lasst das Stroh vollständig abkühlen. Das kann einige Stunden dauern. Das Stroh sollte feucht, aber nicht tropfnass sein.
2. Das Substrat beimpfen: Die Pilzbrut einbringen
Jetzt kommt der spannende Teil: Wir bringen die Pilzbrut in das vorbereitete Stroh ein.
1. Arbeitsbereich reinigen: Reinigt euren Arbeitsbereich gründlich, um Kontamination zu vermeiden. Verwendet Desinfektionsmittel oder Alkohol, um Oberflächen und Werkzeuge zu reinigen.
2. Handschuhe anziehen: Zieht saubere Handschuhe an, um die Pilzbrut nicht zu verunreinigen.
3. Substrat und Brut mischen: Nehmt das abgekühlte Stroh und die Pilzbrut. Mischt beides in einem Verhältnis von etwa 10-20% Brut zu 80-90% Stroh. Das bedeutet, dass ihr für 1 kg Stroh etwa 100-200 g Pilzbrut benötigt. Verteilt die Brut gleichmäßig im Stroh.
4. Substrat verpacken: Füllt das beimpfte Stroh in saubere, hitzebeständige Säcke oder Eimer. Drückt das Stroh leicht an, aber nicht zu fest. Verschließt die Säcke oder Eimer gut. Wenn ihr Säcke verwendet, könnt ihr kleine Löcher hineinstechen, um die Belüftung zu verbessern.
3. Die Inkubationsphase: Warten auf das Myzelwachstum
Jetzt heißt es Geduld haben! Das Myzel muss das Substrat besiedeln.
1. Dunkler, kühler Ort: Stellt die Säcke oder Eimer an einen dunklen, kühlen Ort mit einer Temperatur von etwa 20-24°C. Ein Keller, Schrank oder Abstellraum eignet sich gut.
2. Regelmäßige Kontrolle: Überprüft die Säcke oder Eimer regelmäßig auf Schimmel oder andere Kontaminationen. Wenn ihr Schimmel entdeckt, solltet ihr den betroffenen Sack oder Eimer sofort entfernen, um die Ausbreitung zu verhindern.
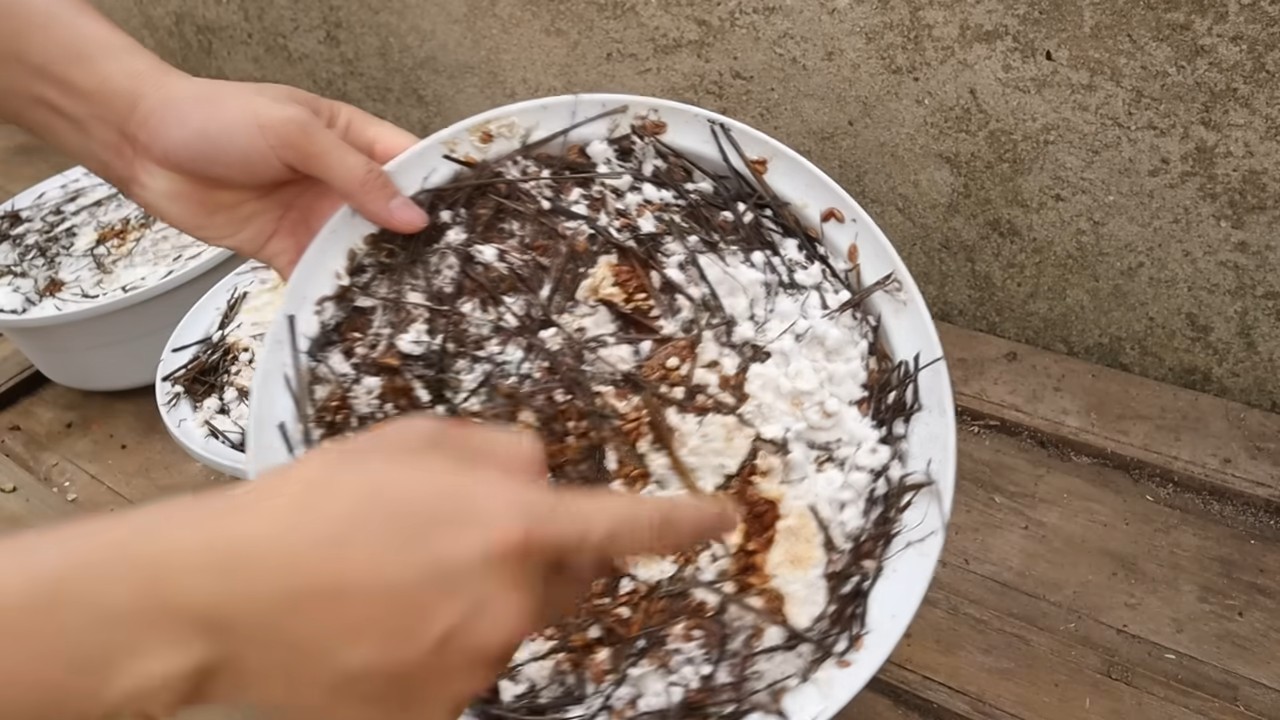
3. Myzelwachstum beobachten: Nach einigen Tagen oder Wochen (je nach Temperatur und Brutqualität) solltet ihr sehen, wie sich das Myzel (weiße, flaumige Fäden) im Stroh ausbreitet. Das ist ein gutes Zeichen!
4. Die Fruchtungsphase: Endlich Pilze ernten!
Wenn das Myzel das gesamte Substrat besiedelt hat, ist es Zeit für die Fruchtungsphase.
1. Licht und Feuchtigkeit: Stellt die Säcke oder Eimer an einen helleren Ort mit indirektem Licht. Die Luftfeuchtigkeit sollte hoch sein (ca. 80-90%). Ihr könnt die Säcke oder Eimer mehrmals täglich mit Wasser besprühen, um die Luftfeuchtigkeit zu erhöhen.
2. Belüftung: Sorgt für eine gute Belüftung, um Schimmelbildung zu vermeiden.
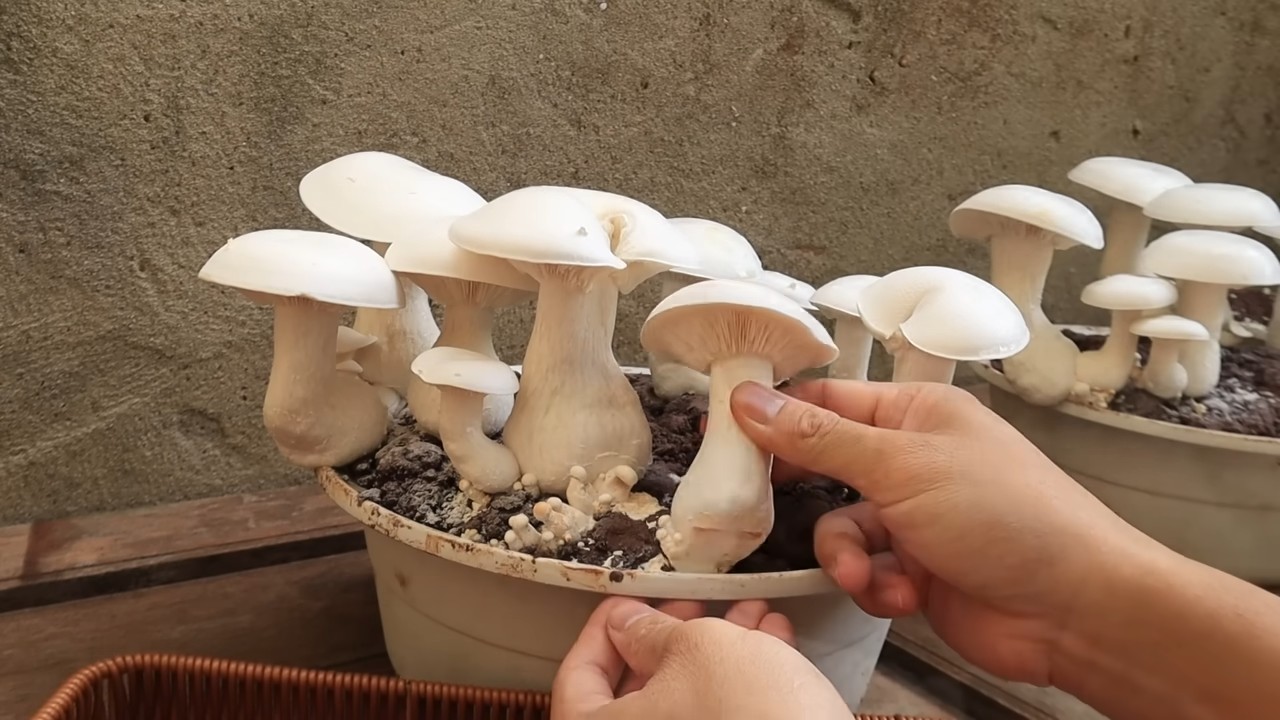
3. Pilze bilden sich: Nach einigen Tagen oder Wochen sollten sich kleine Pilze (Primordien) bilden. Diese wachsen schnell zu ausgewachsenen Austernpilzen heran.
4. Ernten: Erntet die Pilze, wenn sie ausgewachsen sind, aber bevor sie Sporen abwerfen. Schneidet die Pilze am Stielansatz ab.
Tipps und Tricks für eine erfolgreiche Pilzzucht
Hier sind noch ein paar zusätzliche Tipps, die euch helfen, eure Pilzzucht zu optimieren:
* Sauberkeit ist das A und O: Kontamination ist der häufigste Grund für Misserfolge bei der Pilzzucht. Achtet daher auf absolute Sauberkeit bei allen Arbeitsschritten.
* Die richtige Temperatur: Die Temperatur spielt eine entscheidende Rolle für das Myzelwachstum und die Fruchtbildung. Achtet darauf, die empfohlenen Temperaturen einzuhalten.
* Luftfeuchtigkeit kontrollieren: Austernpilze benötigen eine hohe Luftfeuchtigkeit, besonders während der Fruchtungsphase. Besprüht die Pilze regelmäßig mit Wasser oder verwendet einen Luftbefeuchter.
* Nicht aufgeben: Manchmal klappt es nicht gleich beim ersten Mal. Lasst euch nicht entmutigen und probiert es einfach noch einmal!
Häufige Probleme und Lösungen
Auch bei der Pilzzucht können Probleme auftreten. Hier sind einige der häufigsten Probleme und wie ihr sie lösen könnt:
* Schimmel: Schimmel ist ein häufiges Problem. Entfernt betroffene Säcke oder Eimer sofort und achtet auf bessere Belüftung und Sauberkeit.
* Kein Myzelwachstum: Wenn sich kein Myzel bildet, kann das an einer zu niedrigen Temperatur, einer schlechten Brutqualität oder einer Kontamination liegen. Überprüft die Temperatur, verwendet frische Brut und achtet auf Sauberkeit.
* Keine Pilze: Wenn sich das Myzel gut entwickelt hat, aber keine Pilze wachsen, kann das an zu wenig Licht, zu niedriger Luftfeuchtigkeit oder zu schlechter Belüftung liegen. Stellt die Säcke oder Eimer an einen helleren Ort, erhöht die Luftfeuchtigkeit und sorgt für bessere Belüftung.
Fazit: Dein eigenes Pilzparadies ist zum Greifen nah!
Conclusion
So, there you have it! Growing mushrooms at home is not only achievable but also incredibly rewarding. Forget those expensive, pre-packaged mushrooms from the grocery store. With a little patience and the right setup, you can cultivate a continuous supply of fresh, flavorful fungi right in your own home. This DIY trick is a must-try for several reasons. First, it offers unparalleled freshness. The taste of a mushroom harvested moments before cooking is simply unmatched. Second, it’s a sustainable and eco-friendly way to enjoy your favorite varieties. You’re reducing your carbon footprint by eliminating transportation and packaging waste. Third, it’s a fascinating learning experience that connects you to the natural world in a unique and tangible way.
But the benefits don’t stop there. Growing your own mushrooms allows you to experiment with different varieties that you might not find in your local supermarket. Imagine the possibilities: delicate oyster mushrooms, earthy shiitakes, or even the prized lion’s mane, all grown in your own home!
Ready to take your mushroom cultivation to the next level? Consider these variations:
* Coffee Grounds Substrate: For oyster mushrooms, used coffee grounds make an excellent and readily available substrate. They’re rich in nutrients and already pasteurized by the brewing process.
* Log Inoculation: If you have access to hardwood logs, you can inoculate them with mushroom spawn for a long-term, outdoor mushroom patch. This method is particularly well-suited for shiitake and oyster mushrooms.
* Vertical Gardening: Maximize your space by creating a vertical mushroom garden using stacked containers or hanging bags. This is a great option for small apartments or limited growing areas.
* Composting: Incorporate mushroom cultivation into your composting system. Certain mushroom species can help break down organic matter and enrich your compost.
Don’t be intimidated by the process. While it may seem complex at first, growing mushrooms at home is surprisingly straightforward with the right guidance and a little bit of experimentation. Start small, be patient, and don’t be afraid to make mistakes. Every failure is a learning opportunity.
We are confident that you will find the experience of growing mushrooms at home to be both enjoyable and rewarding. The satisfaction of harvesting your own fresh, delicious mushrooms is truly unparalleled. So, gather your supplies, follow the steps outlined in this guide, and embark on your mushroom-growing adventure today!
We encourage you to try this DIY trick and share your experiences with us. Let us know what varieties you’re growing, what challenges you’ve faced, and what successes you’ve achieved. Share your photos and tips in the comments section below. Together, we can build a community of home mushroom growers and spread the joy of cultivating these fascinating fungi. Happy growing!
Frequently Asked Questions (FAQ)
What are the easiest mushrooms to grow at home for beginners?
Oyster mushrooms are generally considered the easiest mushrooms to grow at home for beginners. They are fast-growing, relatively tolerant of environmental conditions, and can be grown on a variety of substrates, including straw, coffee grounds, and cardboard. Shiitake mushrooms are also a good option, but they require a bit more patience as they take longer to fruit. Button mushrooms, the kind you typically find in grocery stores, are more challenging to grow at home and are best left to experienced cultivators.
What kind of space do I need to grow mushrooms at home?
You don’t need a lot of space to grow mushrooms at home. A small closet, a basement corner, or even a shelf in your pantry can be sufficient. The key is to provide the right environmental conditions: darkness, humidity, and proper ventilation. A dedicated grow tent can be helpful for maintaining these conditions, but it’s not essential. The size of your growing area will depend on the amount of mushrooms you want to produce.
How long does it take to grow mushrooms at home?
The time it takes to grow mushrooms at home varies depending on the species and the growing method. Oyster mushrooms can typically be harvested within a few weeks of inoculation, while shiitake mushrooms may take several months. The incubation period, during which the mycelium colonizes the substrate, is usually the longest part of the process. Once the mushrooms start to fruit, they can be harvested within a few days.
What is the best substrate for growing mushrooms at home?
The best substrate for growing mushrooms at home depends on the species you’re growing. Oyster mushrooms thrive on straw, coffee grounds, and cardboard. Shiitake mushrooms prefer hardwood logs or sawdust. Button mushrooms require a composted substrate made from straw, manure, and other organic materials. It’s important to choose a substrate that is appropriate for the specific mushroom species you’re growing.
How do I maintain the proper humidity for growing mushrooms at home?
Maintaining proper humidity is crucial for successful mushroom cultivation. Mushrooms need a humid environment to fruit properly. You can increase humidity by misting the growing area regularly with water, using a humidifier, or placing the growing container inside a plastic bag or tent. Monitor the humidity levels with a hygrometer and adjust accordingly.
How do I prevent contamination when growing mushrooms at home?
Contamination is a common problem in mushroom cultivation. To prevent contamination, it’s important to maintain a clean and sterile environment. Pasteurize or sterilize your substrate before inoculation to kill any competing organisms. Use sterile tools and gloves when handling the substrate and spawn. Keep the growing area clean and free of dust and debris. Monitor the growing container regularly for signs of contamination, such as mold or discoloration.
What are the signs of a successful mushroom grow?
The signs of a successful mushroom grow include healthy mycelial growth, the formation of primordia (tiny mushroom pins), and the development of mature mushrooms. The mycelium should be white and fluffy, without any signs of mold or discoloration. The primordia should be firm and plump, and they should develop into mature mushrooms within a few days.
What do I do if my mushrooms don’t grow?
If your mushrooms don’t grow, there could be several reasons. The most common causes include insufficient humidity, improper temperature, contamination, or poor-quality spawn. Check the environmental conditions and make sure they are within the optimal range for the species you’re growing. Inspect the growing container for signs of contamination. If the spawn is old or of poor quality, it may not be viable.
Can I eat the mushrooms I grow at home?
Yes, you can eat the mushrooms you grow at home, provided that you have properly identified them and are certain that they are edible. Never eat wild mushrooms unless you are absolutely sure of their identity. When growing mushrooms at home, it’s best to start with a known edible species and follow the instructions carefully.
Where can I buy mushroom spawn?
Mushroom spawn can be purchased from a variety of sources, including online retailers, garden centers, and specialty mushroom suppliers. Look for reputable suppliers that offer high-quality spawn. Choose a spawn that is appropriate for the species you want to grow and the substrate you plan to use.
Is growing mushrooms at home legal?
Growing culinary mushrooms at home is legal in most places. However, it’s important to check your local laws and regulations to be sure. Growing certain types of mushrooms, such as those that contain psilocybin, may be illegal in some jurisdictions.
What are the nutritional benefits of growing mushrooms at home?
Growing mushrooms at home provides access to a highly nutritious food source. Mushrooms are low in calories and fat, and they are a good source of protein, fiber, vitamins, and minerals. They also contain antioxidants and other beneficial compounds. Growing your own mushrooms allows you to enjoy these nutritional benefits while also reducing your carbon footprint.
Leave a Comment