

Bean Sprouts DIY Home: Your Gateway to Fresh, Crunchy Goodness! Ever dreamt of having a constant supply of fresh, crunchy bean sprouts right at your fingertips? I know I have! Forget those limp, sad-looking sprouts from the grocery store. I’m about to share a super easy, budget-friendly way to grow your own delicious bean sprouts, right in your kitchen.
Sprouting beans isn’t just a modern health trend; it’s a practice with roots stretching back thousands of years! In many Asian cultures, bean sprouts are a staple ingredient, valued not only for their taste and texture but also for their nutritional benefits and ease of cultivation. Think of all the delicious stir-fries, salads, and sandwiches you can elevate with your own homegrown sprouts!
Why should you bother with this bean sprouts DIY home project? Well, for starters, it’s incredibly rewarding to watch something grow from seed to sprout in just a few days. Plus, you’ll save money, reduce your reliance on store-bought produce, and have complete control over the quality and freshness of your food. In today’s world, where healthy eating and sustainable living are more important than ever, mastering the art of bean sprouts DIY home growing is a skill that will keep on giving. So, let’s dive in and unlock the secrets to sprouting success!
Regrow Celery from Kitchen Scraps: A Beginner’s Guide
Hey there, fellow plant enthusiasts! Ever find yourself tossing out the base of your celery stalk after chopping it up for a delicious soup or salad? Well, stop right there! I’m going to show you how to regrow celery from that very scrap, giving you fresh, homegrown celery right from your kitchen. It’s easier than you think, and incredibly rewarding. Trust me, there’s nothing quite like snipping off a stalk you grew yourself!
What You’ll Need
Before we dive in, let’s gather our supplies. This project is super simple, so you probably already have everything you need:
* A celery stalk base (about 2 inches from the bottom, where the stalks are connected). Make sure it’s firm and healthy-looking, not mushy or brown.
* A shallow dish or bowl (a saucer works great).
* Water (tap water is fine).
* A sunny windowsill or well-lit area.
* Potting soil.
* A pot or container (at least 6 inches in diameter).
* A spray bottle (optional, but helpful for keeping the soil moist).
Phase 1: Rooting Your Celery Base
This is the initial stage where we encourage the celery base to sprout new roots. It’s like giving it a little wake-up call!
1. Prepare the Celery Base: Gently clean the celery base under cool running water to remove any dirt or debris. Don’t scrub too hard, as you don’t want to damage it.
2. Place in Water: Fill your shallow dish with about an inch of water. Place the celery base, cut-side up, in the dish. Make sure the water level is high enough to cover the bottom of the base, but not so high that it submerges the entire thing. We want the cut end to be consistently moist.
3. Find a Sunny Spot: Place the dish with the celery base on a sunny windowsill or in a well-lit area. Celery needs plenty of light to thrive, so aim for at least 6 hours of sunlight per day. If you don’t have a sunny windowsill, you can use a grow light.
4. Change the Water Regularly: This is crucial! Change the water every 1-2 days to prevent bacteria growth and keep the water fresh. This will also provide the celery with a constant supply of oxygen.
5. Observe and Wait: Over the next few days, you should start to see small roots emerging from the bottom of the celery base. You might also notice new green leaves sprouting from the center. This is a sign that your celery is happy and healthy! Be patient; it can take anywhere from 5-7 days (or even a bit longer) for roots to appear.
Phase 2: Planting Your Rooted Celery
Once your celery base has developed a good network of roots (about an inch or two long), it’s time to move it to a pot with soil. This is where the real growing magic happens!
1. Prepare the Pot: Choose a pot or container that’s at least 6 inches in diameter and has drainage holes at the bottom. Good drainage is essential to prevent root rot. Fill the pot with high-quality potting soil, leaving about an inch of space at the top.
2. Create a Planting Hole: Use your finger or a small trowel to create a hole in the center of the soil, large enough to accommodate the celery base and its roots.
3. Carefully Transplant: Gently remove the celery base from the water dish. Be careful not to damage the delicate roots. Place the celery base into the hole in the soil, making sure the roots are spread out and covered with soil. The top of the celery base should be just above the soil line.
4. Water Thoroughly: Water the soil thoroughly until water drains out of the drainage holes. This will help settle the soil around the roots and provide the celery with the moisture it needs.
5. Return to a Sunny Spot: Place the pot back on the sunny windowsill or in the well-lit area.
Phase 3: Caring for Your Growing Celery
Now that your celery is planted, it’s time to provide it with the care it needs to grow into a healthy, thriving plant.
1. Water Regularly: Celery needs consistent moisture, so water the soil whenever it feels dry to the touch. Don’t let the soil dry out completely, but also avoid overwatering, which can lead to root rot. A good rule of thumb is to water deeply when the top inch of soil feels dry.
2. Fertilize (Optional): While not essential, fertilizing your celery can help it grow faster and produce larger stalks. Use a balanced liquid fertilizer diluted to half strength, and apply it every 2-3 weeks. Follow the instructions on the fertilizer packaging.
3. Monitor for Pests and Diseases: Keep an eye out for any signs of pests or diseases, such as aphids, spider mites, or fungal infections. If you notice any problems, address them promptly with appropriate organic pest control methods or fungicides.
4. Provide Support (Optional): As your celery grows taller, it may need some support to prevent it from flopping over. You can use a small stake or tomato cage to provide support.
5. Harvesting Your Celery: This is the best part! You can start harvesting your celery stalks when they reach a size that you’re happy with. Simply cut off the outer stalks with a sharp knife, leaving the inner stalks to continue growing. You can harvest celery stalks gradually over time, as needed.
Troubleshooting Tips
Even with the best care, you might encounter a few challenges along the way. Here are some common issues and how to address them:
* Celery base not rooting: Make sure the celery base is fresh and healthy. Change the water regularly and ensure it’s getting enough sunlight. Sometimes, it just takes a little longer for roots to appear.
* Yellowing leaves: This could be a sign of overwatering, underwatering, or nutrient deficiency. Adjust your watering schedule and consider fertilizing your celery.
* Leggy growth: This usually indicates that the celery isn’t getting enough sunlight. Move it to a sunnier location or supplement with a grow light.
* Pests: Inspect your celery regularly for pests and address any infestations promptly with organic pest control methods.
Important Considerations
* Celery grown from scraps may not be as large or robust as celery grown from seed. This is perfectly normal. You’re essentially giving the celery a second life!
* The flavor of regrown celery may be slightly different from store-bought celery. Some people find it to be more intense or slightly bitter.
* This method works best with organic celery. Non-organic celery may have been treated with chemicals that can inhibit root growth.
* Be patient! Growing celery from scraps takes time and effort. Don’t get discouraged if you don’t see results immediately.
Why I Love This DIY Hack
I absolutely love this DIY hack because it’s a fantastic way to reduce food waste and grow your own fresh produce at home. It’s also a great project for kids, teaching them about the life cycle of plants and the importance of sustainability. Plus, it’s just plain fun to watch your celery grow from a simple kitchen scrap!
So, there you have it! My comprehensive guide to regrowing celery from kitchen scraps. Give it a try, and I’m confident you’ll be enjoying fresh, homegrown celery in no time. Happy growing!
Conclusion
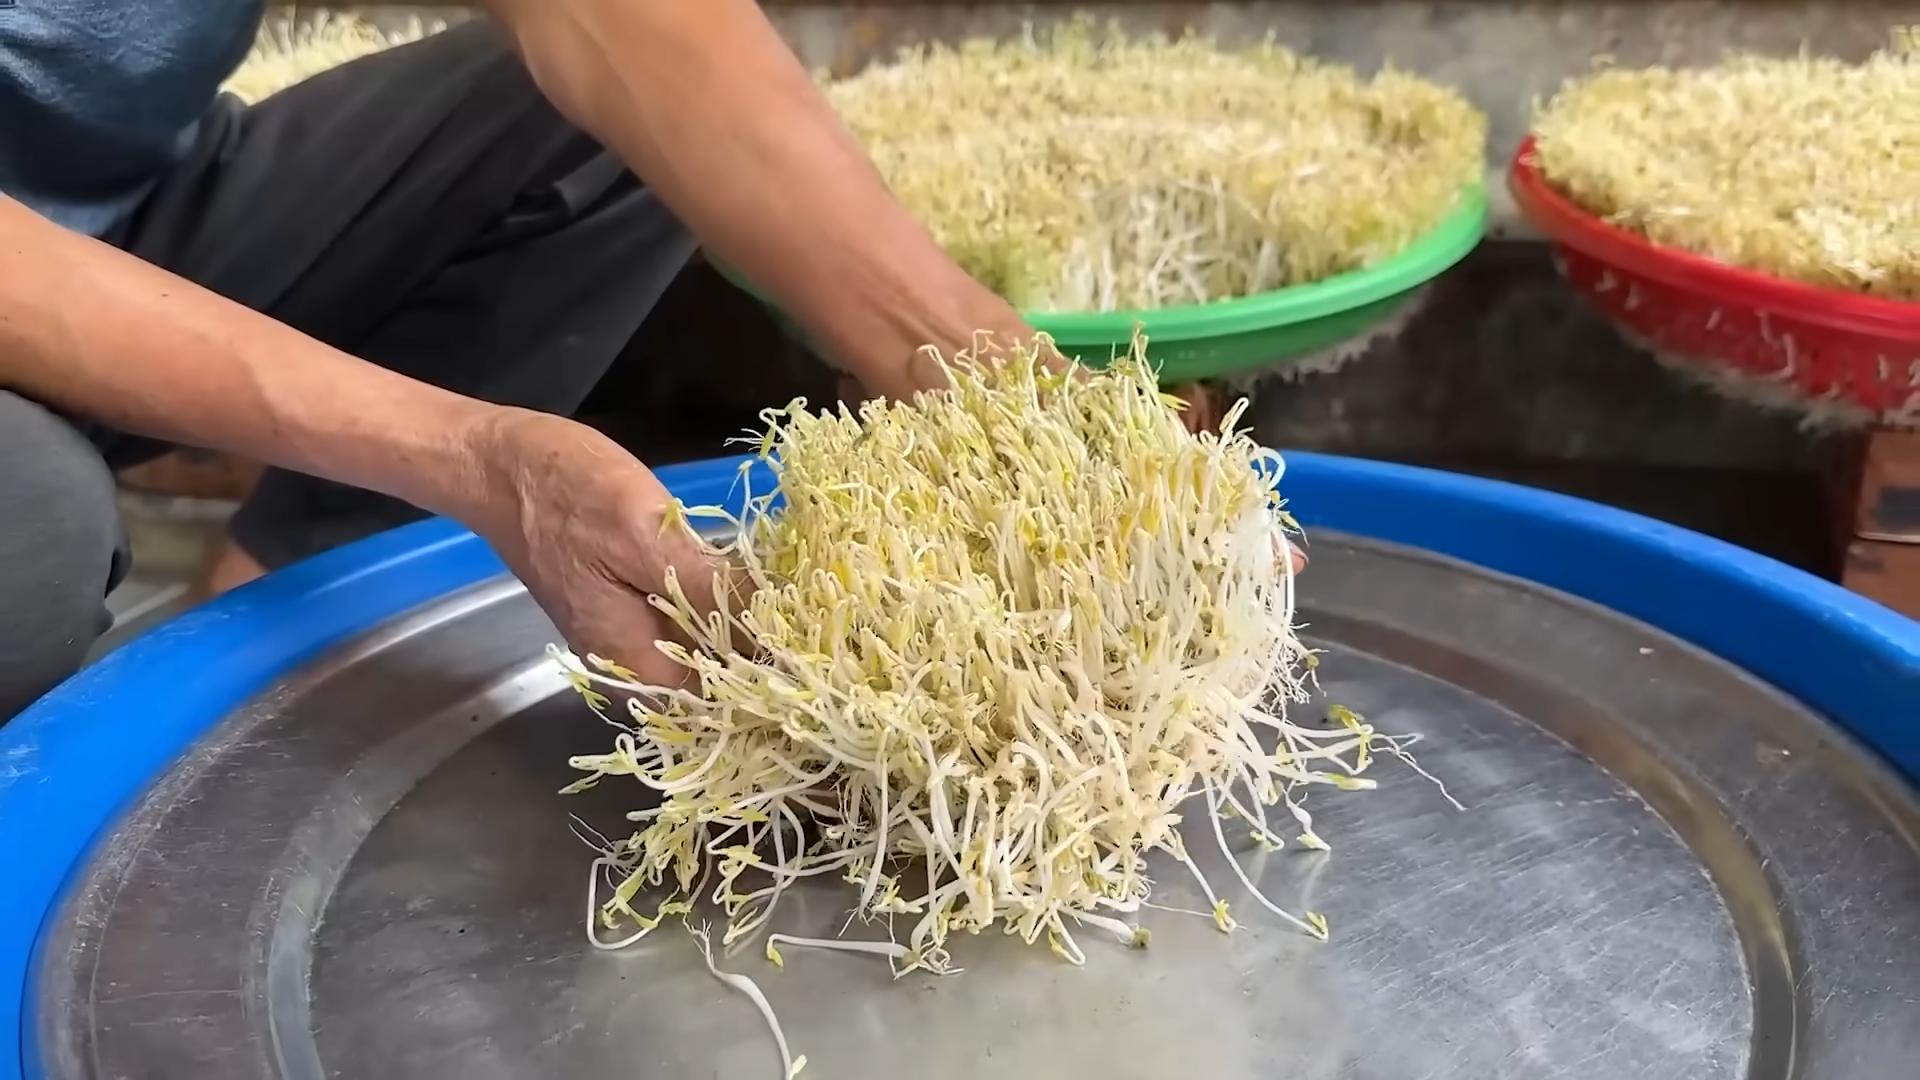
So, there you have it! Cultivating your own bean sprouts at home isn’t just a fun project; it’s a gateway to fresher, more flavorful ingredients right at your fingertips. Forget those limp, often questionable sprouts from the grocery store. With this simple DIY method, you’re in control of the entire process, ensuring peak freshness and maximum nutritional value.
Why is this DIY trick a must-try? Because it empowers you to elevate your meals with a burst of homegrown goodness. Imagine adding crisp, vibrant bean sprouts to your salads, stir-fries, sandwiches, or even as a crunchy topping for your favorite Asian-inspired dishes. The possibilities are endless! Plus, you’ll be amazed at how quickly these little sprouts transform from humble beans into a culinary delight. It’s a truly rewarding experience to witness the magic of growth firsthand.
Beyond the superior taste and freshness, growing your own bean sprouts is also incredibly economical and environmentally friendly. You’re reducing your reliance on commercially produced sprouts, which often travel long distances and require significant resources. By embracing this DIY approach, you’re contributing to a more sustainable food system and saving money in the process.
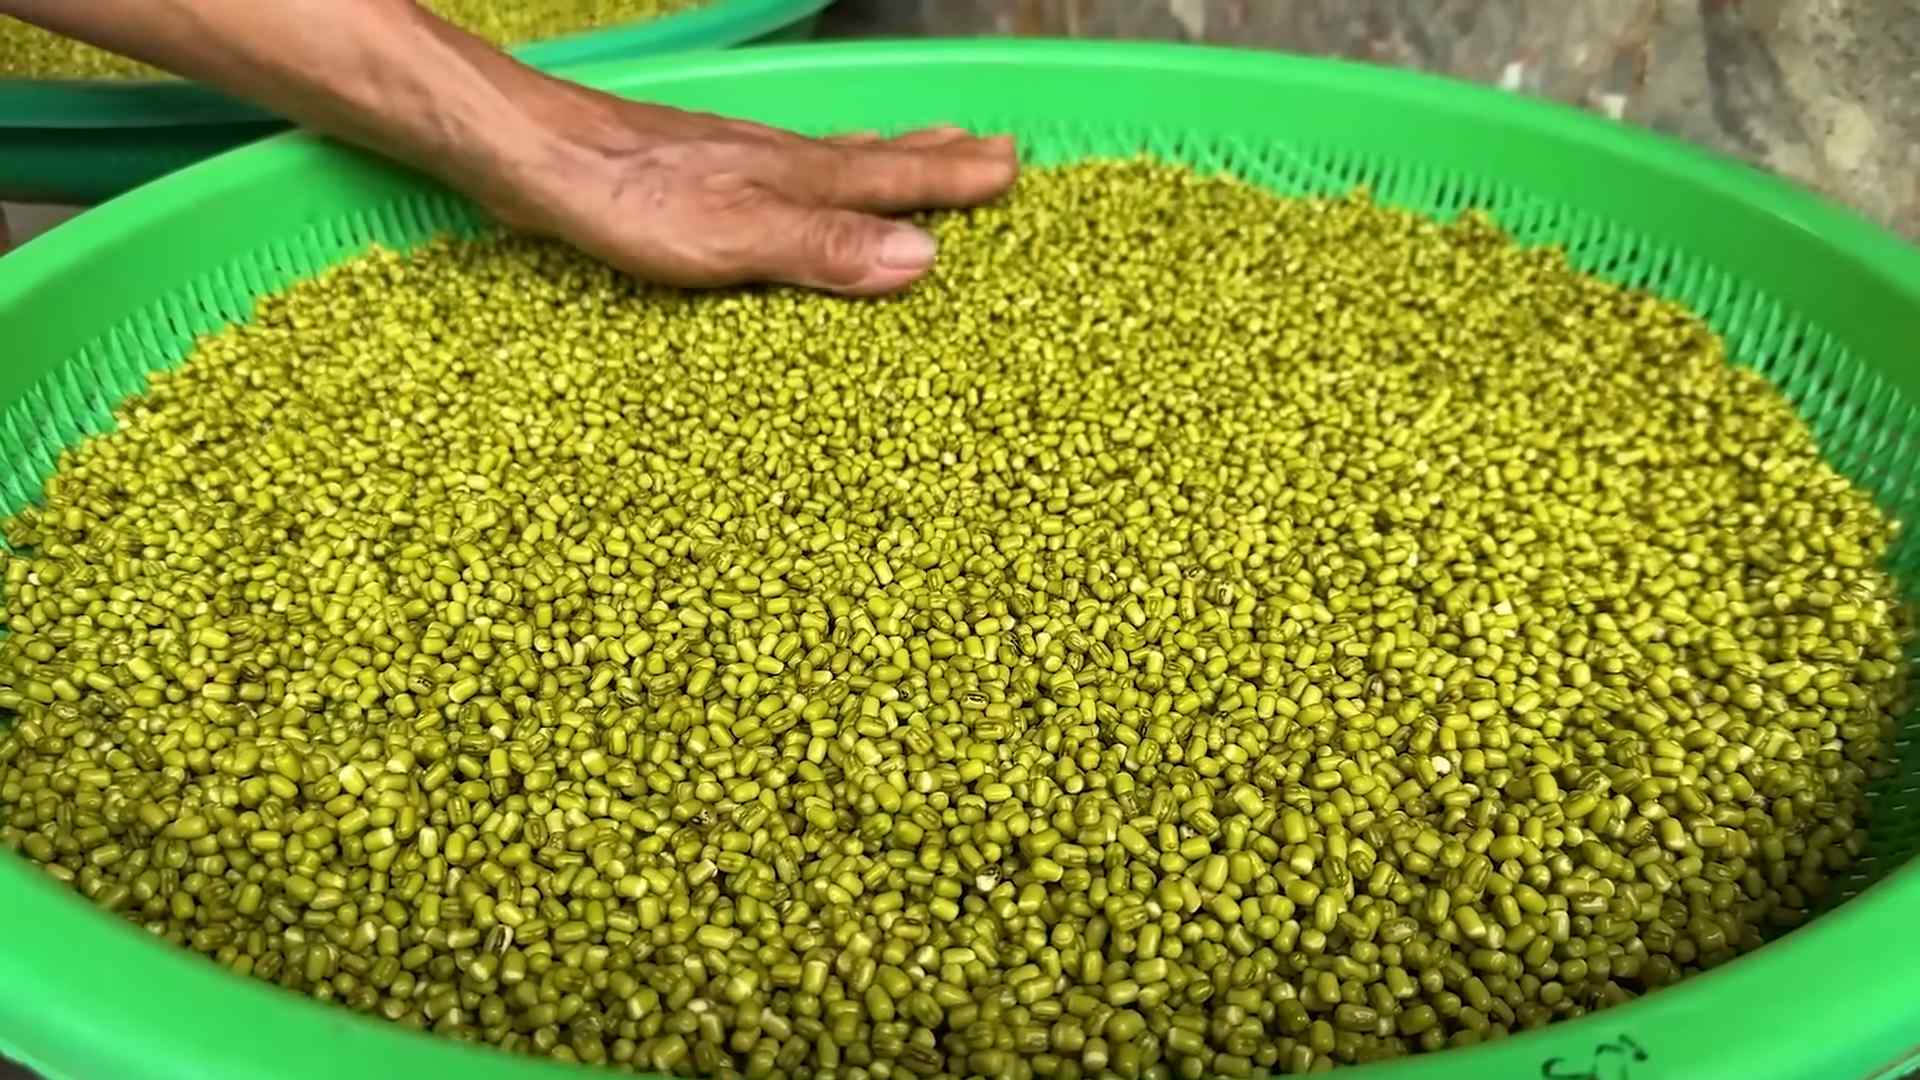
Looking for variations? Absolutely! Experiment with different types of beans to discover your favorite flavor profiles. Mung beans are the classic choice, but you can also try adzuki beans, lentils, or even chickpeas. Each variety will offer a unique taste and texture, adding exciting new dimensions to your culinary creations. You can also play around with the sprouting time to achieve your desired level of crunchiness. Some people prefer shorter sprouts with a milder flavor, while others enjoy longer sprouts with a more pronounced taste.
Another fun variation is to add a touch of spice during the rinsing process. A pinch of chili flakes or a dash of hot sauce can infuse your bean sprouts with a subtle kick, perfect for adding some zing to your meals. Just be sure to use these sparingly, as a little goes a long way!
This DIY bean sprouts at home method is a game-changer for anyone who values fresh, healthy, and flavorful ingredients. It’s a simple, cost-effective, and environmentally friendly way to enhance your culinary creations and connect with the natural world.
We wholeheartedly encourage you to give this DIY trick a try. It’s easier than you might think, and the results are truly remarkable. Once you’ve experienced the joy of growing your own bean sprouts, you’ll never go back to store-bought again.
Don’t forget to share your experience with us! We’d love to hear about your successes, your challenges, and any creative variations you’ve discovered. Post photos of your homegrown bean sprouts on social media using [Your Hashtag Here] and tag us [Your Social Media Handle Here]. Let’s inspire others to embrace the magic of DIY bean sprouts and create a community of sprout enthusiasts! We are excited to see your bean sprouts at home.
Frequently Asked Questions (FAQs)
What types of beans are best for sprouting?
Mung beans are the most commonly used and widely recommended bean for sprouting due to their consistent germination rate and mild flavor. However, you can also successfully sprout adzuki beans, lentils, chickpeas, and even some types of peas. Experimenting with different beans can lead to exciting flavor discoveries. Just be sure to use beans specifically intended for sprouting or cooking, as some raw beans can contain toxins. Avoid using kidney beans for sprouting, as they require thorough cooking to eliminate toxins.
How long does it take for bean sprouts to grow?
Typically, bean sprouts will be ready to harvest in 3-5 days. The exact time will depend on the type of bean, the temperature, and the humidity levels in your environment. Check your sprouts daily and rinse them thoroughly to prevent mold growth. You’ll know they’re ready when they have developed small roots and shoots.
What if my bean sprouts start to smell bad?
A foul odor is a sign of bacterial growth or mold. This usually indicates that the sprouts haven’t been rinsed frequently enough or that the sprouting environment is too warm and humid. Discard any sprouts that smell bad, as they are not safe to eat. To prevent this, ensure you rinse your sprouts at least twice a day with cool, clean water and provide adequate drainage.
How do I store bean sprouts?
Once your bean sprouts have reached your desired length, rinse them thoroughly and drain them well. Store them in an airtight container lined with a paper towel in the refrigerator. The paper towel will help absorb excess moisture and prevent them from becoming soggy. Properly stored bean sprouts can last for up to a week in the refrigerator.
Can I eat the bean sprout roots?
Yes, the roots of bean sprouts are perfectly edible. They are a natural part of the sprout and contribute to its overall texture and flavor. Some people prefer to trim the roots before eating, but this is purely a matter of personal preference.
Why are my bean sprouts not growing?
There could be several reasons why your bean sprouts aren’t growing. First, ensure that your beans are viable and haven’t expired. Old beans may have a lower germination rate. Second, make sure you’re providing adequate moisture and drainage. The beans should be kept consistently moist but not waterlogged. Third, check the temperature of your sprouting environment. Bean sprouts thrive in a cool, dark place. If the temperature is too high, it can inhibit growth. Finally, ensure that your sprouting container is clean and free of any contaminants.
Is it safe to eat raw bean sprouts?
While bean sprouts are generally safe to eat raw, there is a small risk of bacterial contamination. This is because the warm, humid conditions required for sprouting can also promote the growth of bacteria like Salmonella and E. coli. To minimize this risk, purchase your beans from a reputable source, rinse them thoroughly before sprouting, and maintain a clean sprouting environment. If you are concerned about food safety, you can lightly cook your bean sprouts before eating them.
Can I use tap water for sprouting?
Yes, you can use tap water for sprouting, as long as it is safe to drink. However, if your tap water contains high levels of chlorine or other chemicals, it may be best to use filtered water. Chlorine can inhibit the germination process and affect the taste of your sprouts.
What are the nutritional benefits of bean sprouts?
Bean sprouts are a nutritional powerhouse, packed with vitamins, minerals, and antioxidants. They are a good source of vitamin C, vitamin K, folate, and fiber. They are also low in calories and fat, making them a healthy addition to any diet. The sprouting process also increases the bioavailability of certain nutrients, making them easier for your body to absorb.
Can I sprout beans in direct sunlight?
No, bean sprouts should not be exposed to direct sunlight. They thrive in a dark, cool environment. Direct sunlight can overheat the sprouts and inhibit their growth. It can also promote the growth of algae, which can contaminate your sprouts.

Leave a Comment