

Grow Large Rutabagas Easily and impress your neighbors with your gardening prowess! Have you ever dreamed of harvesting rutabagas so big they practically qualify as small boulders? Well, you’re in the right place. This isn’t just about growing rutabagas; it’s about cultivating giants, and I’m here to share my secrets.
Rutabagas, also known as swedes, have a fascinating history, originating as a cross between a cabbage and a turnip. They’ve been a staple in European diets for centuries, providing sustenance through harsh winters. Think of them as the unsung heroes of the root vegetable world! But let’s be honest, sometimes they can be a bit… underwhelming in size. That’s where these DIY tricks come in.
Why do you need these hacks? Because growing large, healthy rutabagas isn’t just about bragging rights (though that’s a definite perk!). Bigger rutabagas mean more delicious, nutritious food for you and your family. Plus, larger vegetables are often easier to peel and prepare. I’ve found that with a few simple adjustments to my gardening routine, I can consistently grow large rutabagas easily, and I’m confident you can too. So, let’s dive into the tips and tricks that will transform your rutabaga patch from ordinary to extraordinary!
Grow Giant Rutabagas: My Foolproof Guide for Bumper Crops!
Okay, friends, let’s talk rutabagas! These often-overlooked root vegetables are nutritional powerhouses and surprisingly easy to grow, especially if you’re aiming for those impressive, prize-winning sizes. I’ve spent years perfecting my rutabaga-growing technique, and I’m excited to share my secrets with you. Get ready for some serious rutabaga bragging rights!
Understanding Rutabagas: The Basics
Before we dive into the nitty-gritty, let’s cover some essential rutabaga knowledge. Rutabagas, sometimes called swedes, are a cross between a cabbage and a turnip. They have a slightly sweet, earthy flavor that’s delicious roasted, mashed, or added to stews. They also store incredibly well, making them a fantastic crop for extending your harvest into the winter months.
* Timing is Key: Rutabagas need a long growing season, typically around 90-100 days. The best time to plant them is in mid-summer, about 3-4 months before your first expected frost. This allows them to mature during the cooler fall months, which is crucial for developing their flavor and size.
* Soil Matters: Rutabagas thrive in well-drained, fertile soil with a pH between 6.0 and 7.0. Amend your soil with plenty of compost or well-rotted manure before planting to provide the necessary nutrients and improve drainage.
* Sunlight is Essential: Like most root vegetables, rutabagas need at least 6 hours of direct sunlight per day. Choose a sunny location in your garden for optimal growth.
* Watering is Crucial: Consistent watering is vital, especially during the early stages of growth. Aim to keep the soil consistently moist but not waterlogged.
* Thinning is Non-Negotiable: This is where many gardeners go wrong! Thinning your rutabaga seedlings is absolutely essential for allowing them to develop into large, healthy roots.
Phase 1: Preparing the Soil and Planting
This is the foundation for your giant rutabaga dreams! A little extra effort here will pay off big time later.
1. Choose Your Location: Select a spot in your garden that receives at least 6 hours of direct sunlight daily. Make sure the area is free of rocks and debris, as these can hinder root development.
2. Amend the Soil: This is where the magic happens! Dig in plenty of compost or well-rotted manure to a depth of at least 12 inches. I like to use a combination of both for maximum benefit. This will improve drainage, add essential nutrients, and create a loose, friable soil that’s perfect for root growth. If your soil is particularly heavy clay, consider adding some sand or perlite to further improve drainage.
3. Test Your Soil’s pH: Use a soil testing kit to determine the pH of your soil. Rutabagas prefer a pH between 6.0 and 7.0. If your soil is too acidic (below 6.0), add lime to raise the pH. If it’s too alkaline (above 7.0), add sulfur to lower the pH. Follow the instructions on the soil testing kit and amendment packaging for proper application rates.
4. Create Raised Beds (Optional but Recommended): Raised beds offer excellent drainage and allow the soil to warm up faster in the spring. If you have heavy clay soil or experience frequent flooding, raised beds are a must. Build your raised beds at least 6-8 inches high and 3-4 feet wide.
5. Sow the Seeds: Sow rutabaga seeds directly into the prepared soil, about 1/2 inch deep and 2 inches apart. Gently cover the seeds with soil and water thoroughly. I like to use a watering can with a gentle rose head to avoid disturbing the seeds.
6. Keep the Soil Moist: Until the seeds germinate, keep the soil consistently moist. You can cover the planting area with a piece of burlap or shade cloth to help retain moisture. Remove the covering once the seedlings emerge.
7. Mark Your Rows: Use plant markers or labels to identify your rutabaga rows. This will help you keep track of your plants and avoid accidentally weeding them out.
Phase 2: Thinning and Ongoing Care
This is where patience and diligence come into play. Don’t skip the thinning!
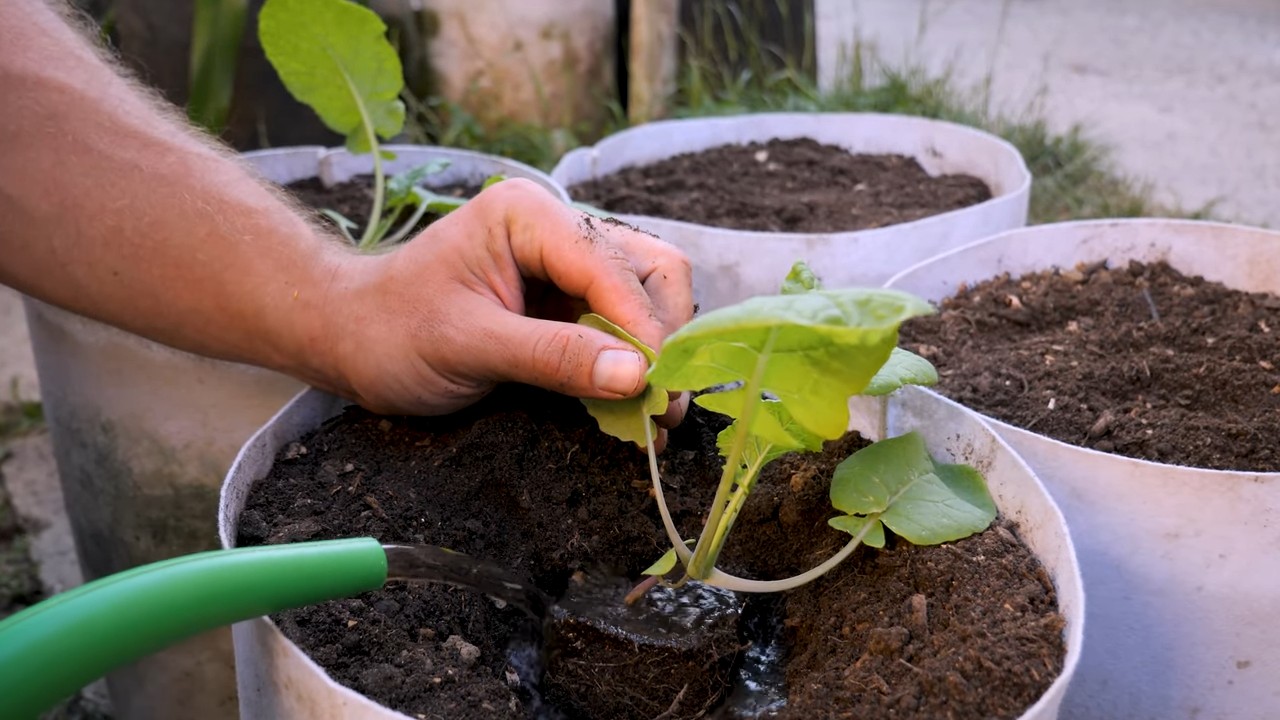
1. Thin the Seedlings (First Thinning): Once the seedlings have developed their first true leaves (the leaves that appear after the initial seed leaves), thin them to about 4-6 inches apart. This may seem brutal, but it’s essential for giving the remaining plants enough space to grow. Carefully snip off the unwanted seedlings at the soil line with scissors to avoid disturbing the roots of the remaining plants.
2. Thin the Seedlings (Second Thinning): When the remaining seedlings are about 2-3 inches in diameter, thin them again to 8-12 inches apart. This final thinning will give your rutabagas plenty of room to develop into those giant roots you’re dreaming of. Again, snip off the unwanted seedlings at the soil line.
3. Water Regularly: Rutabagas need consistent moisture, especially during dry spells. Water deeply and regularly, aiming to keep the soil consistently moist but not waterlogged. I like to water early in the morning to allow the foliage to dry before nightfall, which helps prevent fungal diseases.
4. Weed Regularly: Keep the planting area free of weeds, which can compete with your rutabagas for nutrients and water. Hand-pull weeds carefully to avoid disturbing the roots of your rutabagas. You can also use a hoe to cultivate the soil between the rows, but be careful not to damage the plants.
5. Fertilize Sparingly: Rutabagas are not heavy feeders, but they will benefit from a light feeding of a balanced fertilizer about halfway through the growing season. I like to use a fertilizer that’s specifically formulated for root vegetables. Follow the instructions on the fertilizer packaging for proper application rates. Avoid over-fertilizing, as this can lead to excessive foliage growth at the expense of root development.
6. Monitor for Pests and Diseases: Keep an eye out for common rutabaga pests, such as aphids, flea beetles, and cabbage worms. Treat infestations promptly with insecticidal soap or other appropriate organic pest control methods. Also, watch for signs of fungal diseases, such as powdery mildew and downy mildew. Improve air circulation around the plants and avoid overhead watering to help prevent these diseases. If necessary, treat with a fungicide.
7. Mulch Around the Plants: Apply a layer of mulch around the plants to help retain moisture, suppress weeds, and regulate soil temperature. I like to use straw, hay, or shredded leaves as mulch.
Phase 3: Harvesting and Storage
The moment of truth! Time to reap the rewards of your hard work.
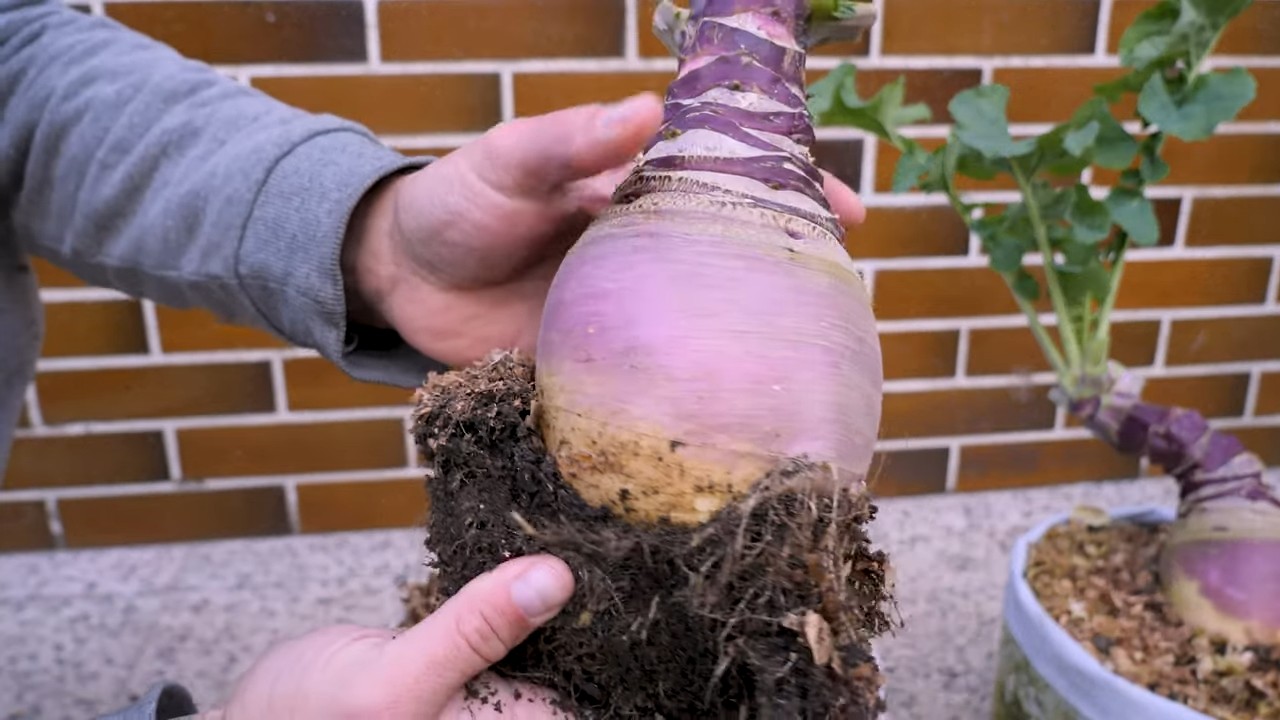
1. Harvest at the Right Time: Rutabagas are typically ready to harvest about 90-100 days after planting, or when the roots are 4-6 inches in diameter. You can harvest them earlier if you prefer smaller, more tender roots. However, for those giant rutabagas, you’ll want to wait until they’ve reached their full size.
2. Check for Maturity: Gently brush away the soil around the base of the plant to check the size of the root. If it’s the size you’re looking for, it’s time to harvest.
3. Harvest Carefully: Loosen the soil around the rutabaga with a garden fork or shovel. Gently lift the rutabaga out of the ground, being careful not to damage the root.
4. Remove the Tops: Cut off the tops of the rutabagas, leaving about 1-2 inches of stem.
5. Clean the Roots: Brush off any excess soil from the roots. Avoid washing them unless they are very dirty, as this can shorten their storage life.
6. Cure the Rutabagas (Optional): Curing the rutabagas for a few days before storing them can help improve their storage life. To cure them, place them in a cool, dry, well-ventilated place for about a week.
7. Store Properly: Store rutabagas in a cool, dark, and humid place, such as a root cellar or refrigerator. The ideal storage temperature is between 32°F and 40°F. You can store them in perforated plastic bags or in bins filled with moist sand or sawdust. Properly stored rutabagas can last for several months.
Tips for Growing Extra-Large Rutabagas
Want to take your rutabaga game to the next level? Here are a few extra tips for growing those truly impressive specimens:
* Choose the Right Variety: Some rutabaga varieties are naturally larger than others. ‘American Purple Top’ and ‘Laurentian’ are two popular varieties known for their large size.
* Provide Consistent Moisture: Consistent watering is crucial for maximizing rutabaga growth. Use a
Conclusion
So, there you have it! Growing large rutabagas doesn’t have to be a daunting task reserved for seasoned gardeners. By implementing these simple yet effective DIY tricks, you can unlock the potential for truly impressive, prize-winning rutabagas right in your own backyard. We’ve covered everything from soil preparation and nutrient optimization to strategic thinning and pest control, all designed to maximize the size and quality of your harvest.
Why is this a must-try? Because store-bought rutabagas simply can’t compare to the flavor and satisfaction of harvesting your own, especially when they’re bursting with homegrown goodness and impressive size. Imagine the delicious soups, stews, and roasted vegetable medleys you can create with these giants! Plus, the process itself is incredibly rewarding, connecting you with nature and providing a tangible sense of accomplishment.
Don’t be afraid to experiment and adapt these techniques to your specific growing conditions. For example, if you live in an area with particularly poor soil, consider amending it heavily with compost and well-rotted manure well in advance of planting. If you’re battling persistent pests, explore companion planting options like marigolds or nasturtiums to deter them naturally. You could also try different varieties of rutabagas to see which performs best in your climate. Some varieties are naturally larger than others, so research is key!
Another variation to consider is the timing of your planting. While we’ve outlined a general timeframe, your local climate will ultimately dictate the optimal planting window. Consult your local agricultural extension office or experienced gardeners in your area for specific recommendations.
We truly believe that anyone can achieve success with this DIY approach to growing large rutabagas. The key is to be patient, observant, and willing to learn from your experiences. Pay close attention to your plants, monitor their growth, and adjust your techniques as needed.
Now, it’s your turn! We encourage you to put these tips into practice and experience the joy of harvesting your own colossal rutabagas. Don’t forget to document your journey – take photos, keep notes, and most importantly, share your successes (and challenges!) with us in the comments below. We’re eager to hear about your experiences and learn from your insights. Let’s build a community of rutabaga-growing enthusiasts and help each other achieve gardening greatness! We can’t wait to see the impressive rutabagas you cultivate! Happy gardening!
Frequently Asked Questions (FAQ)
What is the best type of soil for growing large rutabagas?
Rutabagas thrive in well-drained, fertile soil that is rich in organic matter. A slightly acidic soil pH of around 6.0 to 6.8 is ideal. Before planting, amend your soil with plenty of compost, well-rotted manure, or other organic materials to improve drainage, fertility, and water retention. Avoid heavy clay soils, as they can restrict root growth and lead to smaller rutabagas. If you have clay soil, consider adding sand and organic matter to improve its structure.
How often should I water my rutabaga plants?
Rutabagas need consistent moisture, especially during the early stages of growth and when the roots are developing. Water deeply and regularly, aiming to keep the soil consistently moist but not waterlogged. The frequency of watering will depend on your climate, soil type, and rainfall. As a general rule, water when the top inch of soil feels dry to the touch. During hot, dry weather, you may need to water daily. Mulching around the plants can help retain moisture and reduce the need for frequent watering.
What are the most common pests and diseases that affect rutabagas, and how can I control them?
Common pests that attack rutabagas include aphids, flea beetles, cabbage worms, and root maggots. Diseases can include clubroot, powdery mildew, and downy mildew. To control pests, consider using row covers to protect young plants, handpicking pests off the plants, or using insecticidal soap or neem oil. For diseases, ensure good air circulation, avoid overhead watering, and use disease-resistant varieties if available. Crop rotation can also help prevent the buildup of soilborne diseases. If clubroot is a problem, liming the soil to raise the pH can help.
How much sunlight do rutabagas need?
Rutabagas require at least 6 hours of direct sunlight per day to thrive. More sunlight is always better, as it promotes vigorous growth and larger root development. Choose a planting location that receives full sun throughout the day. If you live in a particularly hot climate, some afternoon shade may be beneficial to prevent the plants from overheating.
When is the best time to harvest rutabagas?
Rutabagas are typically ready to harvest in the fall, after the first frost. The frost helps to sweeten the flavor of the roots. You can harvest them when they reach a size of 4-6 inches in diameter, or larger if desired. To harvest, loosen the soil around the roots with a garden fork and gently pull the rutabagas out of the ground.
Can I store rutabagas after harvesting them?
Yes, rutabagas can be stored for several months if properly handled. After harvesting, remove the tops, leaving about an inch of stem. Gently brush off any excess soil, but do not wash them. Store the rutabagas in a cool, dark, and humid place, such as a root cellar or refrigerator. The ideal storage temperature is around 32-40°F (0-4°C) with high humidity. You can store them in perforated plastic bags or in bins filled with slightly damp sand or sawdust. Check them periodically for signs of spoilage and remove any that are rotting.
How do I know if my rutabagas are getting enough nutrients?
The appearance of your rutabaga plants can provide clues about their nutrient status. Yellowing leaves may indicate a nitrogen deficiency, while stunted growth could be a sign of a phosphorus deficiency. A potassium deficiency may manifest as brown spots on the leaves. To ensure your rutabagas are getting enough nutrients, conduct a soil test before planting to determine any nutrient deficiencies. Amend the soil with appropriate fertilizers or organic amendments based on the test results. Side-dress the plants with a balanced fertilizer during the growing season to provide a continuous supply of nutrients.
What are some creative ways to use large rutabagas in cooking?
Large rutabagas are incredibly versatile in the kitchen. They can be roasted, mashed, boiled, steamed, or added to soups and stews. Try roasting them with other root vegetables like carrots, parsnips, and potatoes for a delicious and nutritious side dish. You can also mash them with butter, cream, and herbs for a creamy and flavorful alternative to mashed potatoes. Rutabaga soup is a classic comfort food, and they can also be grated and added to salads or used in gratins. Don’t forget to try them pickled or fermented for a unique and tangy treat. The possibilities are endless!
Can I grow rutabagas in containers?
While rutabagas are typically grown in the ground, you can successfully grow them in containers if you choose a large enough pot. Select a container that is at least 12 inches deep and wide to accommodate the root growth. Use a well-draining potting mix and ensure the container has drainage holes. Water regularly and fertilize as needed. Container-grown rutabagas may not grow as large as those grown in the ground, but you can still harvest a decent crop.
What if my rutabagas are growing but not getting very big?
Several factors can contribute to rutabagas not reaching their full potential size. Insufficient sunlight, poor soil fertility, overcrowding, and inadequate watering are all common culprits. Make sure your plants are getting at least 6 hours of direct sunlight per day, and amend the soil with plenty of organic matter. Thin the plants to provide adequate spacing, and water deeply and regularly. Consider side-dressing with a balanced fertilizer to provide a boost of nutrients. Also, check for pests and diseases that may be hindering growth. By addressing these issues, you can help your rutabagas reach their maximum size.
Leave a Comment