

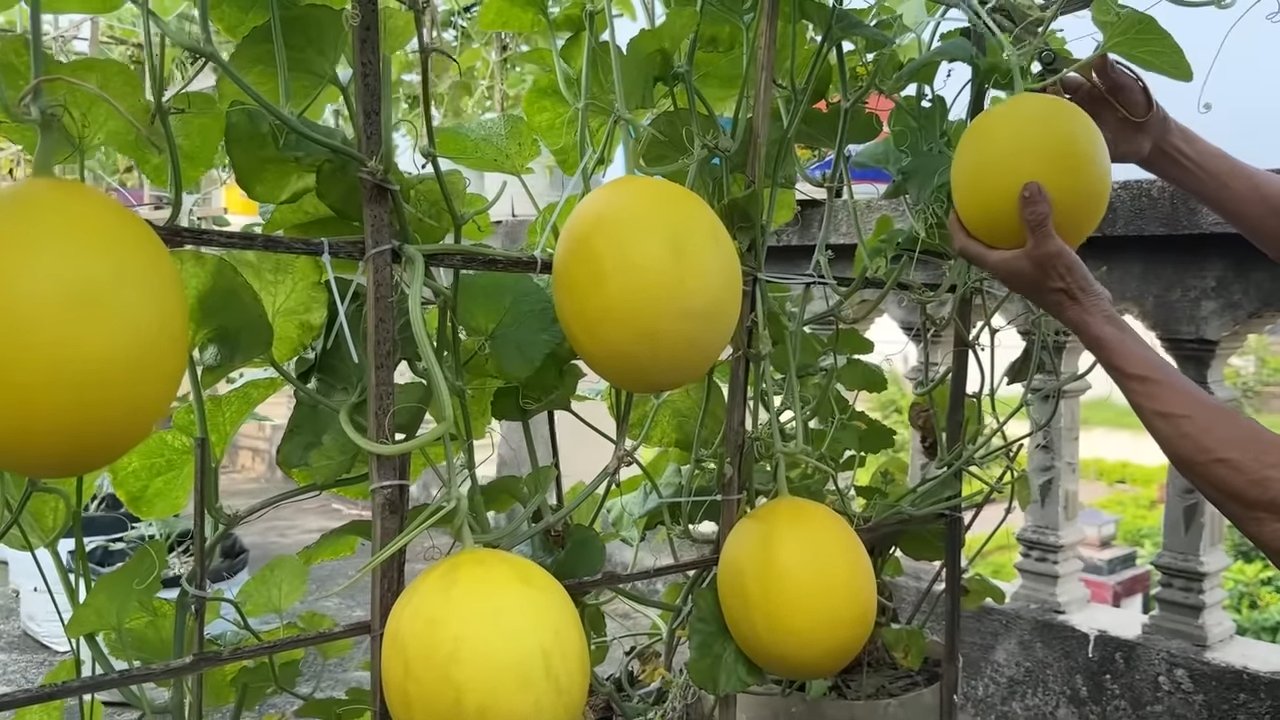
Grow Large Melons at Home – imagine biting into a juicy, perfectly ripe melon you nurtured from a tiny seed right in your own backyard! It’s a dream many gardeners share, and I’m here to tell you it’s absolutely achievable. For centuries, cultivating melons has been a symbol of abundance and prosperity, dating back to ancient Egypt where they were prized for their sweetness and refreshing qualities. Today, the joy of harvesting your own melons remains just as satisfying.
But let’s be honest, getting those supermarket-sized melons can feel like a challenge. That’s where these DIY tricks and hacks come in! Many of us struggle with small, bland melons, or plants that just don’t seem to thrive. I’ve been there, and I’ve learned a few secrets along the way. This article is packed with practical, easy-to-follow tips that will help you grow large melons at home, regardless of your gardening experience. We’ll cover everything from soil preparation and pollination techniques to pest control and watering strategies. Get ready to impress your friends and family with your homegrown melon bounty!
DIY: Unlock Giant Melons in Your Home Garden!
Okay, melon lovers, let’s talk about growing some seriously impressive melons right in your own backyard! I’m talking juicy, sweet, and HUGE. It’s totally achievable with a little know-how and some elbow grease. I’ve learned a lot over the years, and I’m excited to share my secrets with you. This guide will walk you through every step, from seed to slicing into a prize-winning melon.
Choosing the Right Melon Variety
First things first, you need to pick the right melon variety. Not all melons are created equal when it comes to size. Some are naturally smaller, while others are bred for gigantism! Here are a few of my favorite varieties for growing large melons:
* Watermelon: ‘Carolina Cross’ (known for record-breaking sizes), ‘Charleston Gray’ (classic and reliable), ‘Black Diamond’ (dark green rind, sweet red flesh).
* Cantaloupe: ‘Halona’ (large and flavorful), ‘Athena’ (early maturing and good size).
* Honeydew: ‘Honey Dew Green Flesh’ (can get quite large with proper care).
Remember to check your local climate and growing season when selecting your variety. Some melons need a longer growing season than others.
Preparing Your Garden Bed
Melons are heavy feeders, meaning they need a lot of nutrients to grow big and strong. Proper soil preparation is absolutely crucial.
* Sunlight: Melons need at least 6-8 hours of direct sunlight per day. Choose a location in your garden that gets plenty of sun.
* Soil: Melons prefer well-drained, sandy loam soil with a pH between 6.0 and 6.8. If your soil is heavy clay, you’ll need to amend it with organic matter.
* Space: Give your melon plants plenty of room to spread out. Watermelons, in particular, need a lot of space. I usually allow at least 4-6 feet between plants.
Step-by-Step Soil Preparation:
1. Clear the area: Remove any weeds, rocks, or debris from the area where you’ll be planting your melons.
2. Amend the soil: This is the most important step! I like to add a generous amount of compost, well-rotted manure, and peat moss to my soil. This will improve drainage, add nutrients, and help retain moisture. Work the amendments into the soil to a depth of at least 12 inches.
3. Test your soil pH: You can purchase a soil testing kit at your local garden center. If your soil pH is too high (alkaline), you can lower it by adding sulfur. If it’s too low (acidic), you can raise it by adding lime.
4. Create mounds or raised beds: Melons like warm soil, so creating mounds or raised beds can help them get off to a good start. I usually make mounds about 12 inches high and 2-3 feet wide.
5. Fertilize: Before planting, I like to add a slow-release fertilizer to the soil. Choose a fertilizer that is high in phosphorus and potassium, which are essential for fruit development. Follow the instructions on the fertilizer package.
Starting Your Melon Seeds
You can either start your melon seeds indoors or direct sow them in your garden. I prefer to start them indoors, especially if you have a short growing season.
* Starting Indoors: Start your seeds about 4-6 weeks before the last expected frost. Use peat pots or biodegradable pots, as melons don’t like to have their roots disturbed.
* Direct Sowing: Wait until the soil has warmed up to at least 70°F (21°C) before direct sowing your seeds.
Step-by-Step Seed Starting:
1. Soak your seeds: Soak your melon seeds in warm water for 24 hours before planting. This will help them germinate faster.
2. Plant your seeds: Fill your peat pots with a seed-starting mix. Plant the seeds about 1 inch deep.
3. Water gently: Water the soil gently to avoid disturbing the seeds.
4. Provide warmth: Keep the soil warm and moist. You can use a heat mat to help speed up germination.
5. Provide light: Once the seedlings emerge, provide them with plenty of light. You can use a grow light or place them in a sunny window.
6. Harden off your seedlings: Before transplanting your seedlings into the garden, you’ll need to harden them off. This means gradually exposing them to outdoor conditions over a period of 7-10 days. Start by placing them in a sheltered location for a few hours each day, gradually increasing the amount of time they spend outdoors.
Transplanting Your Melon Seedlings
Once your seedlings have been hardened off and the soil has warmed up, it’s time to transplant them into your garden.
Step-by-Step Transplanting:
1. Choose a cloudy day: Transplanting on a cloudy day will help prevent your seedlings from getting stressed.
2. Dig a hole: Dig a hole that is slightly larger than the peat pot.
3. Plant the seedling: Gently remove the seedling from the peat pot and place it in the hole. Make sure the top of the root ball is level with the surrounding soil.
4. Water thoroughly: Water the seedling thoroughly after planting.
5. Mulch: Apply a layer of mulch around the plant to help retain moisture and suppress weeds. I like to use straw or wood chips.
Caring for Your Melon Plants
Now that your melon plants are in the ground, it’s time to give them the care they need to thrive.
* Watering: Melons need consistent watering, especially during hot, dry weather. Water deeply and regularly, aiming for about 1-2 inches of water per week. Avoid overhead watering, as this can lead to fungal diseases. Drip irrigation is ideal.
* Fertilizing: Continue to fertilize your melon plants every 2-3 weeks with a balanced fertilizer. Once the fruits start to develop, switch to a fertilizer that is higher in potassium.
* Weeding: Keep your garden bed free of weeds. Weeds compete with your melon plants for nutrients and water.
* Pest and Disease Control: Keep an eye out for pests and diseases. Common melon pests include aphids, squash bugs, and vine borers. Common diseases include powdery mildew and fusarium wilt. Treat any problems promptly with appropriate organic pesticides or fungicides.
* Pruning: Pruning can help improve air circulation and encourage larger fruit. I usually prune off any suckers (small shoots that grow from the base of the plant) and any leaves that are touching the ground.
* Support: For larger melon varieties, you may need to provide support for the fruits. You can use slings made of cloth or netting to support the melons and prevent them from breaking off the vine.
The Secret to Giant Melons: Fruit Thinning
This is where the magic happens! To grow truly giant melons, you need to limit the number of fruits on each vine. This allows the plant to focus all of its energy on developing just one or two massive melons.
Step-by-Step Fruit Thinning:
1. Choose the best fruits: Once your melon plants start producing fruits, select the one or two most promising fruits on each vine. Look for fruits that are well-shaped, healthy, and free of blemishes.
2. Remove the rest: Carefully remove all of the other fruits from the vine. You can use pruning shears or simply twist them off.
3. Focus on the chosen fruits: Now that you’ve thinned your fruits, you can focus all of your attention on nurturing the chosen ones. Make sure they are getting plenty of water, fertilizer, and sunlight.
Protecting Your Melons
As your melons grow larger, they become more vulnerable to pests and diseases. Here are a few tips for protecting your melons:
* Elevate the melons: Place a piece of wood or cardboard under each melon to prevent it from rotting. This will also help protect it from pests.
* Protect from sunburn: If your melons are exposed to direct sunlight, they can get sunburned. You can protect them by covering them with a cloth or shade cloth.
* Monitor for pests and diseases: Continue to monitor your melons for pests and diseases. Treat any problems promptly.
Harvesting Your Melons
Knowing when to harvest your melons is crucial. Here are a few signs that your melons are ripe:
* Watermelon: The tendril closest to the melon will turn brown and dry. The bottom of the melon (where it rests on the ground) will turn from white to yellow. When you thump the melon, it will sound hollow.
* Cantaloupe: The melon will slip easily from the vine. The skin

Conclusion
So, there you have it! Growing large melons at home isn’t just a pipe dream; it’s an achievable reality with a little know-how and dedication. We’ve explored the key elements, from selecting the right varieties and preparing the soil to mastering pollination and providing essential support. But the real magic lies in the DIY trick we’ve unveiled: the strategic pruning and fruit thinning technique. This isn’t just about getting *a* melon; it’s about cultivating *the* melon – the biggest, juiciest, most flavorful melon you’ve ever tasted.
Why is this DIY trick a must-try? Because it directly addresses the plant’s energy allocation. By limiting the number of melons developing simultaneously, you’re channeling all the plant’s resources into fewer fruits. This concentrated effort translates to exponential growth, resulting in significantly larger and more impressive melons. Think of it as quality over quantity – a principle that truly shines when it comes to home-grown produce.
But don’t think this is a rigid, one-size-fits-all approach. There’s plenty of room for experimentation and personalization. For instance, you could try different types of support structures, from simple slings made of old t-shirts to more elaborate trellising systems. Consider experimenting with different fertilizers, focusing on those rich in potassium and phosphorus during the fruit development stage. You could also try companion planting, incorporating herbs like basil or marigolds to deter pests and attract beneficial insects.
Another variation to consider is the timing of your pruning. While we’ve outlined a general timeframe, closely observe your plants and adjust accordingly. If you notice a melon lagging behind in growth, don’t hesitate to remove it, even if it’s slightly later in the season. Remember, the goal is to maximize the potential of the remaining fruits.
And speaking of maximizing potential, don’t underestimate the power of consistent watering. Melons are thirsty plants, especially during hot weather. Ensure they receive deep, regular watering, but avoid overwatering, which can lead to root rot. A good rule of thumb is to water deeply when the top inch of soil feels dry to the touch.
Ultimately, the success of this DIY trick hinges on your active participation and observation. Pay attention to your plants, learn their nuances, and adapt your approach as needed. Growing large melons at home is a journey, not just a destination. It’s a rewarding experience that connects you to the natural world and allows you to savor the fruits (literally!) of your labor.
So, what are you waiting for? Grab your gardening gloves, select your favorite melon variety, and put this DIY trick to the test. We’re confident that you’ll be amazed by the results. And most importantly, don’t forget to share your experience with us! Post pictures of your giant melons, share your tips and tricks, and let’s create a community of melon-growing enthusiasts. We can’t wait to see what you accomplish! Let’s all learn how to **grow large melons home** together!
Frequently Asked Questions (FAQ)
Q: What types of melons are best suited for this DIY trick?
A: While this technique can be applied to various melon types, it’s particularly effective with larger varieties like watermelons, cantaloupes, and honeydew melons. Look for cultivars known for their potential size and flavor. Some popular choices include ‘Crimson Sweet’ watermelon, ‘Hales Best’ cantaloupe, and ‘Honeycrisp’ honeydew. Smaller melon varieties may still benefit from pruning, but the size difference might not be as dramatic.
Q: How many melons should I leave on each plant after thinning?
A: This depends on the variety and the overall health of your plant. For larger watermelon varieties, it’s generally recommended to leave only one or two melons per plant. For cantaloupes and honeydew melons, you might be able to get away with two or three, especially if your plant is particularly vigorous. The key is to observe your plant and ensure that the remaining melons are receiving adequate sunlight and nutrients. If you notice the plant struggling, it’s best to remove additional melons.
Q: When is the best time to start pruning and thinning my melon plants?
A: Start pruning as soon as the plant begins to develop side shoots. Remove any suckers or non-fruiting vines to direct the plant’s energy towards fruit production. Thinning should begin once the melons are about the size of a tennis ball. Select the most promising fruits and remove any that are damaged, misshapen, or lagging behind in growth.
Q: How do I know which melons to remove during thinning?
A: Prioritize removing melons that are damaged, misshapen, or show signs of disease or pest infestation. Also, remove any melons that are located in shaded areas or are not receiving adequate sunlight. Choose the melons that are developing the fastest and appear to be the healthiest.
Q: Will pruning and thinning affect the overall yield of my melon plants?
A: While you’ll be harvesting fewer melons per plant, the overall yield (in terms of weight and quality) should be higher. By focusing the plant’s energy on fewer fruits, you’ll be able to grow larger, juicier, and more flavorful melons. It’s a trade-off between quantity and quality, and in this case, quality wins.
Q: What kind of support should I use for my growing melons?
A: The type of support you use will depend on the size and weight of the melons you’re growing. For smaller melons, simple slings made of old t-shirts or pantyhose can be effective. For larger watermelons, you’ll need a more robust support system, such as a sturdy trellis or a wooden frame. Make sure the support is strong enough to bear the weight of the mature melon.
Q: Can I use fertilizer to help my melons grow larger?
A: Yes, fertilizer can be a valuable tool for promoting melon growth. Choose a fertilizer that is rich in potassium and phosphorus, as these nutrients are essential for fruit development. Apply the fertilizer according to the manufacturer’s instructions, and avoid over-fertilizing, which can damage the plant. Consider using a slow-release fertilizer to provide a steady supply of nutrients throughout the growing season.
Q: How often should I water my melon plants?
A: Melons need consistent watering, especially during hot weather. Water deeply when the top inch of soil feels dry to the touch. Avoid overwatering, which can lead to root rot. A good rule of thumb is to water deeply two to three times per week, depending on the weather conditions.
Q: What are some common pests and diseases that affect melon plants, and how can I prevent them?
A: Common pests include aphids, squash bugs, and vine borers. Diseases include powdery mildew, fusarium wilt, and anthracnose. To prevent these problems, practice good garden hygiene, such as removing plant debris and weeds. Use insecticidal soap or neem oil to control pests, and apply fungicides to prevent diseases. Choose disease-resistant varieties whenever possible. Crop rotation can also help to prevent soilborne diseases.
Q: What do I do if my melon plant stops producing female flowers?
A: Several factors can cause a melon plant to stop producing female flowers, including stress, nutrient deficiencies, and improper pollination. Ensure that your plant is receiving adequate sunlight, water, and nutrients. You can also try hand-pollinating the female flowers to ensure fruit set. If the problem persists, consider testing your soil to identify any nutrient deficiencies.
Q: How do I know when my melon is ripe and ready to harvest?
A: The signs of ripeness vary depending on the melon variety. For watermelons, look for a dull rind, a dry tendril near the stem, and a hollow sound when you thump the melon. For cantaloupes, the melon should slip easily from the vine when ripe. For honeydew melons, the rind should turn a creamy yellow color. Trust your senses and don’t be afraid to experiment to find the perfect time to harvest your melons. Remember, the ultimate goal is to **grow large melons home** that are delicious and satisfying!
Leave a Comment