

Grow Kale Kitchen Corner: Imagine stepping into your kitchen, not just to cook, but to harvest fresh, vibrant kale right from your very own countertop! Sounds like a dream, right? Well, it doesn’t have to be! For centuries, humans have cultivated food in small spaces, from ancient rooftop gardens in Babylon to the window boxes of Victorian England. This deep-rooted connection to growing our own food is now experiencing a modern resurgence, and I’m here to show you how to participate, even if you have limited space.
In today’s fast-paced world, access to fresh, healthy produce can be a challenge. Supermarket kale, while convenient, often lacks the flavor and nutrients of freshly picked greens. Plus, let’s be honest, the cost can add up! That’s where this DIY guide comes in. I’m going to share some simple, effective tricks and hacks to help you grow kale kitchen corner, transforming even the smallest nook into a thriving mini-garden. You’ll not only enjoy delicious, homegrown kale but also experience the satisfaction of nurturing your own food source. Get ready to ditch the store-bought greens and embrace the joy of homegrown goodness!
Grow Kale in Your Kitchen Corner: A DIY Guide
Hey there, fellow plant enthusiasts! Ever dreamt of having fresh, vibrant kale right at your fingertips? Well, you’re in the right place! I’m going to walk you through a super easy and rewarding DIY project: growing kale in your kitchen corner. It’s simpler than you think, and the satisfaction of harvesting your own greens is unbeatable. Let’s get started!
What You’ll Need
Before we dive in, let’s gather our supplies. This is crucial for a smooth and enjoyable experience. Here’s a checklist:
* Kale Seeds: Choose your favorite variety! I personally love ‘Lacinato’ (dinosaur kale) for its unique texture and flavor, but ‘Red Russian’ or ‘Curly Kale’ are also great options.
* Seed Starting Tray or Small Pots: These will be our nurseries for the baby kale plants.
* Seed Starting Mix: This is a light and airy soil mix specifically designed for seedlings. It provides the perfect environment for germination.
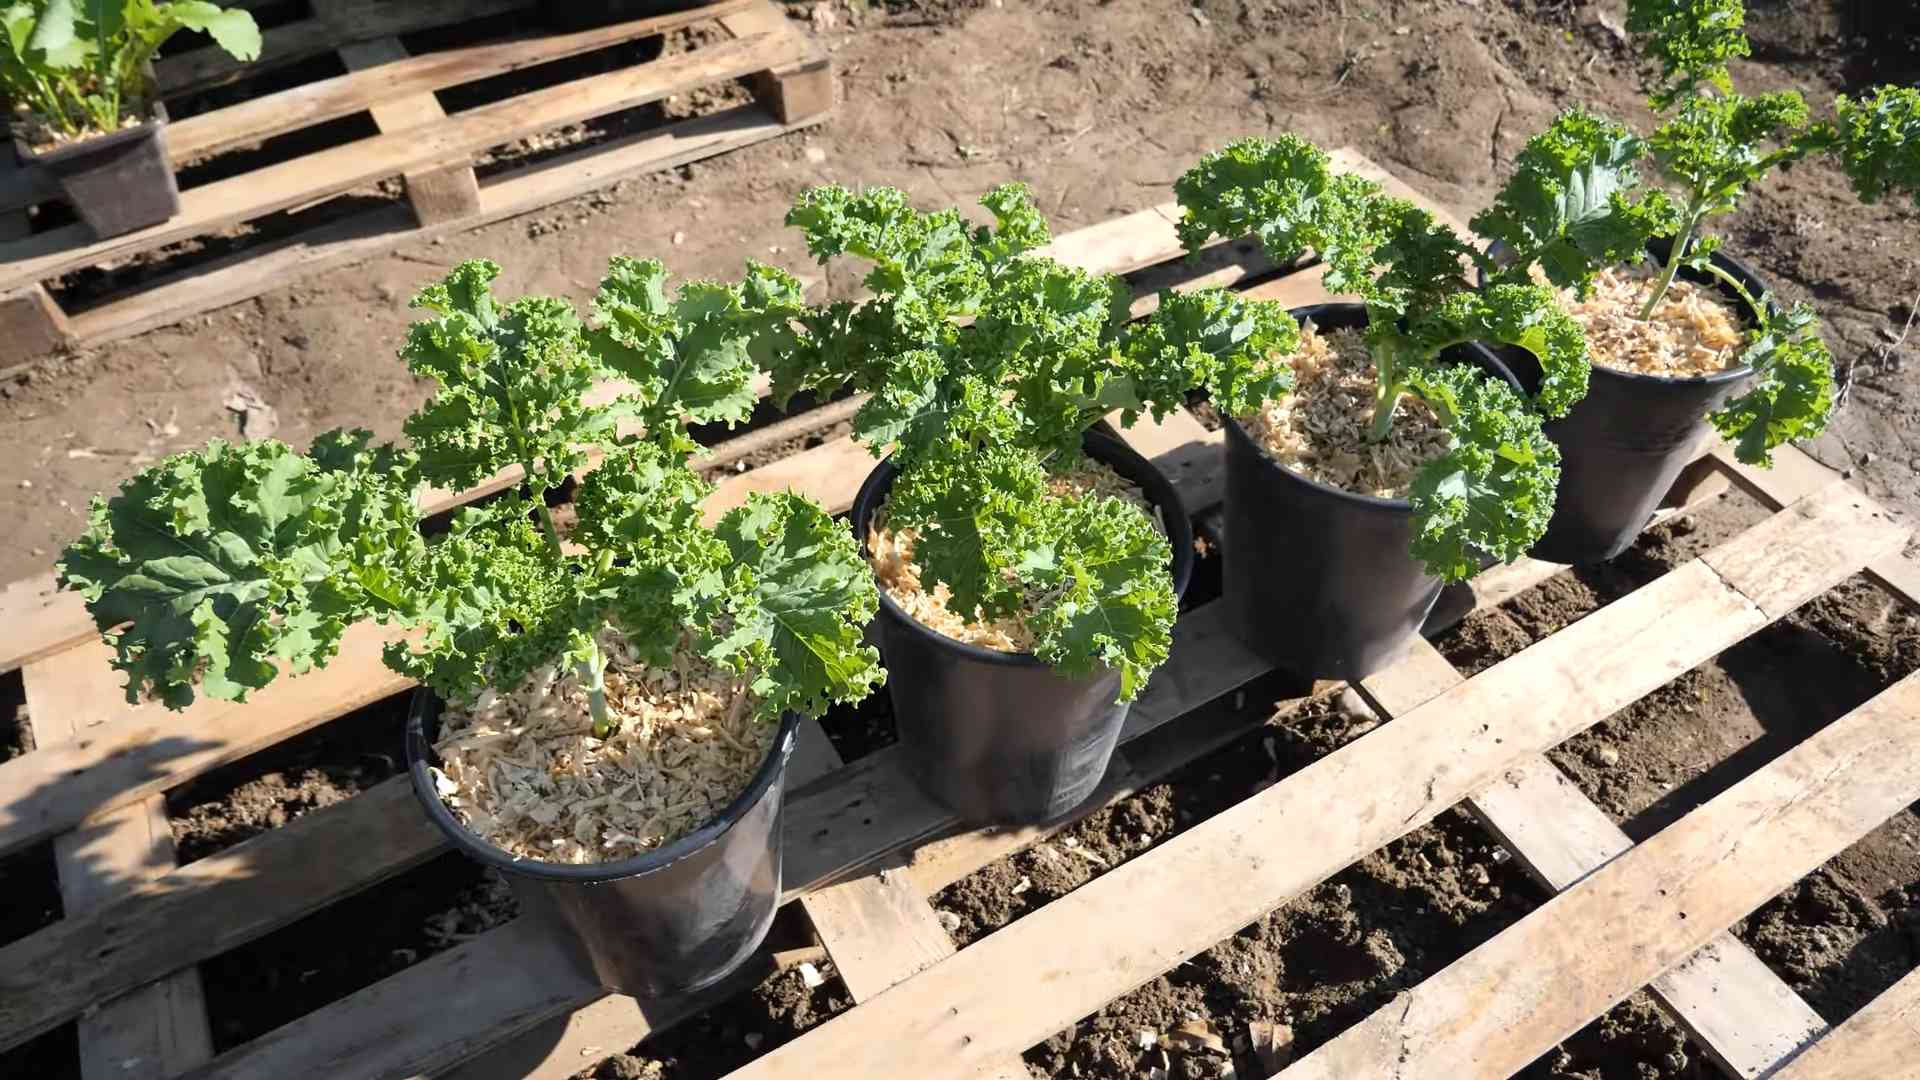
* Larger Pots (at least 12 inches in diameter): These will be the kale’s permanent homes. Make sure they have drainage holes!
* Potting Soil: A good quality potting soil is essential for healthy kale growth.
* Grow Lights (optional, but highly recommended): Especially if your kitchen corner doesn’t get a lot of natural light.
* Watering Can or Spray Bottle: For gentle watering.
* Liquid Fertilizer: A balanced liquid fertilizer will provide your kale with the nutrients it needs.
* Small Shovel or Trowel: For transplanting.
* Spray Bottle with Water: For misting the seedlings.
* Labels and a Marker: To keep track of your kale varieties.
* Well-ventilated Kitchen Corner: Choose a spot that gets at least 4-6 hours of sunlight (or artificial light).
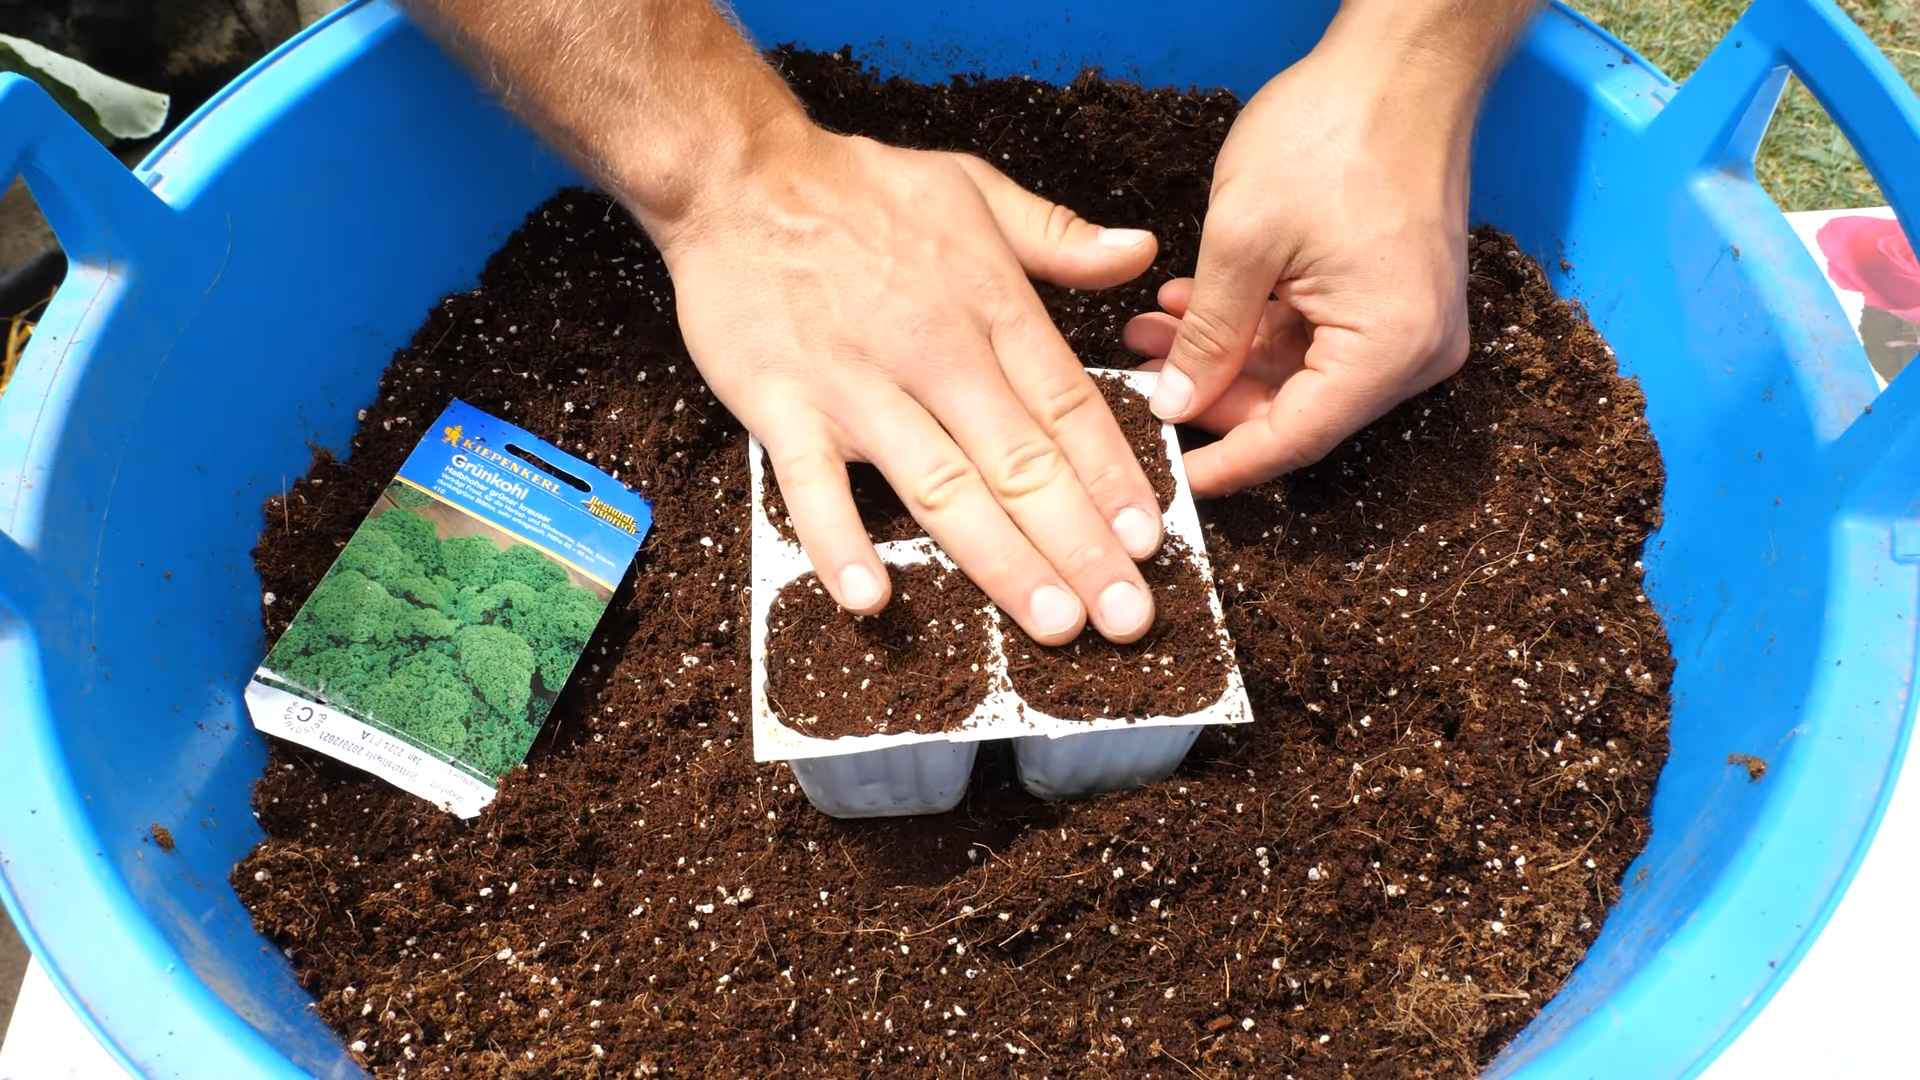
Section 1: Starting Your Kale Seeds
This is where the magic begins! We’ll be nurturing tiny seeds into strong seedlings ready for transplanting.
1. Prepare Your Seed Starting Tray or Pots: Fill your seed starting tray or small pots with seed starting mix. Gently press down the soil to create a firm, even surface. Don’t pack it too tightly!
2. Sow the Seeds: Sprinkle a few kale seeds (2-3) on top of the soil in each cell or pot. You don’t need to bury them too deep; about ¼ inch is perfect.
3. Cover the Seeds: Lightly cover the seeds with more seed starting mix.
4. Water Gently: Use a spray bottle to mist the soil thoroughly. You want it to be moist but not soggy.
5. Provide Warmth and Light: Place the tray or pots in a warm location (around 65-75°F or 18-24°C). If you don’t have a naturally warm spot, you can use a heat mat designed for seed starting. If you are using grow lights, position them a few inches above the tray.
6. Maintain Moisture: Keep the soil consistently moist by misting it regularly. Check the soil daily and water when the top inch feels dry.
7. Wait for Germination: Kale seeds typically germinate within 5-10 days. Be patient!
8. Thin the Seedlings (if necessary): Once the seedlings have emerged and have a couple of true leaves (the second set of leaves that appear after the initial seed leaves), thin them out by snipping off the weaker seedlings with scissors. Leave only the strongest seedling in each cell or pot.
Section 2: Transplanting Your Kale Seedlings
Once your seedlings are strong enough, it’s time to move them to their permanent homes.
1. Prepare Your Larger Pots: Fill your larger pots with potting soil, leaving about an inch of space at the top.
2. Gently Remove the Seedlings: Carefully remove the seedlings from the seed starting tray or pots. Be gentle to avoid damaging the roots. If the seedlings are in individual pots, you can simply tip the pot upside down and gently tap the bottom to loosen the soil. If they’re in a tray, use a small trowel to carefully lift them out.
3. Create a Hole: Make a hole in the potting soil in each of the larger pots, large enough to accommodate the root ball of the seedling.
4. Transplant the Seedlings: Place the seedling in the hole and gently backfill with potting soil. Make sure the top of the root ball is level with the surrounding soil.
5. Water Thoroughly: Water the transplanted seedlings thoroughly to help settle the soil.
6. Provide Light and Air Circulation: Place the pots in your chosen kitchen corner, ensuring they receive adequate sunlight or grow light exposure. Good air circulation is also important to prevent fungal diseases.
Section 3: Caring for Your Kale Plants
Now that your kale is transplanted, it’s time to provide the care it needs to thrive.
1. Watering: Water your kale plants regularly, especially during dry periods. The soil should be consistently moist but not waterlogged. Check the soil moisture by sticking your finger about an inch into the soil. If it feels dry, it’s time to water.
2. Fertilizing: Feed your kale plants with a balanced liquid fertilizer every 2-3 weeks. Follow the instructions on the fertilizer label. I like to use a fertilizer that’s specifically formulated for leafy greens.
3. Light: Kale needs at least 4-6 hours of sunlight per day. If your kitchen corner doesn’t get enough natural light, use grow lights to supplement. Position the grow lights a few inches above the plants.
4. Pest Control: Keep an eye out for pests such as aphids, cabbage worms, and slugs. If you spot any pests, you can try hand-picking them off the plants or using an organic insecticide. I’ve found that a strong spray of water can often dislodge aphids.
5. Pruning: Prune your kale plants regularly to encourage bushier growth. Remove any yellowing or damaged leaves.
6. Air Circulation: Ensure good air circulation around your kale plants to prevent fungal diseases. You can use a small fan to improve air flow.
7. Temperature: Kale prefers cooler temperatures (60-70°F or 15-21°C), but it can tolerate warmer temperatures as well. Avoid exposing your kale plants to extreme heat or cold.
Section 4: Harvesting Your Kale
The best part! Harvesting your own homegrown kale is incredibly rewarding.
1. When to Harvest: You can start harvesting kale leaves when they are about 4-6 inches long.
2. How to Harvest: Harvest the outer leaves first, leaving the inner leaves to continue growing. You can use scissors or a knife to cut the leaves off at the base of the stem.
3. Harvest Regularly: Harvesting regularly will encourage the plant to produce more leaves.
4. Storage: Store your harvested kale leaves in the refrigerator in a plastic bag or container. They will stay fresh for several days.
5. Enjoy Your Harvest: Use your fresh kale in salads, smoothies, soups, stews, or sautéed as a side dish. The possibilities are endless!
Troubleshooting Tips
Even with the best care, you might encounter a few challenges along the way. Here are some common issues and how to address them:
* Yellowing Leaves: This could be a sign of overwatering, underwatering, or nutrient deficiency. Check the soil moisture and adjust your watering accordingly. If the soil is consistently moist, you may be overwatering. If the soil is dry, you may be underwatering. If the leaves are yellowing all over, it could be a sign of nutrient deficiency. Try fertilizing your plants with a balanced liquid fertilizer.
* Leggy Seedlings: This means your seedlings are stretching towards the light because they’re not getting enough. Move them closer to your grow lights or a sunnier window.
* Pests: As mentioned earlier, keep an eye out for pests. Hand-picking them off or using an organic insecticide are good options.
* Slow Growth: This could be due to a lack of light, nutrients, or water. Make sure your plants are getting enough light, water, and fertilizer.
Choosing the Right Kale Variety
There are so many kale varieties to choose from! Here are a few of my favorites:
* Lacinato (Dinosaur Kale): This variety has dark green, bumpy leaves and a slightly sweet flavor. It’s great for salads, soups, and sautéing.
* Red Russian Kale: This variety has reddish-purple leaves and a mild, slightly sweet flavor. It’s great for salads and sautéing.
* Curly Kale: This variety has tightly curled, green leaves and a slightly bitter flavor
Conclusion
So, there you have it! Transforming a neglected corner of your kitchen into a thriving kale patch is not only achievable but incredibly rewarding. We’ve walked you through the simple steps, highlighting the ease and accessibility of this DIY project. Why is this a must-try? Because it offers a constant supply of fresh, organic kale right at your fingertips, eliminating trips to the grocery store and reducing your carbon footprint. Imagine the satisfaction of snipping off vibrant green leaves just moments before adding them to your smoothie, salad, or stir-fry. The flavor is unparalleled, the nutritional benefits are immense, and the convenience is undeniable.
Beyond the basic method, there’s plenty of room for personalization. Experiment with different varieties of kale, from the classic curly kale to the more delicate Lacinato (dinosaur) kale. Consider adding companion plants like herbs (chives, parsley) or even small, compact flowers to create a visually appealing and functional mini-garden. You can also explore different container options, from repurposed buckets and baskets to stylish ceramic pots, to match your kitchen decor. Think vertically! A tiered planter or a wall-mounted system can maximize space and add a unique design element.
Growing kale in your kitchen corner is more than just a gardening project; it’s a lifestyle choice. It’s about connecting with nature, embracing sustainability, and enjoying the freshest possible ingredients. It’s about taking control of your food source and adding a touch of green to your daily life.
Don’t be intimidated if you’ve never grown anything before. This project is designed for beginners, and the rewards far outweigh the effort. The key is to start small, be patient, and observe your plants carefully. Pay attention to their needs, adjust your watering and lighting as necessary, and celebrate every new leaf that unfurls.
We are confident that you’ll find this DIY trick to be a game-changer. It’s a simple, affordable, and sustainable way to enjoy fresh, healthy kale all year round. So, grab your seeds, gather your supplies, and get ready to transform your kitchen corner into a vibrant oasis.
We can’t wait to hear about your experiences! Share your photos, tips, and challenges in the comments below. Let’s build a community of kitchen gardeners and inspire others to embrace the joy of growing their own food. What variety of kale did you choose? What challenges did you face, and how did you overcome them? Your insights will be invaluable to other aspiring kitchen gardeners. Let’s cultivate a greener, healthier future, one kale leaf at a time!
Frequently Asked Questions (FAQ)
What kind of kale is best for growing indoors?
While most kale varieties can be grown indoors, some are better suited than others due to their size and growth habits. Dwarf varieties like ‘Dwarf Blue Curled Vates’ are excellent choices because they stay compact and don’t require as much space. ‘Red Russian’ kale is another good option, known for its beautiful color and relatively small size. Lacinato (dinosaur) kale can also be grown indoors, but it tends to get a bit taller, so ensure you have adequate vertical space. Ultimately, the best kale for you depends on your personal preferences and the available space in your kitchen corner. Consider the size of your containers and the amount of light your chosen spot receives when making your selection.
How much light does indoor kale need?
Kale thrives in bright light, ideally 6-8 hours of direct sunlight per day. However, since most kitchen corners don’t receive that much natural light, you’ll likely need to supplement with artificial lighting. A grow light, either LED or fluorescent, is highly recommended. Position the light about 6-12 inches above the plants and keep it on for 12-16 hours a day. Observe your kale plants closely. If they are leggy (tall and spindly) with pale leaves, they are not getting enough light. Adjust the position of the light or increase the duration it’s on. Remember, consistent light is crucial for healthy kale growth indoors.
What kind of soil should I use for growing kale indoors?
Use a well-draining potting mix specifically formulated for vegetables. Avoid using garden soil, as it can be too heavy and compact, hindering drainage and potentially introducing pests or diseases. A good potting mix will retain moisture while allowing excess water to drain away, preventing root rot. You can also amend the potting mix with compost or other organic matter to provide additional nutrients. Ensure the container you choose has drainage holes to prevent waterlogging.
How often should I water my indoor kale plants?
Water your kale plants when the top inch of soil feels dry to the touch. Avoid overwatering, as this can lead to root rot. Water thoroughly until water drains out of the drainage holes. The frequency of watering will depend on factors such as the size of your container, the temperature and humidity of your kitchen, and the growth stage of your plants. Check the soil moisture regularly and adjust your watering schedule accordingly. During warmer months, you may need to water more frequently.
How do I fertilize my indoor kale plants?
Kale is a heavy feeder, so regular fertilization is essential for healthy growth. Use a balanced liquid fertilizer diluted to half strength every 2-3 weeks. Look for a fertilizer that is specifically formulated for vegetables and contains essential nutrients like nitrogen, phosphorus, and potassium. You can also use organic fertilizers like compost tea or fish emulsion. Avoid over-fertilizing, as this can burn the roots and damage the plants. Always follow the instructions on the fertilizer label.
How do I deal with pests and diseases on my indoor kale plants?
While indoor kale plants are less susceptible to pests and diseases than outdoor plants, they can still be affected. Common pests include aphids, spider mites, and whiteflies. Inspect your plants regularly for signs of infestation, such as small insects, webbing, or yellowing leaves. If you find pests, try washing them off with a strong stream of water or using insecticidal soap. For diseases, ensure good air circulation and avoid overwatering. If you notice any signs of disease, such as spots or lesions on the leaves, remove the affected leaves immediately.
How long does it take for kale to grow indoors?
Kale typically takes about 50-75 days to mature from seed to harvest. However, you can start harvesting leaves as soon as they are large enough to use, usually when they are about 4-6 inches long. The more you harvest, the more the plant will produce. With proper care, your indoor kale plants can provide a continuous supply of fresh leaves for several months.
Can I grow kale from cuttings indoors?
While growing kale from seed is the most common method, you can also propagate it from cuttings, although it’s less reliable. Take a cutting from a healthy kale plant, ensuring it has several leaves. Remove the lower leaves and place the cutting in a glass of water. Change the water every few days. After a few weeks, roots should start to develop. Once the roots are about an inch long, you can transplant the cutting into a pot filled with potting mix. Keep the soil moist and provide plenty of light.
How do I harvest kale leaves from my indoor plants?
Harvest kale leaves by snipping them off at the base of the stem with scissors or a sharp knife. Start with the outer, older leaves, leaving the inner, younger leaves to continue growing. Avoid removing more than one-third of the plant’s leaves at a time, as this can stress the plant. Regular harvesting will encourage the plant to produce more leaves.
What are some creative ways to use my homegrown kale?
The possibilities are endless! Add it to smoothies, salads, soups, stews, stir-fries, and omelets. You can also bake kale chips, make kale pesto, or add it to pasta dishes. Get creative and experiment with different recipes to find your favorites. Freshly grown kale has a much milder flavor than store-bought kale, so you may be surprised at how versatile it is.

Leave a Comment