

Grow Celery Water Efficiently? Absolutely! Imagine harvesting crisp, juicy celery from your own backyard, knowing you’ve done it in a way that’s kind to the planet and your water bill. That’s the magic we’re unlocking today!
Celery, with its satisfying crunch and refreshing flavor, has been enjoyed for centuries. Originating in the Mediterranean, it was initially valued for its medicinal properties before becoming a culinary staple. Now, we can bring this historical veggie into our gardens, even if we’re mindful of water usage.
Let’s face it, traditional gardening can be a thirsty business. But with rising water costs and increasing environmental awareness, finding ways to conserve water is more important than ever. That’s where these DIY tricks come in. I’m going to share some simple, effective methods to help you grow celery water efficiently, ensuring you get a bountiful harvest without wasting a drop. These hacks are perfect for beginner gardeners and seasoned pros alike, and they’ll help you create a thriving, sustainable garden that you can be proud of. Get ready to ditch the wasteful watering habits and embrace a greener way to grow!

Grow Celery From Kitchen Scraps: A Water-Wise DIY Guide
Hey there, fellow gardening enthusiasts! I’m so excited to share this super simple and rewarding DIY project with you: growing celery from the base you’d normally toss in the compost (or, gasp, the trash!). Not only is it a fantastic way to reduce food waste, but it’s also surprisingly easy and a great way to get fresh celery without using a ton of water. Let’s dive in!
What You’ll Need
Before we get started, let’s gather our supplies. This is a pretty low-key project, so you probably already have most of this stuff lying around:
* A celery stalk (the base with the roots attached is key!)
* A shallow dish or bowl (a pie plate or even a plastic container lid works great)
* Water (tap water is fine)
* A sunny windowsill or well-lit area
* Potting soil
* A pot or container (at least 6 inches in diameter)
* A spray bottle (optional, but helpful for misting)
* A sharp knife or scissors
Phase 1: Rooting Your Celery Base
This is where the magic begins! We’re going to coax those little roots to grow and give our celery a head start.
1. Prepare the Celery Base: Using your sharp knife or scissors, carefully cut off the celery stalks about 1-2 inches from the base. You want to keep the base intact, as this is where the new growth will emerge. Don’t throw away the stalks you cut off! You can use them in soups, salads, or as a healthy snack.
2. Place in Water: Fill your shallow dish or bowl with about an inch of water. Place the celery base, cut-side up, in the water. Make sure the bottom of the base is submerged, but the top is exposed to air.
3. Find a Sunny Spot: Place the dish with the celery base on a sunny windowsill or in a well-lit area. Celery needs plenty of light to thrive.
4. Change the Water Regularly: This is crucial! Change the water every 1-2 days to prevent bacteria growth and keep the water fresh. This will encourage healthy root development.
5. Observe and Wait: Over the next few days, you should start to see small roots emerging from the bottom of the celery base. You might also notice new green shoots sprouting from the top. This is a sign that your celery is happy and healthy!
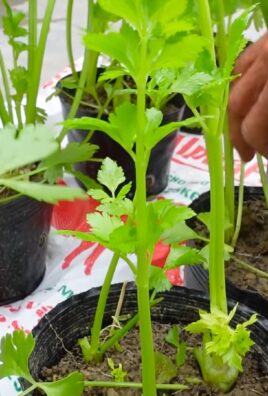
Phase 2: Planting Your Celery
Once your celery base has developed a good root system (about 1-2 inches long), it’s time to move it to a pot with soil.
1. Prepare the Pot: Fill your pot or container with potting soil, leaving about an inch of space at the top. Make sure your pot has drainage holes to prevent waterlogging.
2. Create a Hole: Using your finger or a small trowel, create a hole in the center of the soil large enough to accommodate the celery base.
3. Carefully Transplant: Gently remove the celery base from the water and place it in the hole. Make sure the roots are spread out and covered with soil. The top of the celery base should be just above the soil line.
4. Water Thoroughly: Water the soil thoroughly until water drains out of the drainage holes. This will help settle the soil around the roots.
5. Return to Sunny Spot: Place the pot back on the sunny windowsill or in the well-lit area.
Phase 3: Caring for Your Celery Plant
Now that your celery is planted, it’s time to provide it with the care it needs to grow into a healthy, thriving plant.
1. Watering: Celery needs consistent moisture, but it doesn’t like to be waterlogged. Water your celery plant whenever the top inch of soil feels dry to the touch. Avoid overwatering, as this can lead to root rot. I usually check mine every other day.
2. Sunlight: Celery needs at least 6 hours of sunlight per day. If you don’t have a sunny windowsill, you can supplement with a grow light.
3. Fertilizing: To give your celery a boost, you can fertilize it every 2-3 weeks with a balanced liquid fertilizer. Follow the instructions on the fertilizer label. I like to use a diluted fish emulsion fertilizer.
4. Misting: Celery also appreciates humidity. You can mist your plant with water every few days to increase the humidity around it. This is especially important if you live in a dry climate.
5. Pest Control: Keep an eye out for pests like aphids and spider mites. If you notice any pests, you can treat your plant with insecticidal soap or neem oil. I prefer to use natural methods whenever possible.
6. Blanching (Optional): If you prefer the taste of blanched celery (which is milder and less bitter), you can blanch your celery stalks by covering them with cardboard or soil for a week or two before harvesting. This will block sunlight and prevent the stalks from turning green.
Phase 4: Harvesting Your Celery
After a few months of care, your celery plant should be ready to harvest!
1. Harvesting Stalks: You can harvest individual celery stalks as needed by cutting them off at the base of the plant.
2. Harvesting the Whole Plant: If you want to harvest the entire plant, you can cut it off at the base of the soil.
3. Enjoy Your Harvest: Wash your celery stalks thoroughly and enjoy them in salads, soups, or as a healthy snack!
Tips for Water-Wise Celery Growing
Here are a few extra tips to help you grow celery in a water-efficient way:
* Use a Self-Watering Pot: A self-watering pot can help reduce water loss by providing a consistent supply of moisture to the roots.
* Mulch Around the Plant: Mulching around the base of the plant with organic materials like straw or wood chips can help retain moisture in the soil.
* Water in the Morning: Water your celery plant in the morning to allow the leaves to dry before nightfall. This can help prevent fungal diseases.
* Collect Rainwater: Collect rainwater in a rain barrel and use it to water your celery plant. This is a great way to conserve water and provide your plant with a natural source of nutrients.
* Group Similar Plants Together: Group plants with similar watering needs together to make watering more efficient.
* Monitor Soil Moisture: Regularly check the soil moisture to avoid overwatering or underwatering. A soil moisture meter can be helpful for this.
* Choose the Right Pot Size: Using a pot that is appropriately sized for your celery plant can help prevent water loss. A pot that is too large will retain too much water, while a pot that is too small will dry out quickly.
* Improve Soil Drainage: If your soil is heavy and doesn’t drain well, you can improve drainage by adding perlite or sand to the soil mix.
* Consider Hydroponics: For a truly water-efficient approach, consider growing celery hydroponically. Hydroponics uses significantly less water than traditional soil-based gardening.
Troubleshooting
Sometimes, things don’t go exactly as planned. Here are a few common problems you might encounter and how to fix them:
* Yellowing Leaves: This could be a sign of overwatering, underwatering, or nutrient deficiency. Check the soil moisture and adjust your watering accordingly. You may also need to fertilize your plant.
* Stunted Growth: This could be due to lack of sunlight, poor soil, or pests. Make sure your plant is getting enough sunlight and that the soil is well-draining and nutrient-rich. Check for pests and treat accordingly.
* Root Rot: This is caused by overwatering and poor drainage. Make sure your pot has drainage holes and avoid overwatering. If you suspect root rot, you can try repotting your plant in fresh soil.
* Pests: Aphids, spider mites, and other pests can damage your celery plant. Treat with insecticidal soap or neem oil.
I hope this guide has inspired you to try growing celery from kitchen scraps! It’s a fun, easy, and rewarding project that’s good for the environment and your wallet. Happy gardening!

Conclusion
So, there you have it! Growing celery doesn’t have to be a water-guzzling endeavor. By implementing this simple, yet effective DIY trick, you can significantly reduce your water consumption while still enjoying crisp, delicious celery straight from your garden. This method isn’t just about saving water; it’s about becoming a more conscious and sustainable gardener, minimizing your environmental impact, and maximizing the resources you have available.
This water-efficient celery growing technique is a game-changer for anyone looking to cultivate this versatile vegetable without feeling guilty about excessive water usage. Think of all the ways you can use your homegrown celery: in soups, salads, as a healthy snack with peanut butter, or even juiced for a refreshing and nutritious drink. Knowing that you grew it sustainably makes each bite even more satisfying.
But don’t stop there! Experiment with different variations to find what works best for your specific climate and soil conditions. Perhaps you could try incorporating a layer of mulch around the base of the celery plants to further reduce evaporation. Or, consider using a rain barrel to collect rainwater for watering, creating a truly closed-loop system. You could even try companion planting with herbs like parsley or basil, which are known to attract beneficial insects and deter pests, further reducing the need for interventions.
The beauty of this DIY approach is its adaptability. It’s not a rigid formula, but rather a flexible framework that you can tailor to your own unique gardening situation. The key is to observe your plants, pay attention to their needs, and adjust your watering accordingly.
We wholeheartedly encourage you to give this water-efficient celery growing method a try. It’s easy, affordable, and incredibly rewarding. Not only will you be saving water and reducing your environmental footprint, but you’ll also be enjoying the unparalleled taste of homegrown celery.
Once you’ve tried it, we’d love to hear about your experience! Share your tips, tricks, and successes in the comments below. Let’s build a community of sustainable gardeners who are passionate about growing delicious, healthy food while protecting our precious resources. Your insights could inspire others to adopt this method and contribute to a more water-wise future. So, get your hands dirty, embrace the challenge, and discover the joy of growing celery in a way that’s both good for you and good for the planet. Let’s all strive to **grow celery water efficiently**!
Frequently Asked Questions (FAQ)
Q: How often should I water my celery using this water-efficient method?
A: The watering frequency will depend on your climate, soil type, and the age of your celery plants. However, the key principle of this method is to water deeply and less frequently. Instead of watering a little bit every day, aim to water thoroughly every 2-3 days, or even less often if your soil retains moisture well. Check the soil moisture level before watering. If the top inch of soil feels dry to the touch, it’s time to water. If it’s still moist, wait another day or two. Remember, overwatering can be just as harmful as underwatering, leading to root rot and other problems.
Q: What type of soil is best for growing celery with this method?
A: Celery thrives in rich, well-draining soil that retains moisture. Amend your soil with plenty of organic matter, such as compost or well-rotted manure, before planting. This will improve drainage, aeration, and water retention. A slightly acidic soil pH of around 6.0 to 6.8 is ideal. If your soil is heavy clay, consider adding sand or perlite to improve drainage. If your soil is sandy, adding organic matter will help it retain moisture.
Q: Can I use this method for growing celery in containers?
A: Yes, this method is perfectly suitable for growing celery in containers. Choose a large container with drainage holes to accommodate the celery’s root system. Use a high-quality potting mix that retains moisture but also drains well. Monitor the soil moisture level regularly, as containers tend to dry out faster than garden beds. You may need to water more frequently in hot, sunny weather.
Q: What are some signs that my celery plants are not getting enough water?
A: Signs of underwatering in celery plants include wilting leaves, stunted growth, and yellowing or browning leaf tips. The stalks may also become thin and stringy. If you notice these symptoms, check the soil moisture level and water accordingly.
Q: What are some signs that my celery plants are getting too much water?
A: Signs of overwatering in celery plants include yellowing leaves (especially the lower ones), soft and mushy stalks, and the development of root rot. The leaves may also appear swollen or blistered. If you suspect overwatering, reduce the watering frequency and ensure that the soil is well-draining.
Q: Can I use this method in a dry climate?
A: Yes, this method is particularly beneficial in dry climates, as it helps to conserve water and reduce evaporation. However, you may need to water more frequently than in wetter climates. Consider using a drip irrigation system to deliver water directly to the roots of the plants, minimizing water loss. Mulching around the base of the plants will also help to retain moisture.
Q: What kind of mulch is best for celery?
A: Organic mulches like straw, shredded leaves, or wood chips are excellent choices for celery. They help retain soil moisture, suppress weeds, and regulate soil temperature. Avoid using synthetic mulches, as they can trap heat and prevent water from reaching the roots.
Q: How can I prevent pests and diseases from affecting my celery plants?
A: Healthy, well-watered celery plants are less susceptible to pests and diseases. Practice good garden hygiene by removing any dead or diseased leaves. Companion planting with herbs like parsley or basil can help to deter pests. If you notice any signs of pests or diseases, treat them promptly with organic pest control methods.
Q: Is there a specific time of day that is best for watering celery?
A: Watering in the morning is generally recommended, as it allows the leaves to dry out before nightfall, reducing the risk of fungal diseases. Avoid watering in the evening, as this can create a moist environment that is conducive to disease development.
Q: How long does it take for celery to mature using this water-efficient method?
A: The time it takes for celery to mature will depend on the variety and growing conditions. Generally, celery takes about 100-130 days to mature from seed. Using this water-efficient method should not significantly affect the maturation time, as long as the plants are receiving adequate water and nutrients.
Q: Can I use this method with other vegetables?
A: The principles of this water-efficient method can be applied to other vegetables as well. Deep watering, mulching, and improving soil drainage are all beneficial practices for conserving water in the garden. However, the specific watering frequency and soil requirements will vary depending on the vegetable.

Leave a Comment