

Grow Bell Peppers Balcony: Dreaming of fresh, vibrant bell peppers straight from your own balcony? You’re not alone! For centuries, humans have cultivated gardens in even the most limited spaces, from ancient Roman window boxes to modern-day vertical gardens. There’s something incredibly satisfying about nurturing a plant from seed to harvest, especially when it yields delicious, colorful peppers.
But let’s be honest, balcony gardening can be tricky. Limited sunlight, unpredictable weather, and space constraints can feel overwhelming. That’s where these DIY tricks and hacks come in! I’m going to share my tried-and-true methods for successfully growing bell peppers on your balcony, even if you’re a complete beginner.
Imagine the joy of adding homegrown bell peppers to your salads, stir-fries, and snacks. No more trips to the grocery store for bland, overpriced peppers! With a little know-how and some simple DIY solutions, you can transform your balcony into a thriving pepper paradise. Let’s get started and learn how to grow bell peppers balcony style!
Growing Bell Peppers on Your Balcony: A DIY Guide
Hey there, fellow balcony gardeners! Dreaming of fresh, crisp bell peppers right outside your door? You’ve come to the right place! I’m going to walk you through everything you need to know to successfully grow bell peppers on your balcony, even if you’re a complete beginner. Trust me, it’s easier than you think, and the reward of harvesting your own peppers is totally worth it.
Choosing the Right Bell Pepper Variety
First things first, let’s talk about pepper varieties. Not all bell peppers are created equal, especially when it comes to container gardening. You’ll want to choose varieties that are compact and well-suited for pots. Here are a few of my favorites:
* ‘Patio Bell’: As the name suggests, this variety is specifically bred for containers. It’s compact, produces a good yield of medium-sized peppers, and matures relatively quickly.
* ‘Mini Bell’: These adorable little peppers are perfect for snacking and salads. They’re also great for containers because the plants stay small and manageable.
* ‘Lunchbox Peppers’: Similar to mini bells, these are sweet, colorful, and perfect for small spaces. They come in a variety of colors, adding a vibrant touch to your balcony garden.
* ‘Sweet Palermo’: While technically not a bell pepper, these elongated, sweet peppers are incredibly productive and do well in containers. They have a thinner skin and a delicious flavor.
Gathering Your Supplies
Okay, now that we’ve picked our pepper varieties, let’s gather our supplies. Here’s what you’ll need:
* Bell Pepper Seeds or Seedlings: You can start from seed indoors or purchase seedlings from a local nursery. Seedlings will give you a head start, but starting from seed is more economical and allows you to choose from a wider variety of peppers.
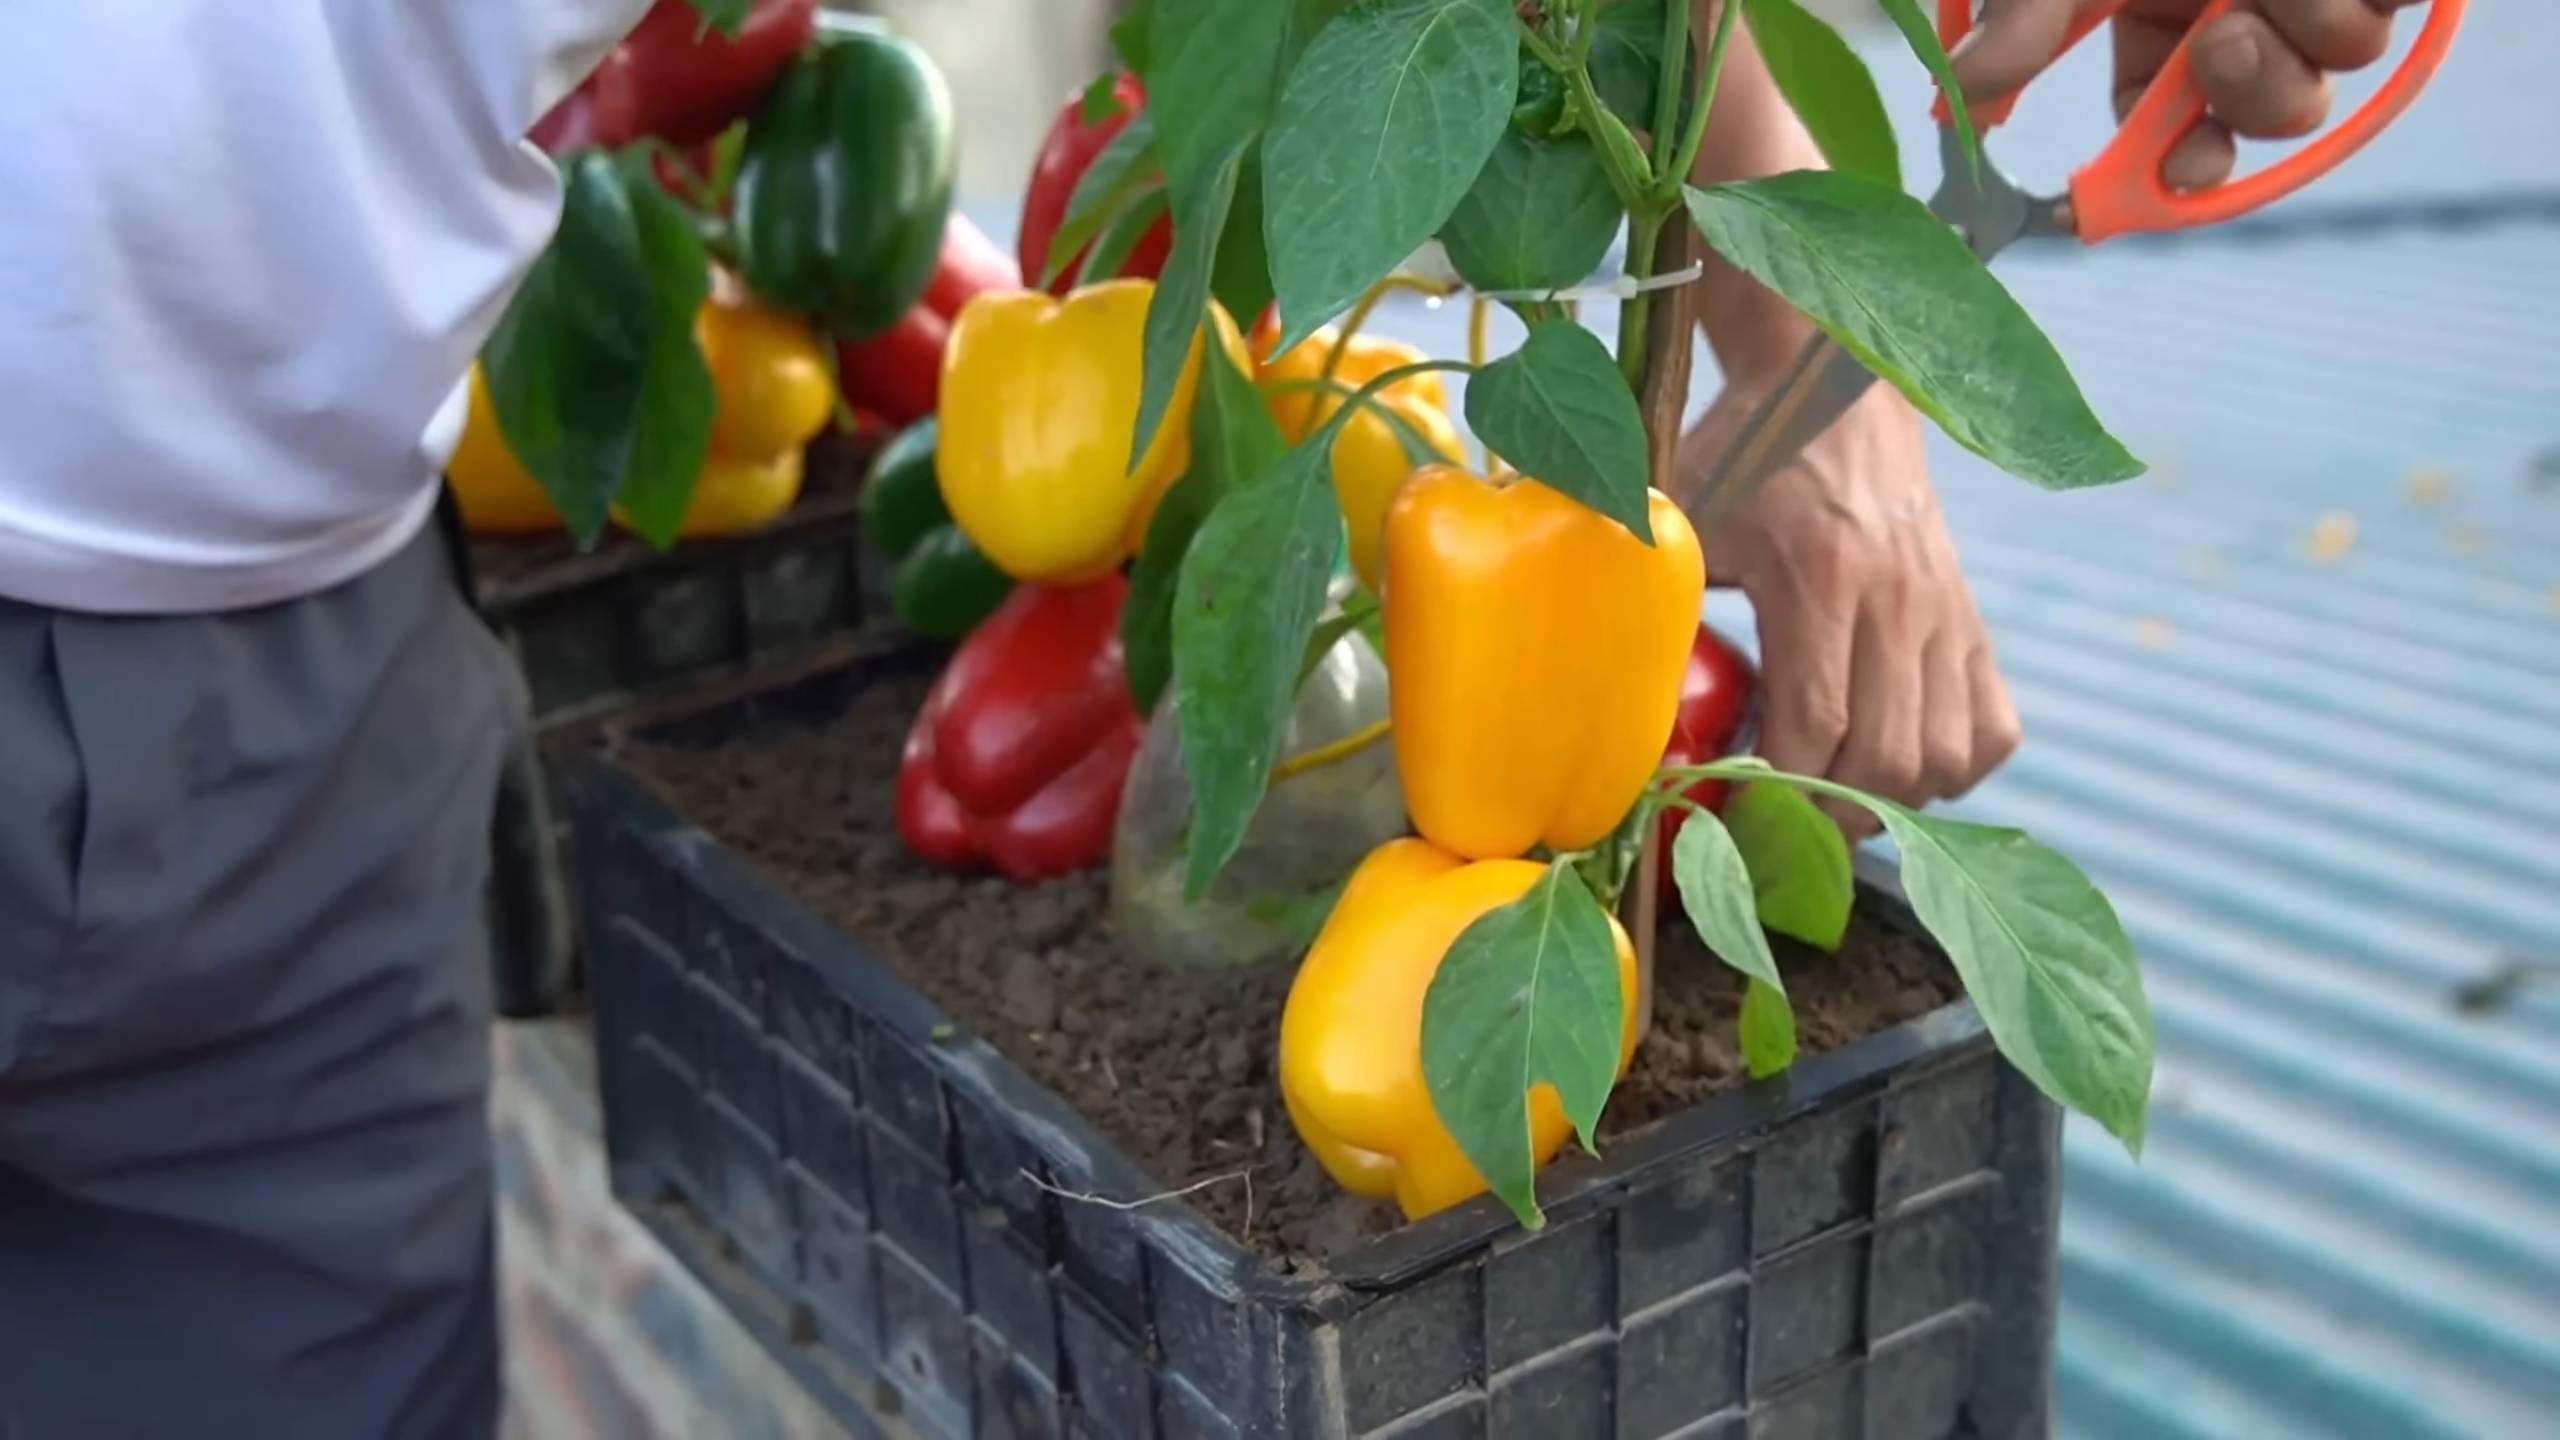
* Pots: Choose pots that are at least 12 inches in diameter and depth. Larger pots are better because they provide more room for the roots to grow and hold moisture longer. Make sure your pots have drainage holes!
* Potting Mix: Use a high-quality potting mix that is well-draining and contains plenty of organic matter. Avoid using garden soil, as it can become compacted in containers and doesn’t drain well.
* Fertilizer: Bell peppers are heavy feeders, so you’ll need to fertilize them regularly. Use a balanced fertilizer (e.g., 10-10-10) or a fertilizer specifically formulated for vegetables.
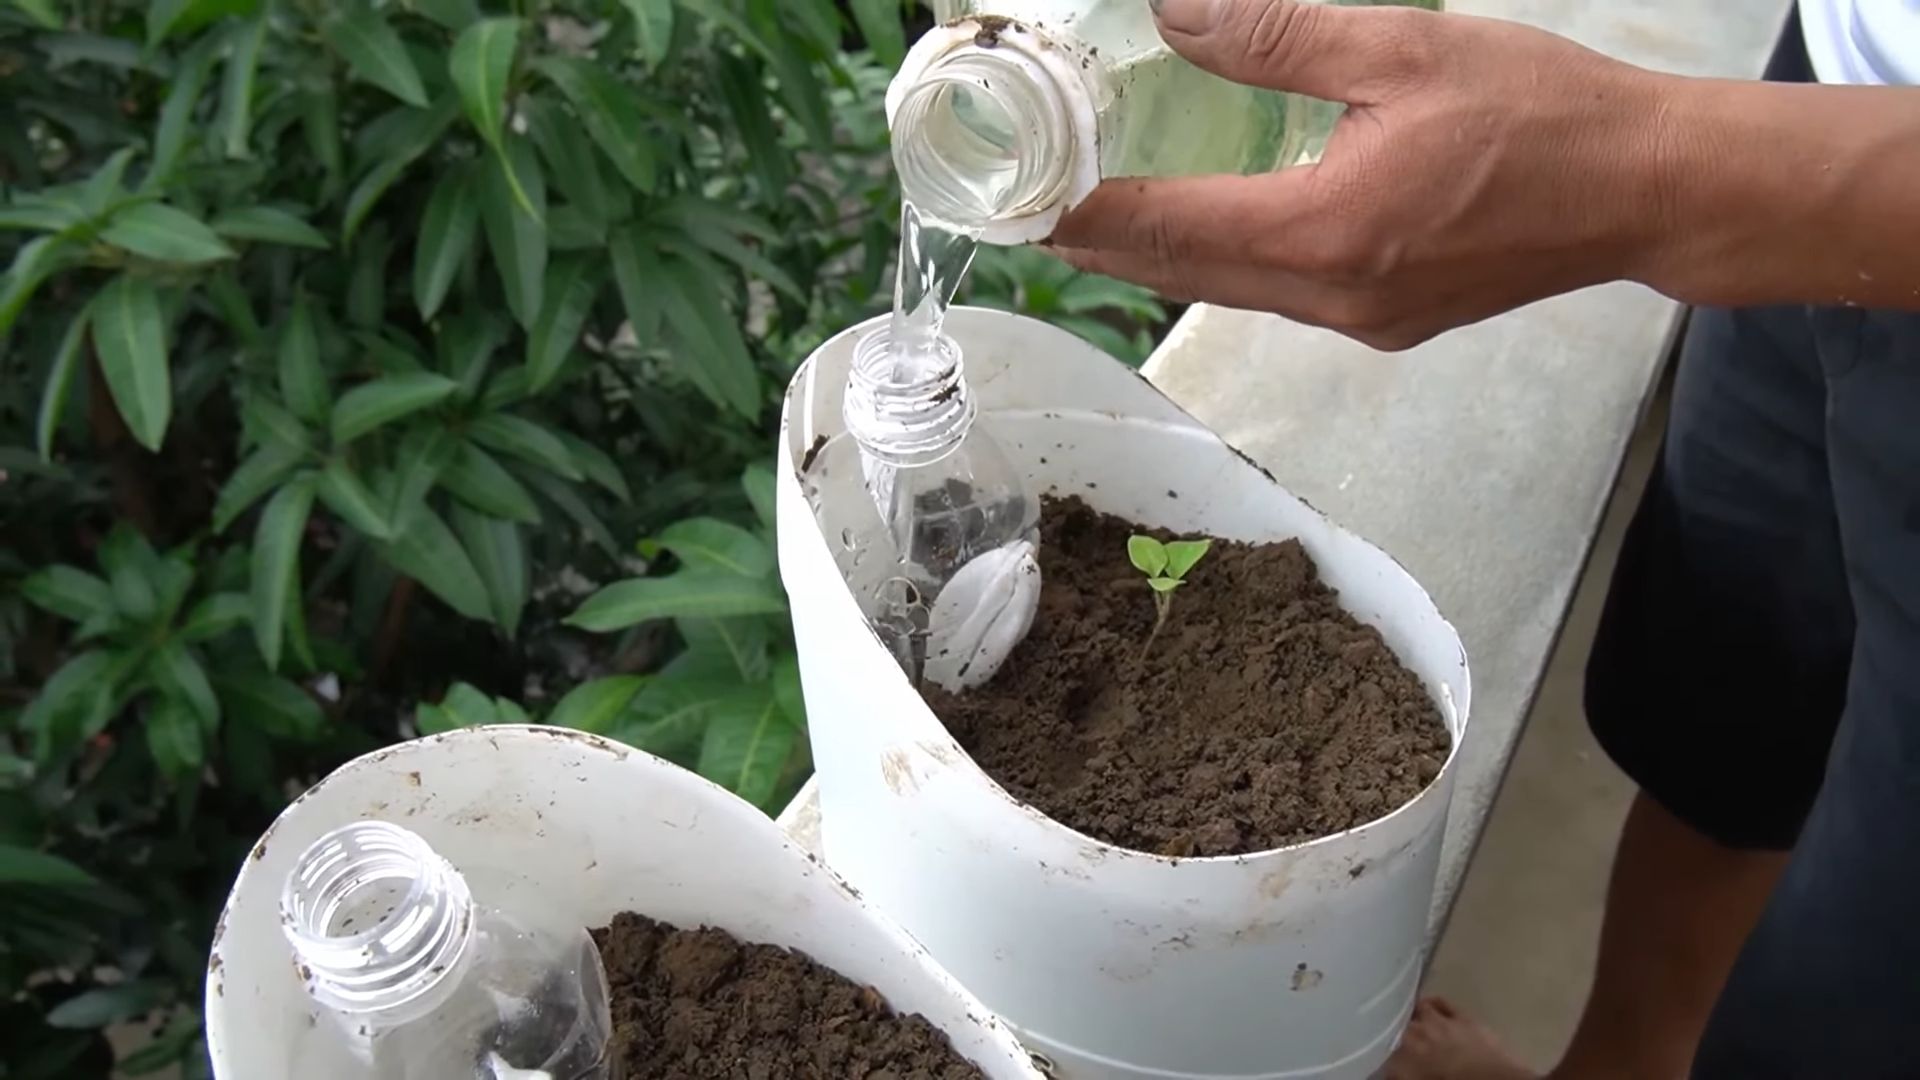
* Watering Can or Hose: You’ll need a way to water your plants regularly.
* Stakes or Cages (Optional): Some bell pepper varieties can get quite tall and may need support to prevent them from falling over.
* Gardening Gloves: To protect your hands.
* Small Shovel or Trowel: For planting.
Starting from Seed (Optional)
If you’re starting from seed, you’ll need to start them indoors about 6-8 weeks before the last expected frost. Here’s how:
1. Sow the Seeds: Fill small pots or seed trays with seed-starting mix. Sow the seeds about 1/4 inch deep and gently water them.
2. Provide Warmth: Bell pepper seeds need warmth to germinate. Place the pots in a warm location, such as on top of a refrigerator or on a heat mat.
3. Keep Moist: Keep the soil consistently moist, but not soggy.
4. Provide Light: Once the seedlings emerge, move them to a sunny location or under grow lights.
5. Transplant: Once the seedlings have developed a few sets of true leaves and the weather has warmed up, you can transplant them into larger pots.
Planting Your Bell Peppers
Whether you’re using seedlings or transplants, the planting process is the same.
1. Prepare the Pots: Fill your pots with potting mix, leaving a few inches of space at the top.
2. Dig a Hole: Dig a hole in the center of the pot that is large enough to accommodate the root ball of the seedling or transplant.
3. Plant the Pepper: Gently remove the seedling or transplant from its container and place it in the hole. Make sure the top of the root ball is level with the soil surface.
4. Fill and Water: Fill in the hole with potting mix and gently firm the soil around the plant. Water thoroughly.
5. Add Support (Optional): If you’re using stakes or cages, install them now to avoid disturbing the roots later.
Caring for Your Bell Peppers
Now comes the fun part – watching your bell peppers grow! Here’s what you need to do to keep them happy and healthy:
1. Sunlight: Bell peppers need at least 6-8 hours of sunlight per day. Place your pots in the sunniest spot on your balcony.
2. Watering: Water your bell peppers regularly, especially during hot, dry weather. The soil should be consistently moist, but not soggy. Check the soil moisture by sticking your finger into the soil. If the top inch feels dry, it’s time to water.
3. Fertilizing: Fertilize your bell peppers every 2-3 weeks with a balanced fertilizer or a fertilizer specifically formulated for vegetables. Follow the instructions on the fertilizer label.
4. Pruning: Pruning isn’t strictly necessary, but it can help to improve air circulation and encourage bushier growth. Remove any yellowing or dead leaves. You can also pinch off the suckers that grow between the main stem and the branches.
5. Pest Control: Keep an eye out for pests such as aphids, whiteflies, and spider mites. If you spot any pests, treat them with insecticidal soap or neem oil.
6. Pollination: Bell peppers are self-pollinating, but you can help them along by gently shaking the plants or using a small paintbrush to transfer pollen from one flower to another. This is especially important if you’re growing your peppers indoors or in a sheltered location where there aren’t many pollinators.
Dealing with Common Problems
Even with the best care, you might encounter some problems along the way. Here are a few common issues and how to deal with them:
* Blossom End Rot: This is a condition where the bottom of the pepper turns black and leathery. It’s caused by a calcium deficiency, which is often due to inconsistent watering. To prevent blossom end rot, water your plants regularly and consistently, and consider adding calcium to the soil.
* Sunscald: This is when the peppers get sunburned, causing them to develop white or yellow patches. To prevent sunscald, provide some shade during the hottest part of the day.
* Pest Infestations: As mentioned earlier, keep an eye out for pests and treat them promptly.
Harvesting Your Bell Peppers
The moment you’ve been waiting for! Bell peppers are typically ready to harvest about 60-80 days after transplanting, depending on the variety.
1. Check for Ripeness: The peppers should be fully colored and firm to the touch.
2. Cut the Pepper: Use a sharp knife or pruning shears to cut the pepper from the plant, leaving a small stem attached.
3. Enjoy! Now you can enjoy your homegrown bell peppers in salads, stir-fries, or any other dish you like.
Extending the Growing Season
If you live in a cooler climate, you can extend the growing season by starting your seeds indoors early and using row covers or a greenhouse to protect your plants from frost. You can also bring your plants indoors during the winter months and keep them growing under grow lights.
Troubleshooting
Sometimes, even with the best efforts, things don’t go as planned. Here’s a quick troubleshooting guide:
* No Flowers: If your plant isn’t flowering, it might not be getting enough sunlight or fertilizer. Make sure it’s in a sunny spot and fertilize regularly.
* Flowers Dropping: This can be caused by temperature fluctuations, inconsistent watering, or lack of pollination. Try to maintain a consistent environment and ensure proper pollination.
* Yellowing Leaves: This could indicate overwatering, underwatering, or a nutrient deficiency. Check the soil moisture and fertilize if necessary.
Additional Tips for Balcony Bell Pepper Success
* Choose the Right Location: As mentioned, sunlight is key. South-facing balconies are usually the best.
* Consider Wind: Balconies can be windy. Protect your plants from strong winds by placing them near a wall or using a windbreak.
* Water Wisely: Overwatering is a common mistake. Let the soil dry out slightly between waterings.
* Rotate Your Crops: If possible, rotate your crops each year to prevent soilborne diseases.
* Enjoy the Process! Gardening
Conclusion
So, there you have it! Growing bell peppers on your balcony isn’t just a whimsical dream; it’s a tangible reality waiting to unfold. We’ve walked you through the essential steps, from selecting the right varieties to nurturing your plants for a bountiful harvest. But why should you even bother with this DIY project?
The answer is multifaceted. First and foremost, the taste. Store-bought bell peppers, while convenient, often lack the vibrant, sun-ripened flavor of homegrown produce. Imagine biting into a crisp, juicy bell pepper, bursting with sweetness, knowing you cultivated it yourself, just steps from your living room. That’s an experience you simply can’t replicate.
Beyond the superior taste, growing your own bell peppers offers a unique sense of accomplishment and connection to nature. In our increasingly urbanized world, tending to a small garden on your balcony provides a therapeutic escape, a chance to reconnect with the earth, and a tangible reminder of the natural world’s rhythms. Watching your tiny seedlings sprout, blossom, and eventually bear fruit is incredibly rewarding.
Furthermore, growing bell peppers on your balcony is a sustainable choice. You’re reducing your carbon footprint by eliminating the transportation and packaging associated with store-bought produce. You also have complete control over the growing process, ensuring your peppers are free from harmful pesticides and chemicals. This is especially important if you are health-conscious and prefer organic options.
But the benefits don’t stop there. Balcony gardening is a fantastic way to maximize limited space. Even a small balcony can accommodate several bell pepper plants, providing you with a steady supply of fresh produce throughout the growing season. It’s also a cost-effective way to supplement your grocery bill.
Now, let’s talk about variations. While we’ve focused on the basics, feel free to experiment! Try different bell pepper varieties, such as the vibrant purple bell peppers or the spicy shishito peppers. Consider companion planting, pairing your bell peppers with herbs like basil or marigolds to deter pests and enhance flavor. You can also explore different container sizes and materials to find what works best for your balcony.
Don’t be afraid to get creative with your setup. Vertical gardening systems, hanging baskets, and repurposed containers can all add visual appeal and maximize space. The possibilities are endless!
Ultimately, the key to success lies in experimentation and observation. Pay close attention to your plants’ needs, adjust your watering and fertilizing schedule as needed, and don’t be discouraged by setbacks. Gardening is a learning process, and every mistake is an opportunity to grow (pun intended!).
So, what are you waiting for? Grab some seeds or seedlings, gather your supplies, and embark on your balcony bell pepper growing adventure today! We’re confident that you’ll be amazed by the results. And most importantly, we want to hear about your experience! Share your photos, tips, and stories with us in the comments below. Let’s create a community of balcony bell pepper enthusiasts and inspire others to embrace the joys of urban gardening. Remember, growing bell peppers on your balcony is more than just a hobby; it’s a lifestyle. It’s about connecting with nature, nourishing your body, and creating a more sustainable future, one bell pepper at a time.
Frequently Asked Questions (FAQ)
What is the best time of year to start growing bell peppers on my balcony?
The best time to start growing bell peppers depends on your climate. In general, bell peppers need warm temperatures to thrive. If you live in a region with mild winters, you can start seeds indoors 8-10 weeks before the last expected frost. If you live in a colder climate, you may need to wait until after the last frost to transplant your seedlings outdoors. A good rule of thumb is to wait until the soil temperature reaches at least 60°F (15°C). You can also purchase starter plants from a local nursery to get a head start.
What kind of soil is best for growing bell peppers in containers?
Bell peppers need well-draining soil that is rich in organic matter. A good potting mix for bell peppers should contain a blend of peat moss, perlite, and vermiculite. You can also add compost or aged manure to improve the soil’s fertility. Avoid using garden soil in containers, as it can become compacted and prevent proper drainage. Look for potting mixes specifically formulated for vegetables or containers.
How much sunlight do bell peppers need?
Bell peppers need at least 6-8 hours of direct sunlight per day to produce a good harvest. If your balcony doesn’t receive enough sunlight, you may need to supplement with grow lights. Place your bell pepper plants in the sunniest spot on your balcony. If you live in a hot climate, you may need to provide some afternoon shade to prevent the plants from overheating.
How often should I water my bell pepper plants?
Bell peppers need consistent moisture, but they don’t like to be waterlogged. Water your plants deeply whenever the top inch of soil feels dry to the touch. Avoid watering the foliage, as this can promote fungal diseases. During hot weather, you may need to water your plants more frequently. Use a moisture meter to check the soil moisture level if you’re unsure.
What kind of fertilizer should I use for bell peppers?
Bell peppers are heavy feeders and need regular fertilization to produce a good harvest. Use a balanced fertilizer with an NPK ratio of 10-10-10 or 14-14-14. Apply fertilizer every 2-3 weeks during the growing season. You can also use organic fertilizers, such as compost tea or fish emulsion. Avoid over-fertilizing, as this can burn the roots of your plants.
How do I prevent pests and diseases from attacking my bell pepper plants?
To prevent pests and diseases, start by choosing disease-resistant bell pepper varieties. Inspect your plants regularly for signs of pests or diseases. Common pests that attack bell peppers include aphids, whiteflies, and spider mites. You can control these pests with insecticidal soap or neem oil. Common diseases that affect bell peppers include blossom end rot, fungal leaf spot, and powdery mildew. Prevent these diseases by providing good air circulation, avoiding overhead watering, and using a fungicide if necessary.
What is blossom end rot, and how do I prevent it?
Blossom end rot is a common problem that affects bell peppers and other vegetables. It is caused by a calcium deficiency in the developing fruit. To prevent blossom end rot, make sure your soil is rich in calcium. You can add lime or bone meal to the soil before planting. Also, water your plants consistently to prevent fluctuations in soil moisture. Avoid over-fertilizing with nitrogen, as this can interfere with calcium uptake.
When are bell peppers ready to harvest?
Bell peppers are typically ready to harvest 60-90 days after transplanting. The exact time will depend on the variety and growing conditions. Bell peppers can be harvested at any stage of maturity, but they are sweetest when they are fully ripe and have reached their mature color. To harvest, use a sharp knife or scissors to cut the pepper from the plant.
Can I grow bell peppers in containers indoors?
Yes, you can grow bell peppers in containers indoors, but you will need to provide them with adequate light. Place your plants near a sunny window or use grow lights. You will also need to pollinate the flowers manually, as there will be no bees or other pollinators indoors. Use a small paintbrush to transfer pollen from one flower to another.
How do I overwinter my bell pepper plants?
In some climates, bell peppers can be overwintered indoors. Before the first frost, prune your plants back to about 6 inches tall and transplant them into smaller containers. Bring the plants indoors and place them in a cool, bright location. Water sparingly during the winter months. In the spring, gradually acclimate the plants to outdoor conditions before transplanting them back into larger containers or the garden.

Leave a Comment