

Bucket Gardening Peanuts: Ever dreamt of harvesting your own crunchy, delicious peanuts right from your backyard, even if you don’t have a sprawling farm? I’m here to tell you, it’s totally achievable, and surprisingly easy, with bucket gardening! Forget the image of vast peanut fields; we’re bringing the peanut patch to your patio, balcony, or even your doorstep.
Peanuts, believe it or not, have a rich history, dating back thousands of years in South America. They weren’t just a snack; they were a vital source of protein and oil. Now, you can connect with that history by growing your own! But why bucket gardening, you ask? Well, let’s face it, not everyone has the space or the ideal soil for traditional in-ground gardening. That’s where the magic of container gardening comes in.
This DIY guide will walk you through every step of the process, from choosing the right bucket and soil to nurturing your peanut plants and harvesting your bounty. I’ll share my favorite tips and tricks for successful bucket gardening peanuts, ensuring you get a plentiful harvest. Imagine the satisfaction of snacking on peanuts you grew yourself – it’s a rewarding experience you won’t want to miss! So, grab your buckets, and let’s get growing!
DIY Bucket Gardening: Growing Peanuts Like a Pro!
Hey there, fellow gardening enthusiasts! I’m super excited to share my experience with growing peanuts in buckets. It’s surprisingly easy, even if you don’t have a huge backyard. Bucket gardening is perfect for small spaces, balconies, or even patios. Plus, there’s nothing quite like the taste of freshly harvested, homegrown peanuts! So, grab your buckets, some peanut seeds, and let’s get started!
What You’ll Need:
Before we dive in, let’s gather all the necessary supplies. Trust me, having everything ready beforehand will make the whole process much smoother.
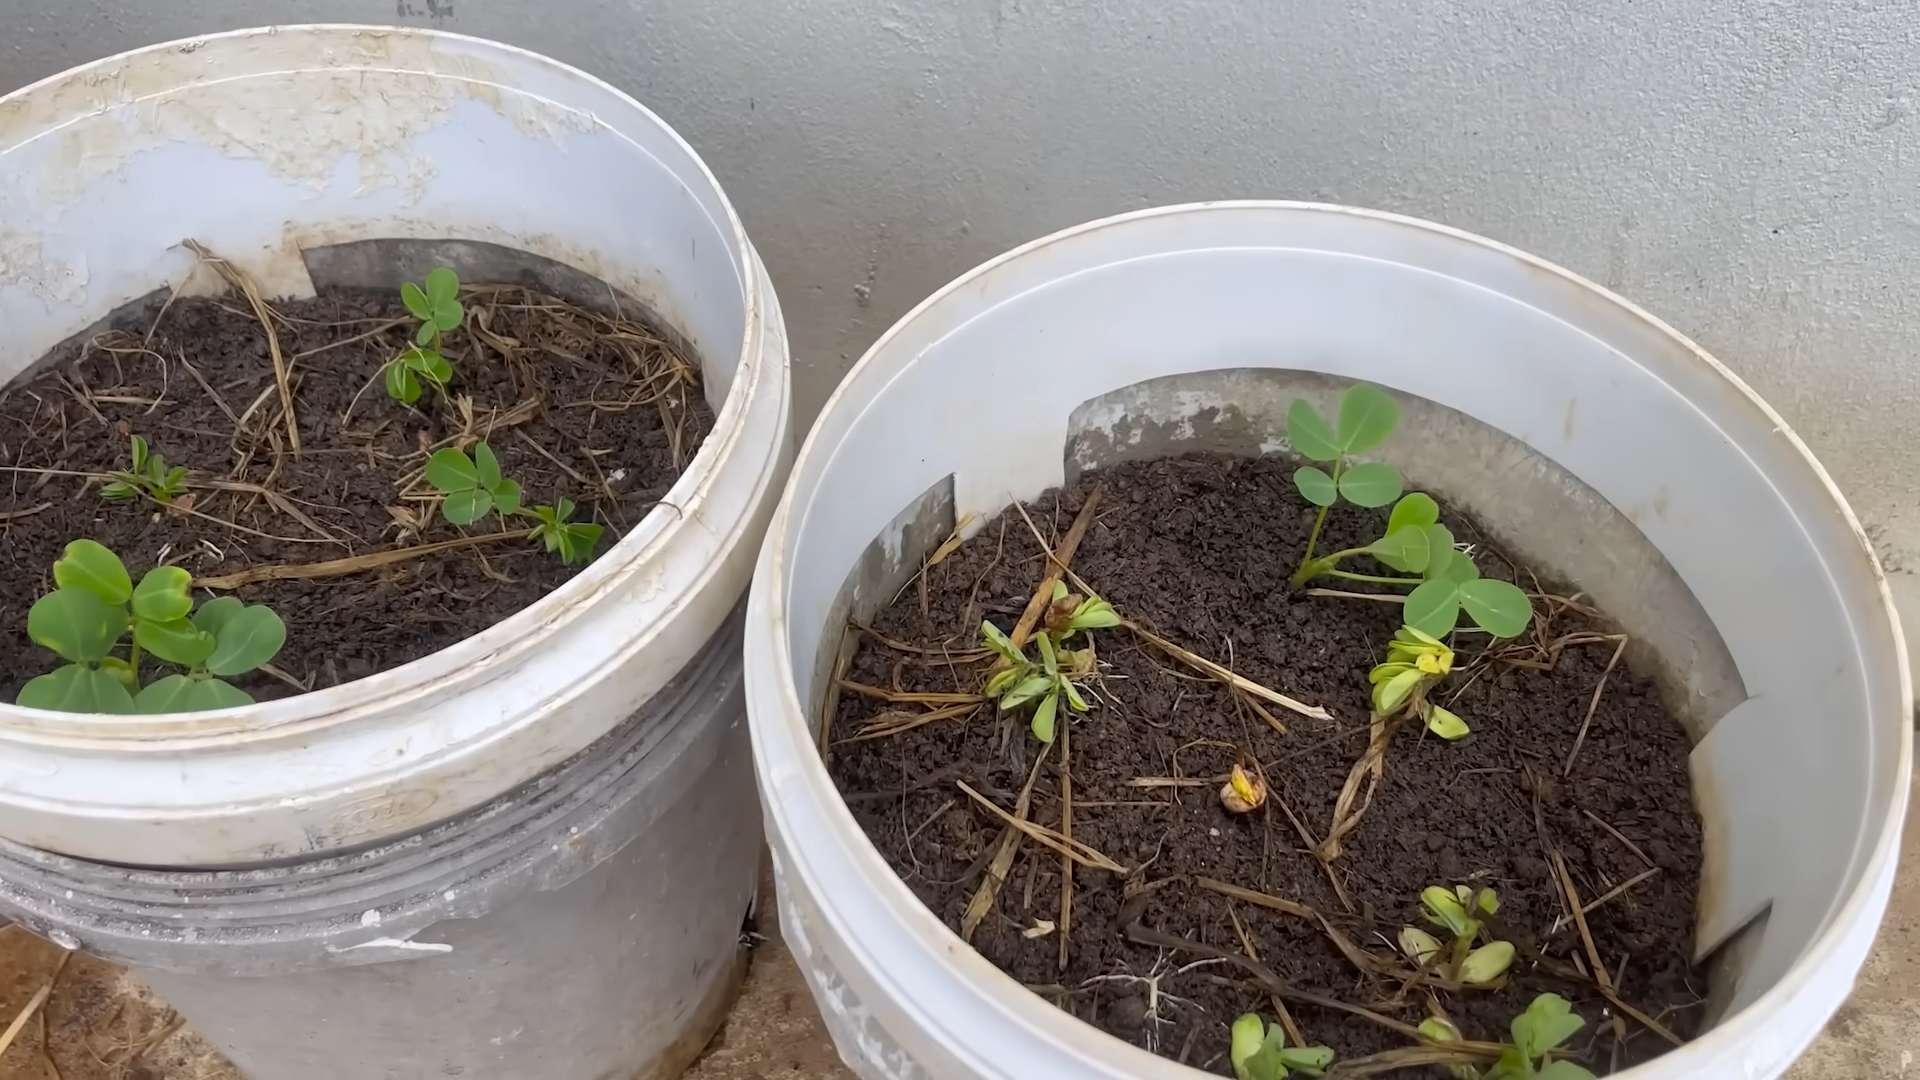
* Large Buckets: I recommend using 5-gallon buckets. They provide enough space for the peanut plants to develop a good root system. Make sure they are clean and food-grade if possible.
* Peanut Seeds: You can find peanut seeds at most garden centers or online. Look for varieties specifically suited for your climate. Virginia, Spanish, and Runner peanuts are all popular choices. Raw, unsalted peanuts from the grocery store *can* work, but germination rates are often lower. I’ve had better luck with seeds specifically sold for planting.
* Potting Mix: Use a high-quality, well-draining potting mix. Avoid using garden soil directly in the buckets, as it can become compacted and hinder drainage.
* Drill (with drill bit): For creating drainage holes in the buckets.
* Watering Can or Hose: For watering your peanut plants.
* Fertilizer (Optional): A balanced fertilizer can help boost growth, but it’s not strictly necessary. I like to use a slow-release fertilizer.
* Mulch (Optional): Mulch helps retain moisture and suppress weeds. Straw or wood chips work well.
Preparing Your Buckets: The Foundation for Success
Proper preparation is key to a thriving peanut crop. This step is all about ensuring your peanuts have the right environment to grow.
1. Drill Drainage Holes: This is crucial! Peanuts don’t like soggy soil. Drill at least 4-5 drainage holes in the bottom of each bucket. I usually space them evenly around the perimeter.
2. Add Potting Mix: Fill the buckets with potting mix, leaving about 2-3 inches of space at the top. This space will prevent the soil from overflowing when you water.
3. Water the Soil: Thoroughly water the potting mix until water drains out of the drainage holes. This helps settle the soil and provides moisture for the seeds.
Planting Your Peanut Seeds: Giving Life to Your Future Harvest
Now for the exciting part – planting the peanut seeds! This is where the magic begins.
1. Sowing the Seeds: Make small holes, about 1-2 inches deep, in the potting mix. I usually plant 3-4 seeds per bucket, spacing them evenly. This increases the chances of at least one seed germinating.
2. Cover the Seeds: Gently cover the seeds with potting mix.
3. Water Again: Lightly water the soil again to ensure good seed-to-soil contact.
4. Mulch (Optional): If you’re using mulch, spread a thin layer around the base of the planting area.
Caring for Your Peanut Plants: Nurturing Your Crop
Peanuts require consistent care to thrive. This section covers watering, fertilizing, and other essential maintenance tasks.
1. Watering: Keep the soil consistently moist, but not waterlogged. Water deeply whenever the top inch of soil feels dry to the touch. I usually water every 2-3 days, depending on the weather.
2. Sunlight: Peanuts need at least 6-8 hours of direct sunlight per day. Place your buckets in a sunny location.
3. Fertilizing (Optional): If you choose to fertilize, apply a balanced fertilizer according to the package instructions. I usually fertilize every 4-6 weeks. Be careful not to over-fertilize, as this can harm the plants.
4. Weeding: Keep the buckets free of weeds. Weeds compete with the peanut plants for nutrients and water.
5. Hilling: This is an important step! As the peanut plants grow, they will produce small yellow flowers. After the flowers fade, “pegs” (small stems) will grow downwards from the base of the plant and enter the soil. These pegs are where the peanuts will develop. To encourage peanut production, gently hill the soil around the base of the plants, covering the pegs with soil. I usually do this every few weeks.
6. Pest Control: Keep an eye out for pests, such as aphids or spider mites. If you notice any pests, treat them with an appropriate insecticide or insecticidal soap. I prefer using organic pest control methods whenever possible.
Harvesting Your Peanuts: The Sweet Reward of Your Labor
Harvesting is the culmination of all your hard work! It’s time to reap the rewards of your gardening efforts.
1. Timing: Peanuts typically take about 120-150 days to mature. The leaves will start to turn yellow and the plants will begin to die back. This is a sign that it’s time to harvest.
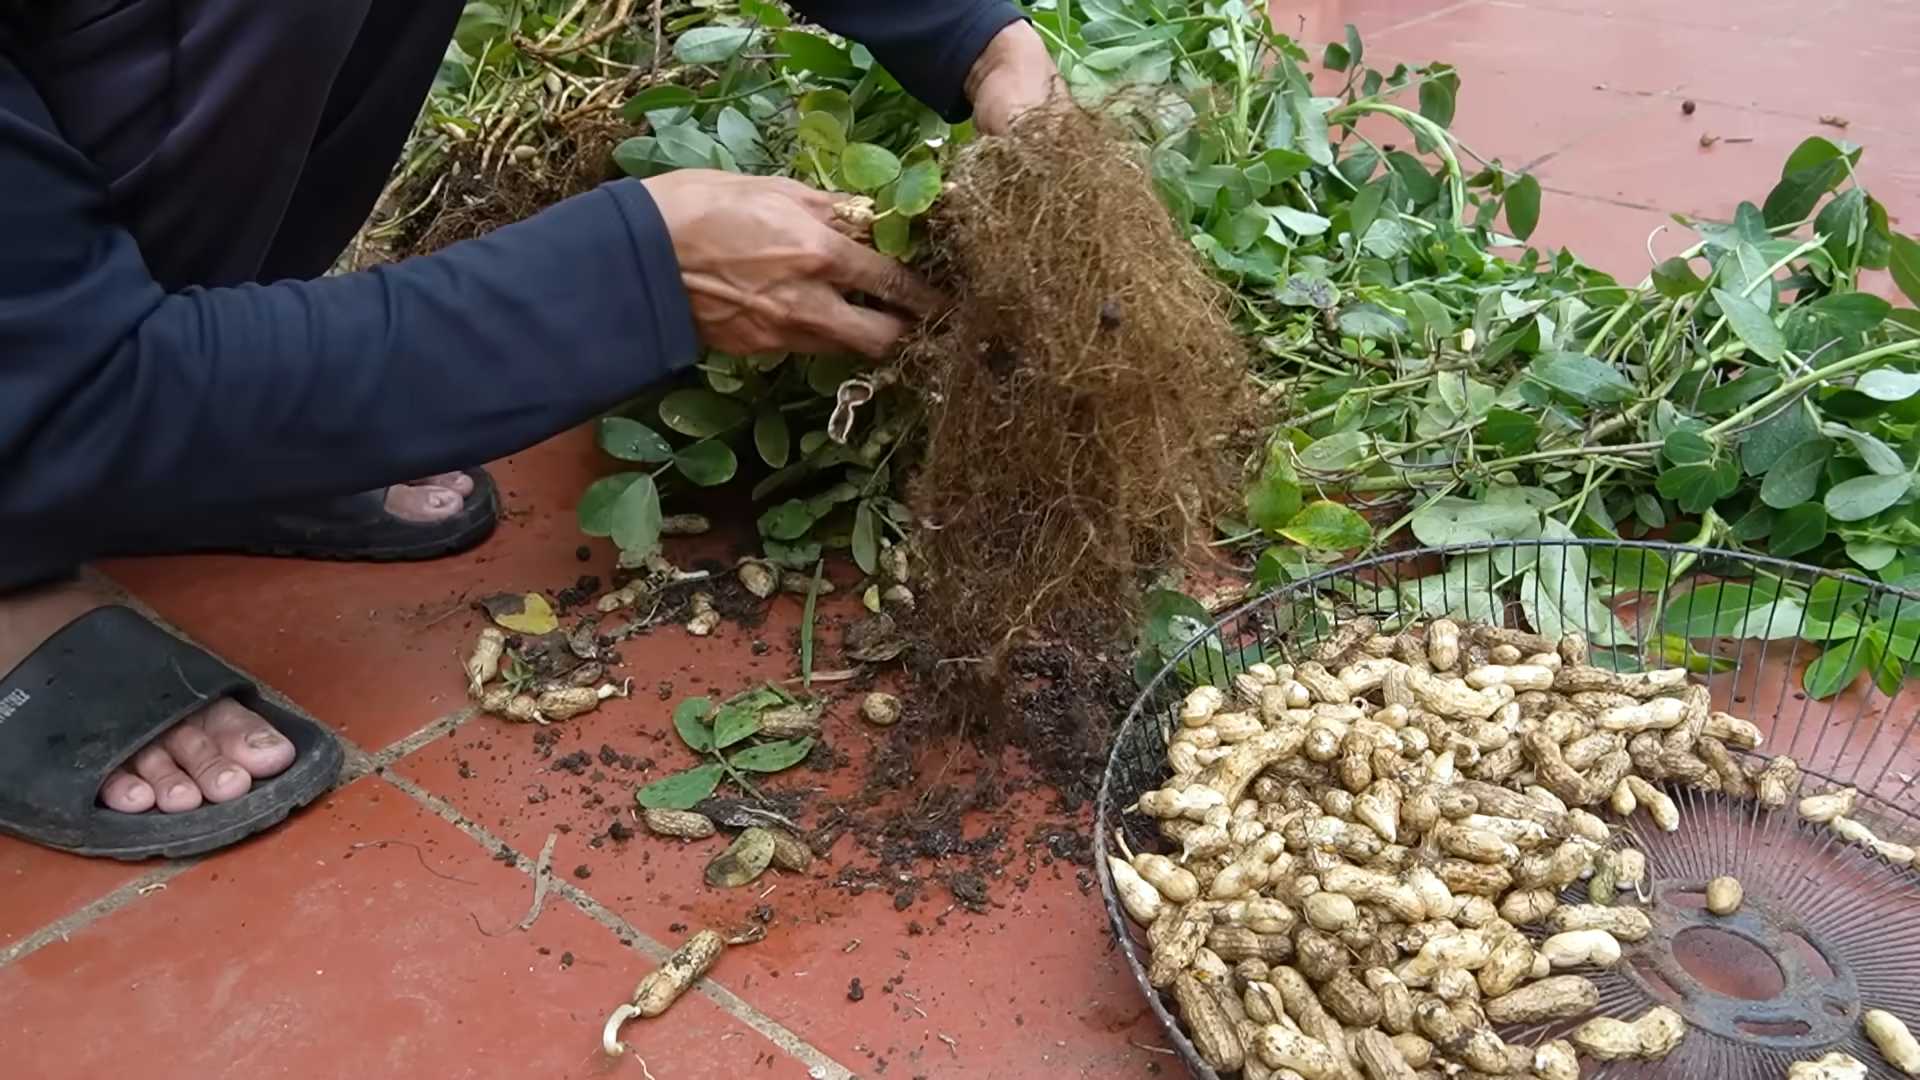
2. Harvesting: Carefully dig up the entire plant, being careful not to damage the peanuts. I usually use a garden fork to loosen the soil around the plant before pulling it up.
3. Cleaning: Gently shake off any excess soil from the peanuts.
4. Curing: This is a crucial step for developing the flavor of the peanuts. Hang the entire plant upside down in a well-ventilated area for 2-4 weeks. This allows the peanuts to dry and cure properly. I usually hang them in my garage.
5. Separating the Peanuts: Once the plants are cured, you can separate the peanuts from the vines.
6. Roasting (Optional): Freshly harvested peanuts can be roasted for a delicious snack. Spread the peanuts in a single layer on a baking sheet and roast them in a preheated oven at 350°F (175°C) for 20-30 minutes, or until they are golden brown and fragrant. Keep a close eye on them to prevent burning.
Troubleshooting: Addressing Common Issues
Even with the best care, you might encounter some challenges along the way. Here are some common issues and how to address them:
* Poor Germination: If your peanut seeds don’t germinate, it could be due to several factors, such as poor seed quality, cold soil temperatures, or overwatering. Make sure you’re using fresh, high-quality seeds and that the soil temperature is warm enough (around 65-70°F). Avoid overwatering, as this can cause the seeds to rot.
* Yellowing Leaves: Yellowing leaves can be a sign of nutrient deficiency, overwatering, or underwatering. Check the soil moisture and adjust your watering accordingly. If the soil is consistently moist, it could be a sign of overwatering. If the soil is dry, it could be a sign of underwatering. You can also try fertilizing with a balanced fertilizer.
* Pest Infestations: Keep an eye out for pests, such as aphids, spider mites, or caterpillars. Treat them with an appropriate insecticide or insecticidal soap. I prefer using organic pest control methods whenever possible.
* Lack of Peanut Production: If your peanut plants are growing well but not producing peanuts, it could be due to a lack of pollination or insufficient hilling. Make sure you’re hilling the soil around the base of the plants regularly to encourage peanut production. Peanuts are self-pollinating, but you can also try gently shaking the plants to help with pollination.
Choosing the Right Peanut Variety
Selecting the right peanut variety is crucial for success, as different varieties are better suited to different climates and growing conditions. Here’s a breakdown of some popular choices:
* Virginia Peanuts: These are known for their large size and are often roasted and sold as “ballpark peanuts.” They require a longer growing season (120-150 days) and are best suited for warmer climates.
* Spanish Peanuts: These are smaller and rounder than Virginia peanuts and have a reddish-brown skin. They have a shorter growing season (100-120 days) and are more tolerant of cooler temperatures.
* Runner Peanuts: These are the most widely grown type of peanut in the United States. They are medium-sized and have a good flavor. They have a growing season of around 120-140 days.
* Valencia Peanuts: These peanuts typically have three or more kernels per shell and are known for their sweet flavor. They are often roasted or boiled. They have a growing season of around 90-110 days.
When choosing a peanut variety, consider your climate, the length of your growing season, and your personal preferences. I recommend
Conclusion
So, there you have it! Growing your own peanuts in a bucket is not only surprisingly easy, but it’s also incredibly rewarding. Imagine the satisfaction of harvesting your very own homegrown peanuts, knowing exactly where they came from and how they were grown. This DIY project transforms a simple bucket into a miniature peanut farm, bringing a touch of the countryside right to your balcony, patio, or even a sunny windowsill.
Why is this a must-try? Because it democratizes gardening. You don’t need acres of land or specialized equipment to enjoy the unique flavor and freshness of homegrown peanuts. Bucket gardening peanuts is accessible to everyone, regardless of their living situation or gardening experience. It’s a fantastic way to introduce children to the wonders of plant life, teaching them about responsibility and the origins of their food. Plus, let’s be honest, the novelty of growing peanuts in a bucket is just plain fun!
Beyond the basic method, there’s plenty of room for experimentation. Try different varieties of peanuts to discover your favorite flavor profile. Valencia peanuts, known for their sweetness, might be a good starting point. Or perhaps you’d prefer the larger kernels of Virginia peanuts. You could also experiment with different soil amendments, adding compost or other organic matter to boost nutrient levels and improve drainage. Consider adding companion plants like marigolds to deter pests naturally.
Don’t be afraid to get creative with your bucket setup. Decorate your bucket to add a personal touch, or even create a multi-tiered system to maximize your peanut yield. The possibilities are endless!
Ready to embark on your peanut-growing adventure? We wholeheartedly encourage you to give this DIY trick a try. It’s a simple, affordable, and incredibly satisfying way to enjoy fresh, homegrown peanuts. And most importantly, don’t forget to share your experience with us! We’d love to hear about your successes, your challenges, and any variations you’ve tried. Post photos of your peanut plants, share your harvesting tips, and let’s build a community of bucket gardening peanut enthusiasts! Your insights could inspire others to take the plunge and discover the joy of growing their own peanuts. Let’s get growing!
Frequently Asked Questions (FAQ)
What kind of bucket should I use?
The ideal bucket size is around 5 gallons. This provides enough space for the peanut plants to develop a healthy root system and produce a decent yield. Make sure the bucket is made of food-grade plastic to avoid any harmful chemicals leaching into the soil. It’s also crucial that the bucket has drainage holes at the bottom to prevent waterlogging, which can lead to root rot. If your bucket doesn’t have drainage holes, you can easily drill a few yourself.
What type of soil is best for growing peanuts in a bucket?
Peanuts thrive in well-draining, sandy loam soil. This type of soil allows for good aeration and prevents the peanuts from becoming waterlogged. You can purchase a pre-mixed potting mix specifically designed for vegetables, or you can create your own mix by combining equal parts of garden soil, sand, and compost. Avoid using heavy clay soil, as it can compact and restrict root growth. Adding perlite or vermiculite to your soil mix can also improve drainage and aeration.
How often should I water my peanut plants?
Peanut plants need consistent moisture, especially during flowering and pod development. Water deeply whenever the top inch of soil feels dry to the touch. Avoid overwatering, as this can lead to root rot. The frequency of watering will depend on the weather conditions and the type of soil you’re using. In hot, dry weather, you may need to water daily, while in cooler, wetter weather, you may only need to water every few days. Check the soil moisture regularly to ensure your plants are getting the right amount of water.
How much sunlight do peanut plants need?
Peanut plants need at least 6-8 hours of direct sunlight per day to thrive. Choose a location for your bucket that receives plenty of sunlight throughout the day. If you’re growing your peanuts indoors, you may need to supplement with artificial lighting, such as grow lights. Insufficient sunlight can lead to stunted growth and reduced peanut production.
When is the best time to plant peanuts?
The best time to plant peanuts is after the last frost, when the soil has warmed up to at least 65 degrees Fahrenheit. Peanuts are warm-season crops and will not germinate in cold soil. In most regions, this is typically in late spring or early summer. You can start your peanut seeds indoors a few weeks before the last frost to get a head start on the growing season.
How long does it take for peanuts to mature?
Peanuts typically take 120-150 days to mature, depending on the variety and growing conditions. You’ll know your peanuts are ready to harvest when the leaves start to turn yellow and the pods feel plump and full. You can also dig up a few plants to check the maturity of the peanuts. The inside of the peanut shells should be dark and the kernels should be fully developed.
How do I harvest peanuts from a bucket?
Harvesting peanuts from a bucket is relatively easy. Simply tip the bucket over and gently remove the plants from the soil. Shake off any excess soil and then hang the plants upside down in a warm, dry place for a few weeks to cure. Curing allows the peanuts to dry out and develop their characteristic flavor. Once the peanuts are cured, you can remove them from the plants and store them in an airtight container.
Are there any common pests or diseases that affect peanut plants?
Peanut plants can be susceptible to various pests and diseases, including aphids, spider mites, leaf spot, and root rot. Regularly inspect your plants for any signs of infestation or disease. You can control aphids and spider mites with insecticidal soap or neem oil. Prevent leaf spot by ensuring good air circulation and avoiding overhead watering. Prevent root rot by using well-draining soil and avoiding overwatering.
Can I grow different varieties of peanuts in the same bucket?
While it’s technically possible to grow different varieties of peanuts in the same bucket, it’s generally not recommended. Different varieties may have different growth habits and maturity times, which can make it difficult to manage the plants effectively. It’s best to stick to one variety per bucket to ensure optimal growth and peanut production.
What can I do with my homegrown peanuts?
The possibilities are endless! You can roast them, boil them, make peanut butter, add them to salads, or simply enjoy them as a snack. Homegrown peanuts have a unique flavor that you won’t find in store-bought peanuts. Plus, you’ll have the satisfaction of knowing that you grew them yourself!
Leave a Comment