

Kitchen Rosemary Growing: A fragrant journey from seed to supper
Kitchen Rosemary Growing has always fascinated me. There’s something incredibly rewarding about nurturing a tiny sprig into a flourishing herb plant, especially one as versatile and flavorful as rosemary. I remember my grandmother’s kitchen, always fragrant with the scent of rosemary – a comforting aroma that instantly evoked memories of family gatherings and delicious home-cooked meals. That’s the magic of homegrown herbs; they connect us to our culinary heritage and add a personal touch to our cooking.
This article is your guide to unlocking that same magic. We’ll explore simple, effective Kitchen Rosemary Growing techniques, perfect for even the most novice gardener. Forget expensive grocery store herbs – learn how to cultivate your own vibrant rosemary right in your kitchen, ensuring a constant supply of fresh, flavorful leaves for your culinary creations.
Why Grow Your Own Rosemary?
Beyond the delightful aroma, growing your own rosemary offers several key advantages. Firstly, you’ll have access to incredibly fresh, flavorful herbs whenever you need them. Imagine snipping a sprig directly from your plant to garnish your roasted chicken or add to your homemade bread – the difference in taste is remarkable! Secondly, homegrown rosemary is often more sustainable and environmentally friendly than store-bought options, reducing your carbon footprint. And finally, there’s the sheer satisfaction of nurturing a plant from seed to harvest – a truly rewarding experience.
So, let’s embark on this fragrant adventure together and discover the secrets to successful Kitchen Rosemary Growing. Get ready to transform your kitchen into a thriving herb garden!
Planting Bok Choy: A Step-by-Step Guide
Bok choy is a delicious and relatively easy-to-grow vegetable, perfect for beginner gardeners. This guide will walk you through the entire process, from seed to harvest. Let’s get growing!
Choosing Your Bok Choy and Planning Your Garden
- Select your variety: There are many types of bok choy, including baby bok choy (fast-growing and smaller), sum choy (a type of Chinese cabbage), and Joi Choi (with long, slender leaves). Consider your space and preferred taste when choosing.
- Assess your growing conditions: Bok choy thrives in cool weather. Ideal temperatures are between 60-75°F (15-24°C). It needs at least six hours of sunlight per day, but afternoon shade in hot climates is beneficial. Well-drained soil is crucial; soggy soil leads to root rot.
- Prepare your garden bed: Choose a location that receives adequate sunlight. Till the soil to a depth of about 12 inches, removing any rocks or debris. Amend the soil with compost or other organic matter to improve drainage and fertility. A soil test can help determine if you need to add any specific nutrients.
- Decide on your planting method: You can start bok choy from seeds directly in the garden or start seedlings indoors about 4-6 weeks before the last expected frost. Starting indoors gives you a head start, especially in cooler climates.
Starting Bok Choy Seeds Indoors (Optional)
- Fill seed trays: Use seed starting mix, not garden soil, as it’s lighter and drains better, preventing damping-off (a fungal disease). Fill the trays almost to the top, leaving a little space.
- Sow the seeds: Sow seeds about ¼ inch deep and 1 inch apart. Gently press the seeds into the soil and cover them lightly. Don’t bury them too deep.
- Water gently: Use a watering can with a fine rose to avoid washing away the seeds. Keep the soil consistently moist but not soggy.
- Provide light: Place the trays in a sunny location, or under grow lights for 12-16 hours a day. Seedlings need plenty of light to grow strong.
- Thin seedlings: Once the seedlings have developed their first two true leaves (the leaves after the cotyledons), thin them out to about 2 inches apart. This gives each plant enough space to grow.
- Harden off seedlings: Before transplanting outdoors, gradually acclimate the seedlings to outdoor conditions over a week. Start by placing them outside for a few hours each day, gradually increasing the time until they can tolerate full sun and temperature fluctuations.
Planting Bok Choy Directly in the Garden
- Prepare the soil: As mentioned earlier, ensure your soil is well-drained and amended with compost. Loosen the soil with a garden fork or cultivator.
- Sow the seeds: Sow seeds about ¼ inch deep and 1 inch apart in rows 12-18 inches apart. Again, don’t bury them too deep.
- Water thoroughly: Water gently after sowing to settle the soil around the seeds. Keep the soil consistently moist until germination.
- Thin seedlings: Once the seedlings have their first two true leaves, thin them to 6-8 inches apart for larger varieties and 4-6 inches apart for smaller varieties. This spacing allows for optimal growth.
Caring for Your Bok Choy
- Watering: Water regularly, especially during dry periods. Aim for consistent moisture but avoid overwatering, which can lead to root rot. Water deeply and less frequently rather than shallowly and often.
- Weeding: Keep the area around your bok choy plants free of weeds, which compete for water and nutrients. Regular weeding is essential for healthy growth.
- Fertilizing: Bok choy is a relatively light feeder. A balanced fertilizer applied at planting time is usually sufficient. Avoid over-fertilizing, which can lead to bitter-tasting leaves.
- Pest and disease control: Monitor your plants for pests like aphids, slugs, and snails. Use organic pest control methods if necessary, such as handpicking pests or using insecticidal soap. Good air circulation helps prevent fungal diseases.
- Mulching: Applying a layer of mulch around your plants helps retain moisture, suppress weeds, and regulate soil temperature.
Harvesting Your Bok Choy
- Select your variety: There are many types of bok choy, including baby bok choy (fast-growing and smaller), sum choy (a type of Chinese cabbage), and Joi Choi (with long, slender leaves). Consider your space and preferred taste when choosing.
- Assess your growing conditions: Bok choy thrives in cool weather. Ideal temperatures are between 60-75°F (15-24°C). It needs at least six hours of sunlight per day, but afternoon shade in hot climates is beneficial. Well-drained soil is crucial; soggy soil leads to root rot.
- Prepare your garden bed: Choose a location that receives adequate sunlight. Till the soil to a depth of about 12 inches, removing any rocks or debris. Amend the soil with compost or other organic matter to improve drainage and fertility. A soil test can help determine if you need to add any specific nutrients.
- Decide on your planting method: You can start bok choy from seeds directly in the garden or start seedlings indoors about 4-6 weeks before the last expected frost. Starting indoors gives you a head start, especially in cooler climates.
- Fill seed trays: Use seed starting mix, not garden soil, as it’s lighter and drains better, preventing damping-off (a fungal disease). Fill the trays almost to the top, leaving a little space.
- Sow the seeds: Sow seeds about ¼ inch deep and 1 inch apart. Gently press the seeds into the soil and cover them lightly. Don’t bury them too deep.
- Water gently: Use a watering can with a fine rose to avoid washing away the seeds. Keep the soil consistently moist but not soggy.
- Provide light: Place the trays in a sunny location, or under grow lights for 12-16 hours a day. Seedlings need plenty of light to grow strong.
- Thin seedlings: Once the seedlings have developed their first two true leaves (the leaves after the cotyledons), thin them out to about 2 inches apart. This gives each plant enough space to grow.
- Harden off seedlings: Before transplanting outdoors, gradually acclimate the seedlings to outdoor conditions over a week. Start by placing them outside for a few hours each day, gradually increasing the time until they can tolerate full sun and temperature fluctuations.
- Prepare the soil: As mentioned earlier, ensure your soil is well-drained and amended with compost. Loosen the soil with a garden fork or cultivator.
- Sow the seeds: Sow seeds about ¼ inch deep and 1 inch apart in rows 12-18 inches apart. Again, don’t bury them too deep.
- Water thoroughly: Water gently after sowing to settle the soil around the seeds. Keep the soil consistently moist until germination.
- Thin seedlings: Once the seedlings have their first two true leaves, thin them to 6-8 inches apart for larger varieties and 4-6 inches apart for smaller varieties. This spacing allows for optimal growth.
- Watering: Water regularly, especially during dry periods. Aim for consistent moisture but avoid overwatering, which can lead to root rot. Water deeply and less frequently rather than shallowly and often.
- Weeding: Keep the area around your bok choy plants free of weeds, which compete for water and nutrients. Regular weeding is essential for healthy growth.
- Fertilizing: Bok choy is a relatively light feeder. A balanced fertilizer applied at planting time is usually sufficient. Avoid over-fertilizing, which can lead to bitter-tasting leaves.
- Pest and disease control: Monitor your plants for pests like aphids, slugs, and snails. Use organic pest control methods if necessary, such as handpicking pests or using insecticidal soap. Good air circulation helps prevent fungal diseases.
- Mulching: Applying a layer of mulch around your plants helps retain moisture, suppress weeds, and regulate soil temperature.
- Harvesting time: Bok choy is ready for harvest when the leaves are fully developed and firm. This usually takes about 4-6 weeks from planting, depending on the variety and growing conditions. Baby bok choy can be harvested earlier.
- Harvesting method: Cut the entire plant at the base using a sharp knife or scissors. Alternatively, you can harvest individual leaves from the outer part of the plant, leaving the inner leaves to continue growing. This method allows for a longer harvest period.
- Storage: Store harvested bok choy in the refrigerator in a plastic bag for up to a week. For longer storage, consider blanching and freezing.
Bok choy is a delicious and relatively easy-to-grow vegetable, perfect for beginner gardeners. This guide will walk you through the entire process, from seed to harvest. Let’s get growing!
Choosing Your Bok Choy and Planning Your Garden
Starting Bok Choy Seeds Indoors (Optional)
Planting Bok Choy Directly in the Garden
Caring for Your Bok Choy
Harvesting Your Bok Choy
Troubleshooting Common Bok Choy Problems
Bolting:
Bolting (going to seed) occurs when bok choy is exposed to hot temperatures. Choose a cool-season variety and provide afternoon shade in hot climates to prevent this.
Pests:
Aphids, slugs, and snails can damage bok choy. Use organic pest control methods to manage these pests.
Diseases:
Root rot is a common problem caused by overwatering. Ensure good drainage and avoid overwatering.
Remember to enjoy the fruits (or rather, vegetables!) of your labor! Happy gardening!
Conclusion
So there you have it – a simple, yet incredibly rewarding journey into the world of culinary herbs with our guide to Kitchen Rosemary Growing. This DIY method isn’t just about saving money on grocery bills; it’s about connecting with nature, experiencing the satisfaction of nurturing life, and elevating your cooking to a whole new level. The fresh, vibrant aroma of homegrown rosemary will transform your dishes, adding a depth of flavor that no store-bought herb can match. The ease of propagation, coupled with the minimal space required, makes this a truly accessible project for everyone, regardless of your gardening experience. Imagine snipping a sprig of fragrant rosemary from your own kitchen windowsill, ready to be incorporated into your next roast chicken or hearty stew – that’s the magic of this DIY trick.
Beyond the basic method outlined, the possibilities for experimentation are endless. Consider trying different types of rosemary, such as the prostrate rosemary for a ground cover effect, or the Arp rosemary for its particularly strong flavor. You can also experiment with different growing mediums, such as coco coir or a well-draining potting mix enriched with compost. For those with limited sunlight, consider investing in a grow light to supplement natural light, ensuring healthy growth throughout the year. Don’t be afraid to get creative! Try different sized containers, from small pots to larger planters, to suit your space and aesthetic preferences. Perhaps even incorporate your rosemary plant into a larger herb garden, creating a fragrant and visually appealing focal point in your kitchen.
Ultimately, the success of your Kitchen Rosemary Growing endeavor hinges on consistent care and attention. Remember to monitor the soil moisture, ensuring it’s consistently moist but not waterlogged. Regular pruning will encourage bushier growth and prevent the plant from becoming leggy. And most importantly, enjoy the process! Watch your little rosemary plant thrive, and feel the immense satisfaction of harvesting your own fresh herbs. This isn’t just a recipe; it’s an experience, a connection to the natural world, and a delicious addition to your culinary repertoire.
We strongly encourage you to try this simple yet effective method of growing your own rosemary. Share your experiences, successes, and even your challenges with us! Post pictures of your thriving rosemary plants on social media using #KitchenRosemaryGrowing and tag us – we’d love to see your culinary creations enhanced by the fresh, fragrant herbs you’ve grown yourself. Let’s build a community of home gardeners, sharing tips, tricks, and the joy of harvesting homegrown goodness.
Frequently Asked Questions
What type of rosemary is best for indoor growing?
Many rosemary varieties thrive indoors. However, those with a more compact growth habit are generally preferred for container gardening. Look for varieties described as “prostrate” or “upright compact” when selecting your rosemary plant or cuttings. These tend to stay smaller and bushier, making them ideal for kitchen windowsills.
How much sunlight does rosemary need indoors?
Rosemary needs at least 6 hours of sunlight per day to flourish. A south-facing window is ideal. If you don’t have sufficient sunlight, consider supplementing with a grow light to ensure your plant receives the necessary light for healthy growth and abundant herb production. Without enough light, your rosemary may become leggy and produce fewer leaves.
How often should I water my indoor rosemary?
Water your rosemary when the top inch of soil feels dry to the touch. Avoid overwatering, as this can lead to root rot. Check the soil moisture regularly, especially during warmer months when the plant may dry out faster. Always ensure that the pot has adequate drainage to prevent water from accumulating at the base.
What kind of soil is best for growing rosemary indoors?
Rosemary prefers well-draining soil that is slightly alkaline. A good quality potting mix is a suitable choice. You can also amend your potting mix with perlite or vermiculite to improve drainage and aeration. Avoid using heavy clay soils, as these can retain too much moisture and lead to root problems.
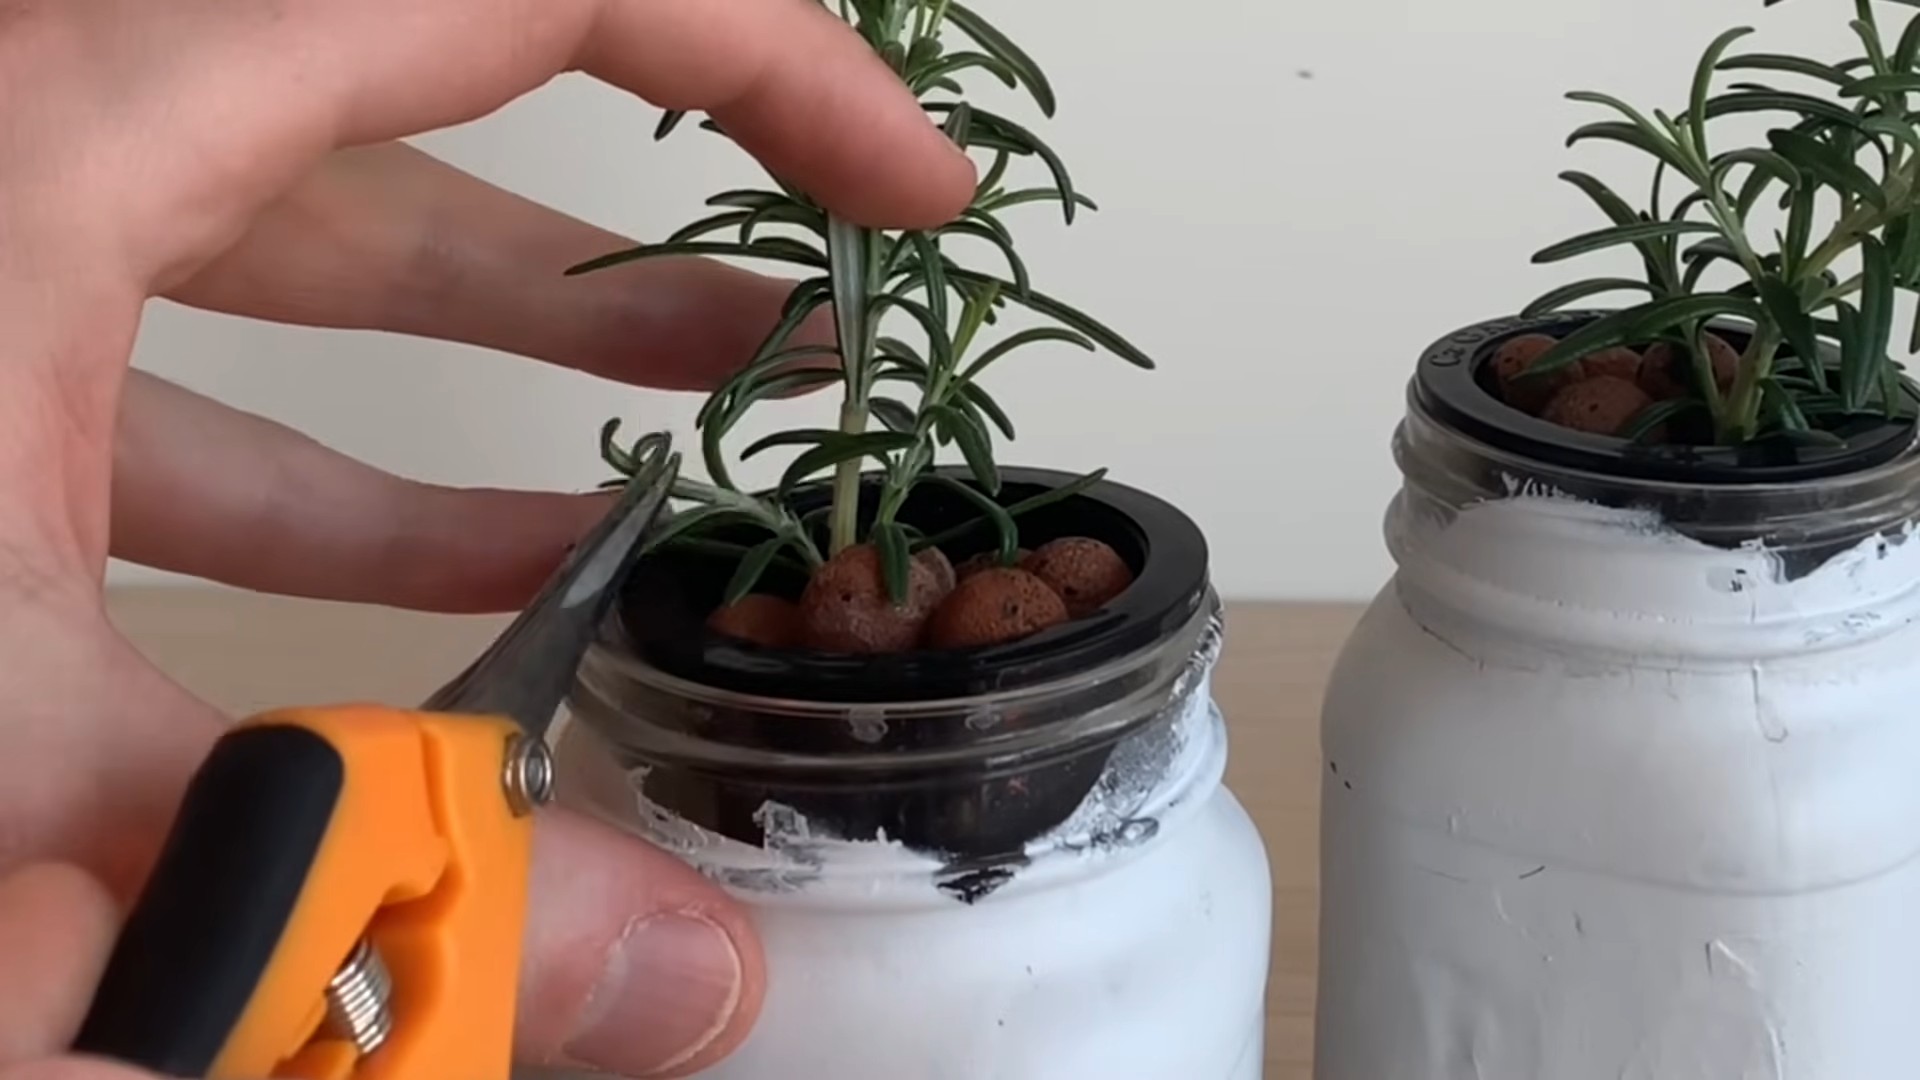
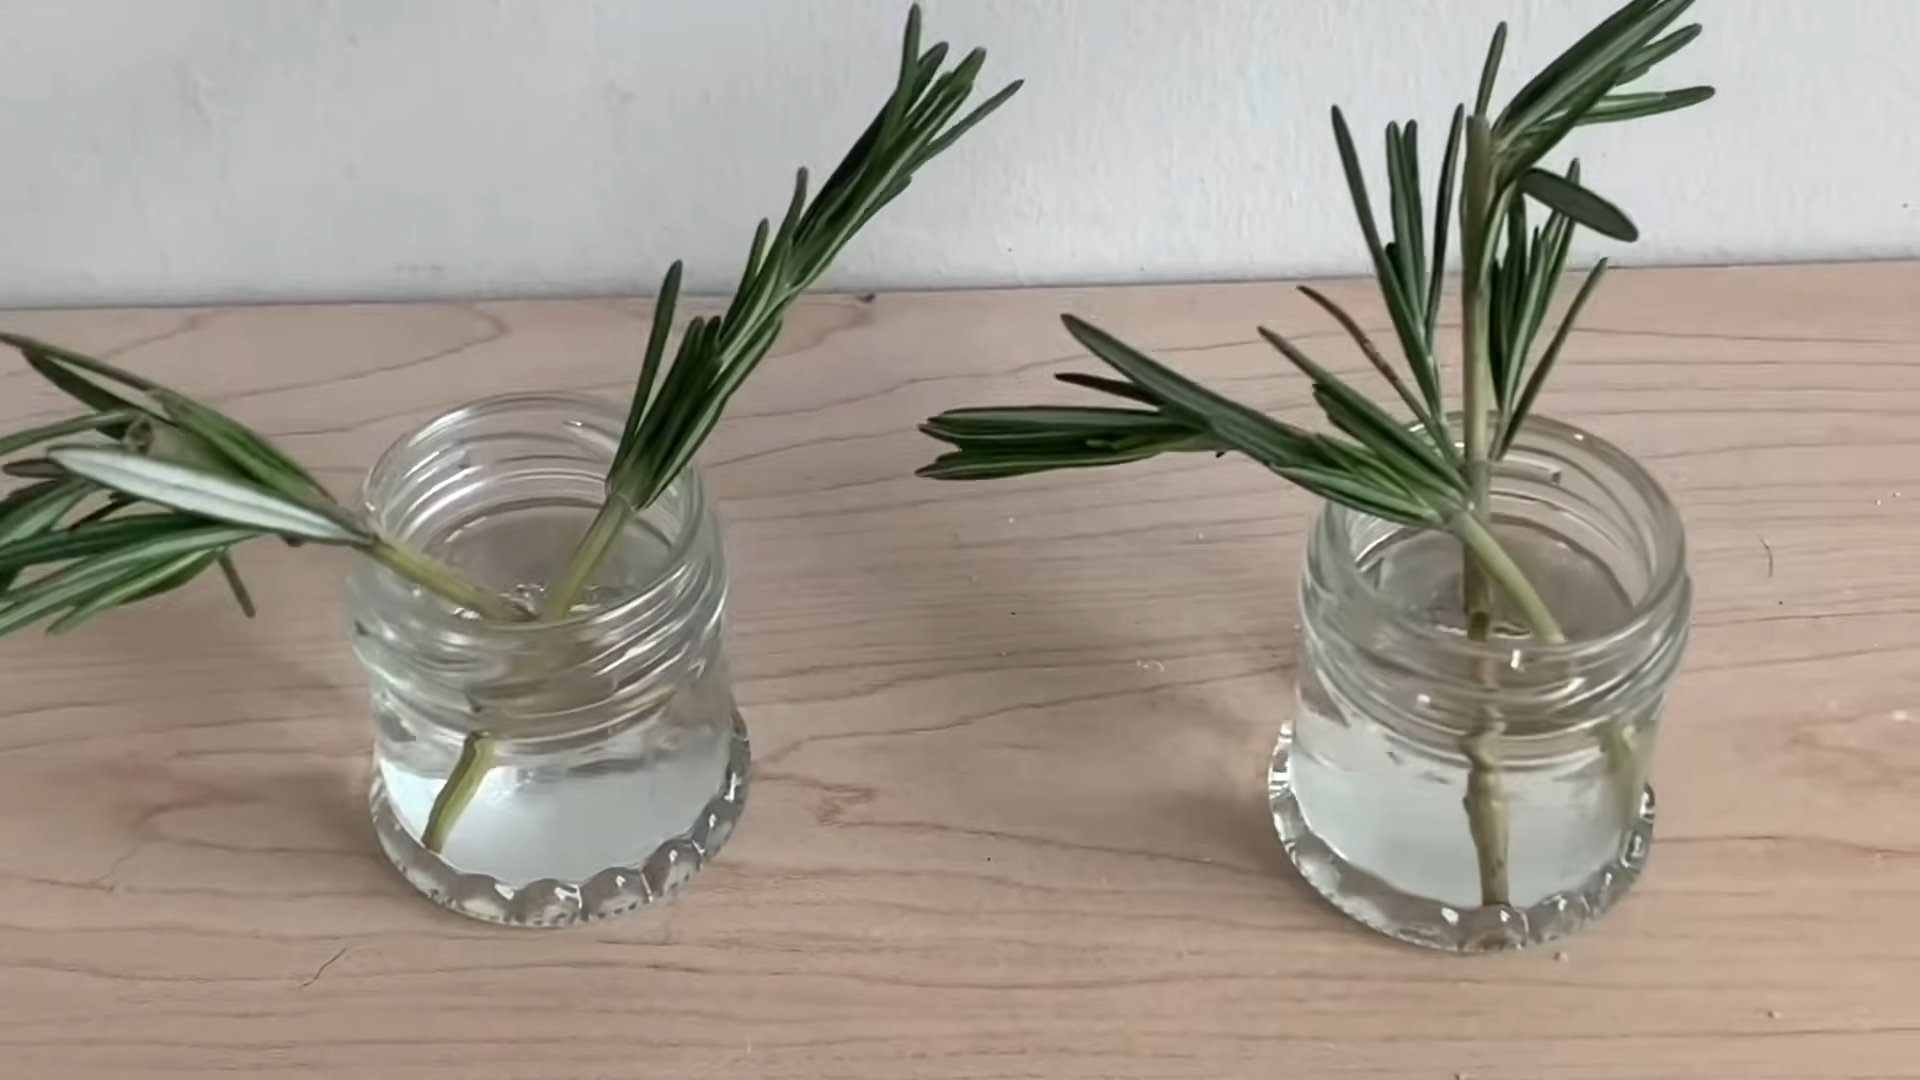
Can I propagate rosemary from cuttings?
Yes! Propagating rosemary from cuttings is a simple and effective method. Take 4-6 inch cuttings from healthy stems, remove the lower leaves, and dip the cut ends in rooting hormone before planting them in a well-draining potting mix. Keep the soil consistently moist and provide bright, indirect light until roots develop. This usually takes several weeks.
What are the common problems encountered when growing rosemary indoors?
Common problems include overwatering (leading to root rot), insufficient sunlight (resulting in leggy growth), and pest infestations (such as spider mites). Regularly inspect your plant for signs of pests or diseases and address any issues promptly. Proper watering and adequate sunlight are key to preventing most problems.
When can I start harvesting rosemary?
You can begin harvesting rosemary once the plant has established itself and has several healthy stems. Harvest by snipping off stems just above a leaf node. This encourages bushier growth and prevents the plant from becoming leggy. Harvesting regularly will also promote new growth and a continuous supply of fresh rosemary.
Can I grow rosemary in a hydroponic system?
Yes, rosemary can be successfully grown in a hydroponic system. Hydroponics provides excellent control over nutrient delivery and water levels, which can lead to vigorous growth. However, it requires a bit more technical knowledge and setup compared to traditional soil-based methods.
Leave a Comment