

Grout cleaning can feel like an endless battle, right? I know I’ve been there, scrubbing away with minimal results, wondering if my grout would ever see its original color again. We’ve all seen those before-and-after photos online and secretly wished we could achieve the same sparkling clean in our own homes. But what if I told you the secret to banishing that stubborn grime might be lurking in your cleaning cabinet right now?
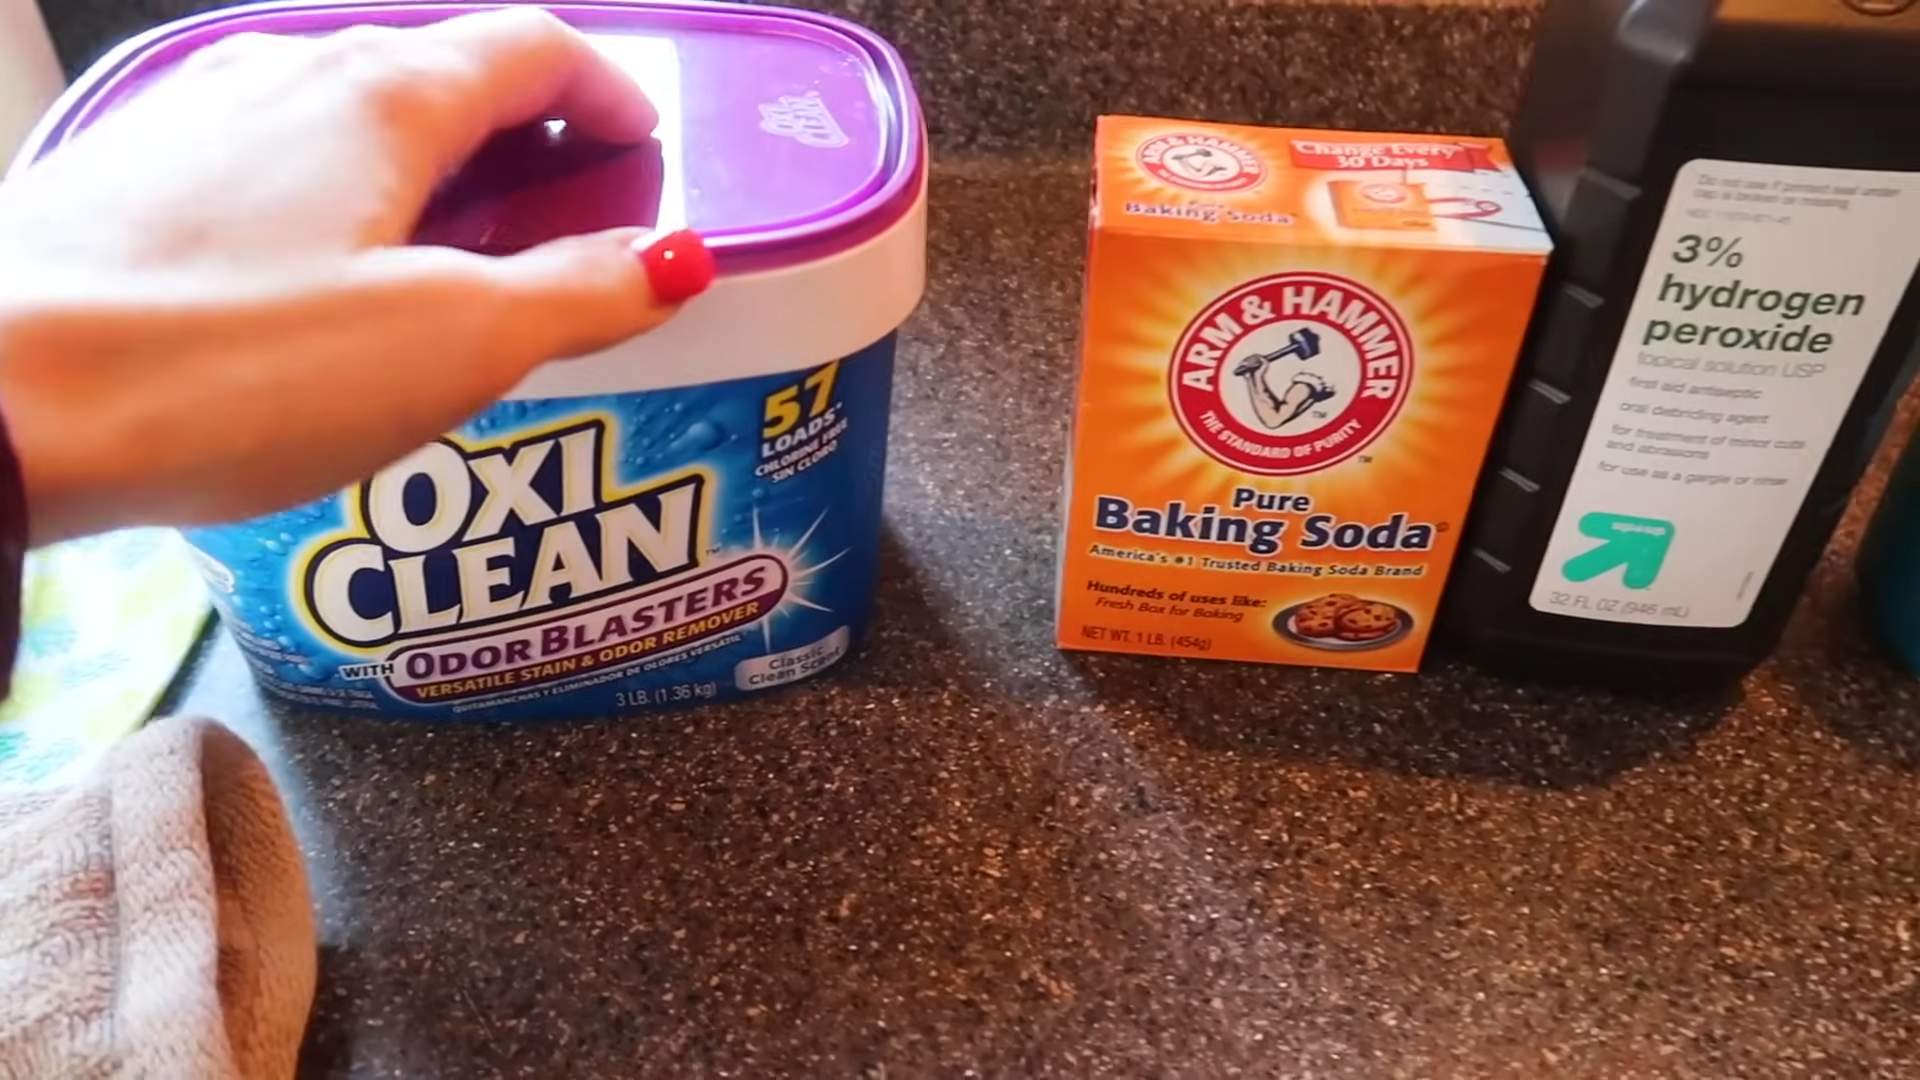
For generations, homeowners have experimented with various concoctions to tackle the challenge of dirty grout. From traditional vinegar and baking soda mixtures to powerful commercial cleaners, the quest for the perfect grout cleaning solution is a tale as old as tiled surfaces themselves. But in recent years, a new debate has emerged: Grout cleaning using Oxiclean versus toilet bowl cleaner.
Why is this DIY trick so important? Because nobody wants to spend hours on their hands and knees scrubbing grout! Plus, harsh chemicals can be damaging to your health and the environment. This article will explore the pros and cons of using Oxiclean and toilet bowl cleaner for grout cleaning, helping you decide which method is best for your needs and ensuring you achieve a sparkling clean without breaking the bank or harming your home.
Growing Corn in Bags: A DIY Guide to a Bountiful Harvest
Hey there, fellow gardening enthusiasts! Ever thought about growing corn, but felt limited by space? Well, I’m here to tell you that you absolutely can grow corn, even if you only have a balcony, patio, or small yard! The secret? Growing corn in bags! It’s a fun, surprisingly effective, and space-saving way to enjoy fresh, homegrown corn. Let’s dive into how you can make this happen.
Choosing the Right Corn Variety
Before we get our hands dirty, let’s talk corn. Not all corn varieties are created equal, especially when it comes to container gardening. You’ll want to choose a variety that’s relatively compact and early-maturing.
* Consider shorter varieties: Look for varieties labeled as “dwarf,” “short-stalk,” or “early maturing.” These tend to be better suited for container growing.
* Sweet corn is a great choice: Sweet corn is a popular option, and there are several compact varieties available.
* Avoid field corn: Field corn, typically used for animal feed or cornmeal, grows much taller and requires more space.
Some specific varieties I’ve had success with include:
* ‘On Deck’: A super sweet variety that matures quickly.
* ‘Golden Bantam’: A classic sweet corn that’s relatively compact.
* ‘Trinity’: An early maturing variety with good flavor.
Gathering Your Supplies
Okay, now for the fun part – gathering our supplies! Here’s what you’ll need to get started:
* Large Bags: You’ll need sturdy bags that can hold a good amount of soil. I recommend using heavy-duty polypropylene grow bags (at least 15-20 gallons in size). These are durable, have good drainage, and are easy to move around. You can also use large plastic containers, but make sure they have drainage holes.
* Potting Mix: Don’t skimp on the soil! Use a high-quality potting mix that’s well-draining and rich in organic matter. Avoid using garden soil, as it can become compacted in containers. I like to mix in some compost for extra nutrients.
* Corn Seeds: Choose your desired corn variety (as discussed above).
* Fertilizer: Corn is a heavy feeder, so you’ll need a fertilizer to provide essential nutrients. I recommend using a slow-release fertilizer at planting time and supplementing with a liquid fertilizer throughout the growing season. Look for a fertilizer with a balanced NPK ratio (nitrogen, phosphorus, potassium).
* Watering Can or Hose: Essential for keeping your corn plants hydrated.
* Optional: Stakes or Tomato Cages: Depending on the variety you choose, you may need to provide support for your corn stalks, especially in windy areas.
* Optional: Mulch: Mulch helps retain moisture, suppress weeds, and regulate soil temperature.
Planting Your Corn
Now, let’s get those seeds in the ground (or, in this case, in the bag!).
1. Prepare the Bags: Fill your grow bags with the potting mix, leaving a few inches of space at the top. Mix in a slow-release fertilizer according to the package directions.
2. Plant the Seeds: Corn is wind-pollinated, so you need to plant multiple plants close together to ensure good pollination. Plant 4-6 seeds per bag, spacing them evenly. Plant the seeds about 1-2 inches deep.
3. Water Thoroughly: After planting, water the bags thoroughly until the soil is evenly moist.
4. Choose a Sunny Location: Corn needs at least 6-8 hours of direct sunlight per day. Place your bags in a sunny spot where they’ll receive plenty of light.
5. Thin Seedlings (If Necessary): Once the seedlings emerge, thin them to the strongest 3-4 plants per bag. This will give them enough space to grow and thrive.
Caring for Your Corn Plants
Once your corn plants are established, it’s important to provide them with proper care to ensure a healthy and productive harvest.
1. Watering: Corn needs consistent moisture, especially during hot weather. Water deeply whenever the top inch of soil feels dry to the touch. Avoid overwatering, as this can lead to root rot.
2. Fertilizing: As I mentioned earlier, corn is a heavy feeder. Supplement with a liquid fertilizer every 2-3 weeks throughout the growing season. Follow the package directions for application rates.
3. Pollination Assistance (If Needed): If you notice that your corn plants aren’t pollinating well (e.g., the silks are turning brown before the kernels fill out), you can assist with pollination. Gently shake the tassels (the male flowers at the top of the plant) to release pollen. You can also collect pollen from the tassels and dust it onto the silks (the female flowers that emerge from the developing ears).
4. Pest and Disease Control: Keep an eye out for common corn pests, such as corn earworms and aphids. You can control these pests with organic insecticides or by handpicking them off the plants. Also, watch out for fungal diseases, such as corn smut. If you notice any signs of disease, remove the affected leaves or plants.
5. Support (If Needed): If your corn stalks start to lean or fall over, provide them with support using stakes or tomato cages. This will help prevent them from breaking in windy conditions.
Harvesting Your Corn
The moment we’ve all been waiting for – harvesting our homegrown corn!
1. Check for Ripeness: Corn is typically ready to harvest about 20-25 days after the silks emerge. To check for ripeness, peel back a portion of the husk and puncture a kernel with your fingernail. If the liquid that comes out is milky, the corn is ready to harvest. If the liquid is clear, it’s not quite ready. If the liquid is doughy, it’s overripe.
2. Harvesting: To harvest the corn, grasp the ear firmly and twist it downward. The ear should snap off easily from the stalk.
3. Enjoy Your Harvest: Freshly harvested corn is incredibly delicious! You can grill it, boil it, roast it, or use it in your favorite recipes.
Troubleshooting Common Problems
Even with the best care, you might encounter some challenges when growing corn in bags. Here are some common problems and how to address them:
* Poor Pollination: As mentioned earlier, corn relies on wind pollination. If you’re growing corn in a sheltered location or if the weather is calm, you may need to assist with pollination.
* Stunted Growth: Stunted growth can be caused by a variety of factors, including nutrient deficiencies, lack of sunlight, or pest infestations. Make sure your corn plants are getting enough sunlight, water, and fertilizer. Check for pests and diseases and take appropriate action.
* Yellowing Leaves: Yellowing leaves can be a sign of nutrient deficiencies, especially nitrogen deficiency. Fertilize your corn plants with a nitrogen-rich fertilizer.
* Ears Not Filling Out: If the ears of corn aren’t filling out properly, it could be due to poor pollination or nutrient deficiencies. Make sure you’re providing adequate pollination and fertilizing your plants regularly.
Tips for Success
Here are a few extra tips to help you succeed with growing corn in bags:
* Start with Quality Seeds: Use fresh, high-quality seeds from a reputable source.
* Provide Adequate Drainage: Make sure your bags have good drainage to prevent root rot.
* Protect from Strong Winds: If you live in a windy area, protect your corn plants from strong winds by placing them in a sheltered location or providing them with support.
* Succession Planting: To extend your harvest, plant corn seeds in succession every 2-3 weeks.
* Experiment with Different Varieties: Try growing different corn varieties to see which ones perform best in your area and growing conditions.
Why Bag Grown Corn is Awesome
Growing corn in bags is a rewarding experience that allows you to enjoy fresh, homegrown corn even if you have limited space. It’s also a great way to get kids involved in gardening and teach them about where their food comes from. Plus, it’s just plain fun! So, give it a try and see for yourself how easy and rewarding it can be to grow corn in bags. Happy gardening!
Conclusion
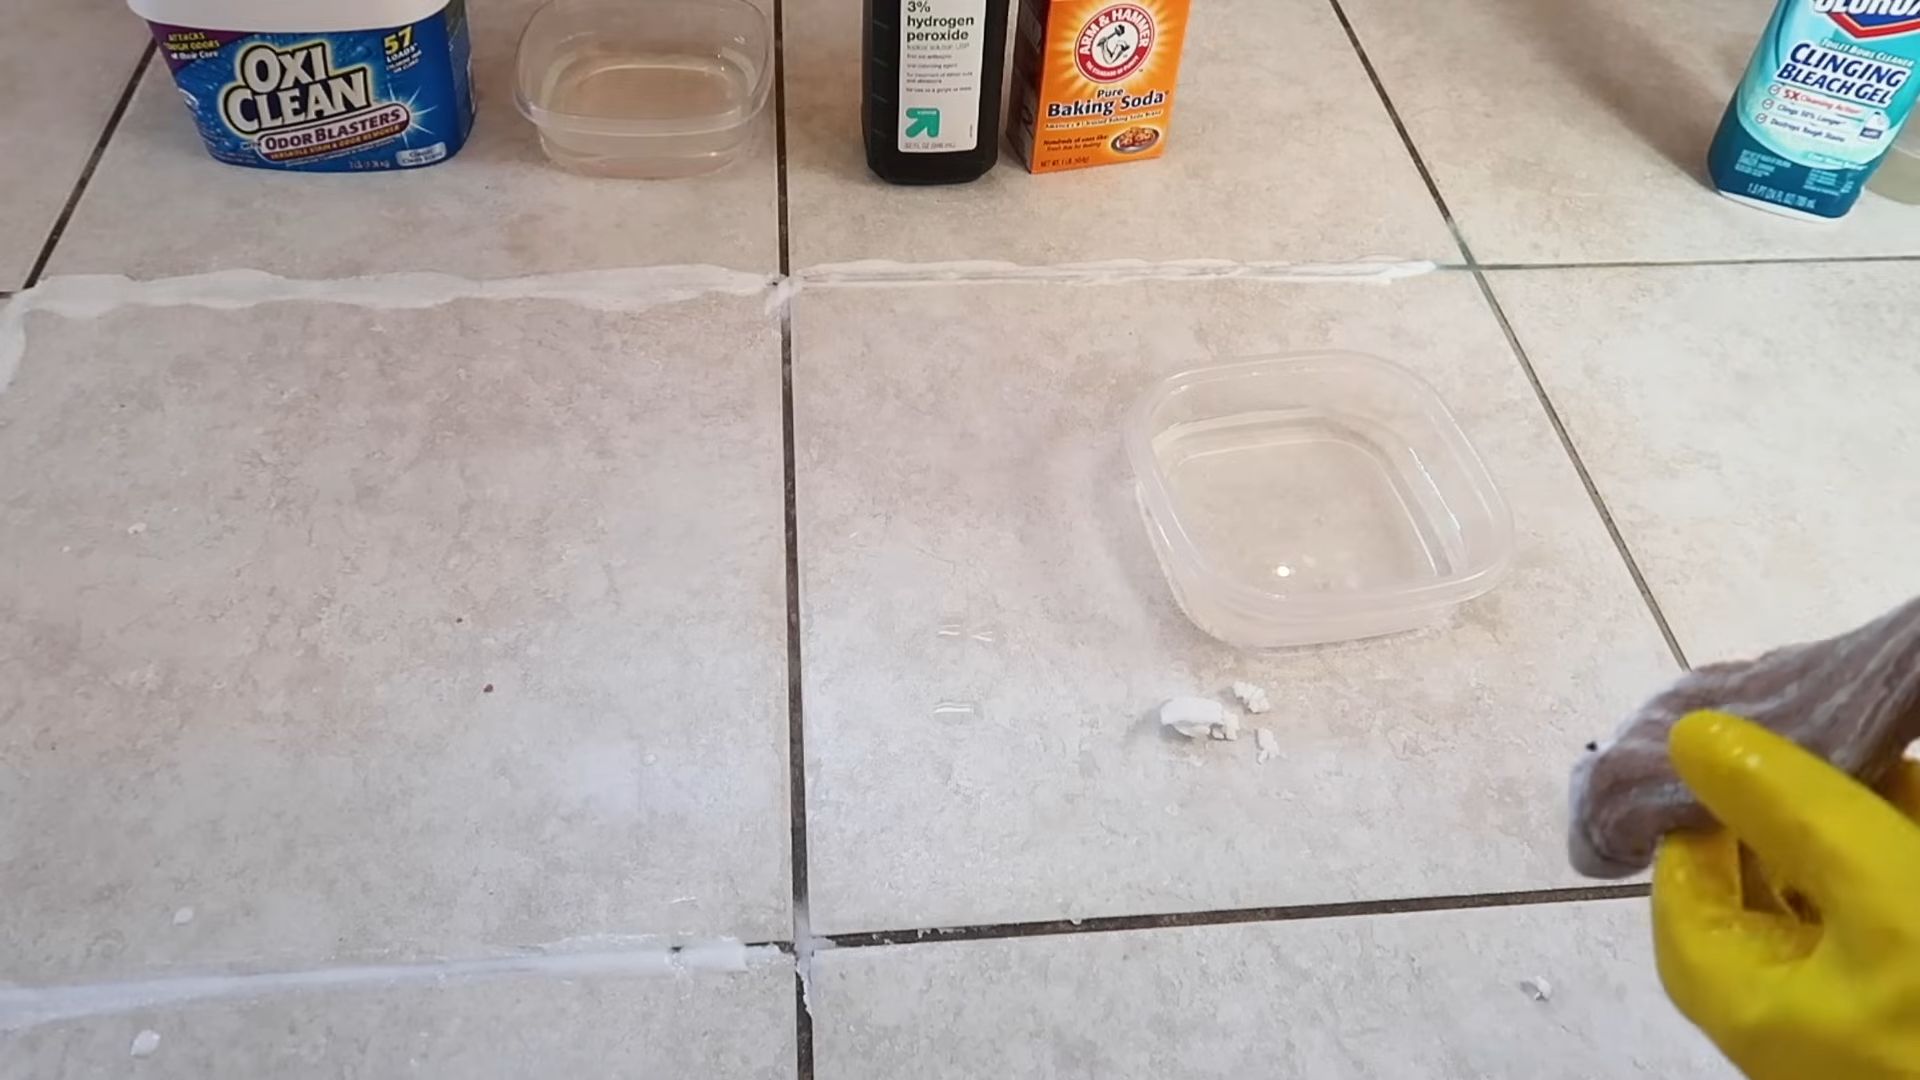
So, there you have it! Ditching the harsh chemicals and embracing this simple DIY grout cleaning solution using Oxiclean offers a powerful, effective, and surprisingly gentle way to restore your tile surfaces. We’ve explored why this method is a must-try: it’s cost-effective, readily accessible (you likely already have Oxiclean in your laundry room!), and significantly less abrasive than many commercial grout cleaners, minimizing the risk of damage to your tiles. Plus, you’re reducing your exposure to potentially harmful fumes and contributing to a healthier home environment.
But the beauty of this DIY approach lies in its adaptability. Feel free to experiment with the consistency of your Oxiclean paste. For heavily soiled grout, a thicker paste that clings to the surface longer might be more effective. Alternatively, for lighter cleaning or maintenance, a slightly thinner solution might suffice. Consider adding a few drops of your favorite essential oil (tea tree, lemon, or eucalyptus are excellent choices for their antimicrobial properties and fresh scents) to the paste for an extra boost of cleaning power and a pleasant aroma.
Another variation to consider is the type of brush you use. While a stiff-bristled brush is generally recommended, you might find that an old toothbrush works wonders for reaching tight corners and intricate tile patterns. For larger areas, a grout brush with a longer handle will save your back and knees. Remember to always test your chosen brush on an inconspicuous area first to ensure it doesn’t scratch your tiles.
This Oxiclean grout cleaning method is truly a game-changer. It’s a simple, effective, and eco-friendlier alternative to harsh chemical cleaners. We’re confident that you’ll be amazed by the results.
Now, it’s your turn! We wholeheartedly encourage you to give this DIY grout cleaning trick a try. We’re eager to hear about your experiences. Did you find it as effective as we did? Did you experiment with any variations? What were your biggest challenges and successes? Share your before-and-after photos and tips in the comments below. Let’s build a community of clean grout enthusiasts and help each other achieve sparkling tile surfaces using this fantastic Oxiclean solution! Your insights could be invaluable to others looking for a safe and effective way to tackle their grout cleaning woes. Don’t hesitate to share your unique experiences and contribute to the collective knowledge. Happy cleaning!
Frequently Asked Questions (FAQs)
What exactly is Oxiclean, and why is it effective for grout cleaning?
Oxiclean is a brand name for a powdered oxygen bleach, primarily composed of sodium percarbonate and sodium carbonate. Sodium percarbonate breaks down into hydrogen peroxide and sodium carbonate when mixed with water. The hydrogen peroxide acts as a powerful oxidizing agent, lifting stains and dirt from porous surfaces like grout. The sodium carbonate helps to soften the water and boost the cleaning power of the hydrogen peroxide. Unlike chlorine bleach, Oxiclean is color-safe and doesn’t produce harsh fumes, making it a safer and more environmentally friendly option for grout cleaning. Its effectiveness stems from its ability to penetrate the grout’s porous surface and break down the organic matter that causes discoloration and staining.
Is Oxiclean safe to use on all types of tile?
While Oxiclean is generally considered safe for most types of tile, including ceramic, porcelain, and glass, it’s always best to test it on an inconspicuous area first. Certain types of natural stone, such as marble or travertine, are more sensitive to acidic or alkaline cleaners. Oxiclean is slightly alkaline, so prolonged exposure could potentially etch or damage these surfaces. If you have natural stone tiles, consult the manufacturer’s recommendations or a professional tile cleaner before using Oxiclean. For all tile types, avoid using abrasive scrubbing pads, as these can scratch the surface.
How do I make the Oxiclean paste for grout cleaning?
Making the Oxiclean paste is simple. Start by mixing Oxiclean powder with warm water in a small container. The ideal ratio is typically 1 part Oxiclean to 2 parts water, but you can adjust this to achieve your desired consistency. For a thicker paste, use less water; for a thinner solution, use more. Stir the mixture thoroughly until the Oxiclean powder is completely dissolved and a smooth paste forms. The paste should be thick enough to cling to the grout lines without running.
How long should I leave the Oxiclean paste on the grout before scrubbing?
The dwell time for the Oxiclean paste depends on the severity of the staining. For lightly soiled grout, 10-15 minutes may be sufficient. For heavily stained grout, you can leave the paste on for up to 30 minutes. However, it’s crucial to monitor the area and prevent the paste from drying out completely. If the paste starts to dry, lightly mist it with water to keep it active. Avoid leaving the paste on for extended periods, as this could potentially damage the grout or tile.
What type of brush is best for scrubbing the grout after applying the Oxiclean paste?
A stiff-bristled brush is generally the best choice for scrubbing grout. A grout brush with a narrow head and angled bristles is ideal for reaching into the grout lines. An old toothbrush can also be effective for smaller areas or tight corners. Avoid using metal brushes or abrasive scrubbing pads, as these can scratch the tile surface. When scrubbing, use firm, even pressure and work in a back-and-forth motion along the grout lines.
How do I rinse the Oxiclean paste off the grout after scrubbing?
After scrubbing the grout, thoroughly rinse the area with clean water. You can use a sponge, a damp cloth, or a mop to remove the Oxiclean residue. Ensure that all traces of the paste are removed, as any remaining residue could attract dirt and grime. For larger areas, you can use a garden hose with a gentle spray nozzle to rinse the grout. After rinsing, dry the area with a clean towel or allow it to air dry completely.
Can I use Oxiclean on colored grout?
Yes, Oxiclean is generally safe to use on colored grout, as it’s color-safe. However, it’s always a good idea to test it on an inconspicuous area first to ensure that it doesn’t cause any discoloration. If you’re concerned about color fading, you can reduce the dwell time or dilute the Oxiclean paste with more water.
Is it safe to use Oxiclean grout cleaning solution if I have pets or children?
While Oxiclean is less toxic than many commercial grout cleaners, it’s still important to take precautions when using it around pets and children. Keep them away from the area while you’re cleaning and until the area is completely dry. Ensure that the area is well-ventilated to minimize exposure to any potential fumes. Store Oxiclean powder out of reach of children and pets. If ingested, contact a poison control center immediately.
How often should I clean my grout with Oxiclean?
The frequency of grout cleaning depends on the amount of traffic and exposure to dirt and grime. In high-traffic areas like bathrooms and kitchens, you may need to clean your grout every few weeks. In less frequently used areas, you can clean your grout every few months. Regular cleaning will help to prevent staining and keep your grout looking its best.
What are some alternative uses for Oxiclean besides grout cleaning?
Oxiclean is a versatile cleaning product with many other uses around the home. It can be used to remove stains from laundry, carpets, upholstery, and other surfaces. It can also be used to clean bathtubs, showers, toilets, and other bathroom fixtures. Oxiclean is a great all-purpose cleaner to have on hand for a variety of cleaning tasks.


Leave a Comment