

DIY kale bottle garden: Ever dreamed of fresh, homegrown kale gracing your salads and smoothies, even if you’re short on space or a seasoned gardener? Well, get ready to turn that dream into a reality with a fun, budget-friendly project that’s as good for the planet as it is for your taste buds!
For centuries, humans have cultivated gardens in all sorts of creative ways. From the hanging gardens of Babylon to the ingenious vertical farms popping up in modern cities, the desire to nurture plants and enjoy fresh produce is deeply ingrained in our history. But you don’t need ancient engineering or cutting-edge technology to get in on the action.
That’s where this DIY kale bottle garden comes in! In today’s busy world, finding time and space for a traditional garden can be a challenge. Plus, buying kale from the store can be expensive, and you’re never quite sure how it was grown. This simple hack lets you recycle plastic bottles, reduce waste, and grow your own delicious, organic kale right on your windowsill or balcony. It’s a win-win-win! I’m so excited to share this easy and rewarding project with you, so let’s get started and create your very own DIY kale bottle garden!
DIY Kale Bottle Garden: Grow Your Greens in Style!
Hey there, fellow gardening enthusiasts! I’m super excited to share this awesome DIY project with you: a kale bottle garden! It’s a fantastic way to grow your own fresh, nutritious kale, even if you don’t have a lot of space. Plus, it’s a great way to recycle those plastic bottles we all seem to accumulate. Let’s get started!
What You’ll Need
Before we dive in, let’s gather our supplies. This is what you’ll need to create your very own kale bottle garden:
* Plastic Bottles: The star of the show! You’ll need several plastic bottles, preferably 2-liter soda bottles or similar. The number depends on how big you want your garden to be. I usually aim for at least 3-4 bottles to start. Make sure they’re clean and dry.
* Kale Seeds or Seedlings: Of course, we need kale! You can start from seeds or buy small seedlings from your local garden center. Seedlings will give you a head start, but seeds are more economical.
* Potting Soil: Choose a good quality potting mix that drains well. Kale likes rich soil, so consider adding some compost.
* Scissors or Utility Knife: For cutting the plastic bottles. Be careful!
* Drill or Awl: To create drainage holes.
* String or Twine: For hanging the bottles. Jute twine looks really nice and is eco-friendly.
* Measuring Tape or Ruler: To ensure even spacing.
* Permanent Marker: For marking cutting lines.
* Watering Can or Spray Bottle: To keep your kale hydrated.
* Optional: Gravel or small stones for drainage.
Preparing the Bottles
This is where we transform those plastic bottles into mini-planters. Take your time and be careful with the cutting tools.
1. Clean and Dry the Bottles: Make sure your bottles are thoroughly cleaned and dried. Remove any labels and sticky residue. A little soap and water usually does the trick.
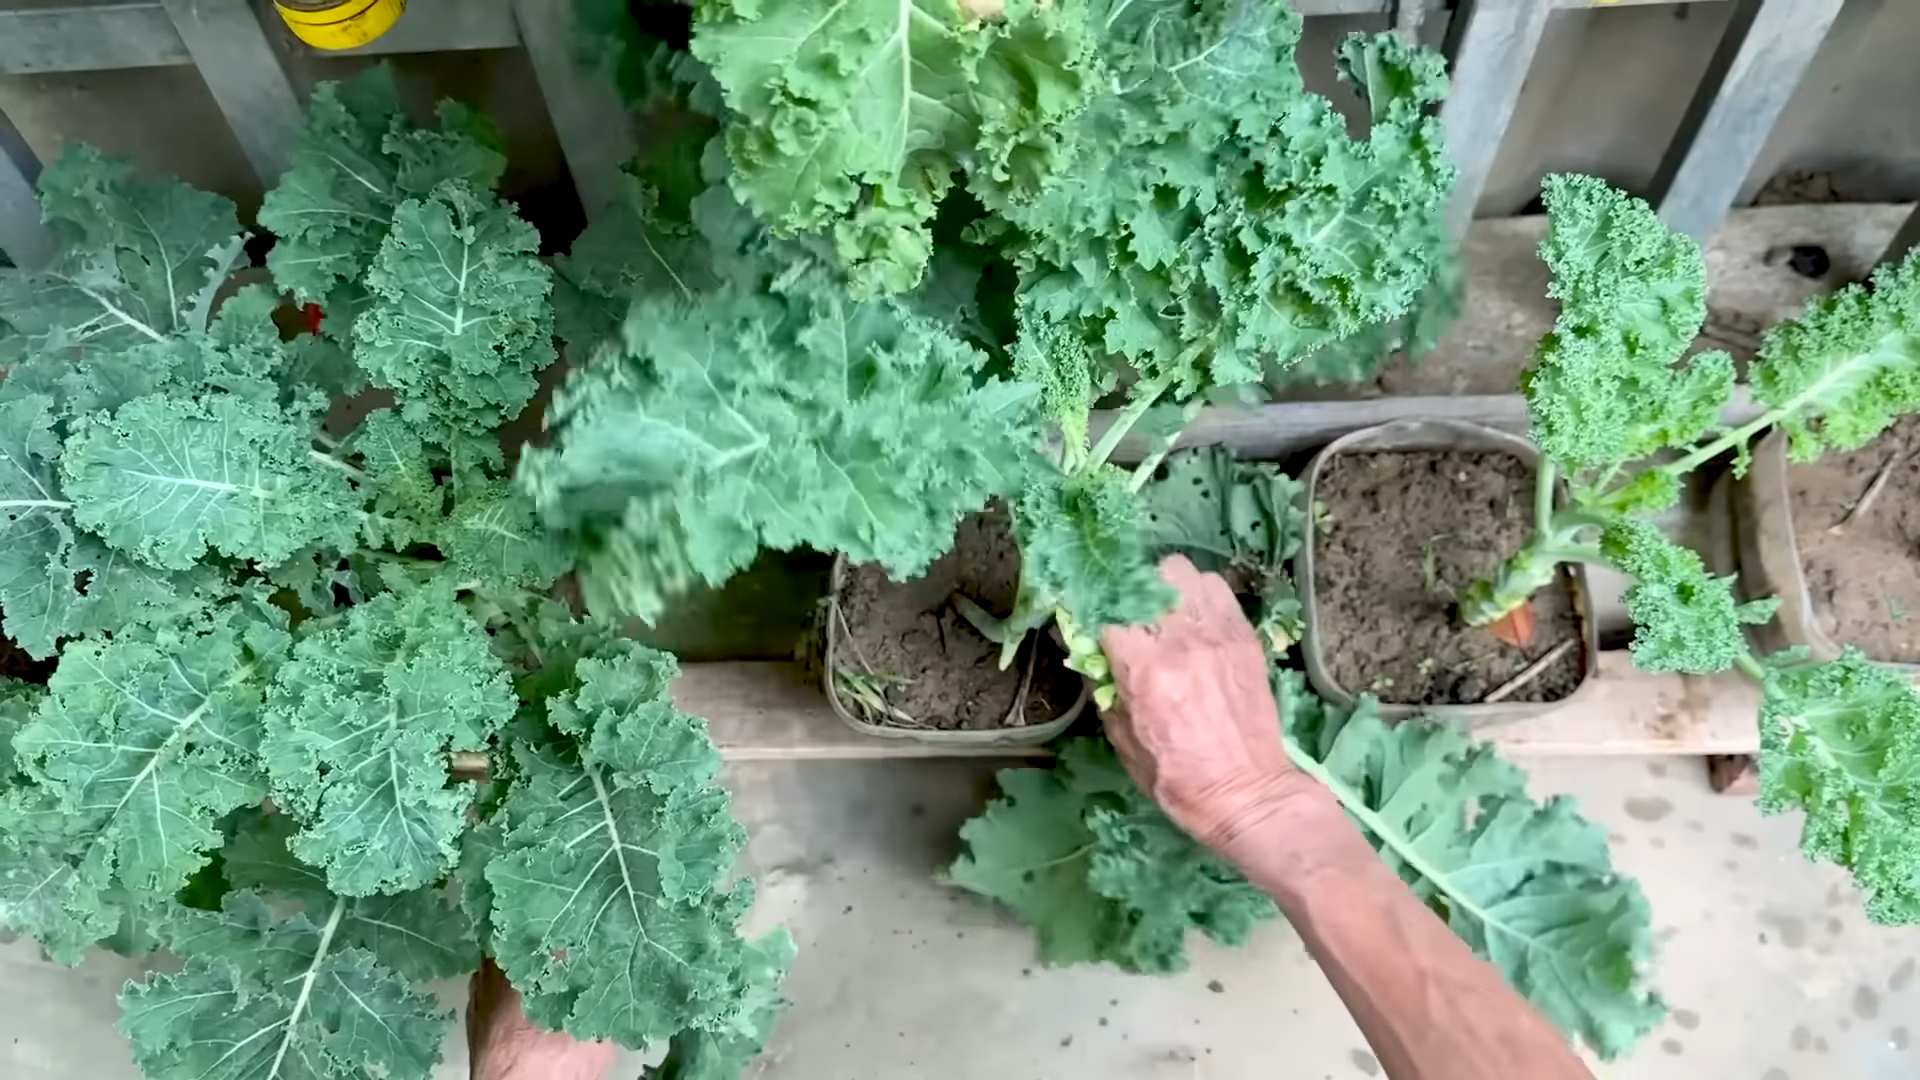
2. Mark the Cutting Lines: Decide where you want to cut the bottles. You’ll essentially be creating a “trough” for the kale to grow in. I usually cut off the top third of the bottle. Use your permanent marker and ruler to draw a straight line around the bottle where you want to cut.
3. Cut the Bottles: Using your scissors or utility knife, carefully cut along the marked lines. Be extra cautious with the utility knife, as it can be very sharp. I find it helpful to start with a small puncture and then gradually work my way around the bottle.
4. Create Drainage Holes: Drainage is crucial for healthy kale growth. Use your drill or awl to create several small holes in the bottom of each bottle. I usually make about 4-5 holes per bottle. If you’re using an awl, be careful not to puncture yourself!
5. Optional: Add Gravel: For extra drainage, you can add a layer of gravel or small stones to the bottom of each bottle before adding the soil. This helps prevent the roots from sitting in water.
Planting the Kale
Now for the fun part – planting our kale!
1. Fill the Bottles with Soil: Fill each bottle with potting soil, leaving about an inch of space at the top. Gently pat the soil down to remove any air pockets.
2. Plant the Seeds or Seedlings: If you’re using seeds, follow the instructions on the seed packet for planting depth and spacing. I usually sow a few seeds per bottle and then thin them out later if too many germinate. If you’re using seedlings, gently remove them from their containers and plant them in the bottles, making sure the top of the root ball is level with the soil surface.
3. Water Thoroughly: After planting, water the soil thoroughly until water drains out of the drainage holes. This helps settle the soil and ensures the roots are well-hydrated.
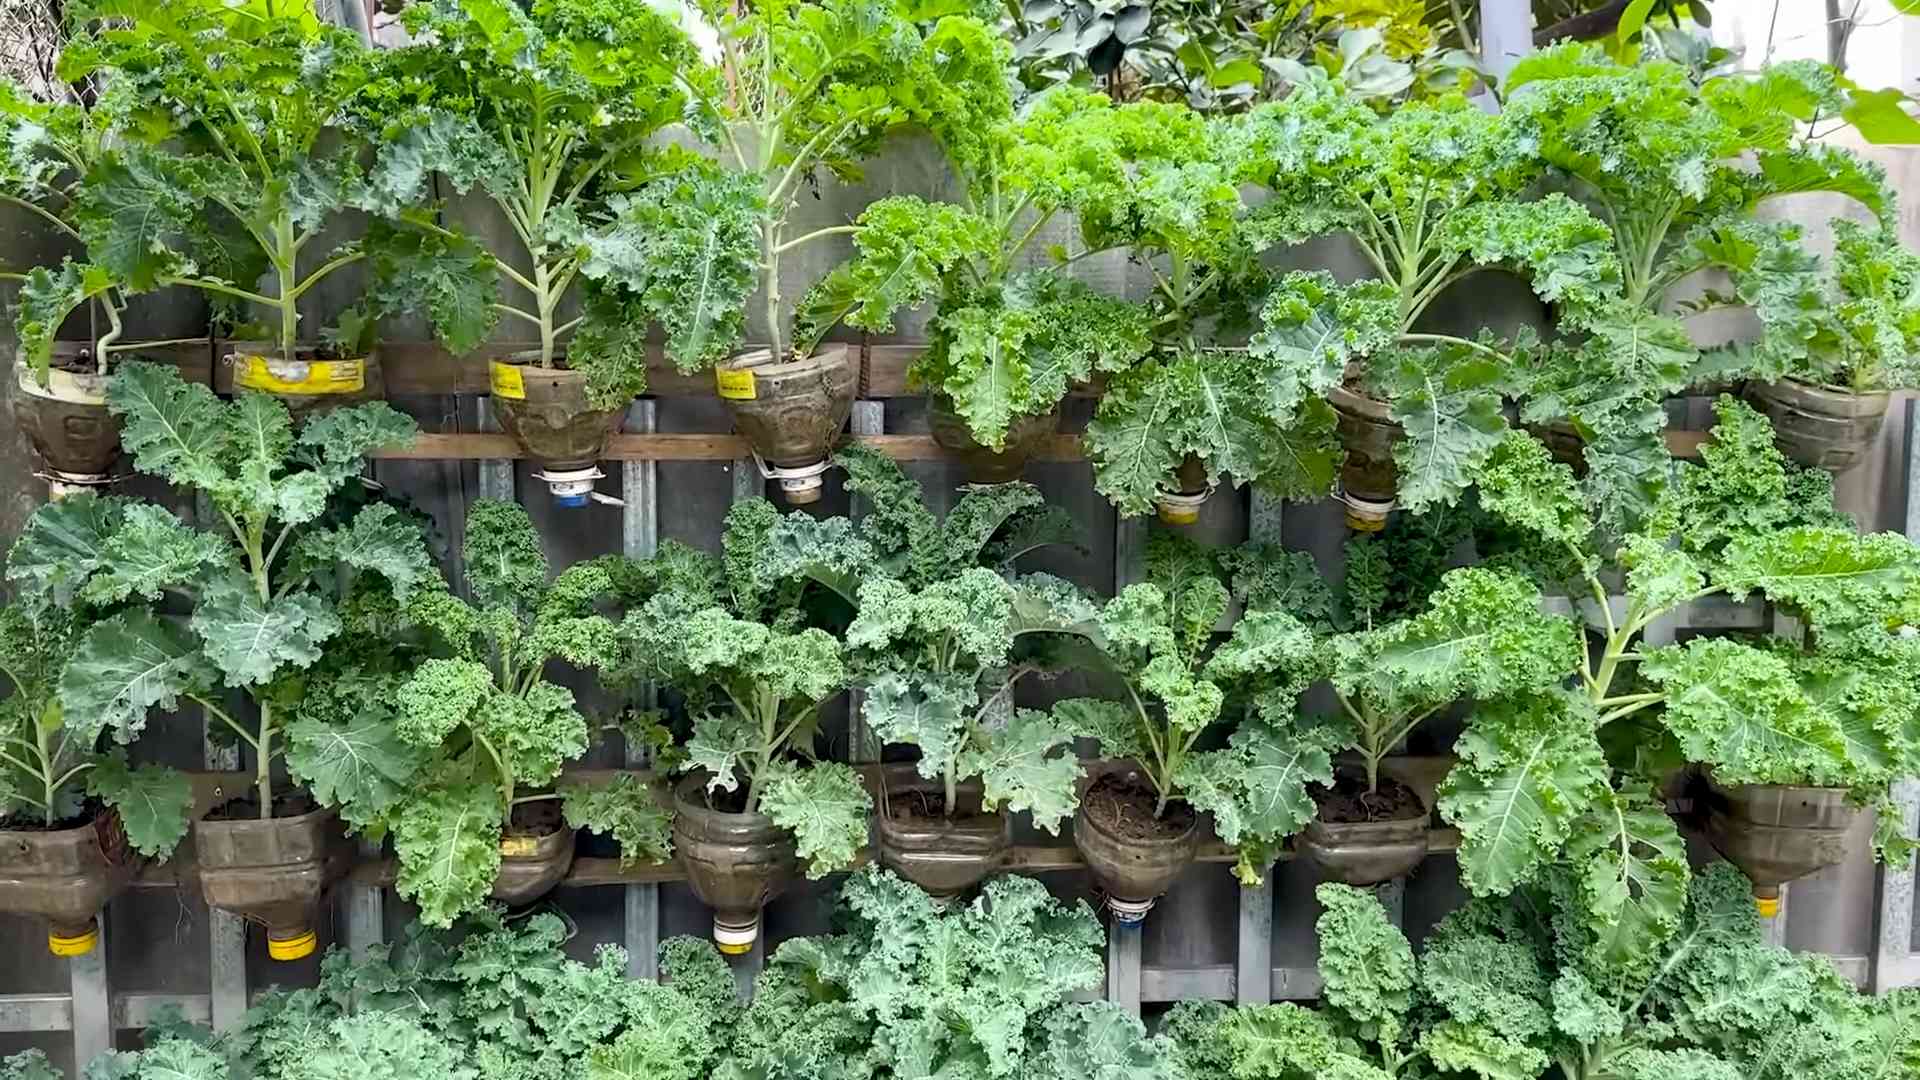
Creating the Hanging System
This is where we turn our individual bottle planters into a vertical garden.
1. Drill Hanging Holes: On each side of the bottle, near the top edge, drill two small holes. These holes will be used to thread the string or twine through for hanging. Make sure the holes are large enough for your string to pass through easily, but not so large that they weaken the bottle.
2. Measure and Cut the String: Decide how long you want your hanging strands to be. Remember to account for the length needed to tie knots. I usually cut the string a bit longer than I think I’ll need, just to be safe.
3. Thread the String: Thread the string through the holes in each bottle, creating a loop for hanging. Tie secure knots at each end of the string. Double-knotting is always a good idea for extra security.
4. Hang the Bottles: Find a sunny spot to hang your kale bottle garden. A balcony, patio, or even a sunny window will work. Make sure the hanging structure is strong enough to support the weight of the bottles filled with soil and water. You can use hooks, nails, or even a sturdy branch.
5. Adjust the Spacing: Once the bottles are hanging, adjust the spacing between them to ensure they receive adequate sunlight and air circulation. You don’t want them to be too crowded.
Caring for Your Kale Bottle Garden
Now that your kale bottle garden is set up, it’s important to provide proper care to ensure healthy growth.
1. Watering: Kale needs consistent moisture, but it doesn’t like to be waterlogged. Water your kale bottle garden whenever the top inch of soil feels dry to the touch. Use a watering can or spray bottle to gently water the soil, avoiding wetting the leaves.
2. Sunlight: Kale thrives in full sun, so make sure your bottle garden is located in a spot that receives at least 6 hours of direct sunlight per day. If you don’t have a sunny spot, you can supplement with grow lights.
3. Fertilizing: Kale is a heavy feeder, so it’s important to fertilize regularly. Use a balanced liquid fertilizer diluted to half strength every 2-3 weeks. You can also add compost tea to the soil for an extra boost of nutrients.
4. Pest Control: Keep an eye out for pests such as aphids, cabbage worms, and slugs. If you spot any pests, you can try hand-picking them off or using an organic insecticide such as neem oil.
5. Harvesting: You can start harvesting kale leaves once they are about 4-6 inches long. Simply cut off the outer leaves, leaving the inner leaves to continue growing. This will encourage continuous production.
Troubleshooting
Even with the best care, you might encounter some challenges along the way. Here are a few common problems and how to fix them:
* Yellowing Leaves: This could be a sign of overwatering, underwatering, or nutrient deficiency. Check the soil moisture and adjust your watering schedule accordingly. Fertilize with a balanced fertilizer to provide essential nutrients.
* Leggy Growth: This usually indicates insufficient sunlight. Move your bottle garden to a sunnier location or supplement with grow lights.
* Pest Infestation: As mentioned earlier, keep an eye out for pests and take action promptly. Organic insecticides are a safe and effective option.
* Slow Growth: This could be due to poor soil quality, insufficient sunlight, or inadequate watering. Amend the soil with compost, move the bottle garden to a sunnier location, and ensure consistent moisture.
Variations and Customizations
The beauty of this DIY project is that you can customize it to your liking. Here are a few ideas:
* Different Bottle Sizes: Experiment with different bottle sizes to create a more visually interesting garden.
* Paint the Bottles: Add a splash of color by painting the bottles with acrylic paint.
* Label the Bottles: Use a permanent marker to label each bottle with the type of kale you’re growing.
* Mix and Match Plants: You can also grow other herbs and vegetables in your bottle garden, such as lettuce, spinach, or basil.
* Tiered System: Create a tiered system by hanging the bottles at different heights.
And there you have it! Your very own DIY kale bottle garden. I hope you enjoy growing your own fresh, delicious kale. Happy gardening!
Conclusion
So, there you have it! Transforming a humble plastic bottle and some leftover kale into a thriving, miniature garden is not just a fun project; it’s a testament to the power of resourcefulness and a fantastic way to enjoy fresh greens, even with limited space. This DIY kale bottle garden offers a sustainable and visually appealing solution for urban gardeners, apartment dwellers, or anyone looking to add a touch of green to their lives.
Why is this DIY trick a must-try? Because it’s incredibly simple, cost-effective, and yields delicious results. You’re not just growing kale; you’re reducing waste by repurposing plastic bottles, learning about plant life cycles, and creating a beautiful, edible display. Plus, the satisfaction of harvesting your own homegrown kale is simply unmatched. Imagine adding freshly picked kale to your morning smoothie, a vibrant salad, or a hearty soup – all grown right in your own DIY bottle garden.
But the beauty of this project lies in its adaptability. Feel free to experiment with different types of kale. Curly kale, Lacinato kale (also known as dinosaur kale), and Red Russian kale all thrive in container gardens. You can also try companion planting. Consider adding herbs like thyme or oregano to your bottle garden to deter pests and enhance the flavor of your kale. Another variation is to create a vertical garden by hanging multiple bottle gardens together, maximizing your space and creating a stunning green wall. Think about painting the bottles with vibrant colors or adding decorative elements to personalize your garden and make it a true reflection of your style.
Don’t be afraid to get creative with your growing medium, too. While a standard potting mix works well, you can also incorporate compost or worm castings to enrich the soil and provide your kale with extra nutrients. Just ensure that your chosen medium provides adequate drainage to prevent waterlogging.
We wholeheartedly encourage you to embark on this rewarding DIY adventure. It’s a fantastic way to connect with nature, learn new skills, and enjoy the freshest, most flavorful kale imaginable. The process is straightforward, the materials are readily available, and the rewards are immeasurable.
Once you’ve created your own DIY kale bottle garden, we’d love to hear about your experience! Share your photos, tips, and tricks in the comments section below. Let us know what varieties of kale you’re growing, what challenges you encountered, and what successes you celebrated. Your insights will not only inspire others but also help us refine and improve this guide for future gardeners. Let’s build a community of DIY kale bottle garden enthusiasts and spread the joy of homegrown goodness! So, grab a bottle, some soil, and a handful of kale seeds, and get ready to cultivate your own little slice of paradise. Happy gardening!
Frequently Asked Questions (FAQ)
What kind of plastic bottle is best for a DIY kale bottle garden?
The ideal plastic bottle is a clear, sturdy bottle that can hold at least 2 liters of soil. Soda bottles, water bottles, and juice bottles all work well. Make sure to thoroughly clean the bottle before using it to remove any residue that could harm your plants. Avoid using bottles that have contained harsh chemicals or cleaning products. The thicker the plastic, the more durable your bottle garden will be, especially if you plan to hang it.
How often should I water my kale bottle garden?
Watering frequency depends on several factors, including the size of the bottle, the type of soil, the weather conditions, and the stage of growth of your kale. As a general rule, check the soil moisture daily. If the top inch of soil feels dry to the touch, it’s time to water. Water thoroughly until excess water drains out of the drainage holes. Avoid overwatering, as this can lead to root rot. During hot, dry weather, you may need to water more frequently. In cooler, more humid conditions, you may need to water less often.
What kind of soil should I use for my kale bottle garden?
A well-draining potting mix is essential for a successful kale bottle garden. Look for a mix that contains a blend of peat moss, perlite, and vermiculite. These ingredients help to retain moisture while also providing good drainage. You can also amend your potting mix with compost or worm castings to add extra nutrients. Avoid using garden soil, as it can be too heavy and compact, leading to poor drainage and root problems.
How much sunlight does my kale bottle garden need?
Kale thrives in full sun, which means at least 6 hours of direct sunlight per day. However, it can also tolerate partial shade, especially during the hottest part of the day. If you’re growing your kale bottle garden indoors, place it near a sunny window or use a grow light to provide supplemental lighting. Insufficient sunlight can result in leggy growth and reduced yields.
How do I fertilize my kale bottle garden?
Kale is a heavy feeder, so it’s important to fertilize regularly to ensure healthy growth. You can use a balanced liquid fertilizer diluted to half strength. Apply the fertilizer every 2-3 weeks during the growing season. Alternatively, you can incorporate slow-release fertilizer granules into the soil at planting time. Organic options like compost tea or fish emulsion are also excellent choices. Avoid over-fertilizing, as this can burn the roots and damage your plants.
How do I prevent pests and diseases in my kale bottle garden?
Regularly inspect your kale plants for signs of pests or diseases. Common pests that affect kale include aphids, cabbage worms, and flea beetles. You can control these pests by handpicking them off the plants, spraying them with insecticidal soap, or using neem oil. To prevent diseases, ensure good air circulation around your plants and avoid overwatering. If you notice any signs of disease, such as yellowing leaves or spots, remove the affected leaves immediately.
When is the best time to harvest my kale?
You can start harvesting kale leaves when they are about 4-6 inches long. Harvest the outer leaves first, leaving the inner leaves to continue growing. Avoid harvesting more than one-third of the plant at a time. Kale leaves are most tender and flavorful when they are young. You can harvest kale throughout the growing season, even into the winter in mild climates.
Can I grow other vegetables in a bottle garden besides kale?
Absolutely! While this guide focuses on kale, you can successfully grow many other vegetables in bottle gardens. Lettuce, spinach, herbs like basil and mint, and even small varieties of tomatoes and peppers can thrive in these containers. Just be sure to choose plants that are appropriate for the size of the bottle and provide them with the right growing conditions.
How do I overwinter my kale bottle garden?
In mild climates, kale can survive the winter with minimal protection. However, in colder climates, you may need to take steps to overwinter your kale bottle garden. You can move the bottle garden indoors to a sunny location or a greenhouse. Alternatively, you can protect the plants from frost by covering them with a blanket or burlap sack. Water sparingly during the winter months, as the plants will not be actively growing.
What if my kale isn’t growing well?
If your kale isn’t thriving, consider these factors: Sunlight: Ensure it’s getting enough light. Water: Check for proper watering – not too much, not too little. Nutrients: Fertilize regularly. Pests: Inspect for and address any pest infestations. Soil: Make sure the soil is well-draining and nutrient-rich. Adjust these elements as needed, and your kale should start to flourish.
Leave a Comment