

Calendula Pot Gardening Small Spaces: Dreaming of vibrant blooms and homegrown goodness, but short on space? You’re not alone! Many of us yearn for a touch of nature, even when living in apartments or homes with limited outdoor areas. But don’t let a lack of sprawling gardens hold you back. I’m here to show you how to transform even the tiniest balcony or windowsill into a thriving oasis with the magic of calendula pot gardening.
Calendula, also known as pot marigold, has a rich history, dating back to ancient civilizations where it was prized for its medicinal properties and vibrant color. From Roman gardens to medieval apothecaries, calendula has been a trusted companion to humans for centuries. Now, you can bring this historical beauty into your own home, no matter how small your space!
Why is calendula pot gardening in small spaces so essential? Well, beyond the sheer joy of nurturing life, calendula offers a multitude of benefits. Its cheerful orange and yellow flowers brighten any corner, attracting beneficial pollinators like bees and butterflies. Plus, calendula petals are edible and can be used in salads, teas, and even natural skincare remedies. In this article, I’ll share my favorite DIY tricks and hacks to help you successfully grow calendula in pots, even if you’re a complete beginner. Get ready to unleash your inner gardener and create a beautiful, functional, and space-saving calendula haven!
DIY Calendula Pot Gardening for Small Spaces: A Burst of Sunshine on Your Balcony!
Hey there, fellow plant enthusiasts! Living in a small space doesn’t mean you have to sacrifice the joy of gardening. I’m here to show you how to create a vibrant and useful calendula pot garden, even if all you have is a tiny balcony or a sunny windowsill. Calendula, also known as pot marigold, is not only beautiful with its bright orange and yellow flowers, but it’s also incredibly useful. The petals are edible (add them to salads for a peppery kick!), and they have amazing medicinal properties for soothing skin. So, let’s get started!
What You’ll Need: The Essential Supplies
Before we dive in, let’s gather everything we need. This will make the whole process smoother and more enjoyable.
* **Calendula Seeds or Seedlings:** You can start from seeds for a more budget-friendly option, or buy seedlings for a quicker start. I personally love the satisfaction of watching seeds sprout, but seedlings are great if you’re short on time. Look for varieties like ‘Pacific Beauty’ or ‘Bon Bon’ for vibrant colors and compact growth.
* **Pot(s):** Choose pots that are at least 6-8 inches in diameter. This gives the calendula roots enough room to grow. Terracotta pots are great because they allow the soil to breathe, but plastic pots work just as well. Just make sure they have drainage holes!
* **Potting Mix:** Don’t use garden soil! It’s too heavy and doesn’t drain well in pots. Opt for a good quality potting mix specifically designed for containers. I like to use a mix that contains peat moss, perlite, and vermiculite for optimal drainage and aeration.
* **Watering Can or Hose:** You’ll need a way to water your calendula plants regularly. A watering can with a gentle rose head is ideal for avoiding soil splash.
* **Trowel or Small Shovel:** This will help you transfer the seedlings or seeds into the pot.
* **Optional: Slow-Release Fertilizer:** Adding a slow-release fertilizer to the potting mix will give your calendula plants a boost of nutrients throughout the growing season.
* **Optional: Gardening Gloves:** If you’re like me and prefer to keep your hands clean, gardening gloves are a must!
* **Optional: Plant Markers:** These are helpful for labeling your pots, especially if you’re growing multiple varieties of calendula or other herbs.
Step-by-Step Guide: Planting Your Calendula
Now for the fun part! Let’s get our hands dirty and plant some calendula.
1. **Prepare the Pot:** If you’re using a new pot, give it a quick rinse to remove any dust or debris. If you’re using an old pot, make sure it’s clean and free of any lingering diseases. Place a small piece of landscape fabric or a coffee filter at the bottom of the pot to prevent the potting mix from washing out through the drainage holes.
2. **Fill the Pot with Potting Mix:** Fill the pot with potting mix, leaving about an inch or two of space at the top. This will prevent the soil from overflowing when you water. Gently pat down the soil to remove any air pockets.
3. **Planting Seeds (If Starting from Seed):**
* Moisten the potting mix with water before planting.
* Sprinkle the calendula seeds evenly over the surface of the soil.
* Cover the seeds with a thin layer (about ¼ inch) of potting mix.
* Gently water the soil again, being careful not to dislodge the seeds.
* Place the pot in a warm, sunny location.
* Keep the soil consistently moist until the seeds germinate, which usually takes about 7-14 days.
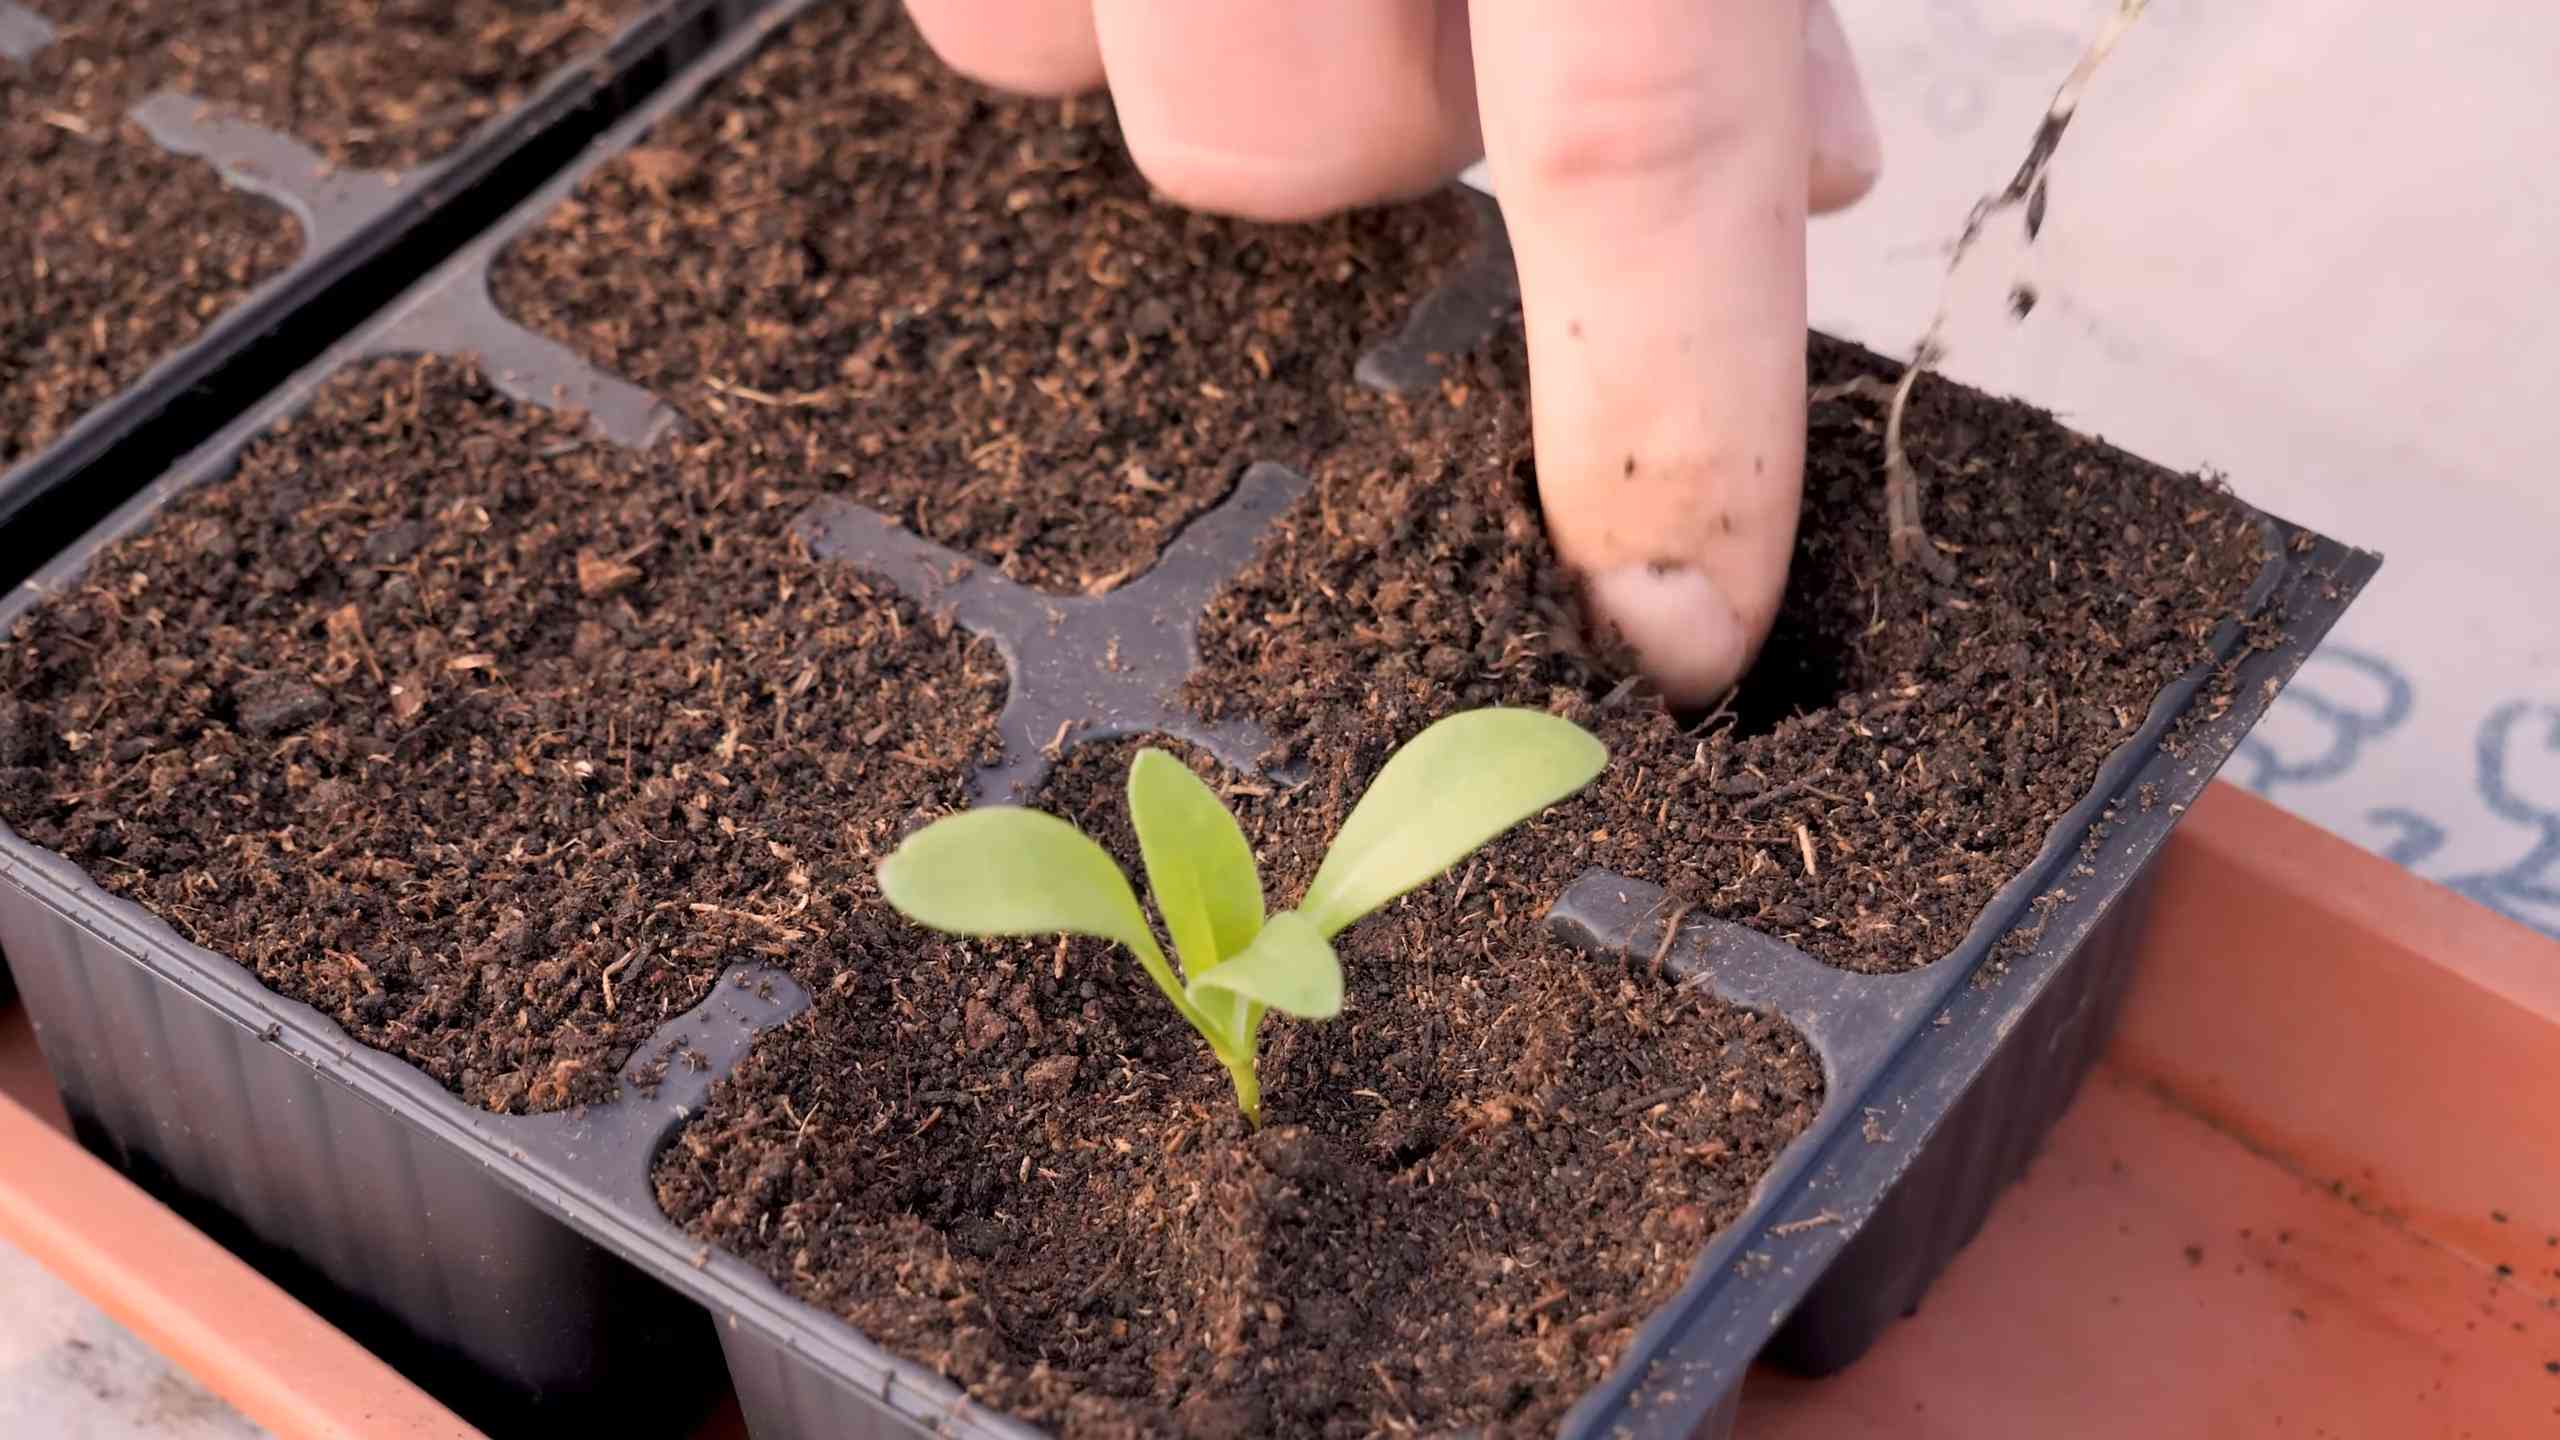
4. **Planting Seedlings (If Starting with Seedlings):**
* Gently remove the calendula seedlings from their nursery pots.
* Loosen the roots slightly with your fingers.
* Dig a small hole in the potting mix that’s large enough to accommodate the root ball.
* Place the seedling in the hole and gently backfill with potting mix.
* Water the seedling thoroughly.
* Space the seedlings about 6-8 inches apart if you’re planting multiple seedlings in the same pot.
5. **Add Slow-Release Fertilizer (Optional):** If you’re using slow-release fertilizer, sprinkle it over the surface of the soil according to the package directions. Gently mix it into the top layer of soil.
6. **Water Thoroughly:** Water the newly planted calendula thoroughly until water drains out of the drainage holes. This will help settle the soil and ensure that the roots are well-hydrated.
7. **Place in a Sunny Location:** Calendula thrives in full sun, so place your pot in a location that receives at least 6 hours of direct sunlight per day. A south-facing balcony or windowsill is ideal.
Caring for Your Calendula: Keeping Your Plants Happy
Now that your calendula is planted, it’s important to provide it with the proper care to ensure healthy growth and abundant blooms.
* **Watering:** Water your calendula plants regularly, especially during hot, dry weather. Check the soil moisture by sticking your finger into the soil. If the top inch of soil feels dry, it’s time to water. Avoid overwatering, as this can lead to root rot. Water deeply, allowing the water to drain out of the drainage holes.
* **Fertilizing:** If you didn’t add slow-release fertilizer at planting time, you can fertilize your calendula plants every 2-3 weeks with a balanced liquid fertilizer. Follow the package directions for dilution rates.
* **Deadheading:** Deadheading, or removing spent flowers, is essential for encouraging continuous blooming. Simply pinch or cut off the faded flowers just below the flower head. This will prevent the plant from putting energy into seed production and encourage it to produce more flowers.
* **Pest Control:** Calendula is generally pest-resistant, but it can occasionally be affected by aphids or spider mites. If you notice any pests, you can try spraying them off with a strong stream of water or using an insecticidal soap.
* **Pruning:** You can prune your calendula plants to maintain their shape and encourage bushier growth. Simply pinch back the tips of the stems to promote branching.
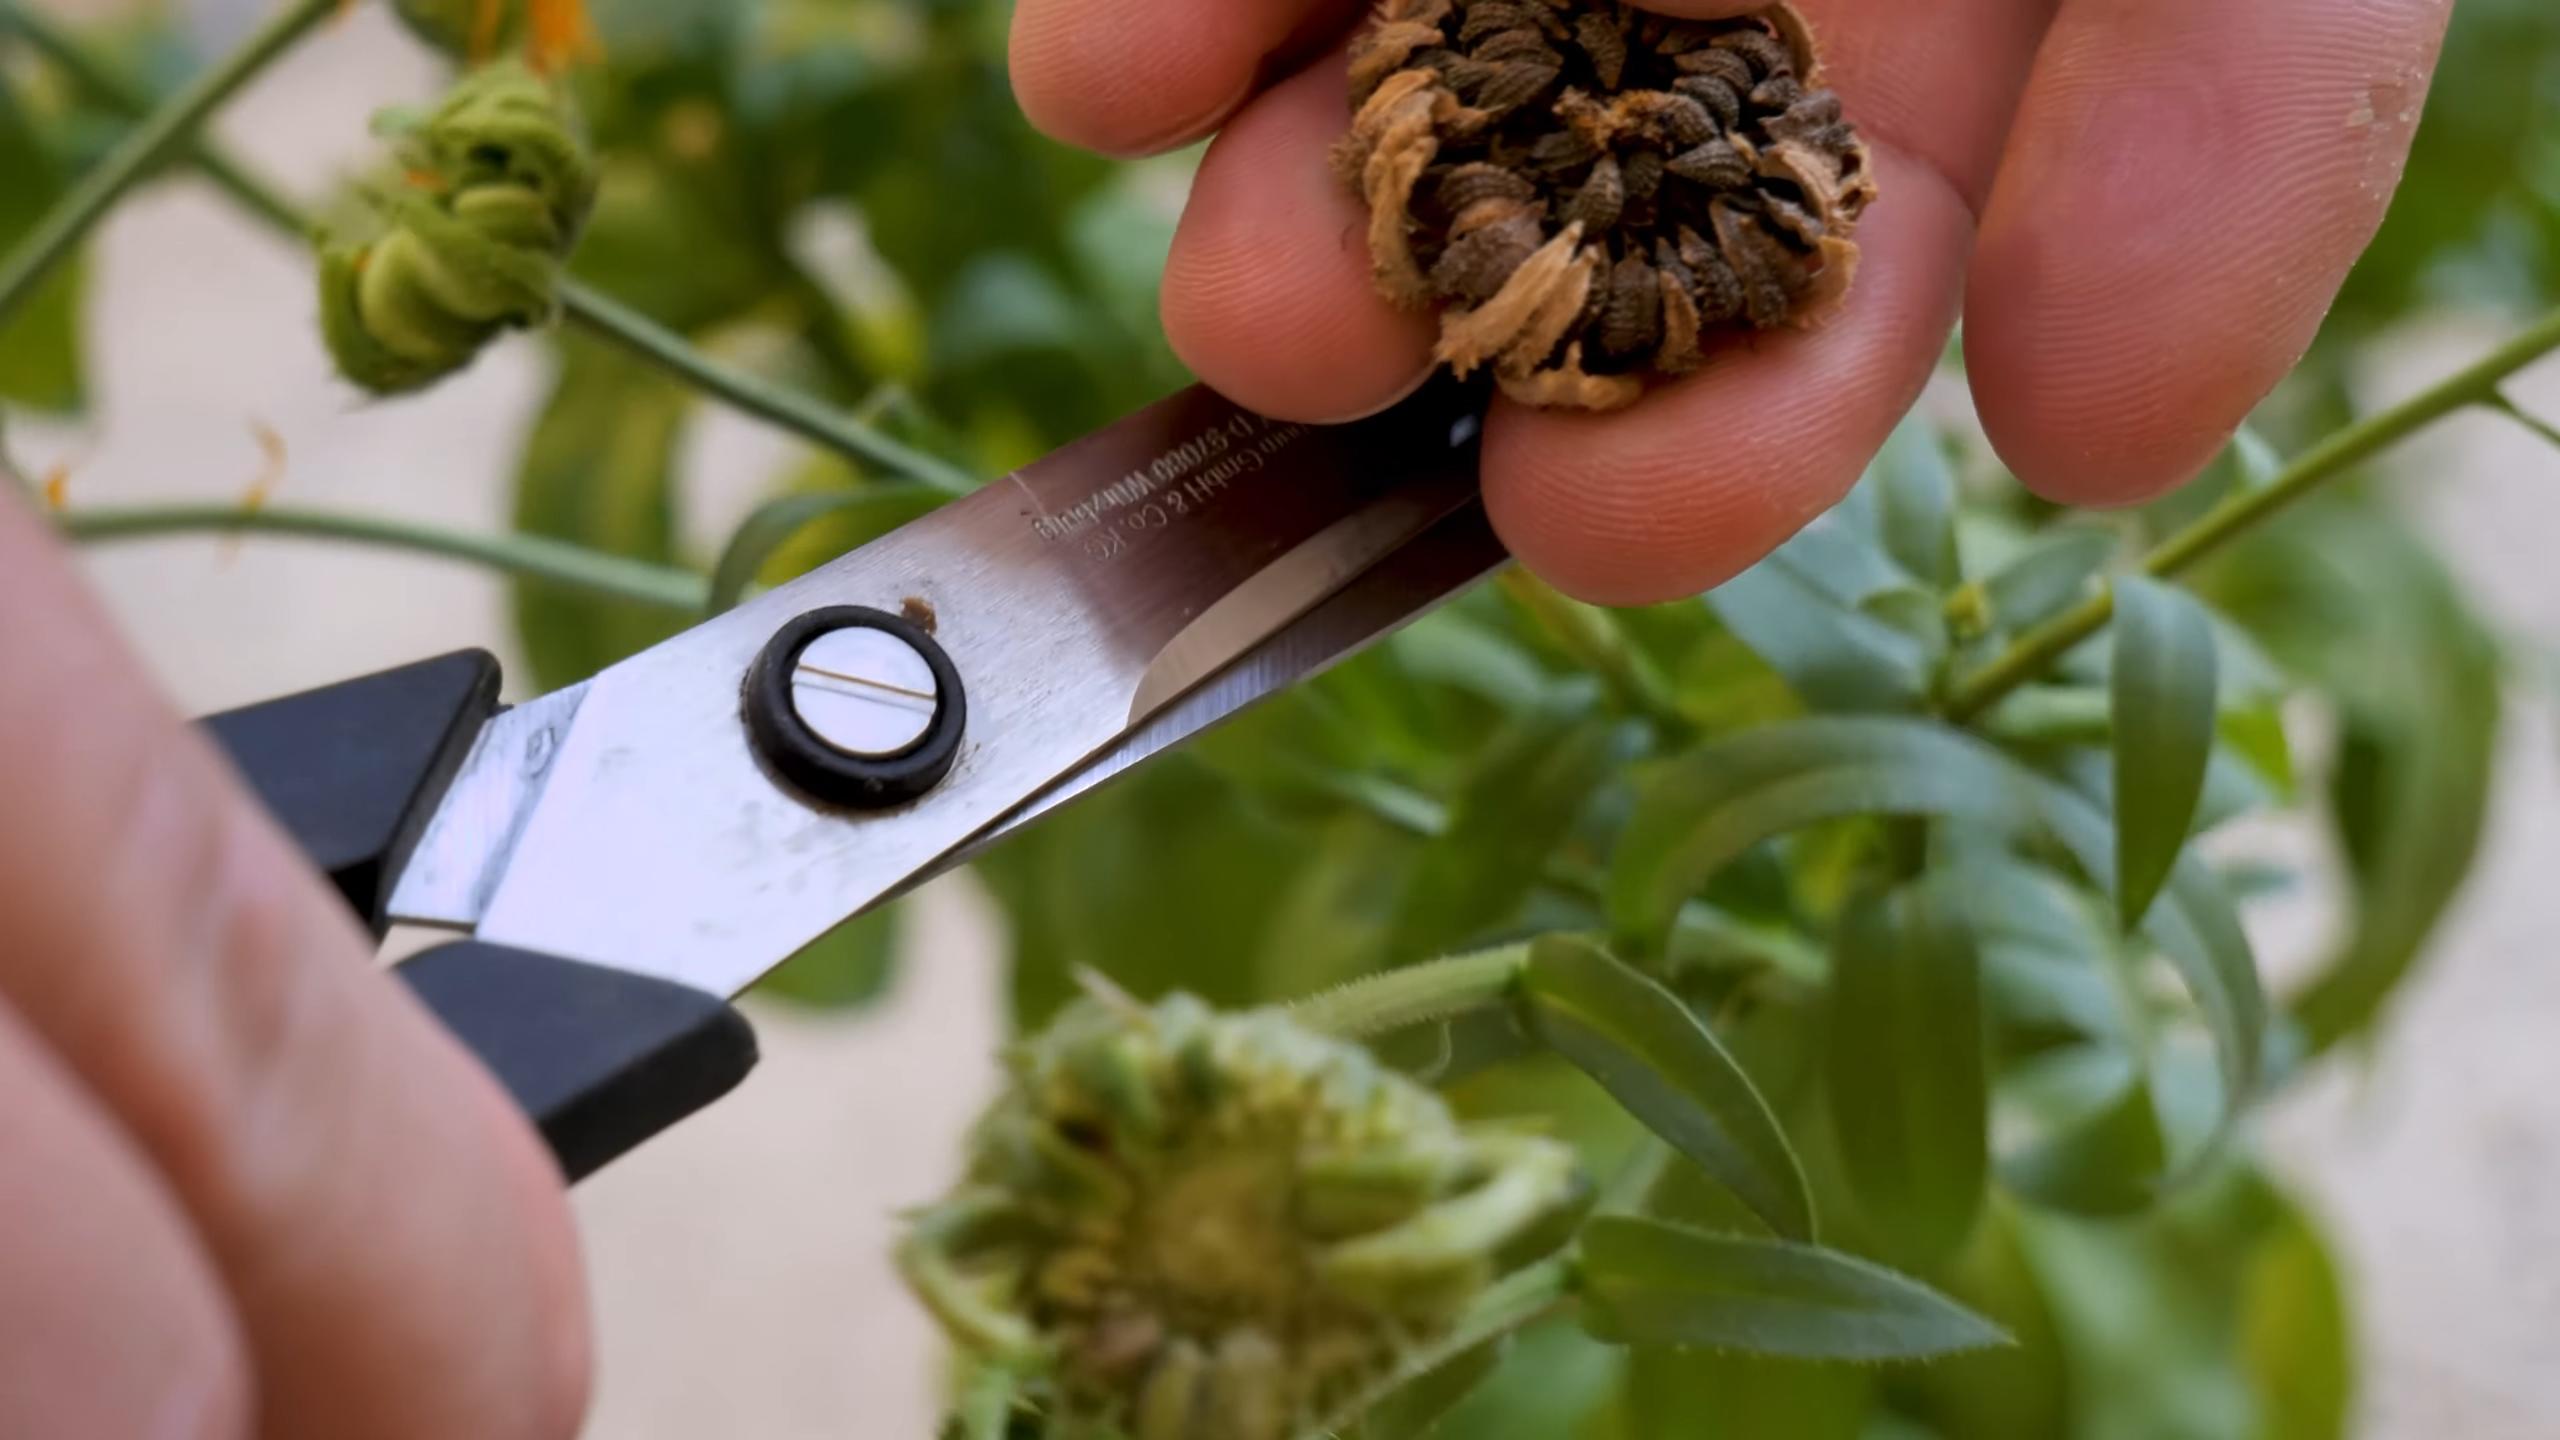
* **Harvesting:** You can start harvesting calendula flowers as soon as they open. The best time to harvest is in the morning, after the dew has dried. Simply pinch or cut off the flower heads. You can use the fresh petals in salads, teas, or homemade skincare products. You can also dry the petals for later use. To dry calendula petals, spread them out on a screen or tray in a cool, dry place. Allow them to dry completely, which usually takes about a week. Store the dried petals in an airtight container.
Troubleshooting: Addressing Common Problems
Even with the best care, you might encounter some problems with your calendula plants. Here are some common issues and how to address them:
* **Yellowing Leaves:** Yellowing leaves can be a sign of overwatering, underwatering, or nutrient deficiency. Check the soil moisture and adjust your watering accordingly. If the soil is consistently moist, you may be overwatering. If the soil is dry, you may be underwatering. If you suspect a nutrient deficiency, fertilize your plants with a balanced liquid fertilizer.
* **Leggy Growth:** Leggy growth, or long, spindly stems with few leaves, is usually a sign of insufficient sunlight. Move your calendula plants to a location that receives more direct sunlight.
* **Lack of Blooms:** A lack of blooms can be caused by several factors, including insufficient sunlight, over-fertilizing with nitrogen, or not deadheading regularly. Make sure your plants are getting enough sunlight and avoid using fertilizers that are high in nitrogen. Deadhead spent flowers regularly to encourage continuous blooming.
* **Powdery Mildew:** Powdery mildew is a fungal disease that can affect calendula plants, especially in humid conditions. It appears as a white, powdery coating on the leaves. To prevent powdery mildew, provide good air circulation around your plants and avoid overhead watering. If you notice powdery mildew, you can try spraying your plants with a fungicide.
Extending the Bloom: Keeping the Color Going
To keep your calendula blooming for as long as possible, here are a few extra tips:
* Succession Planting: Plant new seeds or seedlings every few weeks to ensure a continuous supply of blooms throughout the growing season.
* Choose the Right Variety: Some calendula varieties are more prolific bloomers than others. Look for varieties that are known for their long blooming period.
* Protect from Frost: Calendula is relatively frost-tolerant, but a hard frost can damage the plants and stop them from blooming. If you live in an area with cold winters, you can try moving your pots indoors or covering them with a frost blanket when frost is predicted.
Enjoying Your Calendula: More Than Just a Pretty Flower
Remember, calendula is more than just a
Conclusion
So, there you have it! Transforming your small space into a vibrant, healing haven with your own calendula pot gardening setup is not only achievable but incredibly rewarding. We’ve walked through the simple steps, highlighting how even the tiniest balcony or windowsill can become a flourishing source of these golden blooms.
Why is this DIY trick a must-try? Beyond the sheer beauty of calendula, you’re cultivating a natural remedy right at your fingertips. Imagine the satisfaction of harvesting your own petals to create soothing balms, teas, or even adding a touch of sunshine to your salads. Plus, calendula is a fantastic companion plant, attracting beneficial insects and deterring pests, making your small garden even healthier.
But the benefits don’t stop there. Engaging in gardening, even on a small scale, is a proven stress reliever. The simple act of nurturing a plant, watching it grow, and reaping the rewards of your labor can be incredibly therapeutic. And let’s not forget the environmental impact. By growing your own calendula, you’re reducing your reliance on commercially produced products, often laden with chemicals and transported long distances.
Ready to take your calendula pot gardening to the next level? Consider these variations:
* Vertical Gardening: If space is truly limited, explore vertical gardening options. Stacked planters or hanging baskets can maximize your growing area and create a stunning visual display.
* Companion Planting: Plant calendula alongside other herbs and vegetables that benefit from its presence. Tomatoes, basil, and cucumbers are excellent choices.
* Different Varieties: Experiment with different calendula varieties. Some have double petals, while others boast unique color variations.
* Seed Saving: Once your calendula plants have flowered and gone to seed, collect the seeds to replant next year. This is a sustainable and cost-effective way to keep your garden thriving.
* Creative Containers: Don’t limit yourself to traditional pots. Upcycle old containers like teacups, buckets, or even old shoes to add a touch of whimsy to your garden.
We’re confident that you’ll find this DIY calendula pot gardening trick to be a delightful and enriching experience. It’s a simple, affordable, and sustainable way to bring beauty, healing, and a touch of nature into your life, no matter how small your space may be.
Now, it’s your turn! We encourage you to give this a try. Start small, experiment, and most importantly, have fun. Once you’ve created your own calendula haven, we’d love to hear about your experience. Share your photos, tips, and stories in the comments below. Let’s inspire each other to create beautiful and sustainable gardens, one pot at a time. Happy gardening!
Frequently Asked Questions (FAQ)
What kind of pot is best for growing calendula?
The best pot for growing calendula is one that is at least 6-8 inches in diameter and has good drainage. Calendula plants need room for their roots to grow, and proper drainage is essential to prevent root rot. Terracotta pots are a good choice because they allow the soil to breathe, but plastic pots are also acceptable as long as they have drainage holes. Consider the size of your mature plant when selecting a pot. Some calendula varieties can grow quite large, so a larger pot may be necessary.
What kind of soil should I use for my calendula pot gardening?
Calendula thrives in well-draining soil that is rich in organic matter. A good potting mix specifically formulated for containers is ideal. You can also amend regular garden soil with compost or other organic materials to improve its drainage and fertility. Avoid using heavy clay soil, as it can become waterlogged and suffocate the roots. A slightly acidic to neutral pH (around 6.0 to 7.0) is optimal for calendula growth.
How much sunlight does calendula need?
Calendula plants need at least 6 hours of sunlight per day to thrive. They can tolerate some partial shade, especially in hot climates, but they will produce fewer flowers if they don’t get enough sun. Place your calendula pot in a sunny location, such as a south-facing balcony or windowsill. If you live in a very hot climate, consider providing some afternoon shade to protect the plants from scorching.
How often should I water my calendula plants?
Water your calendula plants regularly, especially during hot, dry weather. The soil should be kept consistently moist but not waterlogged. Check the soil moisture by sticking your finger into the soil about an inch deep. If the soil feels dry, it’s time to water. Water deeply, allowing the water to drain out of the bottom of the pot. Avoid overhead watering, as this can promote fungal diseases.
Do I need to fertilize my calendula plants?
Calendula plants are not heavy feeders, but they will benefit from occasional fertilization. Use a balanced liquid fertilizer diluted to half strength every 2-3 weeks during the growing season. You can also amend the soil with compost or other organic materials to provide a slow-release source of nutrients. Avoid over-fertilizing, as this can lead to excessive foliage growth at the expense of flowers.
How do I harvest calendula flowers?
Harvest calendula flowers in the morning, after the dew has dried. Choose flowers that are fully open and have bright, vibrant petals. Gently pinch or cut the flower heads off the plant, leaving a short stem. You can use the fresh flowers immediately or dry them for later use. To dry calendula flowers, spread them out in a single layer on a screen or tray in a cool, dark, and well-ventilated place. Allow them to dry completely, which may take several days or weeks, depending on the humidity.
What are the benefits of using calendula?
Calendula has a wide range of medicinal and cosmetic benefits. It is known for its anti-inflammatory, antiseptic, and wound-healing properties. Calendula can be used to soothe skin irritations, heal minor cuts and burns, and reduce inflammation. It is also a popular ingredient in skincare products, such as creams, lotions, and balms. Calendula tea can be used to soothe digestive issues and boost the immune system. Always consult with a healthcare professional before using calendula for medicinal purposes.
Can I grow calendula indoors?
Yes, you can grow calendula indoors, but it may require some extra care. Make sure to provide your calendula plants with plenty of bright, indirect sunlight. A south-facing window is ideal. You may also need to supplement with artificial light, especially during the winter months. Keep the soil consistently moist but not waterlogged, and fertilize regularly. Indoor calendula plants may not flower as profusely as those grown outdoors, but they can still provide a beautiful and beneficial addition to your home.
Are there any pests or diseases that affect calendula?
Calendula is generally a pest-resistant plant, but it can be susceptible to certain pests and diseases, such as aphids, spider mites, and powdery mildew. Inspect your plants regularly for signs of infestation or disease. If you notice any problems, take action immediately. Aphids and spider mites can be controlled with insecticidal soap or neem oil. Powdery mildew can be prevented by providing good air circulation and avoiding overhead watering.
Can I eat calendula flowers?
Yes, calendula flowers are edible and can be used to add color and flavor to salads, soups, and other dishes. The petals have a slightly peppery taste and can be used as a substitute for saffron. Make sure to only eat calendula flowers that have been grown organically and have not been treated with pesticides or herbicides. Remove the green base of the flower before eating, as it can be bitter.
Leave a Comment