

Grow Celery at Home? Absolutely! Forget those limp, flavorless stalks from the grocery store. I’m going to show you how to cultivate crisp, vibrant celery right in your own backyard (or even on your balcony!). For centuries, celery has been more than just a crunchy snack; it was prized by the ancient Greeks and Romans, not just for its taste, but also for its medicinal properties. Imagine, growing something with such a rich history, right outside your door!
Let’s face it, buying fresh produce can be expensive, and sometimes, the quality just isn’t there. That’s where the magic of DIY gardening comes in. Learning how to grow celery at home offers a fantastic way to save money, reduce your carbon footprint, and enjoy the unparalleled taste of homegrown vegetables. Plus, there’s something incredibly satisfying about nurturing a plant from seed to harvest.
In this article, I’ll share my favorite tips and tricks for successfully growing celery, even if you’re a complete beginner. We’ll cover everything from seed starting to harvesting, ensuring you have a bountiful supply of this versatile vegetable. Get ready to ditch the store-bought stuff and embrace the joy of homegrown celery!
Growing Butternut Squash: A Beginner’s Guide to a Bountiful Harvest
Hey there, fellow gardening enthusiasts! I’m so excited to share my tips and tricks for growing delicious butternut squash right in your own backyard. Butternut squash is a fantastic addition to any garden, offering a sweet, nutty flavor perfect for soups, roasts, and pies. Don’t be intimidated – with a little planning and care, you can enjoy a fantastic harvest. Let’s dive in!
Choosing the Right Butternut Squash Variety
First things first, let’s talk varieties. While the classic butternut squash is a great choice, there are a few other options you might want to consider:
* **Waltham Butternut:** This is a popular, reliable variety known for its consistent shape and excellent flavor. It’s a great all-around choice.
* **Butterscotch PMR:** If you’re short on space, this semi-bush variety is a good option. It’s also resistant to powdery mildew, a common squash problem.
* **Early Butternut:** As the name suggests, this variety matures earlier than others, making it ideal for shorter growing seasons.
Preparing Your Garden for Butternut Squash
Butternut squash are hungry plants, so soil preparation is key. They need plenty of sunshine and well-drained soil rich in organic matter.
* **Sunlight:** Butternut squash needs at least 6-8 hours of direct sunlight per day. Choose a location in your garden that gets plenty of sun.
* **Soil:** The soil should be well-draining and fertile. Amend your soil with compost or well-rotted manure to improve drainage and add nutrients. Butternut squash prefers a slightly acidic to neutral soil pH (6.0-7.0). You can test your soil pH with a simple soil testing kit.
* **Space:** Butternut squash vines can spread quite a bit, so give them plenty of room. Allow at least 2-3 feet between plants and 4-6 feet between rows. If you’re short on space, consider growing them vertically on a trellis.
Starting Your Butternut Squash Seeds
You can either start your butternut squash seeds indoors or direct sow them in your garden. Starting them indoors gives them a head start, especially in cooler climates.
* **Starting Indoors (Recommended for Cooler Climates):**
* Start seeds about 3-4 weeks before the last expected frost.
* Use biodegradable pots (like peat pots or coco coir pots) to avoid disturbing the roots when transplanting.
* Fill the pots with a good quality seed starting mix.
* Plant 1-2 seeds per pot, about 1 inch deep.
* Water gently and keep the soil moist but not soggy.
* Place the pots in a warm location (70-80°F) or use a heat mat to encourage germination.
* Once the seedlings emerge, provide them with plenty of light. A grow light is ideal, but a sunny windowsill can also work.
* Harden off the seedlings by gradually exposing them to outdoor conditions for a week before transplanting.
* **Direct Sowing (Suitable for Warmer Climates):**
* Wait until the soil has warmed up to at least 60°F.
* Plant seeds about 1 inch deep and 2-3 feet apart.
* Water gently and keep the soil moist.
Transplanting Butternut Squash Seedlings
If you started your seeds indoors, it’s time to transplant them into your garden!
1. **Choose a Cloudy Day:** Transplanting on a cloudy day will help prevent the seedlings from getting stressed.
2. **Prepare the Planting Hole:** Dig a hole that is slightly larger than the pot the seedling is in.
3. **Amend the Soil:** Mix some compost or well-rotted manure into the soil at the bottom of the hole.
4. **Gently Remove the Seedling:** If you used biodegradable pots, you can plant the entire pot. Otherwise, gently remove the seedling from the pot, being careful not to damage the roots.
5. **Place the Seedling in the Hole:** Position the seedling in the hole so that the top of the root ball is level with the surrounding soil.
6. **Fill the Hole:** Fill the hole with soil and gently pat it down.
7. **Water Thoroughly:** Water the seedling thoroughly to help it settle in.
8. **Mulch:** Add a layer of mulch around the plant to help retain moisture and suppress weeds.
Caring for Your Butternut Squash Plants
Once your butternut squash plants are in the ground, it’s important to provide them with the care they need to thrive.
* **Watering:** Butternut squash needs consistent watering, especially during dry periods. Water deeply at the base of the plant, avoiding getting the leaves wet. Aim for about 1 inch of water per week.
* **Fertilizing:** Butternut squash are heavy feeders, so fertilize them regularly. Use a balanced fertilizer (like 10-10-10) every 2-3 weeks. You can also side-dress the plants with compost or well-rotted manure.
* **Weeding:** Keep the area around your butternut squash plants free of weeds. Weeds compete with the plants for nutrients and water.
* **Pest Control:** Butternut squash can be susceptible to pests like squash bugs, squash vine borers, and aphids. Inspect your plants regularly for signs of pests and take action promptly.
* **Squash Bugs:** Handpick squash bugs and their eggs (which are usually found on the underside of leaves). You can also use insecticidal soap.
* **Squash Vine Borers:** These pests bore into the stems of squash plants, causing them to wilt and die. Wrap the base of the stems with aluminum foil to prevent borers from entering. If you see signs of borers, you can try to remove them by carefully slitting the stem and extracting the larvae.
* **Aphids:** These small, sap-sucking insects can weaken plants. Spray them with a strong stream of water or use insecticidal soap.
* **Pollination:** Butternut squash plants have separate male and female flowers. The female flowers need to be pollinated in order to produce fruit. Bees are the primary pollinators, but if you’re not seeing enough bees in your garden, you can hand-pollinate the flowers.
* **Hand-Pollination:** Identify the male and female flowers. The male flowers have a long, thin stem, while the female flowers have a small, immature fruit at the base. Use a small paintbrush to collect pollen from the male flower and transfer it to the stigma of the female flower. Do this in the morning, when the flowers are open.
Dealing with Common Butternut Squash Problems
Even with the best care, you might encounter some problems while growing butternut squash. Here are a few common issues and how to address them:
* **Powdery Mildew:** This fungal disease causes a white, powdery coating on the leaves. Improve air circulation around the plants by pruning some of the leaves. You can also spray the plants with a fungicide.
* **Blossom End Rot:** This condition causes the blossom end of the squash to rot. It’s usually caused by calcium deficiency or inconsistent watering. Ensure the soil has adequate calcium and water the plants regularly.
* **Yellowing Leaves:** Yellowing leaves can be a sign of nutrient deficiency, overwatering, or pest infestation. Check the soil pH and nutrient levels, adjust your watering schedule, and inspect the plants for pests.
Harvesting Your Butternut Squash
The moment you’ve been waiting for! Knowing when to harvest your butternut squash is crucial for optimal flavor and storage.
1. **Maturity:** Butternut squash is typically ready to harvest about 90-100 days after planting.
2. **Visual Cues:** Look for these signs of maturity:
* The skin should be hard and tough. You shouldn’t be able to easily puncture it with your fingernail.
* The color should be a deep tan or beige.
* The stem should be dry and brown.
3. **Harvesting:** Use a sharp knife or pruning shears to cut the squash from the vine, leaving about 2-3 inches of stem attached.
4. **Curing:** Curing the squash helps to harden the skin and improve its storage life. Place the harvested squash in a warm, dry, well-ventilated place for 1-2 weeks.
Storing Your Butternut Squash
Proper storage is essential for enjoying your butternut squash throughout the winter.
* **Ideal Conditions:** Store butternut squash in a cool, dry, and well-ventilated place. The ideal temperature is around 50-55°F.
* **Storage Location:** A basement, garage, or root cellar are good options.
* **Avoid Bruising:** Handle the squash carefully to avoid bruising, as this can lead to spoilage.
* **Shelf Life:** Properly stored butternut squash can last for several months.
Enjoying Your Homegrown Butternut Squash
Conclusion
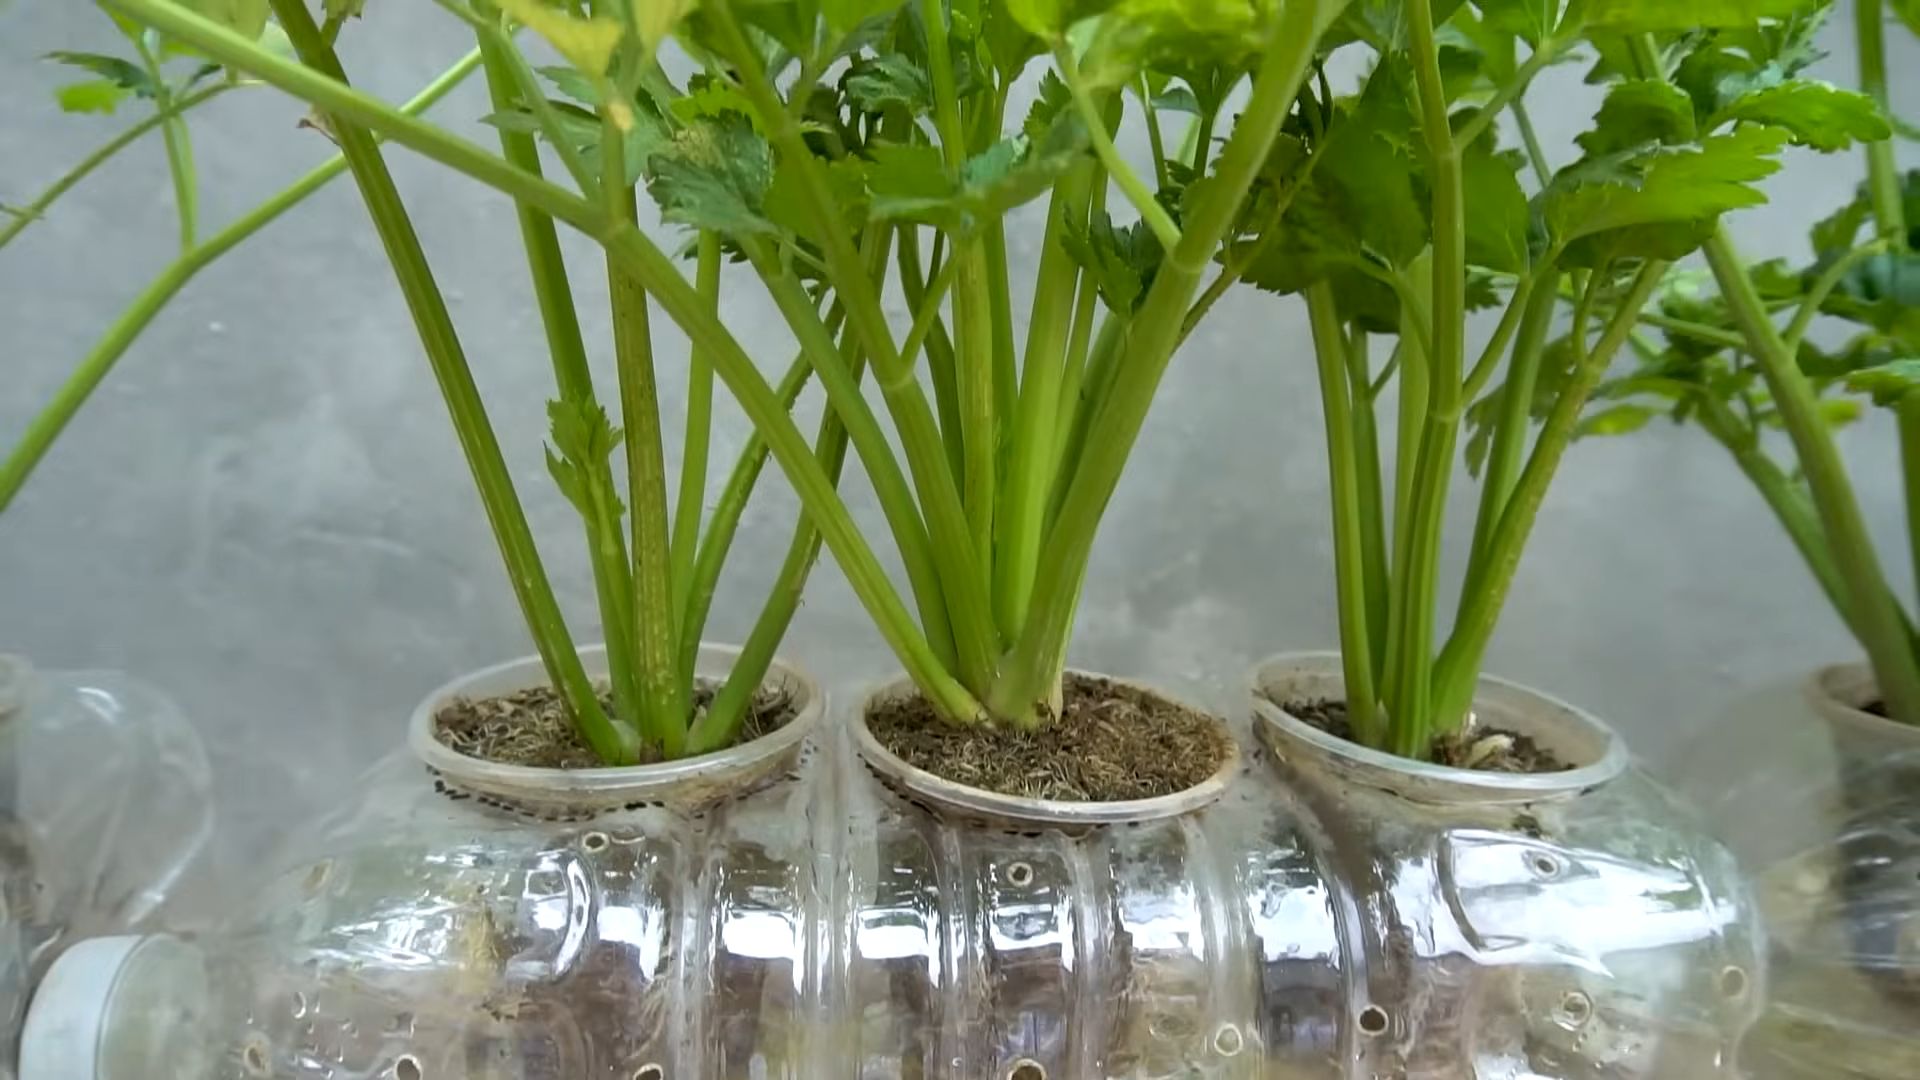
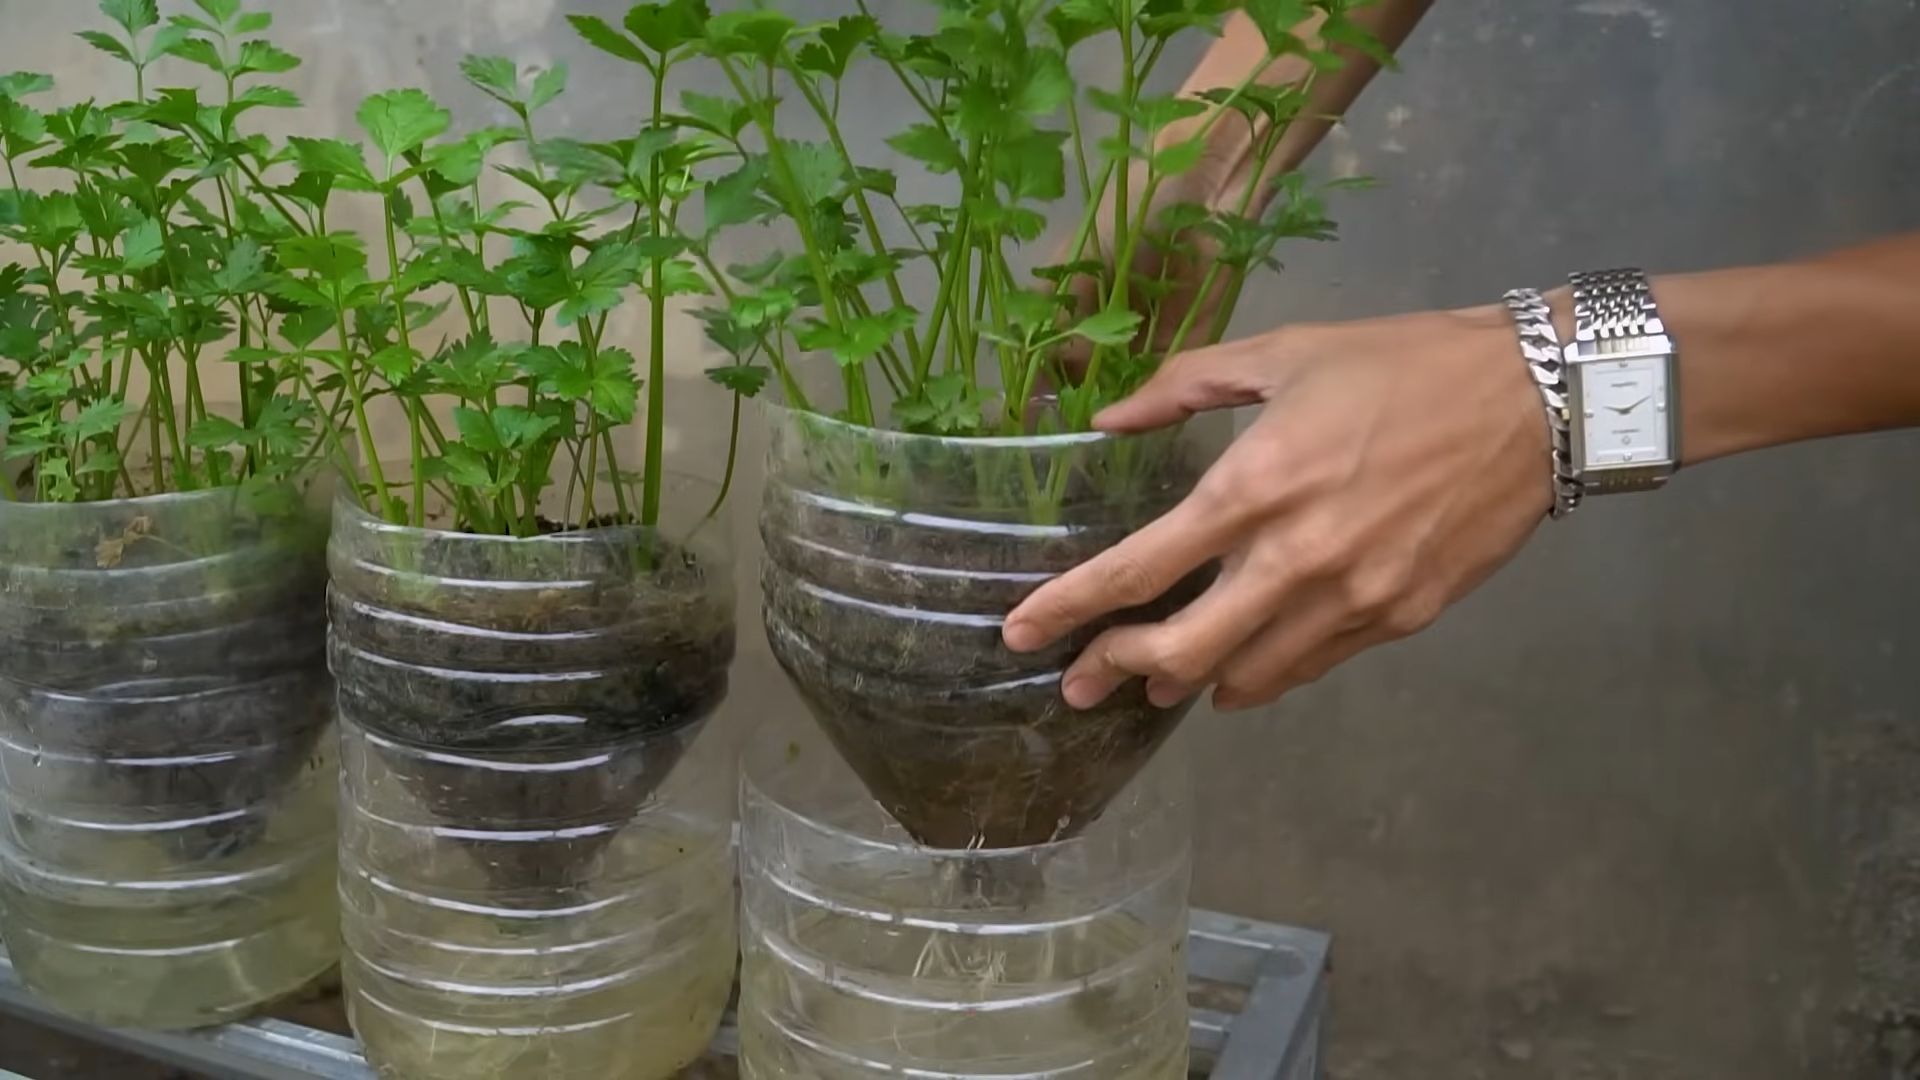
So, there you have it! Growing celery at home from scraps isn’t just a fun experiment; it’s a sustainable way to reduce food waste, enjoy fresh, flavorful celery, and connect with the natural world. It’s a surprisingly simple process that yields impressive results, transforming a discarded celery base into a thriving plant ready to grace your salads, soups, and snacks.
Why is this DIY trick a must-try? Because it’s economical, eco-friendly, and educational. You’re essentially getting free celery from something you would have otherwise thrown away. You’re reducing your carbon footprint by minimizing trips to the grocery store and lessening the demand for commercially grown produce. And you’re learning about plant propagation and the resilience of nature firsthand. Plus, the taste of homegrown celery is noticeably fresher and more vibrant than store-bought varieties.
But the benefits don’t stop there. Once your celery plant is established, you can experiment with different growing conditions to influence its flavor and texture. Try growing it in a sunnier location for a sweeter taste, or in partial shade for a more delicate flavor. You can also experiment with different soil types and fertilizers to see how they affect the plant’s growth and yield.
Consider these variations to elevate your celery-growing experience:
* Celery Seedlings: While regrowing from a base is fantastic, you can also start celery from seed. This gives you access to a wider variety of celery types, including those with different colors and flavors.
* Container Gardening: If you don’t have a garden, don’t worry! Celery thrives in containers, making it perfect for balconies, patios, or even indoor spaces with sufficient sunlight.
* Hydroponics: For the more adventurous gardener, try growing celery hydroponically. This method involves growing plants without soil, using nutrient-rich water solutions. It can lead to faster growth and higher yields.
* Companion Planting: Celery benefits from being planted alongside certain other plants, such as tomatoes, onions, and garlic. These companion plants can help deter pests and improve the overall health of your celery.
Ultimately, the best way to discover the joys of growing celery at home is to simply give it a try. Don’t be intimidated by the process; it’s far more forgiving than you might think. Start with a single celery base, follow the simple steps outlined above, and watch as it transforms into a vibrant, productive plant.
We’re confident that you’ll be amazed by the results. And we’d love to hear about your experience! Share your photos, tips, and stories with us in the comments below. Let’s create a community of home gardeners who are passionate about growing their own food and reducing waste. So, grab that celery base, get your hands dirty, and start growing your own delicious, homegrown celery today! Embrace the simplicity and satisfaction of this rewarding DIY project. Let’s all contribute to a more sustainable and flavorful future, one celery stalk at a time. This simple act of regrowing celery is a small step with a surprisingly large impact.
Frequently Asked Questions (FAQ)
How long does it take to regrow celery from a base?
The initial sprouting and root development typically take about 5-7 days. After that, transplanting to soil and seeing significant growth to harvestable stalks can take anywhere from 2-3 months, depending on growing conditions like sunlight, water, and soil quality. Be patient; celery is a slow grower!
What kind of soil is best for growing celery?
Celery prefers rich, well-draining soil that is high in organic matter. A good mix would be equal parts compost, potting soil, and perlite or vermiculite for drainage. The ideal pH level is between 6.0 and 6.8. You can amend your soil with compost or aged manure to improve its fertility and drainage.
How much sunlight does celery need?
Celery needs at least 6 hours of sunlight per day to thrive. However, in hotter climates, it can benefit from some afternoon shade to prevent the leaves from scorching. If you’re growing celery indoors, place it near a sunny window or use a grow light to supplement natural light.
How often should I water my celery plant?
Celery needs consistent moisture to grow properly. Water deeply whenever the top inch of soil feels dry to the touch. Avoid letting the soil dry out completely, as this can stress the plant and affect its growth. During hot weather, you may need to water more frequently. Mulching around the base of the plant can help retain moisture in the soil.
What are some common pests and diseases that affect celery?
Common pests that can affect celery include aphids, celery leaf tiers, and carrot weevils. Diseases include celery blight, pink rot, and fusarium wilt. Regularly inspect your plants for signs of pests or diseases. You can use organic pest control methods, such as insecticidal soap or neem oil, to control pests. Ensure good air circulation around your plants to prevent fungal diseases.
Can I grow celery indoors year-round?
Yes, you can grow celery indoors year-round, provided you have adequate light and humidity. Place your celery plant near a sunny window or use a grow light to provide sufficient light. Maintain a consistent temperature and humidity level. You may need to mist the plant regularly to increase humidity, especially during dry winter months.
How do I know when my celery is ready to harvest?
Celery is ready to harvest when the stalks are at least 6-8 inches long and have reached a desirable thickness. You can harvest individual stalks as needed, or you can harvest the entire plant at once. To harvest, simply cut the stalks at the base of the plant with a sharp knife.
Can I eat the leaves of the celery plant?
Yes, the leaves of the celery plant are edible and have a similar flavor to the stalks, although they can be slightly stronger. You can use celery leaves in salads, soups, stews, or as a garnish. They can also be dried and used as a seasoning.
What if my celery stalks are bitter?
Bitter celery stalks can be caused by several factors, including insufficient watering, high temperatures, and nutrient deficiencies. Ensure that your celery plant is getting enough water and is protected from extreme heat. You can also fertilize the plant with a balanced fertilizer to provide it with the necessary nutrients. Blanching the stalks by covering them with soil or paper for a few weeks before harvest can also help reduce bitterness.
How can I prevent my celery from bolting (going to seed)?
Bolting is often triggered by stress, such as extreme temperatures or inconsistent watering. To prevent bolting, provide your celery plant with consistent moisture, protect it from extreme heat, and ensure that it has adequate nutrients. Choose bolt-resistant varieties of celery if you live in an area with hot summers.
Is growing celery from a base as nutritious as growing from seed?
Yes, growing celery from a base will produce celery that is just as nutritious as celery grown from seed. The nutritional content of the celery is determined by the growing conditions, such as soil quality, sunlight, and water, rather than the method of propagation.
What are the benefits of growing my own celery?
Growing your own celery offers several benefits, including:
* Freshness: Homegrown celery is fresher and more flavorful than store-bought celery.
* Cost savings: You can save money by growing your own celery instead of buying it from the store.
* Sustainability: Growing your own celery reduces your carbon footprint and supports sustainable gardening practices.
* Control over growing practices: You have control over the growing practices, ensuring that your celery is grown without harmful pesticides or chemicals.
* Educational experience: Growing your own celery is a fun and educational experience that can teach you about plant propagation and gardening.
Leave a Comment