

Bottle planters: who knew that your recycling bin could be the secret to a bountiful garden? I’m always on the lookout for clever ways to maximize my garden yield without breaking the bank, and that’s exactly what led me down the path of upcycled bottle planters.
The concept of repurposing materials for gardening isn’t new. Throughout history, resourceful gardeners have used everything from old tires to discarded containers to cultivate their crops. This ingenuity reflects a deep connection to the land and a desire to make the most of available resources. Think about it – our grandparents and great-grandparents often relied on these kinds of resourceful techniques out of necessity!
But why should you consider bottle planters? Well, space is often a major constraint for urban gardeners, and traditional pots can be expensive. Bottle planters offer a fantastic solution. They’re incredibly space-efficient, allowing you to create vertical gardens on balconies, patios, or even indoors. Plus, they’re practically free! Imagine transforming those empty soda bottles into thriving herb gardens or vibrant flower displays.
In this DIY guide, I’m going to share my favorite tricks and hacks for creating effective and beautiful bottle planters that will boost your garden yield and add a touch of eco-friendly charm to your space. Get ready to unleash your inner upcycling artist and watch your garden flourish!
DIY Bottle Planters: A Thrifty and Eco-Friendly Garden Yield Boost!
Hey there, fellow gardening enthusiasts! Are you looking for a fun, budget-friendly, and eco-conscious way to expand your garden and give your plants a happy home? Look no further! We’re diving into the wonderful world of bottle planters. I’m going to show you how to transform those discarded plastic bottles into charming and functional planters that will not only add a unique touch to your space but also help you reduce waste. Get ready to unleash your creativity and give your green thumb a workout!
What You’ll Need: The Supply Roundup
Before we get our hands dirty, let’s gather our supplies. The beauty of this project is that it primarily uses recycled materials, making it super sustainable!
* Plastic Bottles: This is the star of the show! Collect various sizes and shapes of plastic bottles. Soda bottles, water bottles, juice bottles – they all work! Just make sure they’re clean and dry. The thicker the plastic, the better, as it will be more durable.
* Scissors or Utility Knife: For cutting the bottles. Be careful and always cut away from yourself. A sharp utility knife is great for thicker bottles, but scissors work well for thinner ones.
* Potting Soil: Choose a good quality potting mix that suits the type of plants you’ll be growing.
* Seeds or Seedlings: Decide what you want to grow! Herbs, flowers, vegetables – the possibilities are endless.
* Water: For watering your plants, of course!
* Optional:
* Paint and Brushes: To decorate your planters and add a personal touch. Acrylic paint works best.
* Markers: For labeling your plants.
* String or Wire: For hanging your planters.
* Drill or Nail: For creating drainage holes (if needed).
* Gloves: To protect your hands.
Preparing Your Bottles: The Foundation for Growth
This is where we transform those ordinary bottles into something extraordinary!
1. Clean and Dry: Thoroughly wash your plastic bottles with soap and water to remove any residue. Make sure they are completely dry before proceeding. This will help the paint adhere better if you plan to decorate them.
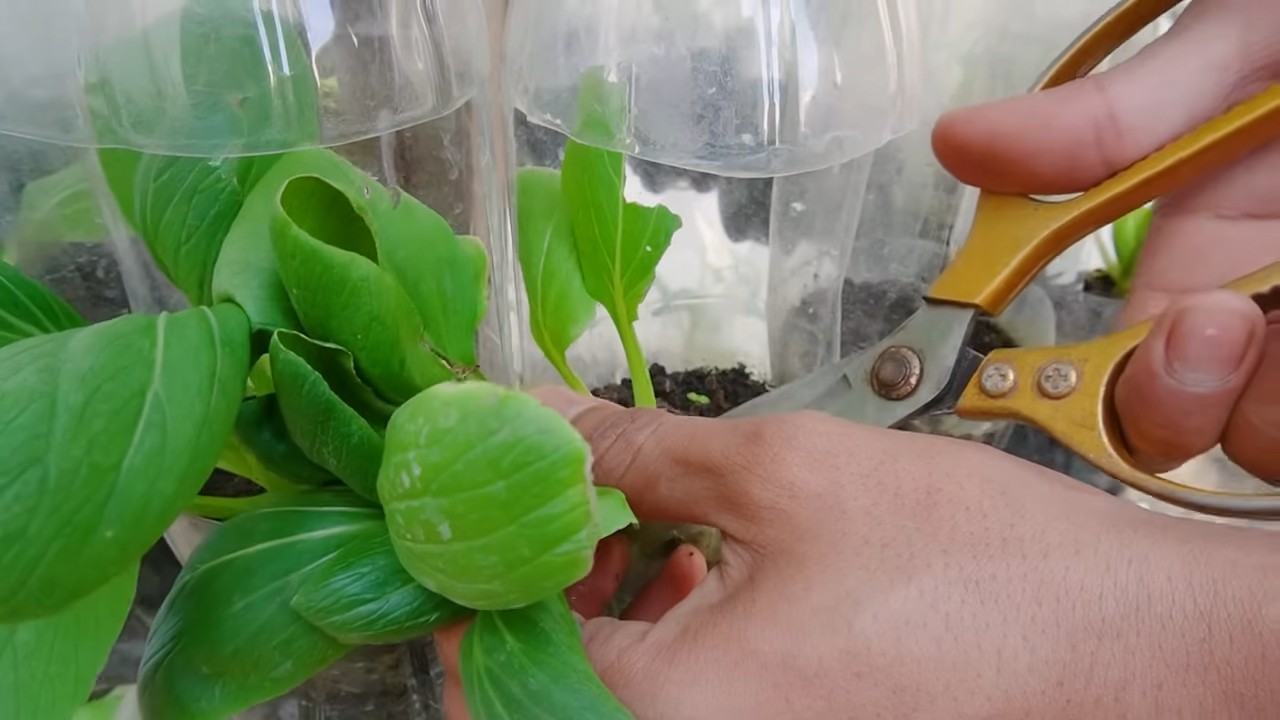
2. Cutting the Bottles: There are several ways to cut your bottles, depending on the type of planter you want to create. Here are a few popular options:
* Horizontal Cut: This is the most common method. Decide where you want to cut the bottle (usually about halfway down). Use your scissors or utility knife to carefully cut around the bottle. You can create a deeper planter by cutting closer to the bottom or a shallower one by cutting higher up.
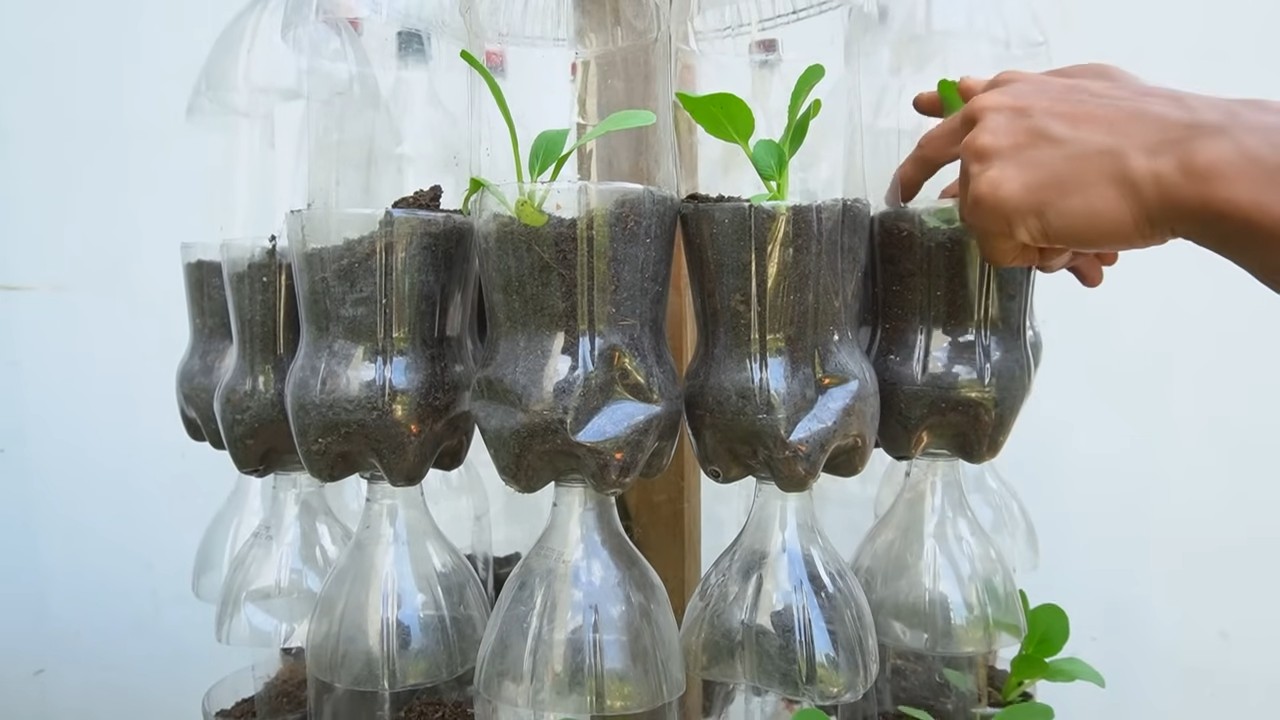
* Vertical Cut: Cut the bottle vertically from the top to the bottom. This is great for creating hanging planters or for making a larger opening for your plants. You can cut the bottle in half or create multiple vertical cuts to create a more decorative effect.
* Self-Watering Planter: Cut the bottle in half horizontally. Invert the top half and place it inside the bottom half. This creates a reservoir of water that the plant can draw from as needed. You’ll need to create a wick (using cotton rope or fabric) that extends from the soil in the top half down into the water in the bottom half.
3. Smoothing the Edges: After cutting the bottles, the edges can be sharp. Use sandpaper or a lighter (carefully!) to smooth them out. If using a lighter, quickly run the flame along the edge to melt and smooth it. Be extremely cautious when using a lighter and do this in a well-ventilated area.
4. Drainage Holes (Optional but Recommended): Most plants need good drainage to prevent root rot. If you’re not using a self-watering system, create drainage holes in the bottom of your planters. You can use a drill, a nail, or even a hot glue gun to create these holes. Just be sure to make enough holes to allow excess water to drain freely.
Decorating Your Planters: Let Your Creativity Bloom!
This is where you can really personalize your bottle planters and make them your own!
1. Painting: Acrylic paint works best for painting plastic bottles. You may need to apply a primer first to help the paint adhere better. Let the primer dry completely before painting. Then, apply several coats of paint, allowing each coat to dry before applying the next. Get creative with your designs! You can paint solid colors, stripes, polka dots, or even intricate patterns.
2. Labeling: Use markers to label your plants. This is especially helpful if you’re growing multiple herbs or vegetables. You can write the name of the plant directly on the bottle or create small labels and attach them with string or glue.
3. Adding Embellishments: Get creative with other embellishments! You can glue on beads, buttons, shells, or anything else that strikes your fancy. You can also wrap the bottles with twine, ribbon, or fabric.
Planting Your Plants: Nurturing New Life
Now for the fun part – planting your plants!
1. Fill with Potting Soil: Fill your prepared bottle planters with good quality potting soil. Leave about an inch of space at the top of the planter.
2. Plant Your Seeds or Seedlings: If you’re planting seeds, follow the instructions on the seed packet. If you’re planting seedlings, gently remove them from their containers and place them in the planters. Make sure the roots are covered with soil.
3. Water Thoroughly: Water your plants thoroughly after planting. Make sure the water drains freely from the drainage holes (if you have them).
4. Place in a Sunny Location: Most plants need plenty of sunlight to thrive. Place your bottle planters in a sunny location where they will receive at least six hours of sunlight per day.
Hanging Your Planters: Elevating Your Garden
If you want to create hanging planters, here’s how to do it:
1. Drill Holes: Drill holes near the top of the bottle planter. You’ll need at least two holes, but four holes will provide more stability.
2. Thread String or Wire: Thread string or wire through the holes. Make sure the string or wire is strong enough to support the weight of the planter and the soil.
3. Hang Your Planters: Hang your planters from a hook, a tree branch, or a railing. Make sure the location is sturdy and can support the weight of the planters.
Maintaining Your Bottle Planters: Keeping Your Garden Thriving
To keep your bottle planters thriving, here are a few tips:
* Water Regularly: Water your plants regularly, especially during hot weather. Check the soil moisture by sticking your finger into the soil. If the soil feels dry, it’s time to water.
* Fertilize: Fertilize your plants every few weeks with a balanced fertilizer. Follow the instructions on the fertilizer package.
* Prune: Prune your plants regularly to encourage growth and prevent them from becoming too leggy.
* Repot: As your plants grow, they may need to be repotted into larger containers. Choose a container that is slightly larger than the current one.
* Protect from Frost: If you live in an area with cold winters, protect your bottle planters from frost. You can bring them indoors or cover them with blankets or burlap.
Bottle Planter Ideas: Inspiration to Get You Started
Need some inspiration? Here are a few ideas to get you started:
* Herb Garden: Grow your favorite herbs in bottle planters and keep them near your kitchen for easy access.
* Strawberry Tower: Create a vertical strawberry tower by stacking bottle planters on top of each other.
* Succulent Garden: Succulents are drought-tolerant and easy to grow in bottle planters.
* Hanging Flower Baskets: Create colorful hanging flower baskets by planting flowers in bottle planters and hanging them from your porch or patio.
* Vegetable Garden: Grow small vegetables like lettuce, spinach, and radishes in bottle planters.
Troubleshooting: Addressing Common Issues
Even with the best intentions, you might encounter a few hiccups along the way. Here’s how to tackle some common problems:
* Yellowing Leaves: This could indicate overwatering, underwatering, or a nutrient deficiency. Adjust your watering schedule and fertilize your plants if needed.
* Root Rot: This is caused by overwatering and poor drainage. Make sure your planters have adequate drainage holes and avoid overwatering.
* Pests: Check your plants regularly for pests. If you find any, treat them with an appropriate insecticide or organic pest control method.
* Leggy Growth: This is caused by insufficient sunlight. Move your plants to a sunnier location.
The Benefits of Bottle Planters: More Than Just a Pretty Face
Creating bottle planters isn’t just a fun DIY project; it’s also a sustainable
Conclusion
So, there you have it! Transforming discarded plastic bottles into thriving planters is more than just a quirky DIY project; it’s a sustainable, cost-effective, and surprisingly rewarding way to boost your garden yield. We’ve explored the simple steps, highlighted the benefits, and hopefully, inspired you to look at those empty bottles in a whole new light.
Why is this DIY trick a must-try? Because it addresses several key concerns for modern gardeners. Firstly, it’s incredibly budget-friendly. Forget expensive pots and planters; you’re repurposing materials that would otherwise end up in landfills. Secondly, it’s space-saving. Bottle planters are perfect for balconies, patios, or even indoor gardening, allowing you to cultivate herbs, vegetables, and flowers even in the most compact spaces. Thirdly, it’s environmentally conscious. By reducing plastic waste and promoting sustainable practices, you’re contributing to a healthier planet. And finally, it’s fun! The creative possibilities are endless, and the satisfaction of watching your plants flourish in your upcycled containers is truly unmatched.
But the beauty of this DIY project lies in its adaptability. Feel free to experiment with different bottle sizes and shapes. Larger bottles are ideal for tomatoes, peppers, or even dwarf fruit trees, while smaller bottles are perfect for herbs, succulents, or strawberries. Consider painting your bottle planters to add a splash of color to your garden or using different types of soil mixes to cater to the specific needs of your plants. You can even create a vertical garden by hanging your bottle planters from a wall or fence, maximizing your space and creating a stunning visual display.
Don’t be afraid to get creative and personalize your bottle planters to suit your own style and preferences. Think about adding drainage holes to the bottom of your bottles to prevent waterlogging, or using a self-watering system by inserting a wick from the soil into a water reservoir at the bottom of the bottle. The possibilities are truly endless!
We wholeheartedly encourage you to give this DIY bottle planters garden yield boosting trick a try. It’s a simple, effective, and rewarding way to enhance your gardening experience while making a positive impact on the environment. Once you’ve created your own bottle planters, we’d love to hear about your experience! Share your photos, tips, and tricks in the comments below. Let’s inspire each other to create beautiful and sustainable gardens, one bottle at a time. What are you waiting for? Start collecting those bottles and get gardening!
Frequently Asked Questions (FAQ)
What types of plastic bottles are best for bottle planters?
Ideally, you should use PET (polyethylene terephthalate) bottles, which are commonly used for water and soda. These bottles are durable and relatively safe for growing plants. Avoid using bottles made from PVC (polyvinyl chloride), as they can leach harmful chemicals into the soil. Always clean the bottles thoroughly before using them as planters. Remove any labels and residue to ensure a clean and healthy environment for your plants.
How do I ensure proper drainage in my bottle planters?
Proper drainage is crucial to prevent waterlogging and root rot. Drill or poke several drainage holes in the bottom of each bottle planter. You can also add a layer of gravel or small stones at the bottom of the bottle before adding soil to further improve drainage. Monitor the moisture levels in the soil regularly and adjust your watering accordingly.
What kind of soil should I use for my bottle planters?
The best type of soil depends on the plants you’re growing. In general, a well-draining potting mix is a good choice for most plants. You can also amend the soil with compost or other organic matter to improve its fertility and water retention. For succulents and cacti, use a soil mix specifically designed for these plants, which typically contains a higher proportion of sand or perlite.
How often should I water my bottle planters?
The frequency of watering depends on several factors, including the type of plant, the weather conditions, and the size of the bottle. Check the soil moisture regularly by sticking your finger into the soil. If the soil feels dry to the touch, it’s time to water. Avoid overwatering, as this can lead to root rot. Water thoroughly until water drains out of the drainage holes.
Can I grow vegetables in bottle planters?
Yes, you can definitely grow vegetables in bottle planters! Smaller vegetables like herbs, lettuce, spinach, and radishes are particularly well-suited for bottle planters. You can also grow larger vegetables like tomatoes, peppers, and cucumbers, but you’ll need to use larger bottles and provide adequate support for the plants. Ensure that the plants receive enough sunlight and nutrients to thrive.
How do I fertilize plants in bottle planters?
Plants in bottle planters need regular fertilization to thrive. You can use a liquid fertilizer or a slow-release fertilizer. Follow the instructions on the fertilizer package carefully. Avoid over-fertilizing, as this can damage the plants. You can also add compost or other organic matter to the soil to provide a slow-release source of nutrients.
How do I protect my bottle planters from pests and diseases?
Regularly inspect your plants for signs of pests or diseases. If you spot any problems, take action immediately. You can use organic pesticides or fungicides to control pests and diseases. You can also try companion planting to deter pests and attract beneficial insects. Ensure that your plants have good air circulation to prevent fungal diseases.
Can I use bottle planters indoors?
Yes, bottle planters are a great option for indoor gardening. Place your bottle planters in a sunny location, such as near a window. You may need to supplement the natural light with artificial light, especially during the winter months. Ensure that the plants receive adequate ventilation and humidity.
How long will my bottle planters last?
The lifespan of your bottle planters depends on the type of plastic used and the environmental conditions. PET bottles are relatively durable and can last for several years. However, they can become brittle and crack over time, especially if exposed to direct sunlight. To extend the lifespan of your bottle planters, protect them from extreme weather conditions and handle them carefully.
What are some creative ideas for decorating my bottle planters?
There are endless possibilities for decorating your bottle planters! You can paint them with bright colors, add decorative stones or shells, or wrap them with twine or fabric. You can also create a vertical garden by hanging your bottle planters from a wall or fence. Let your imagination run wild and create unique and personalized bottle planters that reflect your own style. Remember, the goal is to create a beautiful and sustainable garden that you can enjoy for years to come. Embrace the opportunity to reduce waste, grow your own food, and connect with nature through this simple yet impactful DIY project.


Leave a Comment