

Bottle Grown Eggplants: Imagine harvesting plump, juicy eggplants right from your windowsill, balcony, or even the smallest of patios! Sounds like a dream, right? Well, it doesn’t have to be! I’m here to show you how to unlock the secrets of growing eggplants in bottles, a surprisingly simple and rewarding DIY project that’s perfect for urban gardeners and anyone with limited space.
Growing food in containers is nothing new. Throughout history, people have cultivated plants in pots, troughs, and various repurposed vessels. This method has allowed communities to thrive even in challenging environments. Now, we’re taking it a step further by utilizing plastic bottles, transforming waste into a vibrant ecosystem for our favorite vegetables.
Why should you try this DIY trick? Because it’s incredibly space-saving, cost-effective, and environmentally friendly! Many of us dream of fresh, homegrown produce, but lack the sprawling garden space to make it a reality. Bottle gardening offers a fantastic solution, allowing you to enjoy the taste of homegrown eggplants without needing acres of land. Plus, it’s a great way to recycle those plastic bottles that might otherwise end up in a landfill. So, let’s dive in and discover how easy it is to grow your own bottle grown eggplants!
Growing Eggplants Upside Down in Bottles: A Fun DIY Project!
Hey there, fellow gardening enthusiasts! I’m super excited to share a quirky and effective way to grow eggplants – upside down in bottles! This method is perfect if you’re short on space, want a unique garden feature, or just love experimenting. Trust me, it’s easier than you think, and the results are pretty darn cool.
Why Upside Down Eggplants?
Before we dive in, let’s talk about why this method is so neat.
* Space Saver: Ideal for balconies, patios, or small gardens.
* Pest Control: Less ground contact means fewer soil-borne pests.
* Better Air Circulation: Reduces the risk of fungal diseases.
* Unique Aesthetic: Let’s be honest, it looks awesome!
* Easy Harvesting: No bending over to pick your eggplants.
Materials You’ll Need
Alright, let’s gather our supplies. You probably have a lot of this stuff lying around already!
* Large Plastic Bottles: Think 2-liter soda bottles or even larger water jugs. The bigger, the better, to give your eggplant roots plenty of room.
* Healthy Eggplant Seedlings: Choose a compact variety that’s well-suited for container gardening. Look for healthy leaves and a sturdy stem.
* Potting Mix: A good quality potting mix is crucial. It should be well-draining and nutrient-rich.
* Landscape Fabric or Burlap: To prevent soil from falling out of the bottle’s opening.
* Sharp Knife or Scissors: For cutting the bottles.
* Drill or Nail: To create drainage holes.
* Watering Can: For, well, watering!
* Fertilizer: A balanced, slow-release fertilizer is ideal.
* Gloves: To keep your hands clean.
* Hanging Mechanism: Strong wire, rope, or chain to hang your bottles.
* Measuring Tape: To ensure accurate cuts.
* Safety Glasses: To protect your eyes while cutting.
Preparing the Bottles
This is where we get our hands dirty (or, well, keep them clean with gloves!).
1. Clean the Bottles: Thoroughly wash the bottles with soap and water to remove any residue. Rinse well.
2. Cut the Bottoms Off: Using your knife or scissors, carefully cut off the bottom of each bottle. Aim for a clean, even cut. I usually cut about 2-3 inches from the bottom.
3. Drill Drainage Holes: Drill or poke several drainage holes in the bottle cap. This is super important to prevent waterlogging.
4. Prepare the Landscape Fabric: Cut a circle of landscape fabric or burlap slightly larger than the bottle opening (the neck). This will act as a barrier to keep the soil in place.
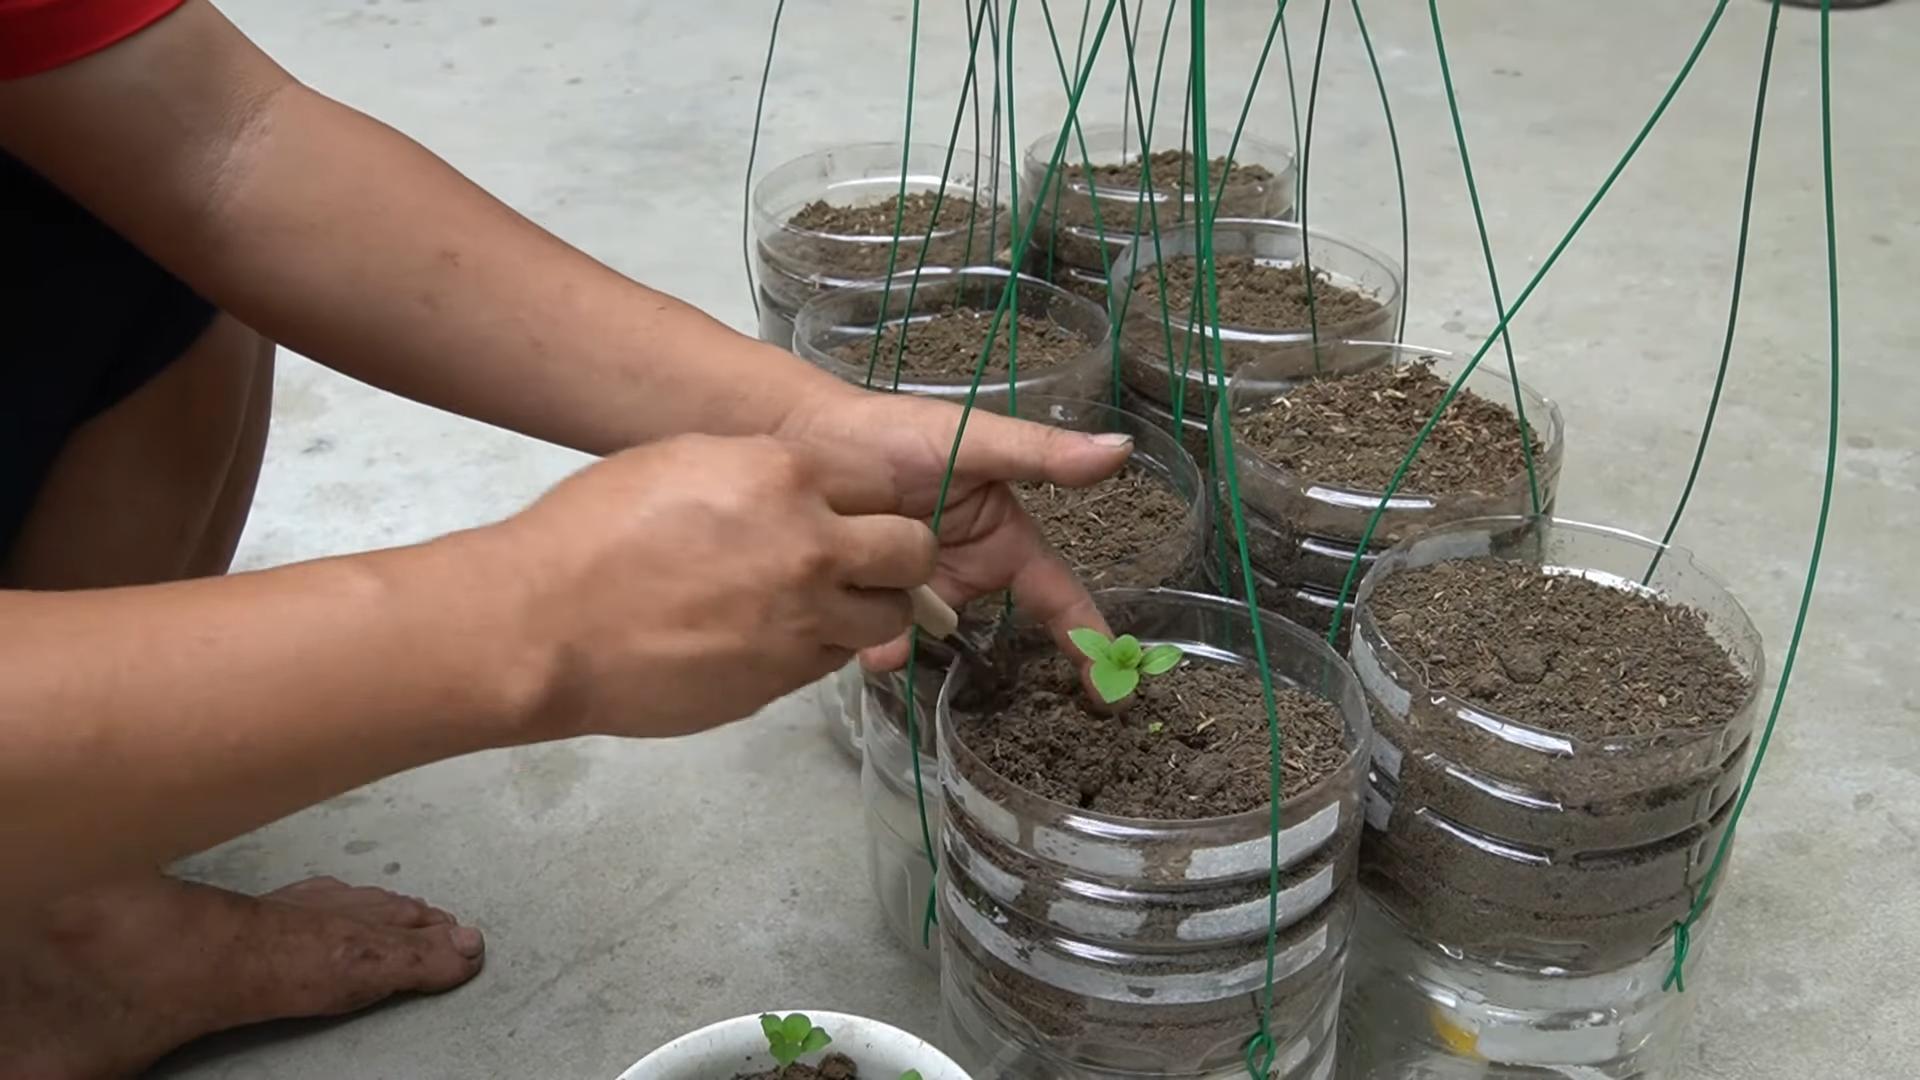
Planting Your Eggplant Seedlings
Now for the fun part – planting!
1. Insert the Landscape Fabric: Carefully push the landscape fabric circle into the bottle neck, creating a pouch. Make sure it’s secure and won’t fall out easily.
2. Add Potting Mix: Gently fill the bottle with potting mix, leaving about 2-3 inches of space at the top.
3. Create a Planting Hole: Make a small hole in the center of the potting mix, large enough to accommodate the eggplant seedling’s root ball.
4. Carefully Remove the Seedling: Gently remove the eggplant seedling from its container, being careful not to damage the roots.
5. Plant the Seedling: Insert the seedling into the hole, ensuring that the top of the root ball is level with the surrounding soil.
6. Backfill with Potting Mix: Gently backfill around the seedling with potting mix, firming it lightly.
7. Water Thoroughly: Water the newly planted seedling thoroughly, allowing the water to drain out of the drainage holes.
Hanging Your Eggplant Bottles
Time to get those bottles hanging!
1. Create Hanging Points: Depending on your chosen hanging mechanism, you’ll need to create points to attach it to the bottle. You can either drill small holes near the top of the bottle (be careful not to crack the plastic) or use a strong adhesive to attach hooks.
2. Attach the Hanging Mechanism: Securely attach your wire, rope, or chain to the hanging points. Make sure it’s strong enough to support the weight of the bottle, soil, and eventually, the eggplant.
3. Choose a Sunny Location: Select a location that receives at least 6-8 hours of sunlight per day. Eggplants love sunshine!
4. Hang the Bottles: Carefully hang the bottles in your chosen location, ensuring they are secure and won’t swing excessively in the wind.
Caring for Your Upside Down Eggplants
The hard work is done! Now it’s all about maintenance.
1. Watering: Water regularly, especially during hot weather. Check the soil moisture by sticking your finger into the top inch of soil. If it feels dry, it’s time to water. Water slowly and deeply, allowing the water to drain out of the drainage holes.
2. Fertilizing: Feed your eggplants with a balanced, slow-release fertilizer every few weeks. Follow the instructions on the fertilizer package. You can also use a liquid fertilizer diluted to half strength.
3. Pruning: Prune away any yellowing or dead leaves to encourage healthy growth. You can also pinch off any suckers (small shoots that grow between the main stem and branches) to direct the plant’s energy towards fruit production.
4. Pest Control: Keep an eye out for pests like aphids, spider mites, and flea beetles. If you spot any, treat them with an organic insecticide or insecticidal soap.
5. Support: As your eggplants grow, they may need additional support. You can use twine or plant ties to support the branches and prevent them from breaking under the weight of the fruit.
6. Pollination: Eggplants are self-pollinating, but you can help them along by gently shaking the plants or using a small paintbrush to transfer pollen from one flower to another.
7. Monitor for Diseases: Watch for signs of fungal diseases like powdery mildew or blossom end rot. Ensure good air circulation and avoid overwatering to prevent these problems. Treat with an appropriate fungicide if necessary.
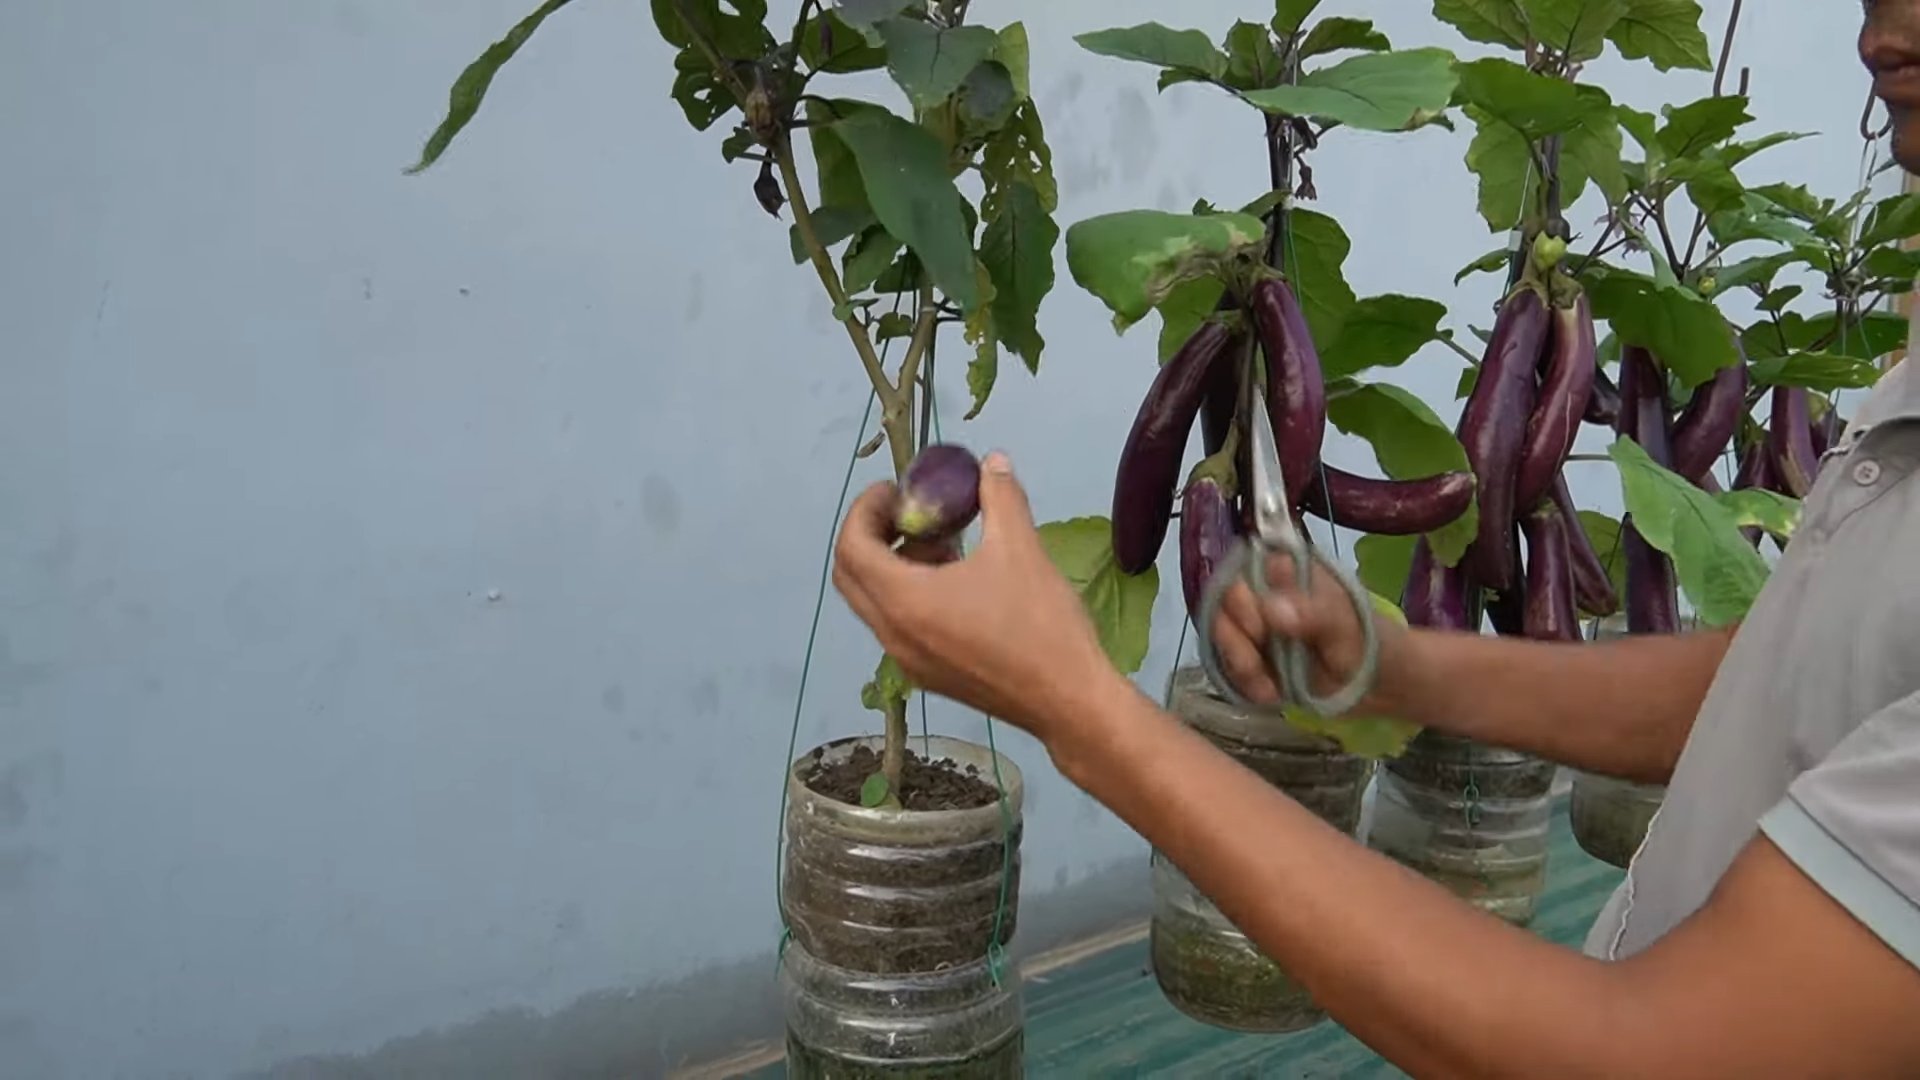
Harvesting Your Eggplants
The moment we’ve all been waiting for!
1. Check for Ripeness: Eggplants are typically ready to harvest when they are glossy, firm, and have reached their mature size. The skin should be smooth and unblemished.
2. Harvest Carefully: Use a sharp knife or pruning shears to cut the eggplant from the plant, leaving a small stem attached.
3. Enjoy Your Harvest: Enjoy your homegrown eggplants in your favorite recipes! They’re delicious grilled, roasted, or used in eggplant parmesan.
Troubleshooting Tips
* Yellowing Leaves: Could indicate overwatering, underwatering, or nutrient deficiency. Adjust your watering schedule and fertilize as needed.
* Blossom End Rot: Caused by calcium deficiency. Add calcium to the soil or use a calcium-rich fertilizer.
* Pest Infestations: Treat with organic insecticides or insecticidal soap.
* Slow Growth: Could be due to lack of sunlight, poor soil, or insufficient watering. Ensure your plants are getting enough sunlight, use a good quality potting mix, and water regularly.
Choosing the Right Eggplant Variety
Not all eggplants are created equal, especially when growing them upside down in containers. Here are a few varieties that I’ve found work particularly well:
* Patio Baby: As the name suggests, this variety is compact and perfect for containers. It produces small, bite-sized eggplants.
* Fairy Tale: This variety produces beautiful, striped eggplants that are tender and flavorful. It’s also relatively compact.
* Hansel: This variety produces clusters of small, elongated eggplants. It’s a prolific producer and well-suited for container gardening.
* Little Fingers: Another compact variety that produces small, slender eggplants. It’s a good choice for smaller containers.
When choosing your eggplant variety, consider the size of your container and the amount of sunlight your plants will receive. Compact varieties are generally a better choice for upside down growing, as they won’t become too top-heavy.
Tips for Success
* Start with Healthy Seedlings: Choose healthy, vigorous seedlings from a reputable nursery. Avoid seedlings that are leggy or have yellowing leaves.
* Use a Good Quality Potting Mix: Don’t skimp on the potting mix! A good quality potting mix will provide the nutrients and drainage that your eggplants
Conclusion
So, there you have it! Growing eggplants in bottles isn’t just a quirky gardening experiment; it’s a game-changer for small spaces, beginner gardeners, and anyone looking to maximize their yield. This method offers a surprising number of benefits, from protecting your precious seedlings from pests and harsh weather to providing a controlled environment that encourages healthy root development. It’s a fantastic way to enjoy fresh, homegrown produce, even if you only have a balcony or a sunny windowsill.
The beauty of this DIY trick lies in its simplicity and adaptability. You’re not confined to just one type of eggplant. Experiment with different varieties! Try growing smaller, more compact eggplants like Fairy Tale or Patio Baby, which are particularly well-suited for container gardening. You can also adjust the size of the bottle to accommodate larger varieties, just be sure to provide adequate support as the plant grows.
Don’t be afraid to get creative with your setup. Consider using different types of bottles – clear plastic, colored plastic, or even glass (with caution, of course!). You can also explore different potting mixes to find what works best for your specific climate and eggplant variety. Adding a slow-release fertilizer to your potting mix can provide a steady stream of nutrients, ensuring your eggplants thrive throughout the growing season.
But the real magic happens when you share your experiences. We encourage you to try this bottle-growing method and document your journey. Take pictures, share your successes (and your challenges!), and let us know what you learn. Did you find a particular type of bottle that worked best? Did you discover a secret to preventing common eggplant problems like blossom-end rot? Your insights can help other gardeners discover the joy of growing their own food, no matter how limited their space may be.
Ultimately, growing eggplants in bottles is about more than just producing vegetables; it’s about connecting with nature, learning new skills, and enjoying the satisfaction of nurturing something from seed to harvest. It’s a sustainable and rewarding way to bring fresh, healthy food to your table, and it’s a testament to the power of ingenuity and resourcefulness. So, grab a bottle, some potting mix, and a few eggplant seeds, and get ready to embark on a gardening adventure that’s both fun and fruitful. You might just be surprised at what you can grow! This **bottle grown eggplants** method is a must try!
Frequently Asked Questions (FAQ)
What kind of bottles are best for growing eggplants?
The ideal bottle is a large, sturdy plastic bottle, such as a 2-liter soda bottle or a gallon-sized water jug. Clear or translucent bottles are preferable as they allow sunlight to reach the soil. However, you can also use colored bottles, but be mindful that darker colors may absorb more heat, potentially overheating the soil in hot climates. Ensure the bottle is clean and free of any residue before planting. You can also use glass bottles, but handle them with extreme care to avoid breakage.
How do I prepare the bottle for planting?
First, thoroughly clean the bottle with soap and water. Remove any labels or adhesive. Next, cut the bottle in half horizontally. The bottom half will serve as the container for the eggplant, while the top half can be inverted and used as a makeshift greenhouse to protect the seedling in its early stages. Be sure to poke drainage holes in the bottom of the bottle to prevent waterlogging. You can use a nail, a screwdriver, or a drill to create these holes.
What type of potting mix should I use?
A well-draining potting mix is crucial for growing healthy eggplants in bottles. A mixture of equal parts potting soil, compost, and perlite or vermiculite is a good starting point. The potting soil provides nutrients, the compost adds organic matter, and the perlite or vermiculite improves drainage and aeration. Avoid using garden soil, as it can be too heavy and compact, hindering root growth.
How often should I water my bottle-grown eggplants?
Water your eggplants regularly, especially during hot and dry weather. The frequency of watering will depend on the size of the bottle, the type of potting mix, and the climate. Generally, you should water when the top inch of soil feels dry to the touch. Avoid overwatering, as this can lead to root rot. Ensure that excess water drains freely from the drainage holes.
How much sunlight do eggplants need?
Eggplants require at least 6-8 hours of direct sunlight per day to thrive. Place your bottle-grown eggplants in a sunny location, such as a south-facing window or a balcony that receives ample sunlight. If you live in a particularly hot climate, you may need to provide some afternoon shade to prevent the plants from overheating.
Do I need to fertilize my bottle-grown eggplants?
Yes, eggplants are heavy feeders and benefit from regular fertilization. Start fertilizing about two weeks after transplanting the seedlings into the bottles. Use a balanced fertilizer, such as a 10-10-10 or a 14-14-14, according to the package instructions. You can also use organic fertilizers, such as compost tea or fish emulsion. Fertilize every 2-3 weeks throughout the growing season.
How do I protect my bottle-grown eggplants from pests and diseases?
Regularly inspect your plants for signs of pests or diseases. Common eggplant pests include aphids, flea beetles, and spider mites. You can control these pests with insecticidal soap, neem oil, or by handpicking them off the plants. Common eggplant diseases include blossom-end rot, fungal leaf spots, and verticillium wilt. Prevent blossom-end rot by ensuring consistent watering and providing adequate calcium. Improve air circulation around the plants to prevent fungal diseases.
How do I support my bottle-grown eggplants as they grow?
As your eggplants grow, they may become top-heavy and require support. You can use stakes, trellises, or cages to support the plants. Insert the support structure into the bottle before the plant gets too large to avoid damaging the roots. Tie the stems of the eggplant to the support structure with soft twine or plant ties.
When can I harvest my bottle-grown eggplants?
Eggplants are typically ready to harvest 60-80 days after transplanting. The fruits should be firm, glossy, and have a deep color. Gently twist or cut the eggplants from the plant, leaving a small portion of the stem attached. Harvest regularly to encourage continued production.
Can I grow other vegetables in bottles using this method?
Yes, this bottle-growing method can be adapted for other vegetables, such as tomatoes, peppers, herbs, and lettuce. Choose varieties that are well-suited for container gardening and adjust the size of the bottle accordingly. The same principles of well-draining potting mix, adequate sunlight, regular watering, and fertilization apply to other vegetables as well.
Leave a Comment