

Growing Potatoes in Containers: Imagine harvesting a bounty of fresh, homegrown potatoes right from your patio or balcony! No sprawling garden needed. I’m so excited to share this incredibly rewarding and surprisingly simple DIY project with you. For centuries, potatoes have been a staple food source around the globe, from the Andean highlands where they originated to the bustling kitchens of today. Their versatility and nutritional value have made them a beloved crop, and now, you can easily cultivate your own supply, regardless of your living space.
But why bother with container gardening for potatoes? Well, let’s face it, not everyone has access to acres of farmland. Many of us are apartment dwellers or have limited yard space. That’s where the magic of container gardening comes in! This method allows you to control the soil quality, protect your precious spuds from pests and diseases, and even move them around to chase the sun. Plus, there’s something incredibly satisfying about nurturing a plant from seed (or in this case, a seed potato) to harvest. I’ve found that growing potatoes in containers is not only a practical solution for small-space gardening but also a fantastic way to connect with nature and enjoy the freshest, most flavorful potatoes imaginable. So, let’s dive in and discover the secrets to a successful potato harvest, right at your doorstep!
Growing Potatoes in Containers: A Bountiful Harvest on Your Patio!
Hey there, fellow gardening enthusiasts! I’m so excited to share my tried-and-true method for growing potatoes in containers. Forget vast fields – you can enjoy a fantastic potato harvest right on your balcony, patio, or even a sunny windowsill! This guide will walk you through every step, from choosing the right container to harvesting your delicious homegrown spuds. Let’s get digging!
Choosing the Right Container and Seed Potatoes
Before we even think about planting, we need to get our supplies in order. This is crucial for a successful potato-growing adventure.
* Container Size Matters: You’ll need a container that’s at least 15 gallons in size. I personally prefer using 20-gallon grow bags because they’re lightweight, breathable, and have handles for easy moving. A large trash can, a half-barrel, or even a sturdy laundry basket (with drainage holes!) will work too. The key is depth – potatoes need room to grow upwards as we “hill” them.
* Drainage is Key: No matter what container you choose, make sure it has excellent drainage. Potatoes hate sitting in soggy soil. Drill extra holes if necessary.
* Seed Potatoes: Don’t just grab any potato from the grocery store! Those are often treated to prevent sprouting. You need “seed potatoes,” which are specifically grown for planting. You can find them at your local garden center or online.
* Choosing Your Variety: Consider what kind of potatoes you like to eat. Red potatoes, Yukon Golds, Russets – the choice is yours! Different varieties have different growing times, so check the seed potato package for details.
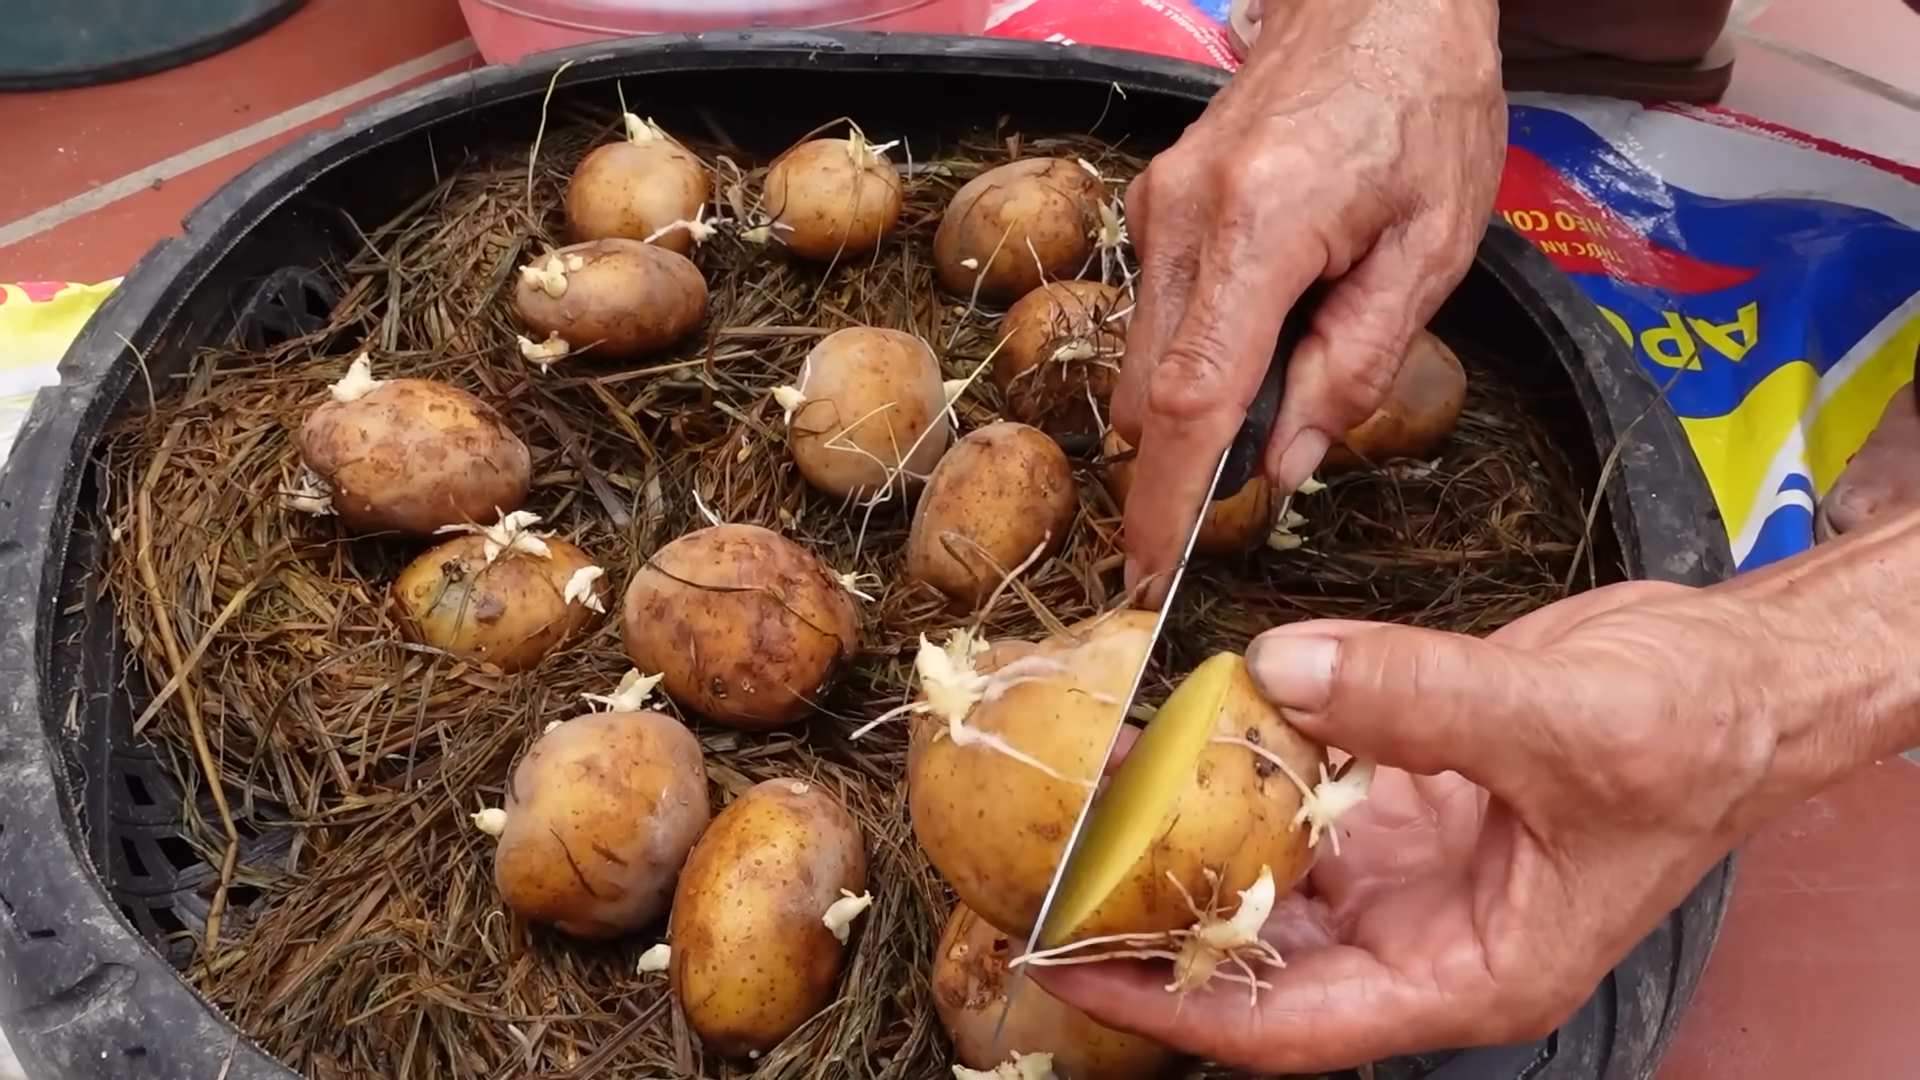
* Chitting (Sprouting) Your Seed Potatoes: This isn’t strictly necessary, but it gives your potatoes a head start. A few weeks before planting, place your seed potatoes in a cool, bright location (but not direct sunlight). Egg cartons work great for this. You’ll see little sprouts, called “eyes,” start to emerge.
Preparing Your Container and Soil
Now that we have our container and seed potatoes ready, let’s get our hands dirty!
* Choosing the Right Soil: Potatoes need well-draining, slightly acidic soil. A mix of equal parts potting soil, compost, and peat moss (or coco coir as a sustainable alternative) works wonders. Avoid using garden soil, as it can be too heavy and compact.
* Filling the Container: Start by adding about 4-6 inches of your soil mixture to the bottom of the container. This is just the beginning! We’ll be adding more soil as the potato plants grow.
* Cutting Seed Potatoes (Optional): If your seed potatoes are large (bigger than an egg), you can cut them into smaller pieces. Each piece should have at least one or two “eyes.” Let the cut pieces dry for a day or two to prevent rotting. I usually don’t cut mine unless they are huge.
* Planting the Seed Potatoes: Place the seed potato pieces (or whole small seed potatoes) on top of the soil, with the “eyes” facing upwards. Space them about 8-10 inches apart if you’re planting multiple pieces in the same container.
* Covering the Seed Potatoes: Cover the seed potatoes with another 4-6 inches of soil. Gently water the soil until it’s moist but not soggy.
The “Hilling” Process: Encouraging More Potatoes!
This is where the magic happens! “Hilling” is the process of adding more soil to the potato plants as they grow. This encourages the plant to produce more potatoes along the buried stem.
* Waiting for Growth: Be patient! It can take a week or two for the potato plants to emerge from the soil.
* First Hilling: Once the plants are about 6-8 inches tall, add more soil to the container, burying the stems up to the bottom set of leaves. Leave the top leaves exposed.
* Subsequent Hillings: Continue hilling every 2-3 weeks as the plants grow taller. Each time, add enough soil to bury the stems up to the bottom set of leaves.
* Watering During Hilling: Water the soil thoroughly after each hilling.
* Why Hilling Works: Potatoes form along the underground stems. By burying the stems, you’re creating more opportunities for potatoes to grow!
Caring for Your Potato Plants
Now that your potatoes are growing, it’s important to provide them with the right care.
* Watering: Potatoes need consistent moisture, especially during flowering and tuber formation. Water deeply whenever the top inch of soil feels dry. Avoid overwatering, which can lead to rot.
* Sunlight: Potatoes need at least 6-8 hours of sunlight per day. Place your container in a sunny location.
* Fertilizing: Feed your potato plants every 2-3 weeks with a balanced fertilizer. Look for a fertilizer that’s specifically formulated for vegetables. I like to use a liquid fertilizer diluted according to the package instructions.
* Pest Control: Keep an eye out for pests like aphids, potato beetles, and flea beetles. Hand-picking them off the plants is often effective. You can also use insecticidal soap or neem oil if necessary.
* Disease Prevention: Good air circulation is important for preventing diseases like blight. Avoid overcrowding the plants and water in the morning so the foliage has time to dry before nightfall.
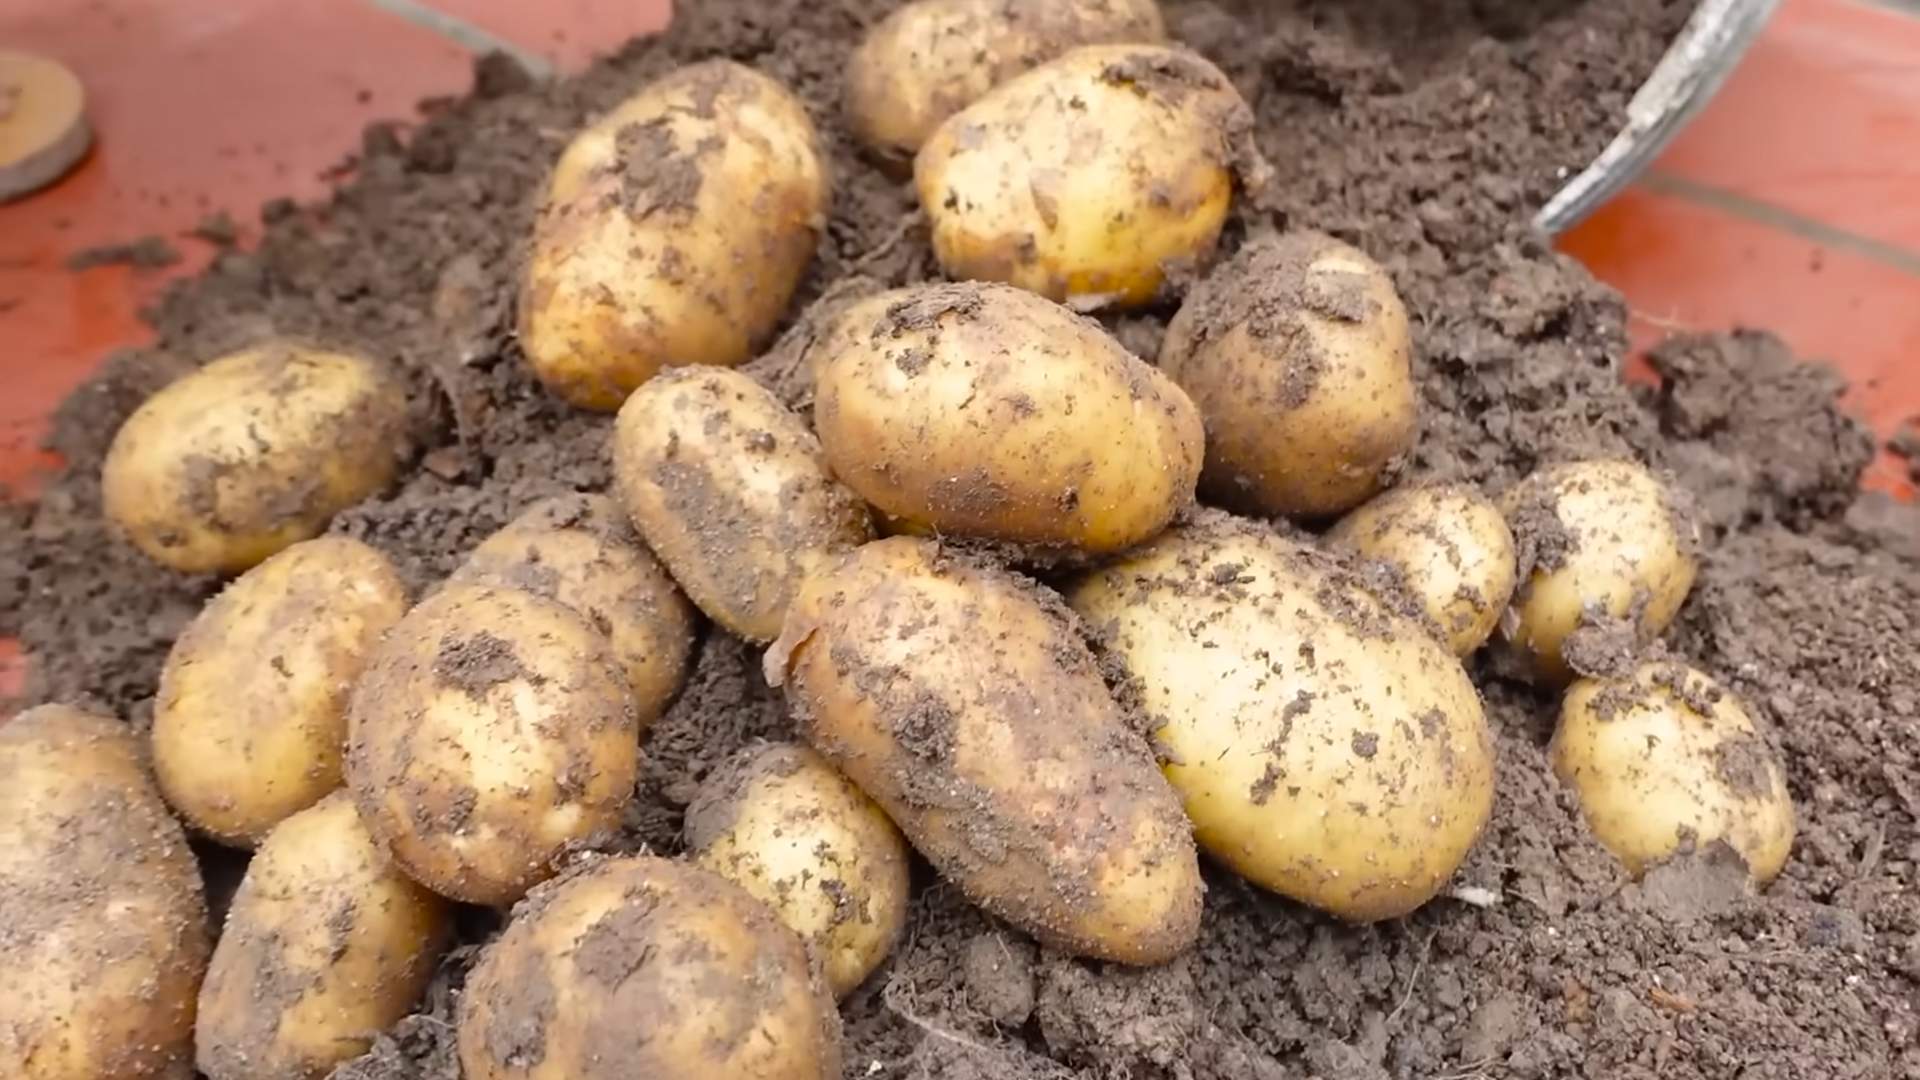
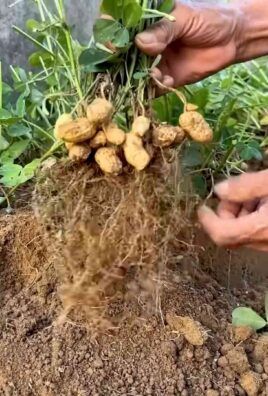
Harvesting Your Potatoes: The Grand Finale!
The moment we’ve all been waiting for! Harvesting your homegrown potatoes is incredibly rewarding.
* When to Harvest: You can harvest “new potatoes” (small, tender potatoes) about 2-3 weeks after the plants flower. These are delicious boiled or roasted. For larger, mature potatoes, wait until the foliage starts to turn yellow and die back. This usually takes about 80-100 days from planting.
* Harvesting New Potatoes: Gently dig around the base of the plant and carefully remove a few small potatoes. Be careful not to disturb the rest of the plant.
* Harvesting Mature Potatoes: Once the foliage has died back, stop watering the plants. Let the soil dry out for a week or two. Then, carefully dump the container onto a tarp or sheet of plastic.
* Digging for Treasure: Gently sift through the soil and collect your potatoes! Be careful not to damage them.
* Curing Potatoes (Optional): If you plan to store your potatoes for a long time, you’ll need to cure them. Spread the potatoes out in a cool, dark, well-ventilated place for about a week. This will help them develop a thicker skin and prevent rotting.
* Storing Potatoes: Store cured potatoes in a cool, dark, dry place. A root cellar is ideal, but a basement or garage will also work. Avoid storing potatoes near apples or onions, as they can cause them to sprout prematurely.
Troubleshooting Common Potato Problems
Even with the best care, you might encounter some challenges along the way. Here are a few common problems and how to address them:
* Potato Blight: This fungal disease can cause brown spots on the leaves and stems. Remove affected foliage immediately and treat with a fungicide if necessary. Good air circulation and avoiding overhead watering can help prevent blight.
* Potato Beetles: These pesky beetles can defoliate your potato plants. Hand-picking them off the plants is often effective. You can also use insecticidal soap or neem oil.
* Scab: This disease causes rough, scabby patches on the potato skin. It’s more common in alkaline soils. Adding sulfur to the soil can help lower the pH.
* Green Potatoes: Potatoes that are exposed to sunlight can turn green and produce a toxic substance called solanine. Avoid eating green potatoes. Make sure to hill your potatoes properly to keep them covered with soil.
Enjoying Your Homegrown Potatoes
Congratulations! You’ve successfully grown potatoes in containers. Now it’s time to enjoy the fruits (or rather, tubers) of your labor! There’s nothing quite like the taste of freshly harvested, homegrown potatoes. Roast them, boil them, mash them, fry them – the possibilities are endless! I love making homemade potato salad with my homegrown red potatoes.
Growing potatoes in containers is a fun and rewarding experience. With a little bit of planning and care, you can enjoy a bountiful harvest of delicious potatoes right on your patio. Happy gardening!
Conclusion
So, there you have it! Growing potatoes in containers is not just a feasible alternative to traditional gardening; it’s a rewarding and accessible way to enjoy fresh, homegrown potatoes, even if you’re short on space. We’ve walked you through the entire process, from choosing the right container and seed potatoes to understanding the importance of “hilling” and knowing when to harvest your bounty.
Why is this DIY trick a must-try? Because it empowers you to take control of your food source, connect with nature, and experience the unparalleled satisfaction of harvesting something you’ve nurtured from start to finish. Imagine the taste of those freshly dug potatoes, still warm from the sun, transformed into crispy fries, creamy mashed potatoes, or a hearty potato salad. The flavor is simply unmatched by anything you can buy in a store.
But the benefits extend beyond just taste. Container gardening allows you to control the soil quality, ensuring your potatoes are grown in a healthy, nutrient-rich environment. It also minimizes the risk of soilborne diseases and pests that can plague traditional potato crops. Plus, it’s incredibly convenient! You can move your containers to follow the sun, protect them from frost, or simply keep them close to your kitchen for easy access.
Looking for variations? Absolutely! Experiment with different potato varieties to discover your favorites. Try using different types of containers, such as grow bags, trash cans, or even repurposed laundry baskets. Consider adding companion plants like marigolds or basil to deter pests and attract beneficial insects. You can even try vertical potato towers for maximum yield in minimal space. The possibilities are endless!
Ultimately, growing potatoes in containers is about more than just producing food; it’s about fostering a connection to the earth, learning new skills, and enjoying the simple pleasures of gardening. It’s a project that’s perfect for beginners and experienced gardeners alike.
We wholeheartedly encourage you to give this DIY trick a try. Don’t be intimidated by the process; it’s much easier than you might think. Start small, be patient, and enjoy the journey. And most importantly, share your experience with us! We’d love to hear about your successes, your challenges, and any tips or tricks you discover along the way. Post photos of your potato plants, share your favorite potato recipes, and let’s create a community of container potato growers!
So, grab a container, some seed potatoes, and get ready to experience the joy of growing your own delicious, homegrown potatoes. You won’t regret it! This method of growing potatoes in containers is a game changer.
Frequently Asked Questions (FAQ)
What kind of container is best for growing potatoes?
The ideal container for growing potatoes should be large enough to accommodate the growing root system and allow for “hilling” – the process of adding more soil as the plant grows. A container that is at least 20 inches in diameter and 24 inches deep is generally recommended. Good options include large pots, grow bags, trash cans (with drainage holes), or even repurposed containers like laundry baskets. Make sure the container has adequate drainage to prevent waterlogging, which can lead to rot.
What type of soil should I use for growing potatoes in containers?
Potatoes thrive in well-draining, slightly acidic soil that is rich in organic matter. A good potting mix specifically formulated for vegetables is a great choice. You can also create your own mix by combining equal parts of compost, peat moss (or coconut coir), and perlite or vermiculite. Avoid using garden soil, as it can be too heavy and compact, hindering drainage and root development.
How many seed potatoes can I plant in one container?
The number of seed potatoes you can plant in a container depends on the size of the container and the size of the seed potatoes. As a general rule, you can plant 2-3 seed potatoes in a container that is 20 inches in diameter. If you are using larger seed potatoes, you may want to plant only one or two per container. Make sure to space the seed potatoes evenly around the container.
How often should I water my potato plants in containers?
Potato plants in containers need consistent moisture, especially during hot weather. Water deeply whenever the top inch of soil feels dry to the touch. Avoid overwatering, as this can lead to root rot. The frequency of watering will depend on factors such as the weather, the size of the container, and the type of soil you are using. Check the soil moisture regularly and adjust your watering schedule accordingly.
How much sunlight do potato plants need?
Potato plants need at least 6-8 hours of direct sunlight per day to thrive. Choose a location for your containers that receives plenty of sunlight. If you live in a particularly hot climate, you may want to provide some afternoon shade to prevent the plants from overheating.
What does “hilling” mean, and why is it important?
“Hilling” is the process of adding more soil to the container as the potato plants grow. This encourages the plants to produce more potatoes along the buried stem. As the plant grows, gradually add soil to the container, covering the lower portion of the stem. Leave the top few sets of leaves exposed. Repeat this process every few weeks until the container is almost full. Hilling is crucial for maximizing your potato yield.
How do I know when my potatoes are ready to harvest?
The timing of your potato harvest will depend on the variety of potato you are growing. Generally, early-season potatoes can be harvested when the plants begin to flower. These potatoes will be smaller and have thinner skins. For larger, more mature potatoes, wait until the foliage begins to yellow and die back. At this point, stop watering the plants and allow the soil to dry out slightly. You can then carefully dig into the container and harvest your potatoes.
Can I reuse the soil from my potato containers?
Yes, you can reuse the soil from your potato containers, but it’s important to amend it with fresh compost and nutrients before planting again. Potatoes are heavy feeders, so the soil will likely be depleted of nutrients after a growing season. Adding compost will replenish the nutrients and improve the soil structure. You may also want to consider adding a slow-release fertilizer to provide additional nutrients.
Are there any pests or diseases that commonly affect potatoes grown in containers?
While container gardening can help minimize the risk of pests and diseases, potatoes can still be susceptible to certain problems. Common pests include aphids, potato beetles, and flea beetles. Diseases include early blight, late blight, and potato scab. Regularly inspect your plants for signs of pests or diseases and take appropriate action if necessary. Organic pest control methods, such as insecticidal soap or neem oil, can be effective for controlling pests. Ensure good air circulation around the plants to prevent fungal diseases.
Can I grow potatoes in containers indoors?
While it’s possible to grow potatoes in containers indoors, it can be challenging to provide them with the necessary sunlight and growing conditions. Potatoes need a lot of light, so you would need to supplement with strong grow lights. Additionally, indoor environments can be prone to pests and diseases. If you do decide to grow potatoes indoors, choose a sunny location and provide adequate ventilation.
Leave a Comment