

Grow Bean Sprouts at Home – sounds intimidating, right? Trust me, it’s not! Forget those expensive grocery store trips for a handful of sprouts. I’m going to show you how to cultivate your own crunchy, nutritious bean sprouts right in your kitchen, and it’s easier than you think!
Sprouting, in general, has a rich history, dating back thousands of years. Ancient cultures recognized the incredible nutritional power packed into these tiny seedlings. In many Asian cuisines, bean sprouts are a staple, adding a delightful crunch and boost of vitamins to everything from stir-fries to salads. Think of all the delicious possibilities!
But why should *you* learn to grow bean sprouts at home? Well, for starters, it’s incredibly cost-effective. A bag of dried beans costs a fraction of what you’d pay for pre-sprouted ones. Plus, you have complete control over the growing process, ensuring they’re fresh, organic, and free from any unwanted additives. More importantly, in today’s world, knowing how to produce some of your own food is a valuable skill. It promotes self-sufficiency, reduces your carbon footprint, and connects you to the natural world. So, are you ready to ditch the store-bought sprouts and embark on this fun and rewarding DIY adventure with me? Let’s get sprouting!
Grow Your Own Crunchy Bean Sprouts: A Simple DIY Guide
Hey there, fellow DIY enthusiasts! I’m so excited to share one of my favorite kitchen hacks with you: growing your own bean sprouts at home. It’s surprisingly easy, incredibly rewarding, and a fantastic way to add fresh, crunchy goodness to your salads, stir-fries, and sandwiches. Plus, you’ll save money and reduce your reliance on store-bought sprouts, which can sometimes be a bit…questionable. Let’s dive in!
What You’ll Need
Before we get started, let’s gather our supplies. The beauty of this project is that you probably already have most of these items lying around:
* **Sprouting Beans:** Mung beans are the classic choice, but you can also use adzuki beans, lentils, or even chickpeas. Make sure they’re specifically labeled for sprouting or food use, not for planting. You can usually find them at health food stores, Asian markets, or online. I usually start with about 1/2 cup of dried beans.
* **A Wide-Mouth Jar:** A quart-sized mason jar works perfectly. You can also use a clean glass container.
* **Sprouting Lid or Cheesecloth:** You’ll need something to cover the jar that allows for drainage and airflow. A sprouting lid is ideal, but a piece of cheesecloth secured with a rubber band works just as well.
* **Water:** Clean, filtered water is best.
* **A Dark Place:** A cupboard, pantry, or even a covered box will do the trick.
* **A Bowl or Tray:** To prop the jar at an angle for drainage.
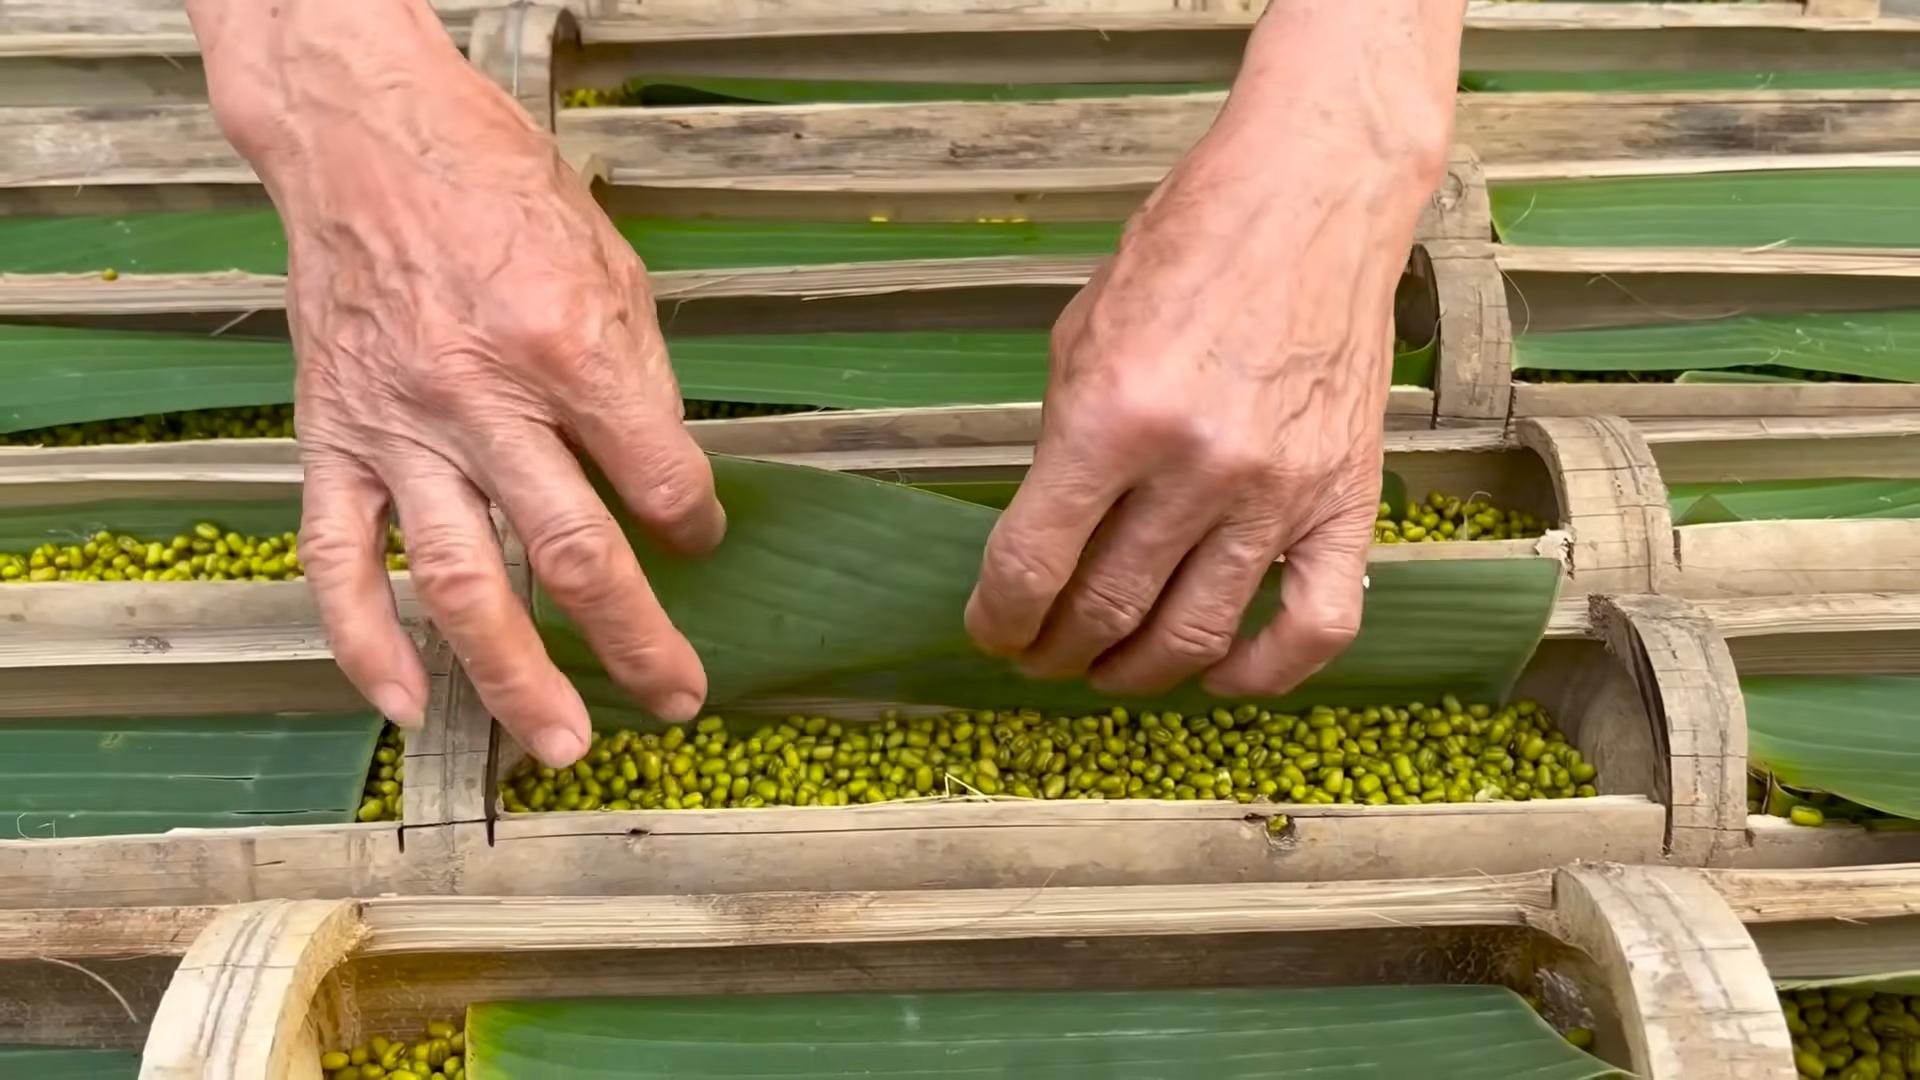
Getting Started: Preparing Your Beans
This initial step is crucial for successful sprouting. We need to wake up those little beans!
1. **Rinse the Beans:** Place your 1/2 cup of dried beans in a colander and rinse them thoroughly under cool running water. This removes any dust, debris, or broken beans.
2. **Soak the Beans:** Transfer the rinsed beans to your wide-mouth jar. Add about 2-3 cups of cool, filtered water. Make sure the beans are completely submerged, as they’ll expand significantly during soaking.
3. **Soak for 8-12 Hours:** Cover the jar with your sprouting lid or cheesecloth and secure it with a rubber band. Place the jar in a dark place and let the beans soak for 8-12 hours, or even overnight. This allows them to absorb water and begin the germination process. I usually soak mine overnight so I can start the sprouting process first thing in the morning.
The Sprouting Process: Daily Care
This is where the magic happens! Consistent rinsing and drainage are key to preventing mold and ensuring healthy sprout growth.
1. **Drain and Rinse:** After the soaking period, drain the water from the jar. Rinse the beans thoroughly with cool, filtered water. Swirl the beans around in the jar to ensure they’re all rinsed.
2. **Drain Thoroughly:** This is super important! You don’t want the beans sitting in stagnant water, as this can lead to mold growth. Invert the jar over a bowl or tray at a 45-degree angle to allow excess water to drain completely. The sprouting lid or cheesecloth will prevent the beans from falling out.
3. **Return to the Dark Place:** Place the jar back in your dark place. The darkness encourages the sprouts to grow long and white.
4. **Repeat Daily:** Rinse and drain the beans 2-3 times per day. Consistency is key here! I usually do it in the morning, afternoon, and before bed. This keeps the beans moist and prevents them from drying out.
5. **Observe and Adjust:** Keep an eye on your sprouts. If you notice any mold (it will usually appear as fuzzy white or gray patches), discard the entire batch. Proper rinsing and drainage are the best ways to prevent mold. If your sprouts seem to be drying out too quickly, increase the frequency of rinsing.
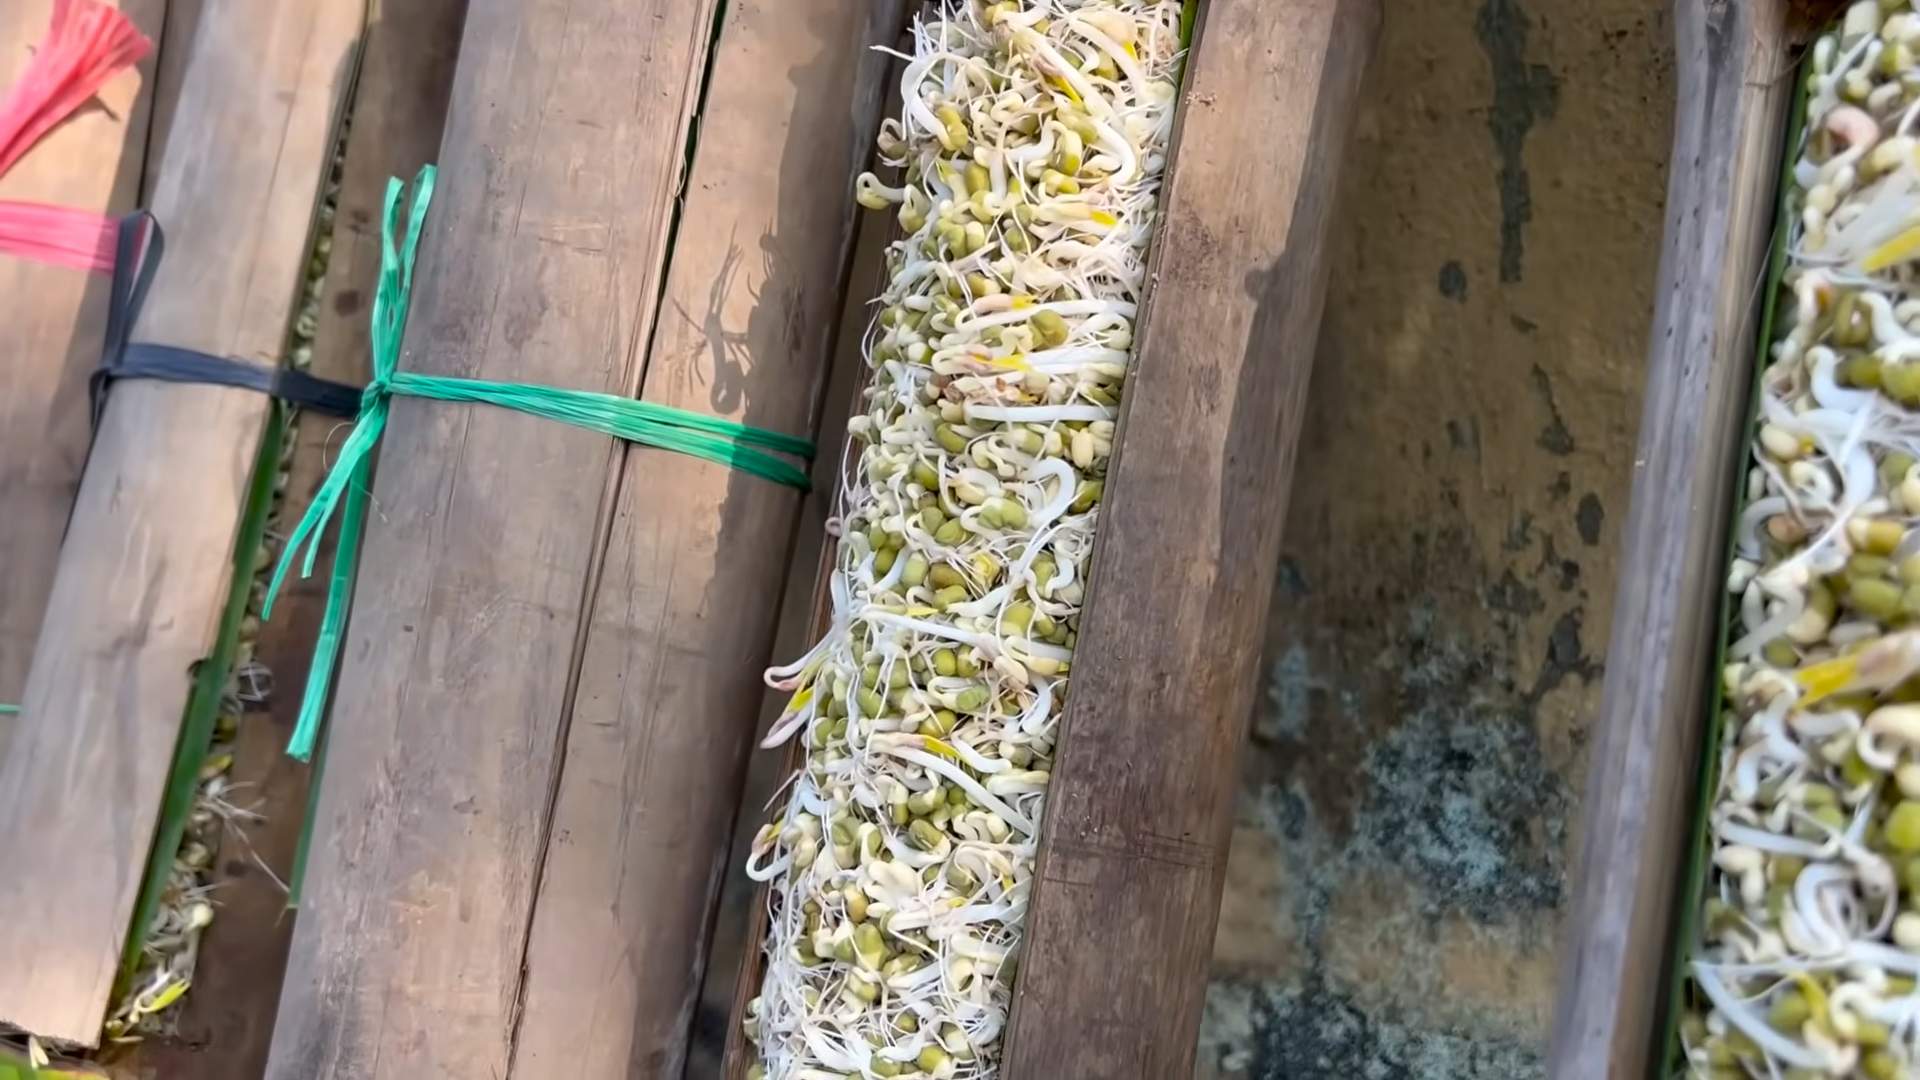
Harvesting and Storing Your Bean Sprouts
After about 3-5 days, your bean sprouts should be ready to harvest. They’ll be about 1-2 inches long and have a nice, crunchy texture.
1. **Rinse Thoroughly:** Give your bean sprouts a final rinse to remove any remaining hulls or loose skins.
2. **Remove Hulls (Optional):** Some people prefer to remove the hulls (the outer skins of the beans) before eating the sprouts. This is purely a matter of personal preference. You can do this by gently agitating the sprouts in a bowl of water. The hulls will float to the surface and can be skimmed off. I usually don’t bother with this step, as the hulls are perfectly edible.
3. **Dry Thoroughly:** This is crucial for preventing spoilage during storage. Spread the sprouts out on a clean kitchen towel or paper towels and gently pat them dry. You can also use a salad spinner to remove excess water.
4. **Store in the Refrigerator:** Place the dried sprouts in a clean, airtight container lined with a paper towel. The paper towel will absorb any excess moisture and help keep the sprouts fresh. Store them in the refrigerator for up to a week.
5. **Enjoy!** Add your fresh, crunchy bean sprouts to salads, stir-fries, sandwiches, soups, or any other dish you like.
Troubleshooting Tips
Even with the best intentions, things don’t always go according to plan. Here are a few common issues you might encounter and how to address them:
* **Mold Growth:** As mentioned earlier, mold is the biggest enemy of bean sprouts. Prevent it by ensuring thorough rinsing and drainage. If you see any mold, discard the entire batch.
* **Slow Growth:** If your sprouts are growing slowly, it could be due to several factors:
* **Temperature:** Sprouts prefer a temperature of around 70-75°F (21-24°C). If your kitchen is too cold, try moving the jar to a warmer location.
* **Bean Quality:** Old or damaged beans may not sprout well. Make sure you’re using fresh, high-quality sprouting beans.
* **Insufficient Rinsing:** Make sure you’re rinsing the beans frequently enough to keep them moist.
* **Bitter Taste:** Sometimes, bean sprouts can develop a slightly bitter taste. This is usually due to the presence of certain enzymes. To reduce bitterness, you can blanch the sprouts in boiling water for a few seconds before eating them.
* **Sprouts Turning Pink/Red:** This can happen with mung beans and is usually due to exposure to light. While it doesn’t necessarily mean the sprouts are bad, it’s best to keep them in a dark place to prevent this from happening.
Experimenting with Different Beans
While mung beans are the most common choice for sprouting, don’t be afraid to experiment with other types of beans and legumes! Adzuki beans, lentils, chickpeas, and even radish seeds can be sprouted. Each type of sprout has its own unique flavor and texture. Just be sure to research the specific sprouting requirements for each type of bean, as soaking and sprouting times may vary.
Why Grow Your Own Bean Sprouts?
Besides being a fun and rewarding DIY project, growing your own bean sprouts offers several benefits:
* **Freshness:** Homegrown sprouts are as fresh as can be! You can harvest them right when you need them, ensuring maximum flavor and nutritional value.
* **Cost Savings:** Store-bought sprouts can be surprisingly expensive. Growing your own is a much more economical option.
* **Control Over Ingredients:** You know exactly what’s going into your sprouts – just beans and water! This is especially important if you’re concerned about pesticides or other chemicals.
* **Reduced Waste:** Growing your own sprouts reduces your reliance on packaged foods, which helps to minimize waste.
* **Nutritional Benefits:** Bean sprouts are packed with vitamins, minerals, and enzymes. They’re a great source of protein, fiber, and antioxidants.
Final Thoughts
Growing your own bean sprouts is a simple, satisfying, and healthy way to add fresh ingredients to your diet. With a little practice, you’ll be enjoying crunchy, homegrown sprouts in no time. So, grab a jar, some beans, and get sprouting! Happy growing!
Conclusion
So, there you have it! Growing your own bean sprouts at home is not only incredibly easy and cost-effective, but it also provides you with a continuous supply of fresh, nutritious ingredients right at your fingertips. Forget those limp, pre-packaged sprouts from the grocery store. With just a few simple supplies and a little patience, you can cultivate vibrant, crunchy bean sprouts bursting with flavor and goodness.
Why is this DIY trick a must-try? Because it empowers you to take control of your food source, ensuring freshness and quality. You know exactly what goes into your sprouts – no hidden preservatives or questionable additives. Plus, it’s a fantastic way to reduce food waste and embrace a more sustainable lifestyle. Imagine the satisfaction of adding your own homegrown bean sprouts to salads, stir-fries, sandwiches, and more!
But the fun doesn’t stop there! Feel free to experiment with different types of beans. Mung beans are the most common choice, but you can also try adzuki beans, lentils, or even chickpeas for a unique twist. Each variety will offer a slightly different flavor and texture, allowing you to customize your sprout experience to your liking. Consider adding a small amount of organic apple cider vinegar to the rinsing water to further inhibit bacterial growth and extend the shelf life of your sprouts.
Another variation to consider is sprouting in different containers. While a mason jar with a sprouting lid is a classic choice, you can also use a plastic container with holes drilled in the bottom or even a specialized sprouting tray. The key is to ensure proper drainage and ventilation to prevent mold growth.
We wholeheartedly encourage you to give this DIY bean sprout growing method a try. It’s a rewarding and surprisingly simple process that will transform the way you think about fresh produce. Once you’ve tasted the difference between store-bought and homegrown, you’ll never go back!
Don’t be afraid to experiment and find what works best for you. And most importantly, share your experiences with us! We’d love to hear about your successes, challenges, and creative variations. Post photos of your beautiful bean sprouts on social media and tag us. Let’s build a community of home sprouters and spread the word about this amazing DIY trick. Growing bean sprouts at home is a game-changer, and we can’t wait for you to experience the benefits firsthand.
Frequently Asked Questions (FAQ)
What kind of beans can I use to grow bean sprouts?
The most common and readily available bean for sprouting is the mung bean. However, you can also successfully sprout other types of beans and legumes, including adzuki beans, lentils, chickpeas, and even some types of peas. Keep in mind that different beans will have different sprouting times and flavor profiles. Experiment to find your favorites! Avoid using kidney beans or other beans that are toxic when raw; these require cooking to be safe for consumption.
How long does it take to grow bean sprouts?
Generally, bean sprouts will be ready to harvest in 3-5 days. The exact time will depend on the type of bean, the temperature, and the humidity levels in your environment. Mung beans typically sprout the fastest. You’ll know they’re ready when the sprouts are about 2-3 inches long and have developed small leaves.
How do I prevent mold from growing on my bean sprouts?
Mold growth is the biggest concern when sprouting beans. To prevent it, ensure proper drainage and ventilation. Rinse your sprouts thoroughly at least twice a day with cool, clean water. Make sure the container you’re using allows excess water to drain away completely. Avoid overcrowding the container with too many beans. If you notice any signs of mold, discard the entire batch immediately. Adding a small amount of organic apple cider vinegar to the rinsing water can also help inhibit mold growth.
How do I store bean sprouts?
Once your bean sprouts are ready, rinse them thoroughly and drain them well. Store them in an airtight container lined with a paper towel in the refrigerator. The paper towel will help absorb excess moisture and keep the sprouts fresh. Properly stored bean sprouts should last for up to a week in the refrigerator.
Why are my bean sprouts not sprouting?
There could be several reasons why your bean sprouts aren’t sprouting. First, make sure your beans are viable. Old or damaged beans may not sprout. Second, ensure the beans are getting enough moisture. They should be kept consistently moist but not waterlogged. Third, check the temperature. Bean sprouts prefer a warm environment (around 70-75°F). If your kitchen is too cold, they may not sprout properly. Finally, make sure the beans are not exposed to direct sunlight, which can inhibit sprouting.
Can I eat the bean sprout roots?
Yes, the roots of bean sprouts are perfectly edible and nutritious. They are a natural part of the sprout and contain valuable vitamins and minerals.
Are bean sprouts safe to eat raw?
While homegrown bean sprouts are generally safe to eat raw, there is always a small risk of bacterial contamination. To minimize this risk, use clean water for rinsing, ensure proper drainage and ventilation, and store your sprouts properly. If you are concerned about food safety, you can lightly cook the bean sprouts before eating them.
How often should I rinse my bean sprouts?
You should rinse your bean sprouts at least twice a day, preferably in the morning and evening. Rinsing helps to keep them moist, prevent mold growth, and remove any accumulated debris.
What if my bean sprouts smell bad?
A foul odor is a sign of bacterial contamination. If your bean sprouts smell bad, discard them immediately. Do not attempt to salvage them.
Can I grow bean sprouts in direct sunlight?
No, bean sprouts should not be grown in direct sunlight. Direct sunlight can overheat the sprouts and inhibit their growth. They prefer a dark or dimly lit environment.
What is the nutritional value of bean sprouts?
Bean sprouts are a good source of vitamins, minerals, and fiber. They are low in calories and fat and contain significant amounts of vitamin C, vitamin K, folate, and manganese. They are also a good source of plant-based protein.
Can I use tap water to grow bean sprouts?
While tap water is generally safe, it’s best to use filtered or purified water to grow bean sprouts. This will help to minimize the risk of contamination from chlorine or other chemicals in the tap water.
How do I know when my bean sprouts are ready to harvest?
Your bean sprouts are ready to harvest when they are about 2-3 inches long and have developed small leaves. The sprouts should be firm and crunchy.
Can I regrow bean sprouts from the same beans?
No, you cannot regrow bean sprouts from the same beans. Once the beans have sprouted, they have exhausted their energy reserves and will not sprout again. You will need to use fresh beans for each batch of sprouts.

Leave a Comment