

One-Pot Spinach Harvest: Imagine stepping outside your door and harvesting a vibrant, fresh batch of spinach, all from a single pot! Sounds like a dream, right? Well, it doesn’t have to be! For centuries, people have cultivated small gardens, even in the most limited spaces. From ancient rooftop gardens in Babylon to modern-day urban balconies, the desire to grow our own food is deeply ingrained in our history. But let’s face it, not everyone has acres of land or the time for extensive gardening. That’s where this amazing DIY trick comes in.
I’m going to show you how to maximize your yield and enjoy a bountiful one-pot spinach harvest, even if you’re a complete beginner. This method is perfect for apartment dwellers, busy professionals, or anyone who wants a simple, rewarding gardening experience. Forget complicated setups and endless weeding. This guide will provide you with a simple and effective way to grow your own delicious spinach, right at your fingertips. So, grab your gardening gloves, and let’s get started on this exciting journey to fresh, homegrown goodness!

One-Pot Spinach Harvest: From Seed to Salad in a Single Container!
Hey there, fellow gardening enthusiasts! I’m so excited to share this super simple and rewarding DIY project with you: growing and harvesting spinach in a single pot! It’s perfect for small spaces, beginners, or anyone who wants a quick and easy way to enjoy fresh, homegrown greens. Trust me, there’s nothing quite like snipping off a handful of your own spinach for a salad or smoothie. Let’s get started!
What You’ll Need: Your Spinach Starter Kit
Before we dive into the planting process, let’s gather all the necessary supplies. This will make the whole experience smoother and more enjoyable. Here’s what you’ll need:
* A Large Pot: Choose a pot that’s at least 12 inches in diameter and 12 inches deep. This gives the spinach roots plenty of room to grow. I prefer using a terracotta pot because it allows for good drainage and airflow, but plastic pots work just fine too.
* High-Quality Potting Mix: Don’t skimp on the potting mix! Use a well-draining mix that’s rich in organic matter. Avoid using garden soil, as it can become compacted in containers and hinder drainage. I like to use a mix specifically formulated for vegetables.
* Spinach Seeds: Select a spinach variety that’s suitable for your climate and growing season. Some popular choices include ‘Bloomsdale Long Standing,’ ‘Giant Nobel,’ and ‘Baby’s Leaf Hybrid.’ I personally love ‘Bloomsdale Long Standing’ because it’s heat-tolerant and slow to bolt (go to seed).
* Watering Can or Hose: You’ll need a gentle way to water your spinach seedlings without disturbing them. A watering can with a rose head or a hose with a gentle spray nozzle works best.
* Optional: Slow-Release Fertilizer: While not essential, adding a slow-release fertilizer to the potting mix at planting time can provide your spinach with a steady supply of nutrients. Look for a fertilizer that’s specifically formulated for leafy greens.
* Optional: Garden Trowel or Hand Rake: These tools can be helpful for preparing the potting mix and sowing the seeds, but you can also use your hands.
* Scissors or Garden Shears: For harvesting your spinach leaves.
Planting Your Spinach Seeds: A Step-by-Step Guide
Now that we have all our supplies, let’s get our hands dirty and plant those spinach seeds!
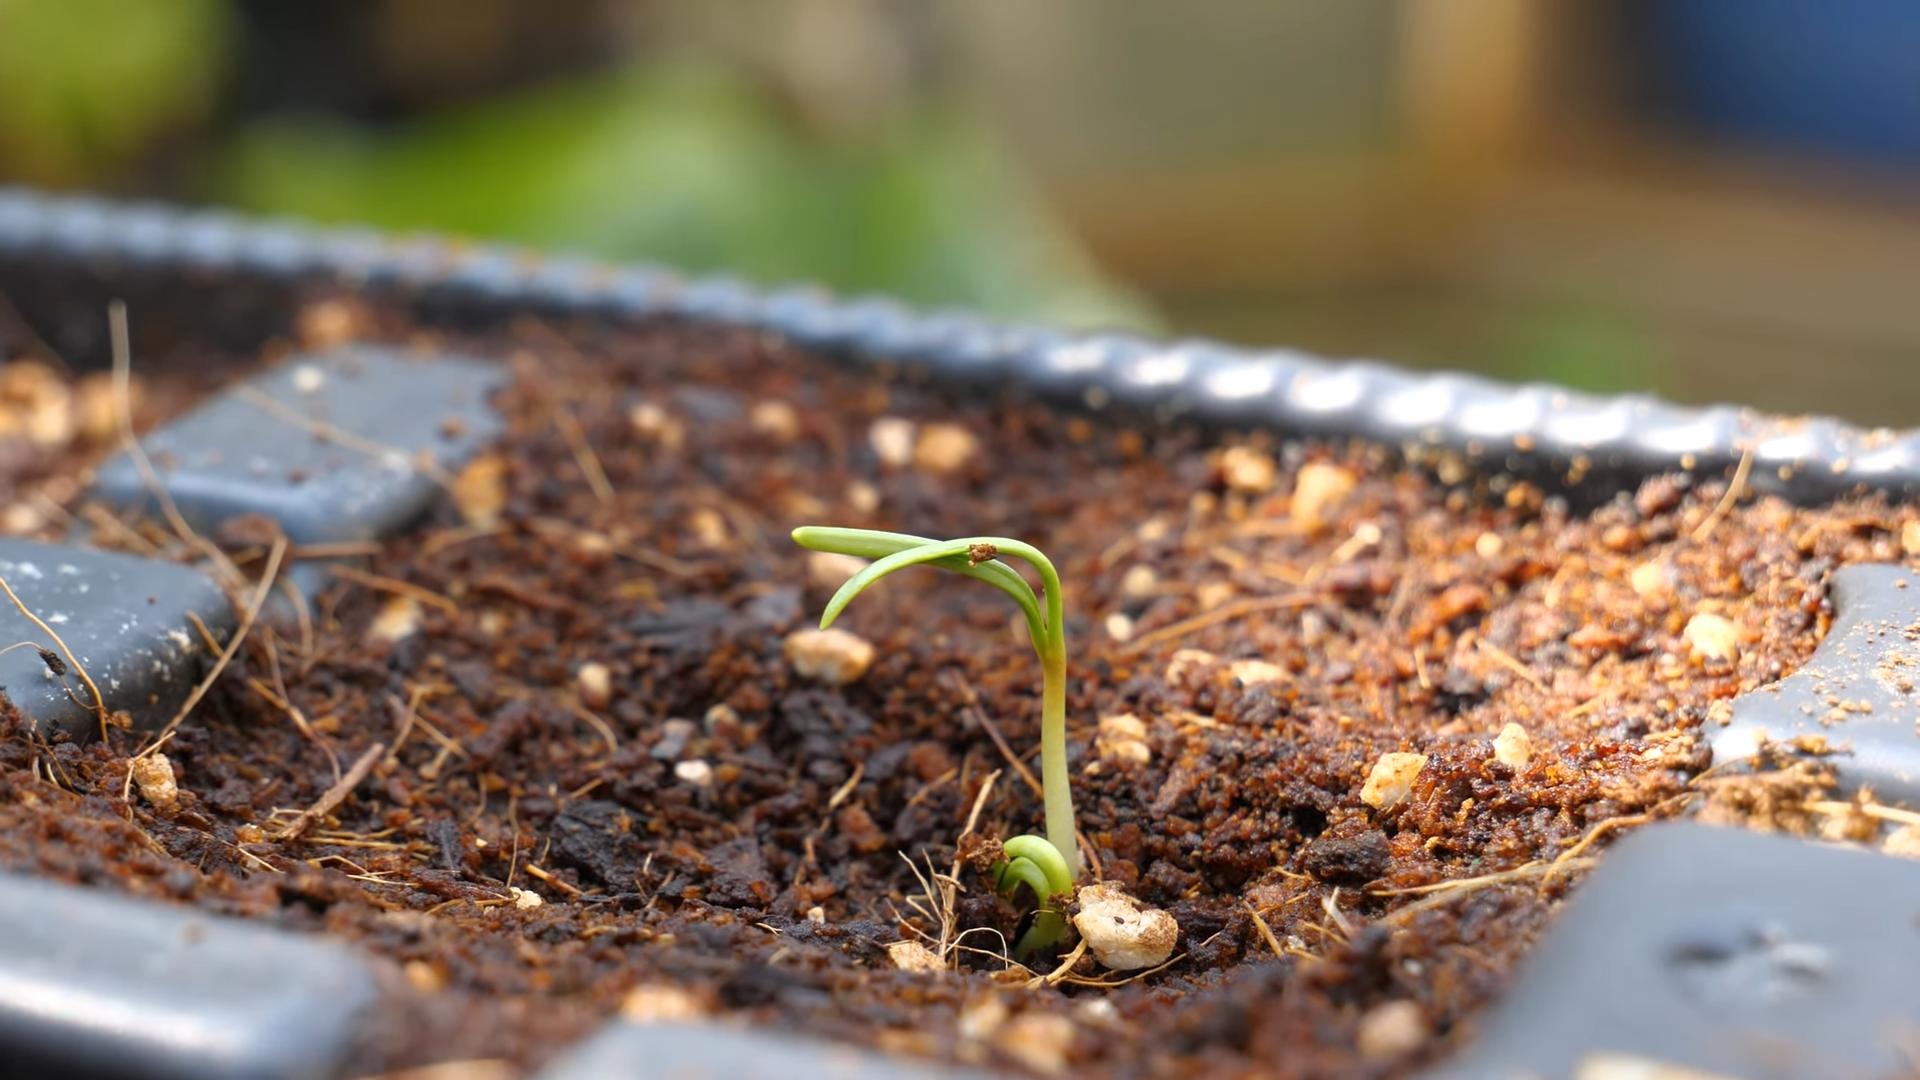
1. Prepare the Pot: First, make sure your pot has drainage holes. If not, drill a few holes in the bottom. Then, fill the pot with potting mix, leaving about an inch or two of space at the top. Gently pat down the soil to create a firm, even surface.
2. Sow the Seeds: Spinach seeds are small, so you don’t need to plant them too deep. Sprinkle the seeds evenly over the surface of the potting mix. Aim for about 10-15 seeds per square foot. You can also sow the seeds in rows, spacing them about an inch apart.
3. Cover the Seeds: Lightly cover the seeds with a thin layer of potting mix, about ¼ inch deep. Gently pat down the soil again to ensure good contact between the seeds and the soil.
4. Water Thoroughly: Water the pot gently but thoroughly, until the water drains out of the bottom. This will help to settle the soil and encourage germination.
5. Label Your Pot: Don’t forget to label your pot with the date and the type of spinach you planted. This will help you keep track of your progress.
6. Find the Perfect Spot: Place your pot in a location that receives at least 4-6 hours of sunlight per day. Spinach prefers cooler temperatures, so a spot with morning sun and afternoon shade is ideal, especially in warmer climates.
Caring for Your Spinach: Keeping it Happy and Healthy
Once your spinach seeds have sprouted, it’s important to provide them with the right care to ensure a bountiful harvest.
1. Watering: Keep the soil consistently moist, but not waterlogged. Water when the top inch of soil feels dry to the touch. Avoid overhead watering, as this can promote fungal diseases. Instead, water at the base of the plant.
2. Thinning: Once the seedlings have developed a few true leaves (the leaves that look like miniature spinach leaves), thin them out to about 2-3 inches apart. This will give the remaining plants enough room to grow and prevent overcrowding. You can eat the thinned seedlings as microgreens!
3. Fertilizing: If you didn’t add slow-release fertilizer at planting time, you can start feeding your spinach plants with a liquid fertilizer every 2-3 weeks. Choose a fertilizer that’s high in nitrogen, which promotes leafy growth. Follow the instructions on the fertilizer label.
4. Weeding: Keep the pot free of weeds, as they can compete with the spinach plants for nutrients and water. Gently pull out any weeds that appear.
5. Pest Control: Spinach is generally pest-resistant, but it can sometimes be affected by aphids or slugs. Check your plants regularly for signs of pests and take action if necessary. You can control aphids with insecticidal soap or by simply spraying them off with water. Slugs can be controlled with slug bait or by hand-picking them off the plants.
6. Bolting Prevention: Spinach is prone to bolting (going to seed) in hot weather. To prevent bolting, keep the plants well-watered and provide them with shade during the hottest part of the day. You can also choose heat-tolerant spinach varieties.
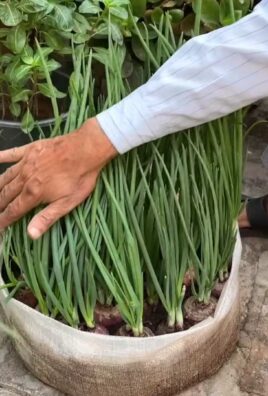
Harvesting Your Spinach: The Sweet Reward
The best part of growing spinach is, of course, harvesting it! You can start harvesting your spinach leaves when they are about 4-6 inches long.
1. Cut the Leaves: Use scissors or garden shears to cut the outer leaves of the plant, leaving the inner leaves to continue growing. This is known as “cut-and-come-again” harvesting, and it allows you to harvest spinach from the same plant multiple times.
2. Harvest Regularly: Harvest your spinach leaves regularly to encourage continued growth. The more you harvest, the more the plant will produce.
3. Harvest in the Morning: Harvest your spinach leaves in the morning, when they are at their freshest and most flavorful.
4. Wash and Store: Wash the harvested spinach leaves thoroughly and store them in a plastic bag in the refrigerator. They should keep for several days.
Troubleshooting: Common Spinach Growing Problems
Even with the best care, you might encounter some problems while growing spinach. Here are a few common issues and how to address them:
* Yellowing Leaves: Yellowing leaves can be a sign of nutrient deficiency, overwatering, or underwatering. Check the soil moisture and adjust your watering accordingly. If the soil is consistently moist, the problem might be a nutrient deficiency. Try fertilizing with a balanced fertilizer.
* Slow Growth: Slow growth can be caused by insufficient sunlight, poor soil, or cool temperatures. Make sure your spinach plants are getting enough sunlight and that the soil is well-draining and rich in organic matter. If the weather is cool, you can try moving the pot to a warmer location.
* Bolting: As mentioned earlier, bolting is a common problem with spinach, especially in hot weather. To prevent bolting, keep the plants well-watered and provide them with shade during the hottest part of the day. You can also choose heat-tolerant spinach varieties. If your spinach plants do bolt, you can still harvest the leaves, but they will be more bitter.
* Pests: Keep an eye out for pests like aphids and slugs. Control aphids with insecticidal soap or by spraying them off with water. Control slugs with slug bait or by hand-picking them off the plants.
Enjoying Your Homegrown Spinach: From Garden to Table
Now that you’ve harvested your own delicious spinach, it’s time to enjoy it! Here are a few ideas:
* Salads: Spinach is a classic salad ingredient. Toss it with your favorite vegetables, dressing, and toppings.
* Smoothies: Add a handful of spinach to your smoothies for a boost of nutrients. You won’t even taste it!
* Sautéed Spinach: Sauté spinach with garlic and olive oil for a simple and delicious side dish.
* Spinach Dip: Use your homegrown spinach to make a creamy and flavorful spinach dip.
* Omelets and Frittatas: Add spinach to your omelets and frittatas for a healthy and delicious breakfast.
* Soups and Stews: Spinach can be added to soups and stews for extra nutrients and flavor.
Growing spinach in a pot is a fun and rewarding experience. With a little bit of care and attention, you can enjoy fresh, homegrown greens all season long. Happy gardening!
Conclusion
So, there you have it! The One-Pot Spinach Harvest isn’t just a recipe; it’s a culinary adventure waiting to happen right in your own kitchen. We’ve explored how to transform a simple collection of ingredients into a vibrant and flavorful dish, all while minimizing cleanup and maximizing taste. But why is this particular method a must-try?
Firstly, the sheer convenience is undeniable. In today’s fast-paced world, time is a precious commodity. This recipe streamlines the cooking process, allowing you to enjoy a healthy and delicious meal without spending hours slaving over the stove. The one-pot approach not only reduces the number of dishes you need to wash but also allows the flavors to meld together beautifully, creating a depth of taste that’s often missing in more complicated recipes.
Secondly, the One-Pot Spinach Harvest is incredibly versatile. Feel free to experiment with different types of pasta, vegetables, and proteins to create your own unique variation. For a heartier meal, consider adding grilled chicken, sausage, or chickpeas. If you’re looking for a vegetarian option, try incorporating different types of beans or lentils. You can also adjust the level of spiciness by adding more or less red pepper flakes. The possibilities are truly endless!
Thirdly, and perhaps most importantly, this recipe is a fantastic way to incorporate more spinach into your diet. Spinach is a nutritional powerhouse, packed with vitamins, minerals, and antioxidants. By including it in this delicious and satisfying dish, you’re making a conscious choice to nourish your body and support your overall health.
Consider these variations to elevate your One-Pot Spinach Harvest even further:
* **Creamy Delight:** Add a dollop of ricotta cheese or a splash of heavy cream at the end for a richer, more decadent flavor.
* **Mediterranean Twist:** Incorporate sun-dried tomatoes, Kalamata olives, and feta cheese for a taste of the Mediterranean.
* **Spicy Kick:** Add a pinch of cayenne pepper or a dash of hot sauce for an extra layer of heat.
* **Lemon Zest Brightness:** A little lemon zest at the end will brighten the flavors and add a fresh, citrusy note.
* **Mushroom Magic:** Sauté some sliced mushrooms with the garlic and onions for an earthy and savory addition.
We are confident that you’ll find this One-Pot Spinach Harvest to be a delightful and rewarding culinary experience. It’s a simple, delicious, and healthy way to enjoy a satisfying meal without the fuss.
So, what are you waiting for? Gather your ingredients, fire up your stove, and get ready to create a culinary masterpiece. We encourage you to try this recipe and share your experience with us. Let us know what variations you tried, what you loved, and what you would change. Your feedback is invaluable and helps us to continue creating recipes that are both delicious and accessible. Share your photos and stories on social media using #OnePotSpinachHarvest – we can’t wait to see what you create! We are sure that you will find this recipe a great addition to your weekly meal plan.
Frequently Asked Questions (FAQ)
Q: Can I use frozen spinach instead of fresh spinach?
A: Absolutely! Frozen spinach is a great alternative to fresh spinach, especially if you’re looking for convenience. Just be sure to thaw it completely and squeeze out any excess water before adding it to the pot. This will prevent the dish from becoming too watery. You’ll typically need about 10 ounces of frozen spinach to equal the amount of fresh spinach called for in the recipe. Remember that frozen spinach often has a slightly different texture than fresh spinach, but it will still provide the same nutritional benefits.
Q: What kind of pasta works best in this recipe?
A: The beauty of the One-Pot Spinach Harvest is its versatility, and that extends to the type of pasta you use. Short pasta shapes like penne, rotini, farfalle (bowties), or elbow macaroni work particularly well because they cook evenly and hold the sauce nicely. However, you can also use longer pasta shapes like spaghetti or linguine, just be sure to break them in half before adding them to the pot to make them easier to manage. Consider using whole wheat pasta for added fiber or gluten-free pasta if you have dietary restrictions.
Q: Can I add protein to this dish?
A: Yes, definitely! Adding protein is a great way to make the One-Pot Spinach Harvest a more complete and satisfying meal. Grilled chicken, sausage (Italian sausage is a particularly good choice), shrimp, or tofu are all excellent options. If you’re using chicken or sausage, you can cook it in the pot before adding the other ingredients. For shrimp or tofu, you can add them towards the end of the cooking time to prevent them from becoming overcooked. For a vegetarian option, consider adding chickpeas, white beans, or lentils.
Q: How do I adjust the seasoning?
A: Taste is subjective, so feel free to adjust the seasoning to your liking. Start with the amount of salt, pepper, and garlic powder called for in the recipe, and then taste the dish as it cooks. If you prefer a saltier flavor, add a pinch more salt. If you like a bit of heat, add more red pepper flakes or a dash of hot sauce. You can also experiment with other herbs and spices, such as oregano, basil, or thyme. Remember to taste and adjust as you go until you achieve the perfect balance of flavors.
Q: Can I make this recipe ahead of time?
A: Yes, you can make the One-Pot Spinach Harvest ahead of time, but keep in mind that the pasta will continue to absorb the liquid as it sits. If you’re planning to make it ahead, you may want to add a little extra broth or water to the pot to prevent it from becoming too dry. When reheating, add a splash of water or broth if needed to loosen it up. The flavors will actually meld together even more as it sits, making it even more delicious the next day.
Q: How do I store leftovers?
A: Store any leftover One-Pot Spinach Harvest in an airtight container in the refrigerator. It will keep for up to 3-4 days. When reheating, you can microwave it, heat it on the stovetop, or even bake it in the oven. If it seems dry, add a little water or broth to moisten it up.
Q: Can I use vegetable broth instead of chicken broth?
A: Absolutely! Using vegetable broth is a great way to make this recipe vegetarian or vegan. It will provide a similar depth of flavor to chicken broth and will complement the other ingredients beautifully. You can also use water in a pinch, but the flavor will be less pronounced.
Q: What if my pasta is sticking to the bottom of the pot?
A: To prevent the pasta from sticking to the bottom of the pot, be sure to stir it frequently, especially during the first few minutes of cooking. You can also add a tablespoon of olive oil to the pot to help prevent sticking. If the pasta does start to stick, gently scrape the bottom of the pot with a wooden spoon or spatula to loosen it.
Q: Can I add cheese to this recipe?
A: Yes, adding cheese is a great way to add flavor and richness to the One-Pot Spinach Harvest. Parmesan cheese, mozzarella cheese, and ricotta cheese are all excellent choices. You can sprinkle the cheese on top of the dish before serving, or you can stir it in towards the end of the cooking time to melt it into the sauce.
Q: Is this recipe suitable for meal prepping?
A: Yes, this recipe is perfect for meal prepping! It’s easy to make a large batch and divide it into individual containers for easy lunches or dinners throughout the week. As mentioned earlier, the flavors will actually meld together even more as it sits, making it even more delicious the next day. Just be sure to store the leftovers in an airtight container in the refrigerator.

Leave a Comment