

Growing carrots in containers might sound like a challenge, but trust me, it’s easier than you think! Have you ever dreamed of plucking fresh, vibrant carrots straight from your patio, balcony, or even your kitchen windowsill? I know I have! For centuries, gardeners have sought ways to cultivate their own food, even in limited spaces. From ancient rooftop gardens in Babylon to modern-day urban farms, the desire to connect with nature and grow our own produce is deeply ingrained in us.
But let’s face it, not everyone has access to a sprawling backyard. That’s where the magic of container gardening comes in! This DIY guide is your passport to a bountiful carrot harvest, no matter how small your living space. We’ll unlock the secrets to successfully growing carrots in containers, from choosing the right pot and soil to mastering the art of watering and fertilizing. Imagine the satisfaction of biting into a sweet, crunchy carrot you nurtured from seed to table. Plus, you’ll avoid the common pitfalls that can lead to stunted growth or misshapen roots. So, grab your gardening gloves, and let’s get started on this exciting journey to homegrown goodness!
Growing Carrots in Containers: A Bumper Crop on Your Patio!
Hey there, fellow gardening enthusiasts! Ever dreamed of pulling fresh, vibrant carrots straight from your own backyard? Well, even if you don’t have a sprawling garden, you can absolutely achieve this dream by growing carrots in containers. It’s easier than you think, and I’m here to guide you through every step of the process. Get ready for some delicious, homegrown goodness!
Choosing the Right Container and Soil
This is where our carrot adventure begins! Picking the right container and soil is crucial for success. Think of it as laying the foundation for a happy carrot family.
* Container Depth: Carrots need room to grow downwards. Aim for a container that’s at least 12 inches deep for shorter varieties like ‘Thumbelina’ or ‘Parisian’. For longer varieties like ‘Nantes’ or ‘Danvers’, you’ll want a container that’s 18-24 inches deep. Trust me, they’ll appreciate the extra space!
* Container Width: The wider the container, the more carrots you can grow! A good rule of thumb is to allow at least 3 inches of space between each carrot. So, a 12-inch wide container could comfortably house 4 carrot plants.
* Drainage: This is non-negotiable! Carrots hate soggy feet. Make sure your container has plenty of drainage holes. If it doesn’t, you can easily drill some yourself.
* Material: Plastic, terracotta, or even fabric pots will work. Just keep in mind that terracotta pots dry out faster, so you’ll need to water more frequently.
* Soil Mix: Forget garden soil! It’s too heavy and compacts easily, which will result in stunted, misshapen carrots. Instead, opt for a loose, well-draining potting mix. I like to use a mix of equal parts potting soil, compost, and perlite or vermiculite. The compost provides nutrients, while the perlite or vermiculite improves drainage and aeration.
Sowing the Seeds: Planting for Success
Now for the fun part – planting those tiny carrot seeds!
1. Prepare the Soil: Fill your container with the potting mix, leaving about an inch of space at the top. Gently pat down the soil to create a firm, even surface.
2. Water Thoroughly: Moisten the soil before planting. This helps the seeds germinate and prevents them from being washed away when you water later.
3. Sow the Seeds: Carrot seeds are tiny, so it’s easy to sow them too thickly. To avoid overcrowding, try mixing the seeds with sand before sowing. This helps to distribute them more evenly. Sprinkle the seed/sand mixture thinly over the surface of the soil.
4. Cover Lightly: Cover the seeds with a very thin layer (about ¼ inch) of potting mix. You can also use vermiculite, which helps to retain moisture.
5. Water Gently: Use a spray bottle or watering can with a gentle rose to water the seeds. Avoid blasting them with a strong stream of water, which can dislodge them.
6. Keep Moist: Carrot seeds need consistent moisture to germinate. Cover the container with plastic wrap or a clear plastic bag to create a mini-greenhouse effect. This will help to retain moisture. Place the container in a warm, sunny location.
7. Germination: Carrot seeds typically germinate in 7-21 days, depending on the temperature. Once the seedlings emerge, remove the plastic wrap.
Thinning the Seedlings: Giving Them Room to Grow
This is a crucial step that many beginners overlook. Thinning ensures that your carrots have enough space to develop properly.
1. Wait Until Seedlings Appear: Once your seedlings have developed a few true leaves (the second set of leaves that appear after the initial seed leaves), it’s time to thin them.
2. Identify the Strongest Seedlings: Choose the strongest, healthiest-looking seedlings to keep.
3. Thin Carefully: Gently pull out the weaker seedlings, being careful not to disturb the roots of the remaining plants. Aim for a spacing of about 3 inches between each carrot.
4. Water After Thinning: Water the remaining seedlings to help them settle in.
Caring for Your Carrots: Watering, Feeding, and Sunshine
Now that your carrots are growing, it’s important to provide them with the right care.
* Watering: Carrots need consistent moisture, but they don’t like to be waterlogged. Water deeply whenever the top inch of soil feels dry to the touch. Avoid overhead watering, which can promote fungal diseases.
* Fertilizing: Carrots are not heavy feeders, but they do benefit from regular fertilization. Use a balanced liquid fertilizer diluted to half strength every 2-3 weeks. Avoid fertilizers that are high in nitrogen, as this can promote leafy growth at the expense of root development.
* Sunlight: Carrots need at least 6 hours of sunlight per day. Place your container in a sunny location where it will receive plenty of light.
* Weeding: Keep the container free of weeds, which can compete with the carrots for nutrients and water.
* Pest Control: Carrots are relatively pest-resistant, but they can be susceptible to carrot rust flies. These flies lay their eggs near the base of the plants, and the larvae burrow into the roots, causing damage. To prevent carrot rust flies, cover your container with a fine mesh netting. You can also use sticky traps to catch the adult flies.
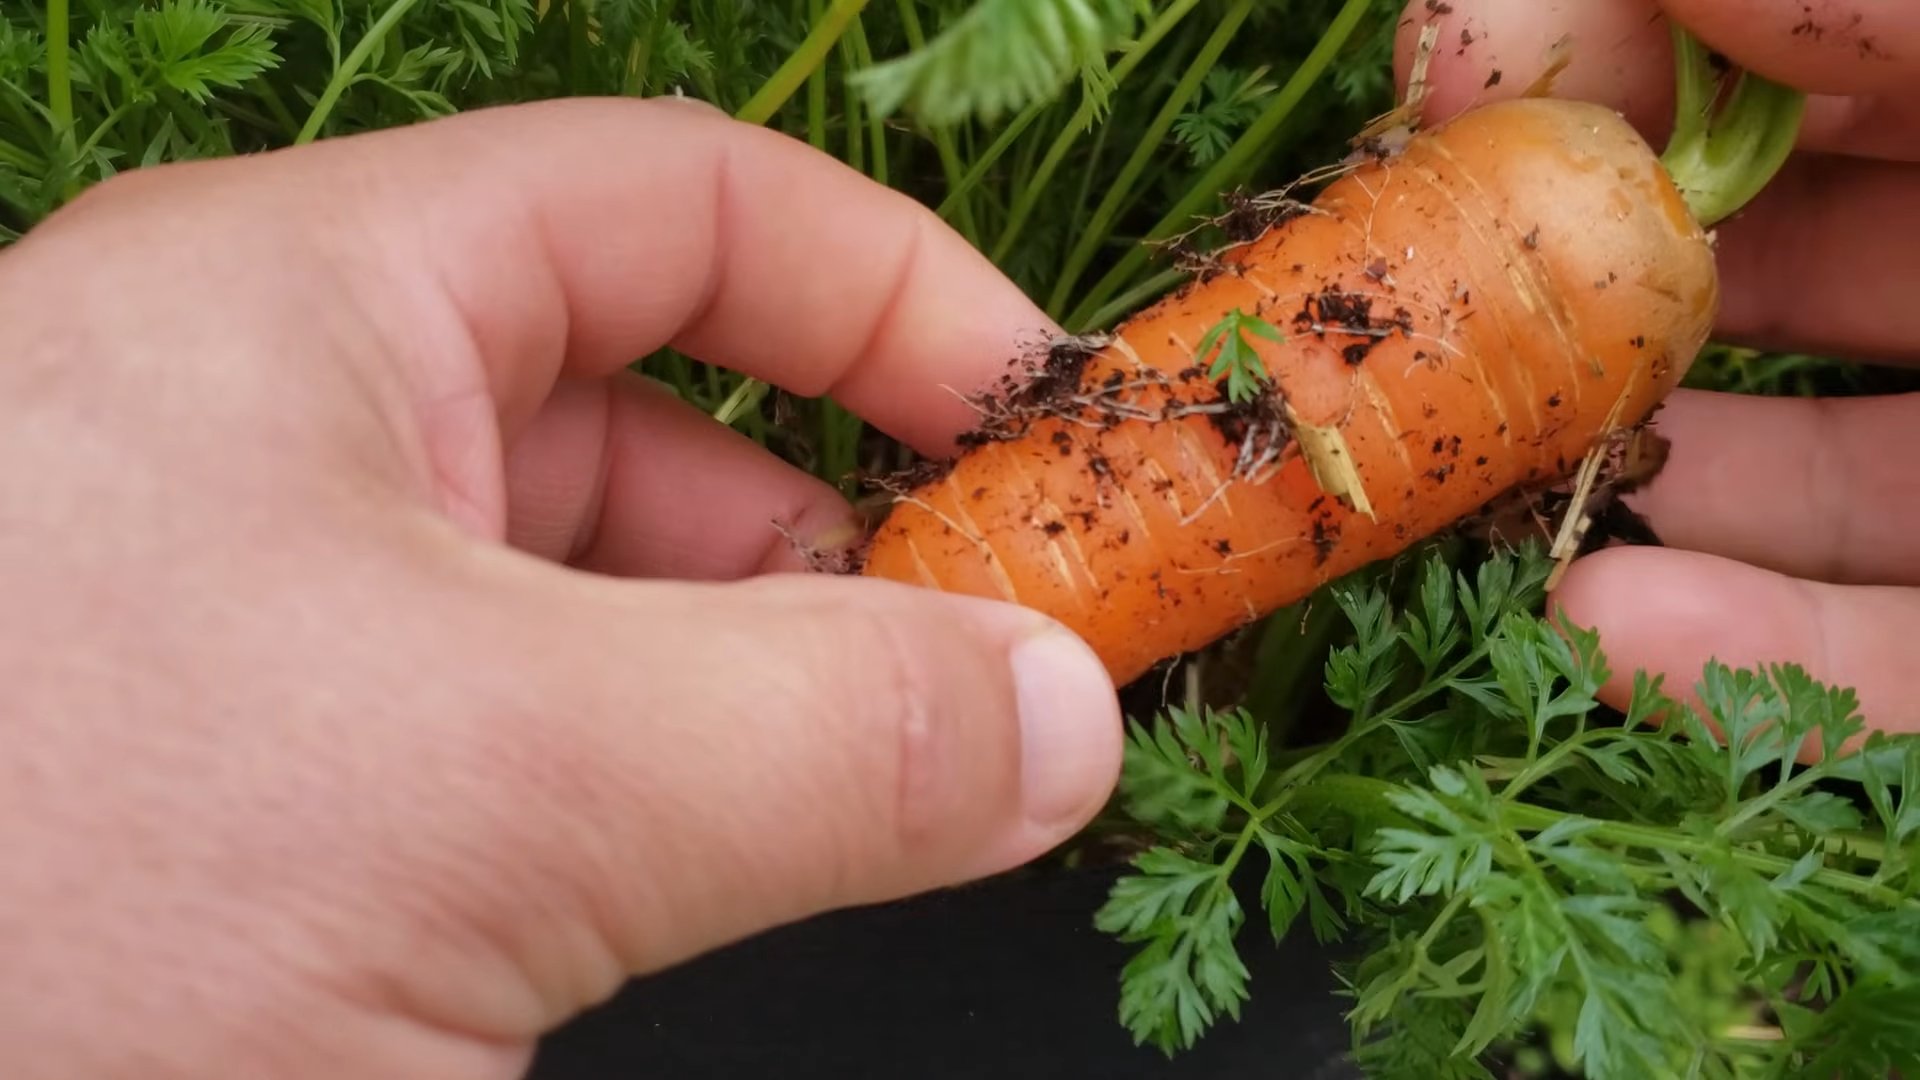
Harvesting Your Carrots: The Sweet Reward
The moment you’ve been waiting for! Harvesting your own homegrown carrots is incredibly satisfying.
1. Check for Maturity: Carrots are typically ready to harvest 60-80 days after planting, depending on the variety. You can check for maturity by gently pulling back the soil around the top of the carrot to see how big it is.
2. Loosen the Soil: Before harvesting, water the soil thoroughly to loosen it. This will make it easier to pull the carrots without breaking them.
3. Pull Gently: Grasp the carrot firmly at the base of the leaves and gently pull upwards, twisting slightly. If the carrot is resistant, use a garden fork to loosen the soil around it.
4. Enjoy! Wash the carrots thoroughly and enjoy them fresh from the garden. They’ll taste so much better than store-bought carrots!
Troubleshooting: Common Problems and Solutions
Even with the best care, you might encounter some problems along the way. Here are a few common issues and how to address them:
* Forked or Stunted Carrots: This is usually caused by compacted soil or rocks in the soil. Make sure to use a loose, well-draining potting mix and remove any rocks or debris from the container.
* Green Shoulders: This happens when the tops of the carrots are exposed to sunlight. To prevent green shoulders, hill up the soil around the carrots as they grow.
* Cracked Carrots: This is usually caused by inconsistent watering. Make sure to water regularly and avoid letting the soil dry out completely.
* Pests: As mentioned earlier, carrot rust flies can be a problem. Use netting or sticky traps to control them. Aphids can also infest carrots. Spray them with a strong stream of water or use insecticidal soap.
Choosing the Right Carrot Variety for Containers
Not all carrots are created equal, especially when it comes to container gardening. Here are a few varieties that thrive in pots:
* ‘Thumbelina’: These are small, round carrots that are perfect for shallow containers.
* ‘Parisian’: Similar to ‘Thumbelina’, these are also round and compact.
* ‘Nantes’: These are classic, cylindrical carrots that are relatively short and sweet.
* ‘Danvers’: Another popular variety, ‘Danvers’ carrots are slightly longer than ‘Nantes’ but still do well in containers.
* ‘Little Finger’: As the name suggests, these are small, finger-sized carrots that are ideal for snacking.
Extra Tips for Container Carrot Success
Here are a few extra tips to help you grow the best carrots possible:
* Rotate Your Crops: Don’t plant carrots in the same container year after year. Rotate your crops to prevent soilborne diseases.
* Succession Planting: Sow a new batch of carrot seeds every few weeks to ensure a continuous harvest throughout the growing season.
* Companion Planting: Plant carrots alongside other vegetables and herbs that can benefit them. For example, onions and garlic can help to repel carrot rust flies.
* Don’t Overcrowd: Give your carrots plenty of space to grow. Overcrowding can lead to stunted growth and misshapen roots.
* Be Patient: Carrots take time to grow. Don’t get discouraged if you don’t see results immediately. Just keep watering and fertilizing them, and they’ll eventually

Conclusion
So, there you have it! Growing carrots in containers isn’t just a possibility; it’s a rewarding and surprisingly simple way to enjoy fresh, homegrown carrots, even if you’re short on space. We’ve walked through the essential steps, from choosing the right container and soil to nurturing your carrot seedlings and harvesting your vibrant crop.
Why is this DIY trick a must-try? Because it democratizes gardening. It removes the barriers of large plots and specialized equipment, putting the power of fresh produce directly into your hands. Imagine the satisfaction of pulling a perfectly formed, brightly colored carrot from a pot on your balcony, knowing you nurtured it from seed to table. That’s a feeling that store-bought carrots simply can’t replicate.
Beyond the sheer joy of gardening, growing carrots in containers offers practical benefits. You have complete control over the soil quality, minimizing the risk of pests and diseases that can plague in-ground gardens. Container gardening also allows you to extend your growing season by moving your carrots indoors during harsh weather. Plus, it’s a fantastic way to introduce children to the wonders of nature and teach them about where their food comes from.
But the beauty of this method lies in its adaptability. Feel free to experiment with different carrot varieties. Nantes carrots are a classic choice, but consider trying round varieties like Parisian carrots if you’re using shallower containers. Rainbow carrots, with their vibrant hues of purple, yellow, and red, add a touch of whimsy to your garden and your plate.
You can also play around with companion planting. Marigolds can help deter pests, while herbs like rosemary and sage can enhance the flavor of your carrots. Just be sure to choose companions that won’t compete with your carrots for resources.
Don’t be afraid to get your hands dirty and embrace the learning process. Gardening is all about experimentation, and even if you encounter a few bumps along the way, the rewards are well worth the effort.
Ready to embark on your container carrot-growing adventure? We encourage you to give it a try! Start small, perhaps with just one or two containers, and see how it goes. Once you’ve mastered the basics, you can expand your operation and enjoy a continuous supply of fresh carrots throughout the growing season.
And most importantly, we want to hear about your experience! Share your tips, tricks, and triumphs in the comments below. What varieties did you try? What challenges did you face? What did you learn along the way? Your insights can help other aspiring container gardeners succeed. Let’s build a community of carrot-growing enthusiasts and spread the joy of homegrown goodness! This is your chance to truly master growing carrots in containers.
Frequently Asked Questions (FAQs)
What is the best size container for growing carrots?
The ideal container size depends on the carrot variety you plan to grow. For longer varieties like Nantes or Imperator, choose a container that is at least 12 inches deep and 8 inches wide. Shorter, round varieties like Parisian carrots can thrive in containers that are 6-8 inches deep. Ensure the container has drainage holes to prevent waterlogging. A good rule of thumb is to provide at least 2-3 gallons of soil per plant.
What type of soil is best for container carrots?
Carrots need loose, well-draining soil to develop properly. Avoid heavy clay soils, as they can hinder root growth and lead to misshapen carrots. A good potting mix specifically formulated for vegetables is ideal. You can also create your own mix by combining equal parts of compost, peat moss (or coconut coir), and perlite or vermiculite. This blend provides the necessary nutrients, drainage, and aeration for healthy carrot growth.
How often should I water my container carrots?
Water your container carrots regularly, especially during hot and dry weather. The soil should be consistently moist but not waterlogged. Check the soil moisture by sticking your finger about an inch deep. If it feels dry, it’s time to water. Water deeply, allowing the water to drain out of the bottom of the container. Avoid overhead watering, as it can promote fungal diseases. Aim to water in the morning to allow the foliage to dry before nightfall.
How much sunlight do container carrots need?
Carrots need at least 6 hours of sunlight per day to thrive. Choose a location that receives full sun for most of the day. If you live in a particularly hot climate, you may need to provide some afternoon shade to prevent the soil from drying out too quickly. If you don’t have a sunny spot, you can supplement with grow lights.
When should I fertilize my container carrots?
Carrots are not heavy feeders, but they do benefit from regular fertilization. Start fertilizing about 3-4 weeks after the seedlings emerge. Use a balanced, water-soluble fertilizer diluted to half strength. Fertilize every 2-3 weeks throughout the growing season. Avoid over-fertilizing, as this can lead to excessive foliage growth at the expense of root development.
How do I prevent pests and diseases in my container carrots?
Container gardening helps minimize pest and disease problems, but it’s still important to be vigilant. Common pests that can affect carrots include aphids, carrot rust flies, and nematodes. Inspect your plants regularly for signs of infestation. You can control aphids with insecticidal soap or neem oil. Carrot rust flies can be deterred by covering your containers with row covers. Nematodes are more difficult to control, but you can improve soil health by adding compost and practicing crop rotation.
Fungal diseases like leaf blight can also affect carrots. Prevent these diseases by providing good air circulation, avoiding overhead watering, and removing any infected leaves promptly.
How do I know when my container carrots are ready to harvest?
The harvesting time depends on the carrot variety. Check the seed packet for the expected maturity date. Generally, carrots are ready to harvest when they reach the desired size and color. You can gently pull back the soil around the top of the carrot to check its size. To harvest, gently loosen the soil around the carrot and pull it straight up. If the soil is dry, water it beforehand to make harvesting easier.
Can I grow carrots in containers indoors?
Yes, you can grow carrots in containers indoors, but you’ll need to provide adequate light. Place your containers near a sunny window that receives at least 6 hours of direct sunlight per day. If you don’t have enough natural light, you can supplement with grow lights. Use full-spectrum LED grow lights and position them a few inches above the plants.
What are some common problems when growing carrots in containers?
Some common problems include:
* **Poor germination:** Ensure you’re using fresh seeds and that the soil is consistently moist.
* **Misshapen carrots:** This can be caused by rocky or compacted soil. Use a loose, well-draining potting mix.
* **Forked carrots:** This can be caused by obstructions in the soil or uneven watering.
* **Bolting (premature flowering):** This can be caused by stress, such as extreme temperatures or inconsistent watering.
Can I reuse the soil from my container carrots?
It’s generally not recommended to reuse soil from container carrots without amending it. Carrots can deplete the soil of nutrients. Before reusing the soil, remove any plant debris and add fresh compost and fertilizer to replenish the nutrients. You can also sterilize the soil by baking it in the oven at 180°F for 30 minutes to kill any potential pests or diseases. However, it’s often easier and more effective to simply use fresh potting mix.
Leave a Comment