

Beginner butternut squash no garden? No problem! I know what you’re thinking: “Butternut squash? That’s for experienced gardeners with acres of land!” But I’m here to tell you that even if you’re a complete newbie with nothing but a sunny balcony or a small patio, you can absolutely grow your own delicious butternut squash.
For centuries, squash has been a staple crop for indigenous communities across the Americas, providing sustenance and playing a vital role in cultural traditions. Now, you can tap into that rich history and bring a piece of that tradition to your own home, regardless of your space constraints.
Why should you try this DIY project? Well, imagine the satisfaction of harvesting your own homegrown butternut squash, knowing exactly where it came from and what went into growing it. Plus, store-bought squash simply can’t compare to the flavor of a freshly picked, sun-ripened beauty. And let’s be honest, who doesn’t love a good DIY project that saves money and reduces your carbon footprint? This guide will provide you with all the essential beginner butternut squash no garden tricks and hacks you need to succeed, from choosing the right container to providing the perfect support system. So, ditch the grocery store squash and get ready to embark on a rewarding gardening adventure 鈥?even without a traditional garden!
Growing Butternut Squash Indoors: A Beginner’s Guide
Hey there, fellow gardening enthusiasts! So, you’re itching to grow butternut squash but don’t have a garden? No problem! I’m here to tell you that you absolutely can cultivate these delicious, vitamin-packed veggies indoors. It might seem daunting, but with a little patience and the right setup, you’ll be enjoying homegrown butternut squash in no time. Let’s dive in!
What You’ll Need
Before we get started, let’s gather our supplies. This is crucial for a smooth and successful growing experience. Trust me, having everything ready beforehand will save you a lot of headaches later.
* **Butternut Squash Seeds:** Choose a variety that’s known for its good flavor and manageable size. Look for terms like “bush” or “compact” varieties, as these are better suited for indoor growing.
* **Seed Starting Trays or Small Pots:** These will be your nurseries for the baby squash plants.
* **Seed Starting Mix:** This is a light, airy soil mix specifically designed for seedlings. It provides good drainage and nutrients.
* **Larger Pots (at least 10-15 gallons):** Once your seedlings are big enough, they’ll need a spacious home to thrive. Fabric pots are great because they allow for good drainage and air circulation.
* **Potting Soil:** A good quality potting mix is essential for healthy growth. Look for a mix that contains compost, perlite, and vermiculite.
* **Grow Lights:** Butternut squash needs a lot of light, so grow lights are a must, especially if you don’t have a super sunny window. LED grow lights are energy-efficient and work wonders.
* **Fertilizer:** A balanced liquid fertilizer will provide your plants with the nutrients they need to produce those yummy squashes.
* **Watering Can or Spray Bottle:** For gentle watering.
* **Trellis or Support System:** Butternut squash vines can get quite long, so you’ll need something to support them.
* **Small Paintbrush:** For hand-pollinating the flowers (more on that later!).
* **Pruning Shears or Scissors:** To keep the vines under control.
* **Thermometer:** To monitor the temperature of your growing area.
Starting Your Seeds
This is where the magic begins! Getting your seeds off to a good start is crucial for a healthy harvest.
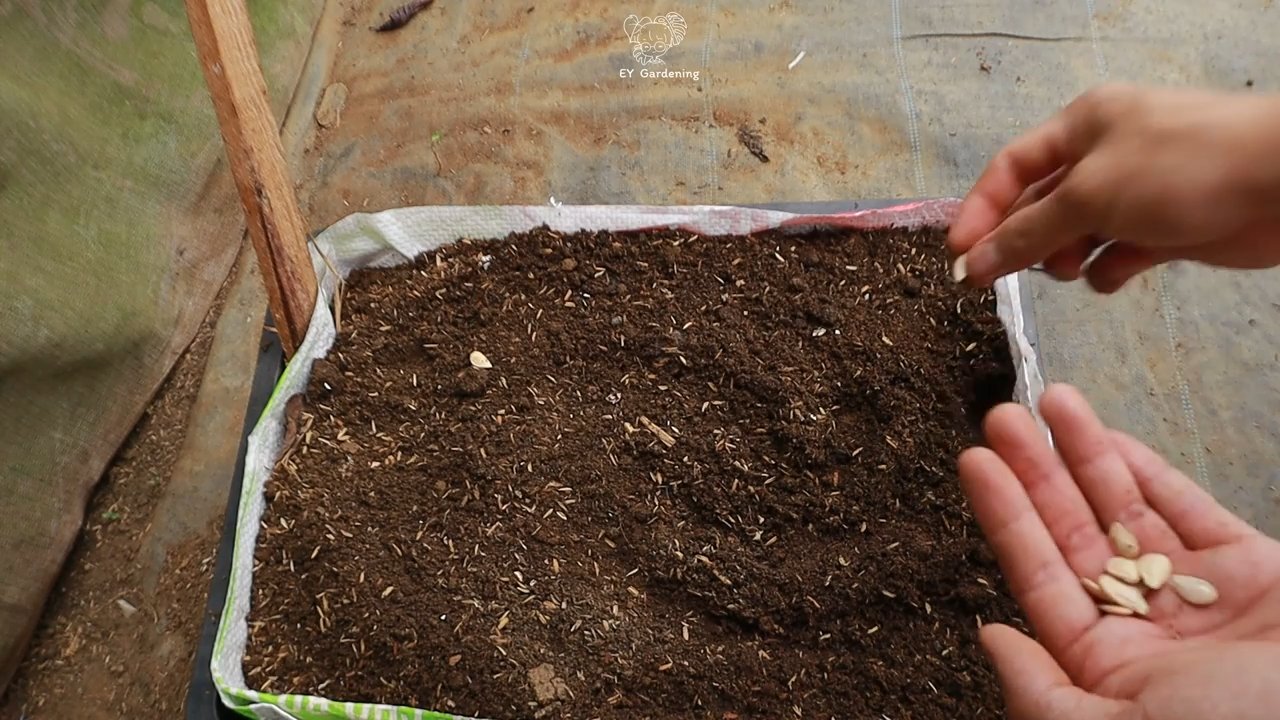
1. **Soaking the Seeds (Optional):** Some gardeners like to soak their butternut squash seeds in water for 24 hours before planting. This can help speed up germination. I’ve had success both with and without soaking, so it’s really up to you.
2. **Planting the Seeds:** Fill your seed starting trays or small pots with seed starting mix. Make a small hole (about 1 inch deep) in the center of each pot. Place one or two seeds in each hole and cover them gently with soil.
3. **Watering:** Water the soil gently until it’s moist but not soggy. You don’t want to drown the seeds!
4. **Creating a Humid Environment:** Cover the seed starting trays with a clear plastic lid or plastic wrap to create a humid environment. This will help the seeds germinate.
5. **Warmth:** Place the trays in a warm location (around 70-80掳F). A heat mat can be helpful if your home is cooler.
6. **Waiting for Germination:** Be patient! Butternut squash seeds usually germinate in 5-10 days. Once the seedlings emerge, remove the plastic cover and place them under grow lights.
Transplanting Your Seedlings
Once your seedlings have developed a few sets of true leaves (those are the leaves that look like miniature versions of the adult plant’s leaves), it’s time to transplant them into their larger pots.
1. **Preparing the Larger Pots:** Fill your 10-15 gallon pots with potting soil. Make a hole in the center of each pot that’s large enough to accommodate the root ball of the seedling.
2. **Carefully Removing the Seedlings:** Gently remove the seedlings from their seed starting trays. Be careful not to damage the roots. If the roots are tightly bound, gently loosen them with your fingers.
3. **Planting the Seedlings:** Place the seedlings in the holes in the larger pots and cover the roots with soil. Gently pat the soil around the base of the plant.
4. **Watering:** Water the newly transplanted seedlings thoroughly.
5. **Placement:** Place the pots under your grow lights or in a sunny window.
Caring for Your Butternut Squash Plants
Now comes the ongoing care that will help your plants thrive and produce delicious butternut squash.
1. **Light:** Butternut squash needs at least 6-8 hours of direct light per day. If you’re using grow lights, keep them on for 14-16 hours per day. Adjust the height of the lights as the plants grow to keep them close to the foliage.
2. **Watering:** Water your plants regularly, keeping the soil consistently moist but not waterlogged. Check the soil moisture by sticking your finger into the soil. If the top inch feels dry, it’s time to water.
3. **Fertilizing:** Feed your plants with a balanced liquid fertilizer every 2-3 weeks. Follow the instructions on the fertilizer label.
4. **Temperature:** Butternut squash prefers temperatures between 65-85掳F. Avoid exposing your plants to extreme temperatures.
5. **Pruning:** As your butternut squash vines grow, you may need to prune them to keep them under control. Remove any yellowing or dead leaves. You can also prune the tips of the vines to encourage branching.
6. **Supporting the Vines:** As the vines grow longer, train them to climb up your trellis or support system. This will help keep the plants off the ground and prevent the squashes from rotting.
Hand-Pollinating Your Butternut Squash
This is a crucial step for indoor butternut squash growing, as you won’t have bees or other pollinators to do the job for you.
1. **Identifying Male and Female Flowers:** Butternut squash plants produce both male and female flowers. Male flowers have a long, thin stem, while female flowers have a small, immature squash at the base of the flower.
2. **Timing:** The best time to hand-pollinate is in the morning, when the flowers are fully open.
3. **Collecting Pollen:** Use a small paintbrush to collect pollen from the male flower. Gently brush the paintbrush inside the male flower to collect the pollen.
4. **Transferring Pollen:** Transfer the pollen to the female flower. Gently brush the pollen onto the stigma (the sticky part in the center of the female flower).
5. **Repeat:** Repeat this process for all the female flowers that are open.
6. **Marking Pollinated Flowers:** You can mark the pollinated flowers with a small piece of tape or ribbon so you know which ones you’ve already pollinated.
Harvesting Your Butternut Squash
After all your hard work, it’s time to reap the rewards!
1. **Maturity:** Butternut squash is usually ready to harvest about 90-100 days after planting. The squash should be a deep tan color and the skin should be hard.
2. **Testing for Ripeness:** You can test for ripeness by pressing your fingernail into the skin. If the skin is hard and doesn’t dent easily, the squash is ready to harvest.
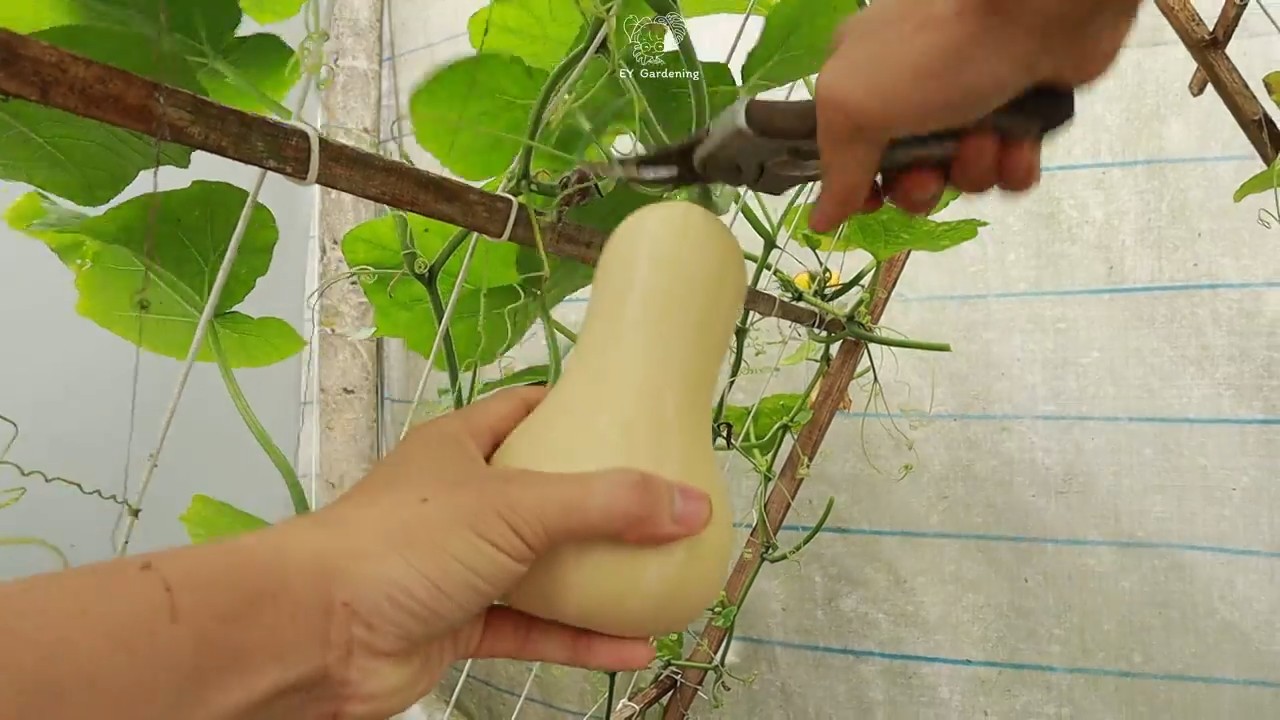
3. **Harvesting:** Use a sharp knife or pruning shears to cut the squash from the vine, leaving about 2 inches of stem attached.
4. **Curing:** Cure the squash in a warm, dry place for 1-2 weeks. This will help the skin harden and improve the flavor.
5. **Storage:** Store the cured butternut squash in a cool, dry place. Properly stored butternut squash can last for several months.
Troubleshooting
Even with the best care, you might encounter some challenges along the way. Here are a few common problems and how to address them:
* **Powdery Mildew:** This is a fungal disease that can affect butternut squash plants. It appears as a white, powdery coating on the leaves. To prevent powdery mildew, provide good air circulation and avoid overhead watering. If your plants do get powdery mildew, you can treat them with a fungicide.
* **Aphids:** These tiny insects can suck the sap from your plants, causing them to weaken and become stunted. You can control aphids by spraying them with insecticidal soap or neem oil.
* **Squash Vine Borers:** These pests can tunnel into the stems of your butternut squash plants, causing them to wilt and die. To prevent squash vine borers, wrap the base of the stems with aluminum foil or netting. If you do find squash vine borers, you can try to remove them by hand or inject the stems with Bacillus thuringiensis (Bt).
* **Lack of Pollination:** If your butternut squash plants are producing flowers but not setting fruit, it could be due to a lack of pollination.
Conclusion
So, you’re a butternut squash enthusiast with no garden? Don’t despair! This DIY trick for growing butternut squash indoors, even without a traditional garden, is more than just a fun experiment; it’s a game-changer. It’s about taking control of your food source, experiencing the joy of nurturing life, and enjoying the unparalleled flavor of homegrown produce, all from the comfort of your home.
Think about it: no more relying solely on grocery store squash, often picked before peak ripeness and shipped from who-knows-where. With this method, you’re in charge. You decide when to harvest, ensuring maximum sweetness and flavor. Plus, you get the satisfaction of knowing exactly what went into growing your food 鈥?no mystery pesticides or questionable practices.
This isn’t just about convenience; it’s about sustainability. By growing your own butternut squash, even on a small scale, you’re reducing your carbon footprint and contributing to a more localized food system. It’s a small step with a potentially big impact.
But the best part? It’s adaptable! Feel free to experiment with different varieties of butternut squash. Try a smaller, more compact variety if space is truly limited. Consider using different types of potting mix to see what works best for your environment. You can even try companion planting herbs like basil or thyme in the same container to deter pests and enhance flavor.
Don’t be afraid to get creative with your support system. If a traditional trellis isn’t feasible, try using sturdy tomato cages or even repurposing old ladders. The key is to provide adequate support for the growing vines and developing squash.
And remember, this is a learning process. Don’t be discouraged if your first attempt isn’t perfect. Every growing season is a chance to learn and improve. The most important thing is to start, to experiment, and to enjoy the journey.
We wholeheartedly encourage you to give this DIY butternut squash growing trick a try. It’s easier than you think, incredibly rewarding, and a fantastic way to connect with nature, even without a garden. Once you’ve harvested your first homegrown butternut squash, you’ll understand why we’re so enthusiastic about it.
But don’t just take our word for it! We want to hear about your experiences. Share your photos, tips, and challenges in the comments below. Let’s create a community of indoor butternut squash growers and learn from each other. What varieties did you try? What challenges did you face? What successes did you celebrate? Your insights could help other beginners embark on their own butternut squash growing adventures. Let’s unlock the secrets of growing delicious, homegrown butternut squash together!
Frequently Asked Questions (FAQ)
What kind of butternut squash is best for growing indoors?
While you can technically grow any variety of butternut squash indoors, some are better suited than others. Look for bush or semi-bush varieties, which tend to be more compact and manageable in containers. Examples include ‘Butterbush’ or ‘Early Butternut’. These varieties produce smaller vines and fruits, making them ideal for limited spaces. Standard vining varieties can still be grown, but they will require more extensive support and pruning. Consider the size of your growing space and the amount of effort you’re willing to put into managing the vines when choosing a variety.
How much sunlight does indoor butternut squash need?
Butternut squash requires a significant amount of sunlight to thrive. Aim for at least 6-8 hours of direct sunlight per day. If you don’t have a south-facing window that provides sufficient light, consider supplementing with grow lights. LED grow lights are a great option because they are energy-efficient and provide the full spectrum of light that plants need for photosynthesis. Position the grow lights a few inches above the plants and adjust as they grow. Insufficient sunlight can lead to leggy growth, poor fruit production, and bland-tasting squash.
What size container do I need for growing butternut squash?
Butternut squash plants need a large container to accommodate their extensive root systems. A minimum of 10-15 gallons is recommended. The larger the container, the more room the roots have to grow, and the healthier the plant will be. Choose a container with good drainage holes to prevent waterlogging, which can lead to root rot. You can use plastic pots, terracotta pots, or even repurposed containers like large buckets or tubs. Just make sure the container is sturdy enough to support the weight of the plant and the developing squash.
How often should I water my indoor butternut squash plant?
Watering frequency depends on several factors, including the size of the container, the type of potting mix, the temperature, and the humidity. Generally, you should water your butternut squash plant when the top inch of soil feels dry to the touch. Water deeply, until water drains out of the drainage holes. Avoid overwatering, as this can lead to root rot. During hot, dry weather, you may need to water more frequently. Check the soil moisture regularly and adjust your watering schedule accordingly.
How do I pollinate my butternut squash flowers indoors?
Butternut squash plants have separate male and female flowers. In order for the female flowers to produce fruit, they need to be pollinated. Outdoors, this is typically done by bees and other insects. Indoors, you’ll need to hand-pollinate the flowers. To do this, use a small paintbrush or cotton swab to collect pollen from the male flower (the one with the long, thin stem) and transfer it to the female flower (the one with the small squash at the base). The best time to hand-pollinate is in the morning, when the pollen is most viable. Repeat the process for several days to ensure successful pollination.
What kind of fertilizer should I use for butternut squash?
Butternut squash plants are heavy feeders and require regular fertilization. Use a balanced fertilizer with equal amounts of nitrogen, phosphorus, and potassium (e.g., 10-10-10) during the early stages of growth. Once the plants start to flower and produce fruit, switch to a fertilizer that is higher in phosphorus and potassium (e.g., 5-10-10) to promote fruit development. Follow the instructions on the fertilizer label for application rates. You can also supplement with organic fertilizers like compost tea or fish emulsion.
How do I deal with pests and diseases on my indoor butternut squash plant?
Even indoors, butternut squash plants can be susceptible to pests and diseases. Common pests include aphids, spider mites, and squash bugs. Check your plants regularly for signs of infestation and take action promptly. You can try spraying the plants with insecticidal soap or neem oil. For diseases like powdery mildew, ensure good air circulation and avoid overhead watering. You can also treat with a fungicide if necessary.
When is butternut squash ready to harvest?
Butternut squash is typically ready to harvest in the fall, about 90-100 days after planting. The squash should be a deep tan color and the skin should be hard and resistant to scratching. The stem should also be dry and brown. To harvest, cut the squash from the vine, leaving a few inches of stem attached. Cure the squash in a warm, dry place for a week or two to allow the skin to harden further and improve its storage life.
Can I save seeds from my homegrown butternut squash?
Yes, you can save seeds from your homegrown butternut squash, but keep in mind that if your plant was pollinated by another type of squash, the seeds may not produce true-to-type offspring. To save seeds, scoop them out of the squash, rinse them thoroughly, and spread them out on a paper towel to dry completely. Store the dried seeds in an airtight container in a cool, dark place.
What if my butternut squash plant isn’t producing fruit?
There are several reasons why your butternut squash plant might not be producing fruit. Insufficient sunlight, lack of pollination, nutrient deficiencies, and stress can all contribute to poor fruit production. Make sure your plant is getting enough sunlight, hand-pollinate the flowers if necessary, fertilize regularly, and provide adequate water and support. If you’ve addressed all of these factors and your plant still isn’t producing fruit, it may be due to a genetic issue or disease.

Leave a Comment